

I have a long list of baked goods that I want to tackle, and croissants have been near the top for quite some time. And while I'm typically pretty fearless when it comes to trying out new recipes, I have been intimidated by croissants - all those turns, chills, etc. And if they were a big flop, I would have wasted so much time and energy. But one day I decided to just dive in, and I studied the recipe I planned to use. As I continued to flip through the cookbook, I happened upon Individual Danishes, which uses the same dough as croissants. Suddenly the croissants were forgotten, and I found myself planning for these instead.
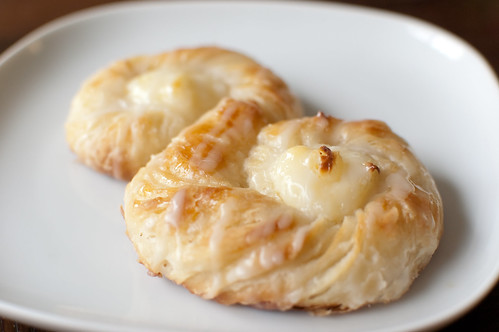
Just as I expected, once I got started, these really weren't terribly challenging. Time consuming, yes. But not necessarily from a labor standpoint. Most of the time is spent waiting and chilling the dough. But man oh man are they worth it in the end! Flaky, buttery, sweet - these were everything a coffee shop Danish tries to be but falls short of. See? Look at those flaky layers!

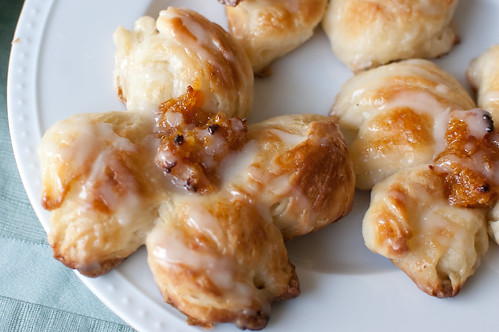
As long as it was well-floured, the dough was a dream to work with. Silky and smooth, with good elasticity. But the most fun part was shaping the pastries. I was really intrigued by the pinwheel shapes, but I actually ended up liking the "S-shaped" ones (called Schnecken) better. I meant to take step-by-step photos of the process to better explain the recipe, but I got so involved in the process that it didn't really work out. The instructions are so clear that photos aren't really necessary anyway (I hope).
I couldn't decide on a filling, so I did half with cream cheese filling and the other half with apricot. The cream cheese ones were hands down mine and Joey's favorite. I also only made a half-batch, which was wise given the fact that I ate an embarrassing number of these within the first hour of them being baked.
Individual Danish
barely adapted from Peter Reinhart's Artisan Breads Every Day
filling from Baking Illustrated
makes 2-4 dozen, depending on the size
Laminated Dough
Detrempe
- 4 2/3 cups (21 oz) all-purpose flour
- 1 3/4 tsp kosher salt
- 1/4 cup sugar
- 1 Tbs instant yeast
- 3/4 cup + 2 Tbs cold milk
- 1/2 cup + 2 Tbs room temperature water
- 2 eggs
- 2 Tbs unsalted butter, melted and cooled to room temperature
- 1 1/2 cups cold unsalted butter
- 2 Tbs all-purpose flour
- 8 oz cream cheese, cut into 1-inch pieces and softened to room temperature
- 1/2 tsp lemon zest
- 1/4 cup sugar
- 1 cup dried apricots, roughly chopped
- 1/2 cup orange juice
- 1/3 cup sugar
- pinch salt
- 3/4 cup water
- 3/4 cup sugar
- 1 heaping Tbs apricot preserves
- pinch salt
- 1/2 lemon
- 4 cups confectioners' sugar, sifted
- 2 Tbs light corn syrup
- 1 tsp vanilla extract
- 1/2-3/4 cup milk
Resume the mixing on the lowest speed for another 30 seconds, then increase the speed to medium-high for 10-15 seconds. The dough will begin to smooth out but should be very soft, supple, and sticky, but not batterlike. Add more flour or water as needed, but only mix until the dough has formed. It should still be somewhat sticky. If it's dry to the touch, it needs more water.
Transfer the dough to a lightly floured surface and, with floured hands, form it into a ball. Place the dough in a clean, lightly oiled bowl, and refrigerate overnight or up to 2 days.
On Baking Day:
To make the butter block, cut the cold butter into 16 pieces, and combine with the flour in a mixing bowl fitted with the paddle attachment. Mix on the lowest speed for about 1 minute to break the butter into smaller pieces. Scrape down the bowl as needed, and mix until the mixture is no longer lumpy. Increase the speed to medium-high as the butter pieces smooth out, and continue mixing until all the lumps of butter are gone and you have a smooth paste.
Spray a piece of plastic wrap lightly with cooking spray, and transfer the butter to the center. Spray the top of the butter, then using the plastic, gently form the butter into a 6-inch square. Using a bench scraper will help achieve even edges. The butter block should be about 1/2-inch thick and smooth across the top. Place it in the refrigerator to chill briefly.
To incorporate the butter block into the detempe, generously flour a large work surface. Transfer the detempe to the work surface and sprinkle more flour over the top of the dough. Roll the dough to a rectangle about 12 1/2 inches wide by 6 1/2 inches long. Roll from the center to the four corners, and then roll to the four sides to even it out. Check under the dough frequently to see if it needs more flour. Square off the sides and corners with a bench scraper. The dough should be about 1/2-inch thick, the same as the butter block.
Check the size of the dough by setting the butter block on the left side of the dough. The butter should only cover half of the dough, with just a 1/4-inch border on the left, top, and bottom. If it covers more or less than that, adjust the dough accordingly.
Remove the plastic wrap and flip the butter block onto the left side of the dough, leaving a 1/4-inch border. Lift the right side of the dough and fold it over the butter to envelop or sandwich the butter. Stretch the dough along the top rim to seal the butter inside by pressing the top rim of the dough to the rim of the underside and pinching them together to form a seal. You now have three layers - dough, butter, dough.
To laminate the dough, lift the dough, one side at a time, and dust more flour underneath it, using a pastry scraper to lift it if the dough sticks. Lightly flour the top of the dough, then tap with a rolling pin over the top to work out any air bubbles and spread the butter evenly into all four corners.
Working from the center to the four corners and then to the four sides, gently roll out the dough into a rectangle, dusting under and on top of the dough with more flour as needed. Roll into a 1/2-inch-thick rectangle that's about 16x9 inches.
Square off the sides and corners, then fold the dough as if you're folding a letter: Fold the right 1/3 of the dough to the left, then fold the left 1/3 to the right. Use the rolling pin to press out any air pockets, hen gently transfer the dough to a lightly floured sheet pan. Cover loosely with plastic wrap. Let the dough chill in the refrigerator 10-15 minutes so the gluten can relax.
Transfer the dough back to the floured surface, with the open seam facing away from you, and the closed side facing you. Gently roll the dough into another 16x9 inch rectangle, and once again fold into thirds. Transfer back to the baking sheet, and chill another 15 minutes.
After the second resting period, once again transfer the dough back to the floured surface, closed side facing you, and gently roll it out and fold it as before. Refrigerate another 15 minutes. You have now completed three "turns," and have created 81 layers of butter and dough.
For the final roll-out and shaping, transfer the dough back to the floured surface and gently roll it out until the dough is just under 1/4-inch thick and forms a rectangle 24 inches wide and 9 inches long. Be careful not to put too much presure on the dough as you roll it out, or the layers could break. If the dough starts to shrink back or resist, add more flour underneat. Square off the sides and corners with a bench scraper.
To make Schnecken, use a straight edge (such as a ruler), to cut 1-inch vertical strips, so that you end up with strips that are 8-9 inches long. Lift each strip at both ends and twist in opposite directions to form the strip into a spring-like coil, then lay the strip down on the work surface and coil from both ends to form an S-shape. Tuck the outer end of the coils underneath to close off the circle. Place the pastries about 2 inches apart on a parchment-lined baking sheet.
To make the pinwheels, cut the dough into 3-inch squares. Working one piece at a time, use a pair of kitchen shears to cut a notch at each corner, cutting from the corner toward the center, without connecting the cuts. Leave an uncut center about 1/2-inch wide for the filling. Take the same side of each corner and fold it over to the center, pressing it into the uncut platform. When all four corners are folded, use your thumb to press the ends into each other and seal them in the center of the pinwheel. Place the pinwheels about 1-inch apart on the baking sheet.
Cover the pastries with plastic wrap. Proof at room temperature for 2 to 2 1/2 hours, until the dough has swelled noticeably.
To make the cream cheese filling, combine the ingredients in a medium bowl and stir to combine until smooth.
To make the apricot filling, combine the apricots and orange juice in a microwave-safe bowl and cover tightly with plastic wrap. Microwave about 1 minute, until the juice is simmering. Let stand, covered, about 10 minutes, until the apricots have absorbed most of the juice. Place the apricots, any remaining juice, sugar, and salt in a food processor and process until a puree forms, about 20 seconds. Scrape into a small bowl and cover with plastic wrap until ready to use.
To bake and glaze the pastries, preheat the oven to 450 degrees. Fill the pastries by using your thumb to make an indention in the center of each coil (or the center of the pinwheel), and add about 1 teaspoon of the filling to the pockets.
To make the fondant icing, stir the sugar, corn syrup, and vanilla together. Gradually whisk in the milk, adding just enough to make a thick but creamy glaze. The more milk you add, the thinner the glaze will be.
Just before baking the Danish, prepare the hot glaze. Combine the water and sugar in a saucepan and bring it to a boil, stirring to dissolve the sugar. Lower the heat and stir in the apricot preserves, then add the entire lemon half. Maintain a gentle simmer as the Danish bake.
As the syrup is heating up, place the pan in the oven and lower the temperature to 400 degrees. Bake for 6 minutes, then rotate the pan and bake an additional 5-6 minutes, until they are a medium golden-brown.
As soon as the Danish come out of the oven, brush with the hot syrup (including over the filling). Allow to cool on the pan for 5 minutes, then drizzle streaks of the fondant glaze over them. Allow the glaze to set up for 5 minutes before serving.


14 comments:
They look really good :-)
You have to come to Denmark sometime and try the real thing.....
My best,
Birthe
Wow, they look fantastic. I want to try them, really soon. When I was a kid we used to call all Danish, schnecks. Funny.
Wow, these seem like a lot of work but worth the effort right?
They look awesome. I wish I could dig my teeth into one ;-)
Beautiful pastries!
Even gave me a shiver down my spine thinking about making dozens of them at 5am every weekend at my parents' bakery. I don't think I've even eaten one since :)
These look incredible! Thanks for sharing the recipe.
They look amazing!
Oh my! I love the look of these - so bakery style :)
Wow! Those look amazing. I am going to add these immediately to my must make list.
I love the "S" shape. These look so delicious, and I LOVE danish with cream cheese filling. Yum!
I've always been intimidated by croissant recipes too, but you may have just inspired me to give the danish version a try! These look too good to pass up.
Oh goodness those look so good. I love the shape.
My husband might propose to me a second time if I make him these. For more diamonds, it's certainly worth a shot, even if the recipe is longer than most of my old college textbooks. :)
These look amazing!!! This would be the perfect breakfast treat in my opinion!
These look amazing!
Post a Comment