Tuesday, February 24, 2015

Shrimp-Stuffed Shells

Shrimp-Stuffed Shells

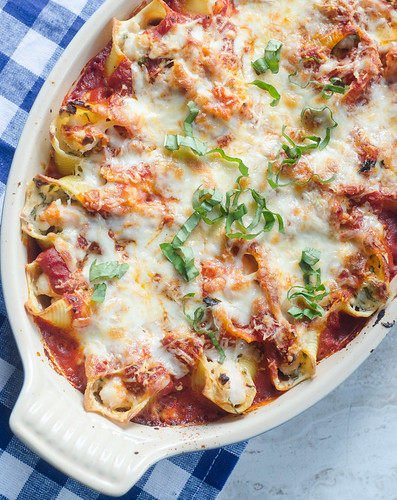
Stuffed shells have long-been one of my favorite dinners, but I typically keep it pretty traditional, with a standard sausage-ricottoa-spinach filling.  However, I absolutely love seafood pastas, so the minute I saw this shrimp-stuffed shells recipe, I knew it would be a winner.  What I didn't expect though, was how MUCH of a winner it would be.  Caroline ate an obscene number of these, and Smith had almost as many.  Henry and Tucker have entered "the picky era" of their lives, and they even ate these shells with reckless abandon.  Which, as I'm sure you can imagine, means, sauce and shrimp flying all over the place and making a giant mess, as only two year olds know how.

Shrimp-Stuffed Shells 

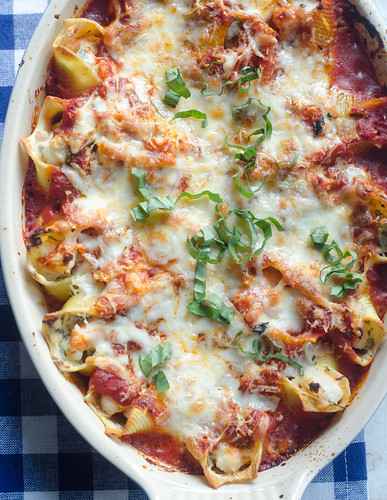
The idea of shrimp in a baked pasta dish may seem kind of .. odd.. but the shrimp cook right in the shells, and there's no overcooked, rubbery seafood to be found.  The filling is cheesy and creamy, and the rich tomato sauce is a great contrast to that.  Of course, no baked pasta dish is complete without a blanket of mozzarella and parmesan, so of course we've got you covered there too.

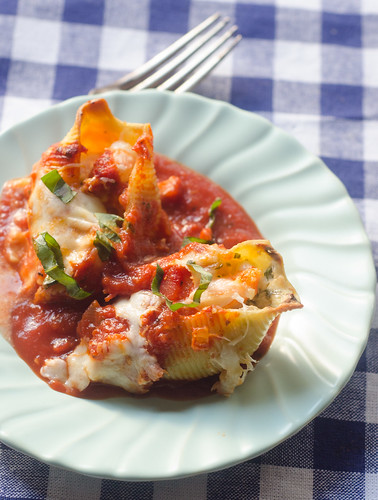
As we hunker down for another winter storm, I am all about comfort food, and baked pasta definitely fits the bill.  And as a bonus, this is actually pretty light.  Four shells, which I found to be a very generous serving, is just under 500 calories, making this a really great healthy meal.

Shrimp-Stuffed Shells 

Shrimp-Stuffed Shells
adapted from Cooking Light, January 2012
serves 5 to 6

  • 20 uncooked jumbo pasta shells
  • 1  Tbs olive oil
  • 1/2 cup diced shallots
  • 2 Tbs minced garlic
  • 1/2 cup (4 oz) reduced fat cream cheese, softened to room temperature
  • 1/4 cup milk
  • pinch of red pepper flakes
  • 1/3 cup chopped fresh basil
  • 1 pound medium shrimp; peeled, deveined, and cut into thirds
  • 2 tsp cornstarch
  • cooking spray
  • 2-3 cups marinara sauce
  • 1/3 cup shredded mozzarella cheese
  • 2 Tbs freshly grated Parmesan cheese

Preheat oven to 400° F.  Lightly spray a 9x13 inch baking dish with cooking spray.

Bring a large pot of water to a boil and add 2 teaspoons  of kosher salt.  Cook pasta 7 to 9 minutes or until just al dente.  Drain and set aside.

Heat a medium skillet over medium heat. Add oil to pan; swirl to coat. Add shallots and cook 3 to 4 minutes, stirring occasionally. Add garlic and red pepper flakes; cook 1 minute, stirring constantly. Whisk in the cream cheese and milk and cook until cheese melts, stirring until smooth. Remove from heat. Stir in basil. Place shrimp in a bowl. Sprinkle with the corn starch and toss well to coat. Add cream cheese mixture to shrimp.  Mix well to combine.

Divide shrimp mixture evenly among pasta shells.  Spread 1 cup marinara over bottom of dish. Arrange the shells in a single layer in the prepared dish; top with remaining 1-2 cups marinara. Sprinkle shells evenly with the mozzarella and parmesan cheese. Cover  Bake at 400° for 20 minutes.  Remove the foil and bake an additional 5 to 10 minutes, or until the cheese is melted and the shrimp are cooked through.  Serve.


Sunday, February 22, 2015

Brussels Sprouts Salad with Apples, Cranberries and Aged Gouda

Brussels Sprouts Salad with Apples, Cranberries, and Aged Gouda


I've made it abundantly clear that I loathe winter and love summer for a multitude of reasons, one being my preference for summer produce over winter.  However, this year I'm trying not to be such a whiner, and I'm embracing the produce of the season.  This year that has meant that I'm all about brussels sprouts.  We enjoy them roasted at least once a week, as a side to our main dish.  I roast them and top with a runny egg for breakfast.  I throw them on the best chopped salad in the world.  I shred them, along with potatoes, and make hash for brunch (again, topped with a runny egg.  And steak).  And now, I shred them and eat them raw as a salad.

Normally when they are eaten raw, brussels sprouts can be bitter, bracing, and hard to chew.  But after a quick marinade in a lemony dressing, they are softened, well-seasoned, and super addictive.  I used this technique for the base of the salad, then added some shredded apples, dried cranberries, and aged Gouda to the mix.  I think that pecans, hazelnuts, or walnuts would be a great addition as well.

I eat salad a lot as a side, especially when we have a heavier dinner, such as pasta.  So the brussels sprouts salad was a nice change of pace to the normal spinach or romaine salad.  And as a bonus, it is super hearty, thus it keeps really well in the refrigerator.  I ate the leftovers for lunch for a few days afterward, and it was just as good as the first day!

I loved the flavor profile here, but this salad is open to innumerable combinations - try it with some cherry tomatoes, bacon, and goat cheese; or simply shaved onions and parmesan cheese; maybe try shredded carrots and feta… the options are endless!

Brussels Sprouts Salad with Apples, Cranberries, and Aged Gouda 

Brussels Sprouts Salad with Apples, Cranberries, and Aged Gouda
adapted from Cook's Country
serves 8
  • 2 lbs brussels sprouts
  • 3 Tbs lemon juice
  • 2 Tbs Dijon mustard
  • 1 small shallot, minced
  • 1 garlic clove, minced
  • kosher salt and freshly ground black pepper
  • 6 Tbs extra-virgin olive oil
  • 1 cup shredded aged gouda, or extra sharp cheddar
  • 1 Granny Smith apple, peeled, cored, and shredded 
  • 1/4 cup dried cranberries, chopped
Trim off the stem of each brussels sprout, then shred.  Either use a food processor with the slicing attachment, or slice very thinly with a knife.

In a large bowl, whisk together the lemon juice, Dijon mustard, shallot, garlic, and 1/2 teaspoon of salt. Slowly whisk in the oil until it's incorporated.  Add the shredded brussels sprouts and toss to coat well.  Let sit at room temperature for at least 30 minutes, or up to 2 hours.

Fold in the shredded apples, gouda, and dried cranberries.  Taste and season with additional salt and pepper as needed.  Serve.


Tuesday, February 17, 2015

Middle Eastern-Spiced Turkey & Zucchini Sliders (or lettuce wraps!)

Middle Eastern-Spiced Turkey and Zucchini Sliders with Creamy Sumac Sauce

Every so often we have a meal that absolutely blows us away.  These little sliders may look humble and unassuming, but don't be fooled:  this has been unanimously voted to be the best meal we've had all year!  I believe it was Caroline who loudly proclaimed "best dinner EVER" as we finished up.  I try not to be overly-effusive about every meal I share with you guys, so trust me when I tell you that these are absolutely fan-freaking-tastic!

These little patties are made up of ground turkey, zucchini, lots of fresh herbs, and cumin.  And then you serve them with a tangy and creamy sumac sauce.  They can also be served any number of ways:  Joey ate his as sliders, Caroline ate hers as-is, dipping them in the sauce, and I made lettuce wraps out of mine.  I chopped up the leftover patties and ate them on a salad with tons of veggies, and thinned out the sumac sauce to use as a dressing -- also highly recommend this vehicle!    The burgers are super flavorful from the zucchini and fresh herbs, with a nice smokiness and spice from the cumin and cayenne.  It's been almost a month since we ate these, and my mouth still waters when I think about that dinner.

I served these sliders with root veggie fries, and we all loved dipping them in the sauce as well.  Really, this sauce should become a staple condiment, one that you keep on hand for pretty much everything!

Sadly, my local Williams-Sonoma closed in January, and I was lucky enough to snag a copy of Ottolenghi's Jerusalem for an absolute steal.  This was the first recipe I've made from it, but I have a ton flagged and saved to make soon.  And if any of them are half as good as these burgers, then I'm definitely in for a treat.  Now go make these sliders!

Middle Eastern-Spiced Turkey and Zucchini Lettuce Wraps with Creamy Sumac Sauce

Middle Eastern-Spiced Turkey and Zucchini Sliders
adapted from Ottolenghi's Jerusalem
makes 16-18 burgers

  • 1 large zucchini, shredded on the large holes of a cheese grater (about 2 cups of grated zucchini)
  • 1 lb ground turkey
  • 3 green onions, minced
  • 2 Tbs chopped fresh mint
  • 2 Tbs chopped fresh cilantro
  • 1 large egg, lightly beaten
  • 2 cloves garlic, minced
  • 1 tsp ground cumin
  • 1 tsp kosher salt
  • 1/2 tsp freshly ground black pepper
  • 1/4 tsp cayenne pepper
  • 4 Tbs canola oil
First, make the sauce (recipe below) by whisking al the ingredients together in a small bowl.  Taste and season with salt and pepper.  Set aside or refrigerate until ready to serve.

To make the burgers, preheat the oven to 425 degrees.  Line a baking sheet with parchment paper and set aside.

Wrap the zucchini in  a lint-free kitchen towel and squeeze over the sink to remove as much moisture as possible.

Combine all of the ingredients (up to the oil) in a large bowl.  Mix with your hands or a fork.  Shape into about 18 burgers, each weighing about 1.5 oz/45 g (this is really easy if you have a kitchen scale).  At this point, the patties can be chilled for several hours in the refrigerator, or you can proceed with the recipe.

Add 2 tablespoons of the oil to a large skillet and heat over medium-high heat.  Carefully add about half the patties to the pan, and cook about 2 minutes per side.  Repeat with the remaining oil and patties.

As you finish cooking the patties on the stovetop, transfer them to the prepared baking sheet, and arrange in a single layer.  Cook the patties for 5 to 7 minutes, or until they are cooked through.  

Serve with the sauce, either as sliders, lettuce wraps, or as-is.


Sumac-Sour Cream Sauce
  • scant 1/2 cup sour cream (low-fat is fine, but avoid fat-free)
  • scant 2/3 cup Greek yogurt
  • 1 tsp grated lemon zest
  • 1 Tbs freshly squeezed lemon juice
  • 1 small garlic clove, minced
  • 1 Tbs olive oil
  • 1/2 tsp kosher salt
  • 1/4 tsp freshly ground black pepper
  • 1 Tbs sumac


Sunday, February 15, 2015

Hearty Vegetable Chowder

Hearty Vegetable Chowder

It's really freaking cold outside, and I live in the south.  You northerners have my respect because this cold weather is breaking me.  Especially since various illnesses have been passed around among my kids, and we're pretty much quarantined for at least one week out of ever month.  So needless to say, comfort food has been in great demand around these parts.

This chowder is definitely comforting, and it's reasonably healthy and quite filling and nourishing as well.  It's packed with veggies:  leeks, onions, carrots, celery, and potatoes.  The chowder is finished with a splash of half-and-half for a little richness, and some chives and lemon juice for freshness.  The vegetables are definitely the star here, with the half-and-half and finishing garnishes playing supporting roles.  The end result is supremely satisfying and comforting, and the leftovers reheat wonderfully, giving you a lunch to look forward to!

This is a pretty filling and substantial soup on it's own, but serving it with a nice light salad and flaky buttermilk biscuits makes a great meal out of it.  Here's to staying warm, healthy, and eating good soup!

Hearty Vegetable Chowder

Hearty Vegetable Chowder
adapted from Cook's Country
serves 4 to 6
  • 4 slices of bacon, chopped
  • 2 leeks, white and light green parts only; halved lengthwise, sliced thin, and rinsed thoroughly
  • 1 cup chopped yellow onion (about 1/2 large onion)
  • 4 carrots, peeled, halved lengthwise, and cut into 1/2-inch pieces
  • 2 celery ribs, halved lengthwise and cut into 1/2-inch pieces
  • 1 1/2 lbs russet potatoes, peeled and cut into 1-inch pieces
  • 1 tsp minced fresh thyme
  • kosher salt and freshly ground black pepper
  • 2 cloves garlic, minced
  • 4 cups chicken broth
  • 1 bay leaf
  • 1/2 cup half and half
  • 1 Tbs minced fresh chives, plus more for serving
  • juice of 1/2 lemon
Cook the bacon in a Dutch oven or large saucepan over medium heat until the fat is rendered and the bacon is crispy, 7 to 9 minutes.  Use a slotted spoon to remove the bacon to a paper towel-lined plate, leaving the fat in the pot.  

Stir in the leeks, onion, carrots, celery, 1/2 teaspoon of pepper, and 1 teaspoon of salt.  Cook until the leeks are translucent and the vegetables are beginning to soften, about 8 minutes.  Add the potatoes and cook, stirring constantly, for about 2 minutes.  Stir in the garlic and thyme and cook 30 seconds.

Add the broth and the bay leaf and bring to a boil.  Reduce heat to medium-low, cover, and and simmer until the vegetables are tender, stirring occasionally, about 20 minutes.

Discard the bay leaf.  Transfer 2 cups of the liquid to a blender, and use a slotted spoon to transfer 1 cup of the vegetables to the blender as well.  Puree until smooth, about 1 minute (be sure to open the vent on your blender and cover it with a towel, to prevent explosions!).  

Stir the processed soup back into the pot, and then stir in the half-and-half, chives, and lemon juice.  Season with salt and pepper.  Top each portion with a sprinkle of chives and the reserved bacon, and serve.


Tuesday, February 10, 2015

Blood Orange-Rosemary Pork Tenderloin

Blood Orange-Rosemary Pork Tenderloin

Ahhh blood oranges.  The beautiful bright spot in an otherwise bleak winter.  I buy out every grocery store in my area that carries them throughout the months of January to March.  Most of the oranges are reserved for margaritas and martinis, but I always squirrel some away for snacking and recipes as well.  Like this gorgeous pork tenderloin.

The pork is marinated in a  mixture of blood orange juice, rosemary, balsamic vinegar, and Dijon mustard, then seared and roasted.  Meanwhile, you make a super simple blood orange sauce for the finished pork.  The result is a perfectly roasted, flavorful, and healthy dinner.  The sweet-tart blood orange juice is a great contrast to the earthy rosemary and sweet, tender pork.

I don't know what your plans are for Valentine's Day, but this pork tenderloin would be a wonderful option if you're cooking at home.  It's super easy, is prepped ahead, and is elegant and beautiful.  Serve this with a side of roasted asparagus and some goat cheese grits, and you have a lovely dinner.  And it's low-maintenace enough that it leaves you with plenty of time for smooching your sweetie!

Blood Orange-Rosemary Pork Tenderloin

Blood Orange-Rosemary Pork Tenderloin
adapted from Grill It!  by Bobby Flay

2 1/2 cups fresh blood orange juice (squeezed from 8 to 10 blood oranges)
1/2 cup + 1 Tbs olive oil
2 Tbs balsamic vinegar
2 Tbs chopped fresh rosemary leaves
1 Tbs Dijon mustard
1 1-lb pork tenderloin, trimmed
1 Tbs honey
kosher salt and freshly ground black pepper

Whisk together 1/2 cup of the blood orange juice, 1/4 cup of oil, 1 Tbs of the balsamic vinegar, and the Dijon mustard.  Combine this mixture with the pork tenderloin a gallon-sized ziploc bag.  Seal and agitate the bag to coat the pork, then transfer to the refrigerator.  Allow to marinate for at least 1 hour, and up to 4 hours.

Meanwhile, pour the remaining 2 cups of blood orange juice into a medium saucepan.  Cook over medium-high heat until it's reduced to 3 tablespoons, watching it carefully so it doesn't boil over.

Transfer the reduced juice to a  blender or small food processor, and and add the remaining tablespoon of vinegar and the honey.  Blend until smooth.  Add the remaining 1/1/4 cup of oil, and blend until it's smooth and emulsified.  Transfer to a small bowl.  The sauce can be refrigerated for up to 4 hours before serving as well.

When you're ready to cook the pork, preheat the oven to 425 degrees.

Heat 1 tablespoon of the oil in a 12-inch oven-safe skillet over medium-high heat.  Remove the pork from the marinade and season generously on all sides.  Cook in the skillet for 7 to 9 minutes, turning every 2 minutes or so, or until it is well-browned on all sides.

Transfer the skillet + pork to the oven and cook until the pork registers 140 degrees in the thickest portion, 13 to 18 minutes.  Remove from oven, cover loosely with aluminum foil, and allow to rest for 5 to 10 minutes.

Slice the pork and serve with the blood orange sauce.


Sunday, February 8, 2015

The Jalisco Flower (wherein tequila is appropriate for breakfast)

The Jalisco Flower


So, hi.  Long time no post.  Unfortunately, I discovered this week that my computer is lactose-intolerant.  A cup of milk, poured on the keyboard = no bueno.  So an impromptu blog vacation it was! But I'm back, and I have so much to share.  This week is all about Valentine's Day.

Since the holiday falls on a Saturday this year, we have some fun family plans and will spend the whole day celebrating.  We'll start with a big breakfast, then do some festive crafts and activities, have a heart-shaped lunch, and then Joey and I are going to to dinner that night while the kids watch a movie and eat popcorn.  

Since I won't be cooking dinner, I'm focusing all of my energy on breakfast this year.  First things first.  Whenever there's an opportunity for mimosas, I'm game.  And I hereby proclaim that Valentine's Day is the perfect opportunity.  But why not turn them up a notch?  Perhaps with the addition of grapefruit juice, tequila, and St. Germain?   Yes, these will do quite nicely.  And bonus:  they make it totally acceptable to drink tequila before noon!

These potent breakfast cocktails are a great balance of fruity, sweet, boozy, and sour.  And the fizzy, bubbly, Prosecco is the perfect finish.  Even if you don't plan to partake in a breakfast cocktail, these are great pre-dinner drinks as well.  That's the beautiful thing about prosecco:  it's great any time of the day!

DSC_0388

The Jalisco Flower
adapted from Food and Wine
makes 2 cocktails
  • 3 oz freshly squeezed Ruby Red Grapefruit juice
  • 1 1/2 oz St. Germain elderflower liqueur
  • 1 oz silver tequila
  • ice
  • 8 oz chilled Prosecco, divided
In a cocktail shaker, combine the grapefruit juice, St. Germain, and tequila.  Fill with ice and shake well to chill.  Divide the mixture evenly between two champagne flutes or wine glasses, then top each with 4 oz of the prosecco.  Serve immediately.


BLOG DESIGN BY: SHERBET BLOSSOM DESIGNS