Monday, December 30, 2013

2013 in Review: My Picks

Is it just me, or has this been the fastest year ever?  We started things off with a bang with the birth of Henry and Tucker, and things just got better from there.  I cannot even begin to imagine our family without these two sweet sweet babies, but I'll save the sappy stuff for their first birthday post in a few weeks (sob!).  Overall this has been a fabulous year for our family:  Smith has blossomed into a fun-loving and sweet toddler, Caroline started Kindergarten, and Joey passed his CPA exams!  As I mentioned yesterday, this old blog wasn't quite as active as it's been in years past, but looking back through my archives, there was still plenty of deliciousness to choose from!  Here are my favorites from the year:

The Sweet


Apple Cider Caramels were a huge hit, and after snacking on more than my fair share, I used them in these salted caramel apple crumble bars and caramel-stuffed brown butter cookies.  Not bad at all.  The extra step of reducing apple cider down to a thick syrup really takes these little babies to the next level of caramel perfection.


Strawberries and balsamic vinegar is one of my very favorite flavor combos, and to use it in a thick, creamy, and luxurious ice cream makes it even better.  The subtle flavor of the vinegar isn't overpowering here, it just adds an extra complexity and depth of flavor to the ice cream.  I really cannot wait to make this balsamic strawberry ice cream again this spring.


Chocolate Chip Cookies with Browned Butter, Nutella, and Sea Salt.  I feel like I don't even need to say anything else here.


When I made this Blueberry-Swirl Bundt Cake, I caught myself eating bite after bite every time I wandered into the kitchen.  It was bright, sweet, and so so good.  And it's perfectly acceptable to eat it for breakfast.


The Savory


Autumnal Chicken Pot Pie has been a family favorite for a few years now, so I was really excited to finally share it with you guys.  It's a pretty standard pot pie, but with the addition of butternut squash, mushrooms, and sage, it definitely takes advantage of beautiful fall produce.  Plus, you cook it in a cast iron skillet - one of my favorite ways to serve dinner!


Here's another recipe I was holding out on you guys - sorry!  Grilled Tuna and Avocado Salad was one of the first dinners I made after we got married, so it's always held a special place in my heart.  It's so bright, fresh, and summery, and man does it make me miss hot weather!


This Flat-Roasted Chicken with Tiny Potatoes was not only one of our favorite dinners of the year, but it also led me to master my spatchcocking technique!  I finally understand what the fuss is about roasted chicken!


Corn Risotto-Stuffed Poblanos combined so many of my favorite things:  sweet corn, risotto, beer, and poblano peppers.  It was such a great summer dinner, and one I'll definitely be repeating for years to come.


It's not very often that I repeat recipes, but this Spicy Cilantro-Grilled Chicken made many appearances on our table this summer.  Served with fresh watermelon and grilled corn on the cob, it really was my favorite summer dinner.  And pssst - the leftovers made some killer nachos!


The Pizza


2013 was the Year of the Pizza.  Seriously, we probably ate homemade pizza 3-4 times a month - both because we love it so much, and because the kids are obsessed with helping me make it.  And out of all the pizza we made and ate, Pizza alla Vodka was by far my favorite. Vodka sauce, spicy sausage, roasted tomatoes, and fresh mozzarella.  Yes, please.


I know it sounds really weird to use a corn puree as the sauce on a pizza, but I'm begging you to make this Pizza with Corn, Tomatoes, and Mozzarella this summer.


It may not seem like anything special, but there's something about this Sausage, Provolone, and Spinach Pizza that we just love.  I almost always have all these ingredients on hand, so it's perfect for a last-minute dinner, and it always hits the spot.


The Boozy


Using my ice cream maker to create frozen boozy drinks was a total game-changer for me, and Sangria Slushies were a major home run.  Is it a cocktail?  Is it a dessert?  Who cares!

Happy New Year, everyone!


Sunday, December 29, 2013

2013 in Review: Top Posts of the Year

2013.  Oh man, what a year.  The twins were born on January 9th, so pretty much the entire year was spent in survival mode.  Over the past few months, I've felt like I made it to the other side... with only minimal permanent damage ;-)  It's been a really crazy, hectic, trying, and exhausting year, but without a doubt, it's also been the most rewarding.

It should come as no surprise that my blog was on the back burner this year.  I didn't post very often, and I'm okay with that.  But I'm starting to get my groove back a bit both in the kitchen and behind the computer, so I have lots to share with you guys in the coming year:  recipes, tutorials, and what I hope will be a useful series for many of you with kids.  Thanks so much for sticking with me this year, and I hope you all enjoy a festive end to 2013.

Without further adieu, here are the most popular posts of this year.

I only just posted this in December, but Skillet-Baked Ziti quickly became the top recipe of the year.  It's easy, fast, and so so delicious.  Baked ziti in under an hour?  You can't beat that.


Chicken & Summer Vegetable Rice Casserole was another instant favorite.  It's easy, relatively healthy, cheesy, and full of summer's best produce.  What else could you ask for?


Quinoa Chicken Chili in the crock pot was one of the first meals I made after we brought the twins home.  It was a huge hit with all of us, and it fed us for days.  Win win.


Oh man, this Strawberry Poppyseed Chicken Salad makes me yearn for spring like you wouldn't believe.  This was by far one of the best things I made this year, and I know exactly what I'll be making with the first strawberries of the season.


These Baked Breakfast Taquitos were another instant classic around here.  It's been a while since I've made a batch, and that needs to be remedied, stat!


Strawberries.  Margaritas.  Cupcakes.  Need I say more?


This was apparently the year of the strawberry, and combining them with rhubarb to make strawberry-rhubarb pie bars was a great decision.  You guys seemed to agree.


This Foil-Baked Lemon-Garlic Shrimp with Asparagus was a spinoff of another popular recipe around here, the foil-baked fish with black beans and corn.  I loved this variation, using plenty of lemon and fresh garlic; and serving it over asparagus made it such an easy and low-maintenance meal.


Easy one-pot meals were in heavy rotation this year, and this creamy one-pot lemon pasta was a great one.  It was embarrassingly easy, comforting, and yet somehow still elegant.


mmmm.  Strawberries + Red Velvet Cake.  These cupcakes elevated red velvet to another level.


I have a huge weakness for brownies, and this year I finally found the perfect recipe.  The Baked Brownie is impossibly chewy, chocolatey and just... perfect.


I made this shrimp caprese pizza countless times this summer, and it never got old.  Shrimp on a pizza was a new concept for me, and it's one I'll definitely be exploring further in 2014.


This Chicken Enchilada Quinoa Bake combined a few of my favorite things, and resulted in an awesome and healthy casserole.  Winner all-around!

Thanks for reading, and I'll be back tomorrow with some personal favorites.


Sunday, December 22, 2013

Chocolate-Gingerbread Cupcakes


Christmas is in two days.  Do you have your menus planned, groceries bought, gifts bought and wrapped, and food prepped?  Or are you more of a last-minute person, braving the grocery store tonight, hitting the mall tomorrow, and staying up until 3 am Christmas Eve to wrap presents?  I'm somewhere in the middle.  Presents are all bought, but none are wrapped.  Menu is planned, groceries are bought, but nothing is prepped.  And yet, I somehow feel ahead of the game - wishful thinking?  Delusional?  Who knows.

Surprisingly, planning my menu is the hardest part of it all.  The thing is, I save so many recipes, and have so many ideas, that I have a really hard time narrowing it down and committing.  I'm always afraid that I'll think of something better, and then regret my early decision.

So if you're in the same boat, and still trying to pick a dessert, look no further than these cupcakes.  While chocolate may not be inherently festive or Christmas-y, I'm of the opinion that it's pretty fantastic year-round.  And here, it's even more fantastic when it's the best chocolate frosting known to man, and spiked with molasses, cinnamon, ginger, and nutmeg.  Oh, and then swirled on top of a soft and spicy gingerbread cupcake.  There are no losers here, for sure.

Whatever you are celebrating, I hope you have a very merry holiday.  Cheers to you all!

Chocolate-Gingerbread Cupcakes
cupcakes and frosting adapted from Martha Stewart's Cupcakes

Gingerbread Cupcakes
makes about 22 cupcakes

  • 1 1/2 cups all-purpose flour
  • 2 Tbs ground ginger
  • 2 tsp ground cinnamon
  • 1/4 tsp freshly grated nutmeg
  • 1/4 tsp ground cloves
  • 1/4 tsp salt
  • 1 1/2 cups (3 sticks) unsalted butter
  • 1 1/2 cups sugar
  • 3 Tbs molasses
  • 4 large eggs
  • 1 tsp vanilla extract
Preheat the oven to 350 degrees and line 2 muffin pans with liners.

In a medium bowl, sift together the flour, spices, and salt.

Cream the butter and sugar in an electric mixer at medium-high speed until light and fluffy, about 3 to 5 minutes.  Lower the speed to medium and add the molasses and vanilla, then add the eggs one at a time, mixing well between each egg.  Scrape down the sides of the bowl, then with the mixer on low speed, add the flour mixture.  Mix just until it's incorporated and no streaks of flour are visible.

Divide the batter evenly between the lined cups, filling each three-quarters full.  Bake, rotating the pans halfway through, until the cupcakes are cooked through and spring back when lightly touched, 23 to 25 minutes.

Allow the cupcakes to cool in the pans 10 minutes, then turn them out onto a wire rack to cool completely before frosting.

Spiced Chocolate Frosting
  • 8 oz (2 cups) confectioner's sugar, sifted
  • 1/4 cup unsweetened Dutch-process cocoa powder
  • pinch of salt
  • 1 tsp ground ginger
  • 1/2 tsp ground cinnamon
  • pinch of ground nutmeg
  • 6 oz cream cheese, at room temperature
  • 6 Tbs unsalted butter, at room temperature
  • 1 Tbs molasses
  • 9 oz bittersweet chocolate, melted and cooled to room temperature
  • 3/4 cup sour cream
  • Sift together the sugar, cocoa powder, salt, and spices.  

In the bowl of a stand mixer fitted with the paddle attachment, beat the cream cheese, butter, and molasses at medium-high speed until pale and fluffy. 

 Reduce speed to low, and gradually add the sugar mixture, mixing until combined.  

Mix in the melted chocolate, then the sour cream, scraping down the sides of the bowl as needed, beating until smooth.

Use immediately, or the frosting can be refrigerated for up to 5 days.

Frost cupcakes as desired, then garnish with halved gingersnaps.


Monday, December 16, 2013

Pepper-Glazed Goat Cheese Gratin


During the holidays, and really throughout the entire year, it's nice to have a super easy appetizer in your back pocket.  One that you can make on short notice - like if you have last minute guests stop by, or if you forget that you're supposed to bring a dish to share to a meeting, party, or event.  Or if you don't have time to make anything time-consuming.  We've all been there.

Let this be your "go-to" appetizer.  It is embarrassingly easy, pretty and festive, and always well-received.  Do you need more convincing?  It's equally tasty fresh out of the oven, at room temperature, and chilled.  Oh, and it only calls for three ingredients.

Goat cheese and pepper jelly are a great combination (try it on a grilled cheese and thank me later).  Creamy, tangy goat cheese + addictively sweet and spicy pepper jelly spread on a piece of crusty bread?  This is a winner all around.

Pepper-Glazed Goat Cheese Gratin
inspired by Food and Wine

  • 10 oz creamy goat cheese, softened to room temperature
  • 4 oz cream cheese, softened to room temperature (low-fat is fine)
  • large pinch of kosher salt
  • 1/2 cup pepper jelly
Preheat the oven to 400 degrees Fahrenheit.  Combine the goat cheese, cream cheese, and salt in a medium bowl, mixing well to combine.  Spread in a lightly greased 8x8 inch baking dish or other small baking dish.

Whisk the pepper jelly in a small bowl to smooth out any lumps, then spread in an even layer over the cheese.

Bake 7-8 minutes, then turn on the broiler and cook an additional 2-3 minutes, until the top is bubbly.  

Allow to cool slightly, then serve with toasted baguette slices or crackers.


Thursday, December 12, 2013

Peppermint Bark Cookies


I really began to love cooking around the time I graduated from college when I moved into a "fancy grown-up" apartment with a spacious kitchen - the apartment complex had a security gate and everything!  My previous apartment was pretty much exactly what you'd expect from a crappy college apartment, so I really felt like I was living the good life.  My roommate was a guy I'd been friends with since my freshman year of college, and through him and his friends, I eventually met Joey (another story for another day).  So all in all, it was a great time in my life.

That winter, I attended several holiday parties:  a cocktail party with friends, my work party, family parties, random Friday night gatherings, etc.  And through them all, I became quite the creature of habit.  I brought a cold veggie pizza appetizer, and peppermint bark.  While peppermint bark is a pretty standard holiday offering, I felt like mine was super special - my "secret" was using half peppermints and half spearmints - fancy! 

It has been quite a while since I've made peppermint bark, so these cookies brought back a lot of memories of the old days.  Like my secret ingredient peppermint bark, this is a little different than the usual as well.  You have the standard melted chocolate, crushed mints, and white chocolate drizzle, but underneath that candy blanket lies a buttery, crisp, shortbread cookie.  It takes the ubiquitous holiday dessert up a notch or two, and is definitely a little unexpected.  I like to think of these peppermint bark cookies as sort of the evolution of the standard dessert.  It only seems natural to take a perfectly good piece of peppermint-studded chocolate and add a tasty cookie underneath, right?  Next to some of the fancy and frilly holiday cookies, simple peppermint bark can seem a bit humble and boring, so the evolution of turning it into a cookie helps it keep up with the Joneses.  Plus, it's really fun to cut and break it into jagged, irregular pieces.  :)

As Caroline and Smith helped me pat out the dough, crush the mints, and drizzle the chocolate, I thought about how much things have changed in what's really a short amount of time.  Back then, if you'd told me that I'd have FOUR kids, I would have laughed my young and wrinkle-free little head off.  But life's full of surprises, and just like peppermint bark, you adapt and evolve.  And in this case, I couldn't be happier to do just that.

Peppermint Bark Cookies
barely adapted from Bon Appetit, December 2009
makes approximately 36 cookies, depending on how you cut/break them
  • Nonstick cooking spray
  • 2 cups all purpose flour
  • 1/4 tsp kosher salt
  • 1 cup (2 sticks) unsalted butter, softened to room temperature
  • 1 cup sugar
  • 1 teaspoon vanilla extract
  • 1 large egg yolk
  • 6 ounces bittersweet chocolate, chopped
  • 1/2 cup (about 3 oz) finely chopped red-and-whitestriped hard peppermint candies or candy canes - a few pulses in the food processor 
  • 2 ounces white chocolate 


Preheat oven to 350°F. Spray 13 x 9 x 2-inch metal baking pan with nonstick spray, and line the bottom of the pan with a long strip of parchment paper.  Leave an overhang on both short sides of the pan.  

Whisk flour and salt in medium bowl and set aside. 

Using an electric mixer fitted with the paddle attachment, beat the butter in large bowl until creamy, about 2 minutes.  Gradually beat in sugar, and continue beating until the mixture is light and fluffy, about 3 minutes.  Beat in vanilla, then egg yolk. Gradually add flour mixture, beating on low speed just until it's combined.

Drop the dough by tablespoonfuls into prepared baking pan, spacing evenly. Using moistened fingertips, press dough to form even layer over bottom of pan, then pierce dough all over with a fork.

Bake the cookie base until it's light golden brown, slightly puffed, and the edges begin to come away from sides of pan, about 30 minutes. Remove from the oven and place the pan on a cooling rack.  iImmediately sprinkle the chopped chocolate over the cookie base, and let stand until the chocolate softens, about 3 minutes.  Using a small offset spatula, spread the chocolate over the top of the cookie in a thin, even layer.  Immediately sprinkle the chopped peppermint candies on top.

Stir white chocolate in medium metal bowl set over saucepan of simmering water until it is melted and smooth.  Remove from the heat, and using a fork, drizzle and drop the white chocolate over the cookies.  Alternatively, you can spoon the melted white chocolate into a pastry bag, cut a small hole at the tip, and drizzle it over the mints.  Chill until white chocolate is set, at least 30 minutes.

Using the paper overhang as an aid, lift the cookie from pan and transfer to a cutting board.  Use a large knife to cut the cookie into irregular pieces.


Tuesday, December 10, 2013

Italian-Style Chicken & Vegetable Quinoa Stew


Over the course of the past 3 years, I've kind of forgotten what it's like to eat for only one person.  I've gone from pregnant to nursing to pregnant with twins to nursing twins, and in that time have pretty much just eaten whatever I wanted, and pretty however much of it I wanted.  While I generally eat pretty healthy, snacking, late-night desserts, and portion sizes were definitely out of control; so needless to say, once I weaned the twins this fall, it kind of all caught up to me.

Thus, I've been counting calories via My Fitness Pal.  It's been eye-opening to say the least, and has definitely helped me to get a handle on it all.  It's been a good reminder of how much food I actually need versus how much I eat.  Tracking my calories definitely helps to reign in mindless snacking, cut down on the fancy calorie-bomb coffee drinks, and just generally keep me in check.

However, over Thanksgiving, I threw all my good habits out the window, and as we all tend to do over the holidays, I ate waaaaay too much.  Pie for breakfast?  Okay!  Gravy on everything?  Why not?!  By Sunday afternoon, I NEEDED something wholesome, satisfying, and healthy. Enter this quinoa stew.  I had plenty of leftover turkey meat,  I'd already made a big pot of stock, and I had a good assortment of herbs leftover from all of my Thanksgiving cooking; so I threw this together for dinner that night.

It was healthy, hearty, and just what I needed to get back on track.  I've taken to using quinoa instead of rice in many recipes, and I love that it provides extra protein and fiber, while still giving you that "starchy" comfort food feel that you get from rice.  With tomatoes, spinach, carrots, and onions, this isn't short on the veggies, but I think mushrooms would be lovely here as well.  It's a simple, one-pot recipe, but paired with some garlic bread, makes for a comforting and cozy winter meal.  We all loved this stew (especially Henry and Tucker!), so it will definitely be making repeat appearances in the next few months.

I know everyone is pinning and saving recipes for Christmas cookies, candy, cakes, and cocktails, but you still have to eat dinner.  So why not make it healthy?


Italian-Style Chicken and Vegetable Quinoa Stew

  • 1 Tbs olive oil
  • 1 cup diced yellow onion
  • 1/2 cup diced carrots
  • 2 cloves garlic, minced
  • 1 tsp minced fresh thyme*
  • 1 tsp minced fresh oregano*
  • 1 tsp tomato paste
  • 3/4 tsp kosher salt
  • 1/2 tsp freshly ground black pepper
  • 1 (14.5 oz) can diced tomatoes, with their liquid
  • 3 1/2 cups chicken broth, plus more as needed
  • 3/4 cup quinoa, rinsed and drained
  • 3 cups coarsely chopped fresh spinach
  • 2 cups chopped/shredded cooked chicken
  • 2 Tbs minced fresh parsley
  • chopped fresh basil, for garnish
  • freshly shaved parmesan cheese, for serving
Heat the olive oil over medium heat until shimmering, then sauté the onion and carrots until softened and beginning to brown, 5 to 8 minutes.  Add the garlic, thyme, oregano, tomato paste, salt, and pepper, and cook, stirring constantly for an additional minute.

Stir in the tomatoes, broth, and quinoa, and bring to a gentle boil.  Cook until the quinoa is cooked through, about 15 minutes.  Add the chicken and spinach, and cook until the spinach wilts and the chicken is heated through, another 2 to 3 minutes.  Stir in the chopped parsley, then taste and season with additional salt and pepper as needed.  If the stew seems too thick, stir in additional broth.

Ladle the stew into bowls, then top each serving with chopped basil and freshly shaved parmesan cheese (I use my veggie peeler to just shave off thin pieces from the wedge).  Serve.

*1 teaspoon of dried herbs can be substituted for the fresh herbs here.  I'd recommend using an Italian dried herb blend or even Herbes de Provence.


Sunday, December 8, 2013

Cranberry-Pecan Muffins


Smith is two years old, and I have to admit that so far it has simultaneously been the most fun and the most frustrating age.  He oscillates between being inSANELY adorable and sweet, and ridiculously wild, crazy, and unreasonable.  One minute he is splitting his cracker in half and feeding it to his baby brothers, and the next minute he is chasing Caroline around and pulling her hair, knocking the twins over, and throwing a tantrum because I won't let him eat cornstarch.  It's hard to stay mad at him though.  I mean, look at that face!


Recently, our QT time has been spent almost exclusively in the kitchen.  He seems to have inherited my love for cooking, and anytime I so much as set foot in the kitchen, he's dragging the step stool over and asking to help.  And I love having him in there.  It's been especially fun to make recipes that require several steps, or call for using different appliances.  His favorite kitchen appliance of the moment is the food processor.  I let him press the button, and it absolutely makes his day.

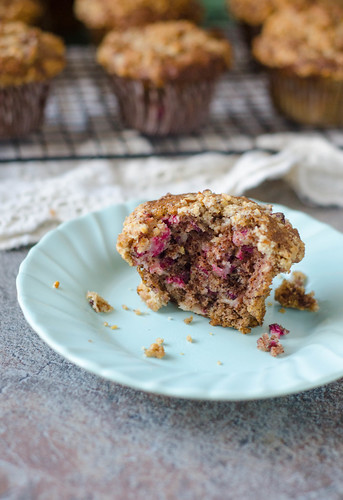
These muffins were such a fun project for us to do together one afternoon.  Not only did we get to use the food processor THREE TIMES, but we got to eat muffins at the end!

And these muffins are awesome.  There are a few key points that set these muffins above the rest.  First is the preparation of the cranberries.  Using fresh cranberries definitely feels more festive and seasonal, but biting into a whole cranberry can be pretty jarring.  Here, the cranberries are coarsely chopped in the food processor, along with some sugar and a tiny bit of salt.  The salt helps tame the bitterness of the cranberries, while the sugar of course sweetens them a bit.  Chopping the cranberries also helps them to be more evenly distributed throughout the muffin, giving you cranberry in every bite.

Secondly, instead of just mixing in chopped pecans, you make a pecan flour in the food processor by simply grinding them in the food processor with some sugar.  This appeases those who don't like the texture of having nuts added, but it gives the muffins plenty of nutty and delicious flavor.  So as to provide extra texture, a streusel topping finishes them off.

These muffins were a huge hit with both Caroline and Smith, and I loved them as well.  With their crunchy streusel topping, big domed tops, and awesome sweet-tart flavor, they reminded me a lot of a big bakery muffin.  These made a great breakfast for a few days, and Smith and I would split one for a snack sometimes as well.  If you need a fun and festive muffin for a holiday party, or are looking to bake something for Christmas morning, give these a try!  Having a two year old around to help is recommended, but not required. ;)


Cranberry-Pecan Muffins
barely adapted from The Cook's Illustrated Baking Book
makes 12 muffins

Streusel Topping

  • 3 Tbs all-purpose flour
  • 1 Tbs packed brown sugar
  • 4 tsp granulated sugar
  • 1/2 tsp ground cinnamon
  • 2 Tbs unsalted butter, cut into 1/2-inch pieces, softened
  • pinch salt
  • 1/2 cup pecans
Muffins
  • 1 1/2 cups all-purpose flour
  • 1 1/2 tsp baking powder
  • 1 tsp salt
  • 1 1/4 cups pecans, toasted and cooled*
  • 1 cup + 1 Tbs granulated sugar
  • 2 large eggs
  • 6 Tbs unsalted butter, melted and cooled
  • 1/2 cup milk
  • 8 oz (2 cups) fresh cranberries
  • 1 Tbs confectioners' sugar
Preheat the oven to 425 degrees and adjust the oven rack to the upper-middle position.  Line a 12-cup muffin pan with liners, or spray with cooking spray.  Set aside.

For the topping:  Combine the flour, brown sugar, granulated sugar, cinnamon, butter, and salt in the food processor, and pulse 4 to 5 times, until the mixture resembles coarse sand.  Add the pecan and pulse another 4 to 5 times, until they are coarsely chopped.  Transfer the mixture to a small bowl and set aside.

For the muffins:  Whisk the flour, baking powder, and 3/4 teaspoon of the salt together in a medium bowl and set aside.

Combine the toasted pecans and granulated sugar in the food processor, and process until the mixture resembles coarse sand, 10 to 15 seconds.  Transfer to a large bowl and whisk in the eggs, melted butter, and milk.

Whisk the flour mixture into the egg mixture until it's just combined, with no streaks of flour remaining.  Set aside for 30 minutes to thicken.

Meanwhile, pulse the cranberries, remaining 1/4 teaspoon of salt, and the confectioners' sugar in the food processor until very coarsely chopped, 4 to 6 pulses.  Use a rubber spatula to fold the cranberries into the batter.

Divide the batter evenly among the muffin cups using an ice cream scoop or large spoon, filling each cup completely.  Evenly sprinkle the streusel topping over the batter, gently pressing into the batter to adhere.

Bake 17 to 18 minutes, rotating the pan halfway through baking.  They are done when a toothpick inserted into the center comes out clean.  Cool the muffins in the tin for 10 minutes, then remove them to a wire rack and cool at least 10 more minutes before serving.


Thursday, December 5, 2013

Caramel-Filled Brown Butter Cookies


Earlier this fall, when I made these apple cider caramels, my pal Annie and I were texting about their awesomeness.  Predictably, our texts turned to all the different treats we could make using them, and when Annie mentioned stuffing them into a browned butter cookie, I knew I'd be making them ASAP.

As a general rule, I'm not so much into turducken desserts, but I am head over heels in love with these cookies.  They are the perfect balance of sweet and salty, and chewy and crispy.  The center is obviously gooey and sweet from the caramel, and the edges are perfectly crispy.  The small amount of salt in the caramels themselves helps to balance out their sweetness and the sweetness of the cookie, as does a tiny sprinkle of sea salt over the top of each cookie.  The browned butter gives the cookies a slightly toasted flavor, and just a hint of apple cider comes through from the caramels.  Just a whisper of cinnamon comes through, giving them just a little warmth and spice.  These are the Mary Poppins of cookies:  Perfectly perfect in every way.


Caramel-Filled Browned Butter Cookies
slightly adapted from Annie's Eats and Ambitious Kitchen
  • 1 cup (8 oz) unsalted butter
  • 2 1/4 cups all-purpose flour
  • 1 1/4 tsp baking soda
  • 1/4 tsp ground cinnamon
  • 1/2 tsp fleur de sel, plus more for sprinkling
  • 1 lightly packed cup brown sugar
  • 1/2 cup granulated sugar
  • 1 large egg + 1 egg yolk
  • 2 1/2 tsp vanilla extract
  • 1 Tbs greek yogurt or sour cream
  • 20 apple cider caramels (or other 1x1inch caramels)
In a medium skillet, melt the butter over medium heat.  Whisking continuously, continue to cook the butter until it begins to turn brown and smell nutty.  Immediately remove from heat and pour into a bowl.  Set aside to cool slightly.

In a medium bowl, whisk together the flour, baking soda, cinnamon, and fleur de sel.  Set aside.

To make the cookies, combine the brown sugar, granulated sugar, and butter in the bowl of an electric mixer fitted with the paddle attachment.  Beat at medium speed until well-combined.  Add the egg + egg yolk, vanilla, and sour cream and mix well.  Reduce the speed to low and slowly add the flour mixture, mixing until just incorporated.  

Preheat the oven to 350 degrees.  Line two baking sheets with parchment paper or silicone mats.

Measure out about 2 tablespoons of the dough, and roll into a ball.  Flatten the dough ball in the palm of your hand, then place a caramel in the center.  Fold the edges over the caramel, enclosing it in the dough.  Transfer to the prepared baking sheet, and repeat with the remaining dough, spacing the dough balls about 2-3 inches apart.  Transfer to the refrigerator and chill at least 30 minutes.

Bake 13-15 minutes, or until the edges are golden-brown the the cookies are set, rotating the pans halfway through baking.  Remove from the oven and immediately sprinkle each cookie lightly with sea salt.  Allow to cool slightly before transferring to a wire rack (or before eating them!).

Note:  These are best eaten warm, and will harden the following day.  To enjoy, just reheat in the microwave briefly (about 10-15 seconds).


Tuesday, December 3, 2013

Skillet Baked Ziti


Baked Ziti is one of my favorite pasta dishes, but it's hardly a quick and easy weeknight meal:  boil the pasta, make the sauce, cook the sausage, shred the cheese, assemble it all... then bake it for a cruelly long time.  Enter my genius friends at America's Test Kitchen.  Just as they did with lasagna, they've created a way to have a bowl full of pasta goodness on your table in just over thirty minutes.  For real.

This couldn't be any easier.  First, you cook the sausage in a big skillet; throw in plenty of garlic, just enough red pepper flakes to give it a little kick, and crushed tomatoes.  Then comes the best part:  stir in uncooked noodles and some water, and the pasta cooks directly in the pan, simultaneously absorbing that delicious tomato sauce.  Finish it off with some cream, basil, and cheese, and after a brief stint in the oven, it emerges as a perfectly cheesy, creamy, and oh-so comforting pasta dish.

I have made baked ziti countless times, and this is just as good as the best version we've had in the past.  And the fact that it's made completely in ONE dish, and in under an hour?  Definite win.


Skillet-Baked Ziti
adapted from America's Test Kitchen's Pasta Revolution
serves 4 to 6

  • 1 lb sweet or hot Italian sausage, casings removed
  • 6 cloves garlic, minced
  • 1/4 tsp red pepper flakes (or more or less to your taste)
  • kosher salt and freshly ground black pepper
  • 1 (28-oz) can crushed tomatoes
  • 3 cups water
  • 12 oz ziti
  • 1/2 cup heavy cream
  • 3/4 cup Parmesan cheese
  • 1/4 cup chopped fresh basil
  • 4 oz (about 1 cup) freshly grated mozzarella cheese
Heat the oven to 475 degrees Fahrenheit.  

In a 12-inch oven-safe skillet set over medium-high heat, brown the sausage until no longer pink, about 4 minutes, breaking up any large pieces with a wooden spoon.  Stir in the garlic and red pepper flakes and cook until fragrant, about 1 minute.  Stir in the crushed tomatoes and 1/2 teaspoon of salt.  Reduce the heat to medium-low and simmer gently for 8 to 10 minutes.

Add the water and ziti and stir to combine.  Cover, increase the heat to medium, and cook at a vigorous simmer, stirring often, 15 to 18 minutes, until the pasta is just tender.

Remove from heat and stir in the cream, 1/2 cup of the Parmesan, and 3 tablespoons of the basil.  Taste and season with salt and pepper as needed.  Sprinkle the mozzarella and remaining 1/4 cup of parmesan over the top, and transfer to the oven.  Bake until the cheese has melted and browned, and the sauce is bubbling, 10 to 15 minutes.  Sprinkle with the remaining tablespoon of basil and serve.


Sunday, December 1, 2013

Baked Pumpkin & Chorizo Taquitos


Hello, December.  According to Caroline, it's now acceptable to decorate for Christmas, listen to holiday music, and read books about Christmas and baby Jesus.  And we did all three of those things today.  The only thing we missed was sitting in front of the fireplace drinking hot chocolate.  Luckily, we still have 23 days to get that done before Christmas.  But that doesn't mean that she wasn't upset that it didn't happen tonight.  Five year olds are not known for their patience.

So now that the holidays are in full swing, does that mean that the pumpkin-everything craze is over?  I sure hope not!  I much prefer pumpkin spice lattes over the holiday drinks.. and pumpkin-cream cheese muffins still make me pretty happy.  And these pumpkin taquitos.  My oh my, are they delicious.    The original recipe was for pumpkin taquitos, but I added chorizo.  I thought the spicy meat and added texture would work really well with the creamy, sweet pumpkin... big shock:  it was a great addition.  I mean, to be honest, adding chorizo to pretty much anything will make me happy, but these taquitos were one of my favorite recent dinners.

Joey tends to be lukewarm to most pumpkin offerings, but he really loved these (see above comment re:  chorizo).  They are spicy, but not too spicy, with just a hint of sweetness from the pumpkin.  And the crispy, crunchy shell is a great foil to the creamy, cheesy filling.  We dipped these in my roasted tomatillo salsa, and everyone loved this meal.

So whether you are still pumpkin-obsessed, or firmly in the "No pumpkin past Thanksgiving" camp, think you'll love these.  They are quick and easy, can be made ahead of time, and your whole family will love them.


Baked Pumpkin & Chorizo Taquitos
significantly adapted from The New Southwest by Meagan Micozzi

  • 8 oz fresh chorizo, casings removed
  • 3/4 cup diced yellow or white onion (about half a medium onion)
  • 2 cloves garlic, minced
  • 1 1/2 cups pumpkin puree
  • 1/2 tsp kosher salt
  • 1 tsp ground cumin
  • 1 tsp chili powder
  • 2 Tbs minced fresh cilantro
  • 2 Tbs Greek yogurt or sour cream
  • juice of 1/2 lime
  • 1 1/2 cups shredded Monterey Jack or Pepperjack cheese
  • 14-15 small flour or corn tortillas
  • 1 Tbs canola oil
  • roasted tomatillo salsa, for serving
Preheat the oven to 425 degrees Fahrenheit.  Line a baking sheet with foil and spray lightly with cooking spray, or brush with oil.

Heat a large skillet over medium heat.  Add the chorizo, and cook, breaking up the large clumps, until it is starting to brown and the fat is beginning to render off, 3-4 minutes.  Add the onion and cook an additional 10 minutes, or until the chorizo is cooked through and the onions are soft.  Stir in the garlic and cook 1-2 minutes, then remove the pan from heat.  Set aside.

Meanwhile, in a large bowl, stir together the pumpkin, salt, cumin, chili powder, Greek yogurt, shredded cheese, cilantro, and lime juice.  Fold in the chorizo-onion mixture and stir until incorporated.

Stack the tortillas on a plate, cover with a damp paper towel, and microwave for 30 second intervals, until they are warm and pliable.  Top each tortilla with 3 tablespoons of the filling, roll tightly, and place seam side-down on the prepared baking sheet.  Brush each taquito with oil, and sprinkle lightly with salt.

Bake 15 to 20 minutes, or until the taquitos are golden-brown and crispy.  Cool slightly, then serve with roasted tomatillo salsa.


BLOG DESIGN BY: SHERBET BLOSSOM DESIGNS