Showing posts with label nuts. Show all posts

Sunday, December 8, 2013

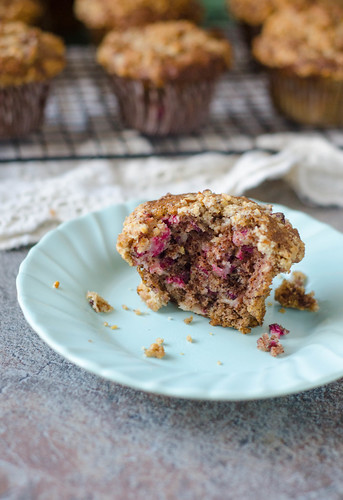
Cranberry-Pecan Muffins


Smith is two years old, and I have to admit that so far it has simultaneously been the most fun and the most frustrating age.  He oscillates between being inSANELY adorable and sweet, and ridiculously wild, crazy, and unreasonable.  One minute he is splitting his cracker in half and feeding it to his baby brothers, and the next minute he is chasing Caroline around and pulling her hair, knocking the twins over, and throwing a tantrum because I won't let him eat cornstarch.  It's hard to stay mad at him though.  I mean, look at that face!


Recently, our QT time has been spent almost exclusively in the kitchen.  He seems to have inherited my love for cooking, and anytime I so much as set foot in the kitchen, he's dragging the step stool over and asking to help.  And I love having him in there.  It's been especially fun to make recipes that require several steps, or call for using different appliances.  His favorite kitchen appliance of the moment is the food processor.  I let him press the button, and it absolutely makes his day.

These muffins were such a fun project for us to do together one afternoon.  Not only did we get to use the food processor THREE TIMES, but we got to eat muffins at the end!

And these muffins are awesome.  There are a few key points that set these muffins above the rest.  First is the preparation of the cranberries.  Using fresh cranberries definitely feels more festive and seasonal, but biting into a whole cranberry can be pretty jarring.  Here, the cranberries are coarsely chopped in the food processor, along with some sugar and a tiny bit of salt.  The salt helps tame the bitterness of the cranberries, while the sugar of course sweetens them a bit.  Chopping the cranberries also helps them to be more evenly distributed throughout the muffin, giving you cranberry in every bite.

Secondly, instead of just mixing in chopped pecans, you make a pecan flour in the food processor by simply grinding them in the food processor with some sugar.  This appeases those who don't like the texture of having nuts added, but it gives the muffins plenty of nutty and delicious flavor.  So as to provide extra texture, a streusel topping finishes them off.

These muffins were a huge hit with both Caroline and Smith, and I loved them as well.  With their crunchy streusel topping, big domed tops, and awesome sweet-tart flavor, they reminded me a lot of a big bakery muffin.  These made a great breakfast for a few days, and Smith and I would split one for a snack sometimes as well.  If you need a fun and festive muffin for a holiday party, or are looking to bake something for Christmas morning, give these a try!  Having a two year old around to help is recommended, but not required. ;)
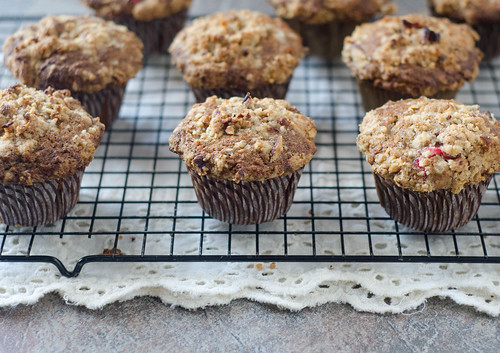


Cranberry-Pecan Muffins
barely adapted from The Cook's Illustrated Baking Book
makes 12 muffins

Streusel Topping

  • 3 Tbs all-purpose flour
  • 1 Tbs packed brown sugar
  • 4 tsp granulated sugar
  • 1/2 tsp ground cinnamon
  • 2 Tbs unsalted butter, cut into 1/2-inch pieces, softened
  • pinch salt
  • 1/2 cup pecans
Muffins
  • 1 1/2 cups all-purpose flour
  • 1 1/2 tsp baking powder
  • 1 tsp salt
  • 1 1/4 cups pecans, toasted and cooled*
  • 1 cup + 1 Tbs granulated sugar
  • 2 large eggs
  • 6 Tbs unsalted butter, melted and cooled
  • 1/2 cup milk
  • 8 oz (2 cups) fresh cranberries
  • 1 Tbs confectioners' sugar
Preheat the oven to 425 degrees and adjust the oven rack to the upper-middle position.  Line a 12-cup muffin pan with liners, or spray with cooking spray.  Set aside.

For the topping:  Combine the flour, brown sugar, granulated sugar, cinnamon, butter, and salt in the food processor, and pulse 4 to 5 times, until the mixture resembles coarse sand.  Add the pecan and pulse another 4 to 5 times, until they are coarsely chopped.  Transfer the mixture to a small bowl and set aside.

For the muffins:  Whisk the flour, baking powder, and 3/4 teaspoon of the salt together in a medium bowl and set aside.

Combine the toasted pecans and granulated sugar in the food processor, and process until the mixture resembles coarse sand, 10 to 15 seconds.  Transfer to a large bowl and whisk in the eggs, melted butter, and milk.

Whisk the flour mixture into the egg mixture until it's just combined, with no streaks of flour remaining.  Set aside for 30 minutes to thicken.

Meanwhile, pulse the cranberries, remaining 1/4 teaspoon of salt, and the confectioners' sugar in the food processor until very coarsely chopped, 4 to 6 pulses.  Use a rubber spatula to fold the cranberries into the batter.

Divide the batter evenly among the muffin cups using an ice cream scoop or large spoon, filling each cup completely.  Evenly sprinkle the streusel topping over the batter, gently pressing into the batter to adhere.

Bake 17 to 18 minutes, rotating the pan halfway through baking.  They are done when a toothpick inserted into the center comes out clean.  Cool the muffins in the tin for 10 minutes, then remove them to a wire rack and cool at least 10 more minutes before serving.


Wednesday, June 22, 2011

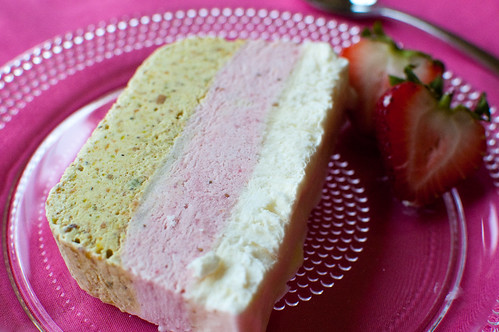
Pistachio, Strawberry, and Vanilla Semifreddo


In case you can't tell from my blog design, my favorite colors are pink and green.  In addition to using them in my blog design, they were my wedding colors, and also the colors of Caroline's nursery.  So pretty much from the moment I saw this dessert in June's Bon Appetit, I knew I needed to make it.   Not to mention that I am absolutely loving pistachio flavored desserts these days, and strawberries are at their peak.  So I knew this would be something I'd love.

In case you're not familiar with the term "semifreddo," it basically means half-cold.  It is a custard based dessert that is lightened with whipped cream, so it's a bit like ice cream, but has sort of a mousse-like texture at the same time.  When reading the instructions, it seemed kind of complicated and labor intensive (prep each flavor, make the custard, whip the cream, freeze each layer individually..), but once I started it was very straightforward.  The only "difficult" step was straining the pistachio mixture.  It had thickened significantly upon standing, so it definitely took some elbow grease to extract as much liquid as possible (though it was really more of a paste).  And it turned out to be my favorite layer of the dessert.  Other than that, everything else came together quite easily.  The hardest part was waiting for it to chill, so I could dig in :-)

As expected, this turned out to be such a pretty dessert.  As I mentioned, the pistachio layer was my favorite, but the strawberry and vanilla layers were great as well.  This would be a great dessert for entertaining, since it is made completely ahead of time, and it presents so beautifully.  I think it would also be great served with strawberry sauce or chocolate sauce, but it was still wonderful on it's own.


Pistachio, Strawberry, and Vanilla Semifreddo
adapted from Bon Appetit, June 2011
  • 1 cup shelled unsalted pistachios
  • 4 tablespoons sugar, divided, plus 1/2 cup
  • 1 cup whole milk, divided
  • 1/4 teaspoon almond extract
  • 1 1/2 tsp vanilla extract
  • 1 cup fresh strawberries (about 4 ounces), hulled, halved
  • 1 teaspoon vanilla extract
  • 2 large eggs, at room temperature
  • 1/4 teaspoon kosher salt
  • 1 1/3 cups chilled heavy whipping cream
Line a loaf pan (approximately 9x5x3") with 2 layers of plastic wrap, leaving a generous overhang on all sides. 

Grind pistachios and 2 tablespoons sugar in a food processor until very finely chopped. Transfer pistachio mixture to a small saucepan. Add 1/2 cup milk and bring to a boil. Remove from heat, cover, and let steep for 20 minutes. Set a fine-mesh strainer over a medium bowl; strain, by pressing down on the pistachios with a wooden spoon or spatula.  Discard the solids. Stir in almond extract and set pistachio mixture aside. 

Place remaining 1/2 cup milk in a medium bowl.  Stir in the vanilla extract and chill until ready to use.

Purée strawberries and 2 tablespoons sugar in a food processor until smooth. Set a fine-mesh strainer over another medium bowl; strain, pressing on solids to extract as much juice as possible. Discard solids. Stir in vanilla extract and set strawberry mixture aside. 

Whisk eggs, salt, and remaining 1/2 cup sugar in a medium metal bowl. Set bowl over a medium saucepan of simmering water (do not allow bottom of bowl to touch water). Beat egg mixture at high speed until it triples in volume and an instant-read thermometer inserted into mixture registers 170°F, about 3 minutes. Remove bowl from heat and continue beating until thick and cool, about 3 minutes. Add one-third of egg mixture to each of the pistachio, strawberry, and vanilla mixtures; fold each just to blend. 

Beat cream in a large bowl until soft peaks form. Add one-third of cream to each of the pistachio, strawberry, and vanilla mixtures; fold each just to blend. Cover vanilla and strawberry mixtures separately; chill. Pour pistachio mixture into pan; smooth top. Cover; freeze until firm, about 45 minutes. 

Gently pour strawberry mixture over pistachio layer; smooth top. Freeze until firm, about 45 minutes. 

Gently fold vanilla mixture to blend; pour over and smooth top. Freeze until firm, about 4 hours. 

DO AHEAD: Can be made 3 days ahead. Fold plastic wrap over; seal tightly and keep frozen.
 
To serve, uncover semifreddo. Using plastic wrap as an aid, lift from mold. Invert onto a chilled platter; peel off plastic. Slice crosswise.


Tuesday, June 14, 2011

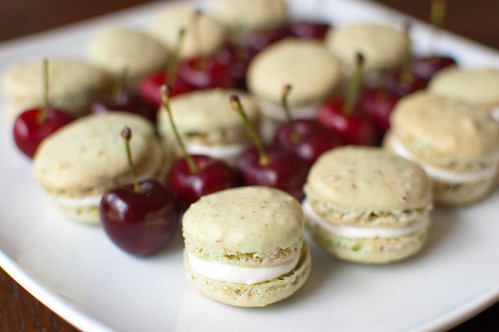
Pistachio Macarons


Ever since I first conquered macarons over the holidays, I've been looking forward to making different variations and flavors.  When I hosted my Trashy to Classy Cocktail Party, I knew I had a perfect opportunity to make something "trashy" into delicate, elegant little macarons.

I know there are countless variations on Watergate "salad," but the gist of it is instant pistachio pudding mixed with marshmallows and some sort of canned fruit - pineapple, fruit cocktail, etc.  I remember this salad well from family picnics growing up, so I was really excited to adapt it into macarons.  I kept it simple and just made pistachio macarons with marshmallow filling, and I served them on a platter with fresh cherries (yay, cherry season!).

The macarons were by far the most popular dish of the night.  Partly because no one had ever had them before and they were a fun new novelty, but mostly because they're so darn delicious!  They were all gone within the first hour of the party - even the sad misshapen ones that I didn't initially put out.

As far as the combination of pistachio with marshmallow goes, I wouldn't have initially put them together, but it turned out to be quite good.  That's not to say I'll make the same combo next time - I'd love to try pistachio buttercream, raspberry jam, or chocolate ganache.

As far as the process of making the macarons goes, I didn't have any trouble really, but as I folded the ground pistachios in I noticed that I definitely should have ground them finer.  It wasn't an issue for baking, but there were just bigger pieces than I would have preferred. 

Check out these sites for more in-depth info for making macarons:
DemystifyingMacarons 
Confections of a Foodie Bride
Annie's Eats


Pistachio Macarons
makes about 25 sandwich cookies

For the macarons:
  • 225 gm confectioners’ sugar
  • 60 gm blanched, slivered almonds
  • 65 gm pistachios
  • 3 egg whites (about 100 gm), aged 1 day at room temperature
  • 25 gm granulated sugar
  • Green powdered food coloring (optional)

To make the cookies, combine the confectioners sugar, almonds, and pistachios in the bowl of a food processor.  Process until the nuts are very finely ground and the mixture is well blended.

In the bowl of an electric mixer fitted with the whisk attachment, whip the egg whites on medium-high speed until foamy.  Gradually add the granulated sugar and continue beating until the egg whites are glossy and hold stiff peaks.  Mix in the powdered green food coloring, if using.  (Start with only a little bit at a time.  Remember, you can always add more but you can’t take it away.)

Add the ground nut/sugar mixture to the mixing bowl and gently fold in to the egg whites using a wide spatula. The mixture should remain shiny and flow easily.

Transfer the batter to a pastry bag fitted with a plain round tip.  Pipe rounds (approximately 1 inch in diameter) onto baking sheets lined with silicone baking mats.  Let rest for 20-30 minutes, or until the outsides form a harder "shell." 

Preheat the oven to 315˚ F.  When they are finished resting, baking for 12-15 minutes.  Let cool completely before carefully removing from the baking sheets.

When the cookies are cool, match them up according to size and fill with desired filling.

source:  Annie's Eats, originally from Use Real Butter and Tartlette


Wednesday, March 9, 2011

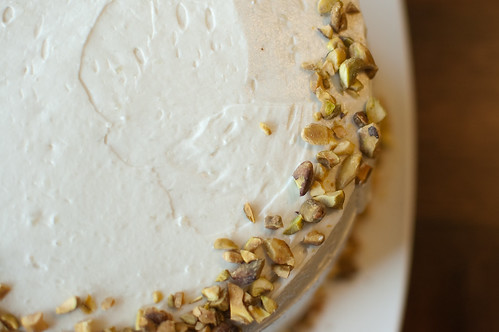
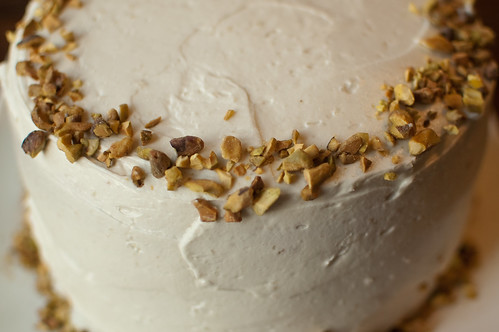
Pistachio Cake with Honey-Vanilla Frosting


So my birthday was last week (the big 29!), and my wonderful mother-in-law offered to keep Caroline for the afternoon so I could have the day to myself.  The way I saw it, I had 3 options:  take a nap, go shopping, or bake a cake. After much debate, I ended up baking a cake.  I'd had my eye on this pistachio cake from Baked:  Explorations for quite some time, and since I had everything on hand, I was set to go.

The cake itself is a little more complicated than a standard layer cake, but not overly so.  Some of the pistachios are ground to a fine powder, while some are only roughly chopped.  This infuses the entire cake with pistachio flavor, and still gives you some crunch and texture.  The cake is also lightened by egg whites, which results in a light, soft, and airy cake.  It is slightly sweet, but the pistachios give it a bit of a savory note as well.


The real star of this cake however, is the frosting.  The buttercream has a subtle honey flavor, which play off of the pistachios quite well.  It is also made using an interesting technique that I had never done before.  Milk, cream, flour, and sugar are boiled together, then whipped until cool.  Butter is then added, and the frosting is mixed until it comes together.  It is then flavored with honey and vanilla.  I was a little concerned as I made the buttercream, as it was very thin and was an unappetizing gray color.  However, after a few minutes, it magically thickened up and turned into the lovely off-white color you see here.

Not only was this cake fun to make, it was delicious as well.  Definitely something a little different from your standard layer cake, and certainly a great birthday cake!


Pistachio Cake with Honey-Vanilla Frosting
Baked:  Explorations


Pistachio Cake
  • 1 cup shelled pistachios (plus 1/3 cup for decorating)
  • 2 1/2 cups cake flour
  • 3/4 cup all-purpose flour
  • 1 tablespoon baking powder
  • 1 teaspoon baking soda
  • 3/4 teaspoon salt
  • 1/2 cup (1 stick) unsalted butter, softened
  • 1/2 cup vegetable shortening
  • 1 3/4 cups sugar
  • 1 tablespoon. vanilla extract
  • 1 large egg
  • 3 large egg whites, at room temperature
  • 1 1/2 cups ice cold water
  • 1/4 tsp. cream of tartar
Honey-Vanilla Buttercream:
  • 1 1/2 cups sugar
  • 1/3 cup all-purpose flour
  • 1 1/2 cups whole milk
  • 1/3 cup heavy cream
  • 1 1/2 cups (3 sticks) unsalted butter, soft but cool, cut into small pieces
  • 1 teaspoon pure vanilla extract
  • 1/4 cup honey

Make the cake: Preheat the oven to 325° F. Butter three 8-inch round cake pans, line the bottoms with parchment paper and butter the parchment. Dust parchment with flour and knock out excess flour.

In the bowl of food processor, pulse the pistachios until they are coarsely chopped. Transfer about 2 tablespoons’ worth of the coarse pistachios to a large bowl. Continue to process the rest of the pistachios until they are almost powdery- but not a superfine dust. Stir the pistachio powder into the reserved coarse pistachios. Sift the flours, baking powder, baking soda and salt, together over the large bowl containing the pistachios mix. Stir to combine.

In the bowl of a standing mixer fitted with the paddle attachment, beat the butter and shortening on medium speed until creamy, 3 to 4 minutes. Add the sugar and vanilla and beat until fluffy, about 3 minutes. Scrape down the bowl, add the whole egg, and beat until just combined. Turn the mixture to low.

In a measuring cup, make 1 1/2 cups ice water. Add the flour mixture to the mixer in three parts, alternating with the ice water, beginning and ending with the flour mixture. For each addition, turn the mixer to low to add ingredients, then up to medium speed for a few seconds until incorporated. Scrape down the bowl, then mix on low speed for a few more seconds.

In a medium bowl, whisk the egg whites and cream of tartar until soft peaks form (You can do this by hand. Don’t be intimidated, it should only take 2 to 3 minutes). Do not overbeat. Gently fold the egg whites into the batter.

Divide the batter among the prepared pans and smooth the tops. Bake for 35-45 minutes, rotating the pans halfway through the baking time, until a toothpick inserted into the center of the cake comes out clean. Transfer the pans to a wire rack and let cool for 20 minutes. Turn the cakes out onto the rack and let cool completely. Remove the parchment paper.


Make the honey vanilla buttercream: In a medium heavy-bottomed saucepan, whisk the sugar and flour together. Add milk and cream and cook over medium heat whisking occasionally, until the mixture comes to a boil and has thickened, about 10 to 15 minutes.

Transfer the mixture to the bowl of a standing mixer with paddle attachment. Beat on high speed until cool (this takes at least 7 to 9 minutes of mixing) then add the butter; mix until thoroughly incorporated. Increase the speed to medium-high and beat until frosting is light and fluffy, 1 to 2 minutes.

Add the vanilla and honey and continue mixing until combined. If the frosting is too soft, put the bowl in the refrigerator to chill slightly, then beat again until it is proper consistency. If the frosting is too firm, set the bow over a pot of simmering water and beat with a wooden spoon until it is the proper consistency.

Assemble the cake: Place one cake layer on a serving platter. Trim the top to create a flat surface, and evenly spread about 1 1/4 cups frosting on top. Add the next layer, trim and frost it, then add the third layer. Spread the sides and top of the cake with the remaining frosting. Garnish the cake with crushed pistachios and refrigerate it for 15 minutes to it firm up before serving.

This cake will keep beautifully in a cake saver at room temperature for up to 3 days, if the weather is humidity free. Otherwise, put it in a cake saver and refrigerate it for up to 3 days. Let the cake sit a room temperature for at least 2 hours before serving.


Tuesday, July 6, 2010

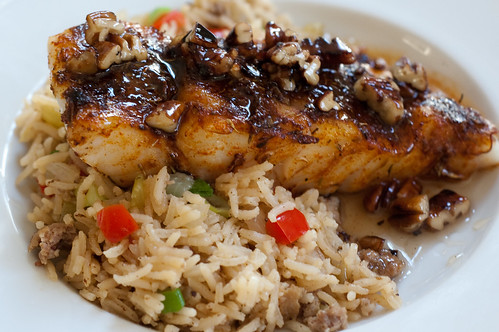
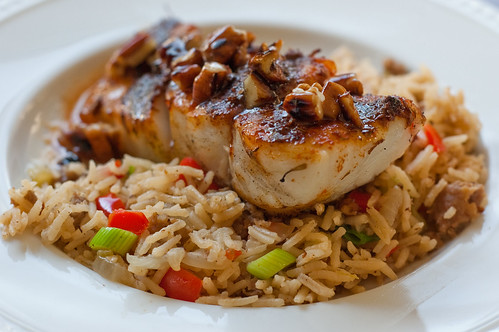
Cajun Halibut with Dirty Rice


Over the course of the past few months we have really upped our seafood consumption.  Its funny, because when I was single, I would cook fish for dinner several nights a week, but once Joey and I got married, I all but stopped cooking seafood for some reason.  I have no idea why, because it is easy, quick, and healthy.

This halibut makes me really happy that I'm cooking fish again.  Its got a delicious Cajun seasoning, a praline sauce that's just sweet enough to keep things interesting, and its served with a yummy dirty rice.  Joey said this was a very "Top Chef" meal because there were several components and they all went so well together.  I take that as a pretty good compliment.  :-)

As much as I'm a fan of the sweet and savory, the sauce was actually just a tad too sweet, so I've decreased the sugar below.  I also bulked up the rice by doubling the veggies (this is a trick that I do quite often actually).  All in all this was a really delicious dinner that is easy enough for a weeknight but impressive enough for guests.

One Year Ago:  Chicken and Summer Vegetable Tostadas and Guacamole Salad


Cajun Halibut with Praline Sauce
adapted from Cuisine Grilling
serves 4

For the Praline Sauce
  • 1/2 cup chopped pecans
  • 2/3 cup sugar
  • 1/3 cup water
  • pinch of salt
  • 1 Tablespoon unsalted butter
  • 1 Tablespoon whiskey or apple juice
For the Fish
  • 2 Tablespoons olive oil
  • 1 Tablespoon smoked paprika
  • 2 Tablespoons fresh thyme
  • 2 teaspoons garlic powder
  • 1 teaspoon kosher salt
  • 1 teaspoon black pepper
  • 4 halibut fillets (about 6 oz each)
Preheat the grill to medium-high.

Toast the pecans in a nonstick skillet over medium-high heat until golden, 3-4 minutes.  Remove from heat and set aside.

In a small saucepan set over medium heat, bring the sugar and water to a simmer, and cook until reduced by half, about 5 minutes.  Stir in the pecans and salt, and cook another 1-2 minutes.  Remove from heat and whisk in butter and whiskey.  The sauce will thicken upon standing, but you can reheat over low heat before serving if needed.

Combine the oil, paprika, thyme, garlic powder, salt, and pepper in a small bowl.  Brush mixture over both sides of the fish.

Use a paper towel with oil to grease the grates of the grill.  Grill, covered, until the fish is cooked through and the fillets release easily from grate, about 3 minutes per side.  Drizzle warm sauce over fish before serving.

Dirty Rice
  • 1 link Italian sausage, casing removed
  • 1 Tablespoon olive oil
  • 1/2 cup diced onion
  • 1/4 cup diced celery
  • 1/4 cup diced red bell pepper
  • 1 Tablespoon minced garlic
  • 3/4 cup dry white rice
  • 1 1/2 cups low-sodium chicken broth
  • salt and cayenne pepper to taste
  • 1/2 cup chopped scallions
Saute sausage in a skillet in oil over medium-high heat until starting to brown, 2-3 minutes.   Add the onion, celery, bell pepper, and garlic.  Cook until softened, 2-3 minutes.

Stir in rice, and saute 1 minute, then add broth.  Bring to a boil, reduce heat, and cook, covered, until rice is tender, about 20 minutes.  Let the rice stand 5 minutes, then fluff with a fork.  Season with salt and cayenne, and stir in the scallions.  Fluff with a fork and serve.


Monday, December 7, 2009

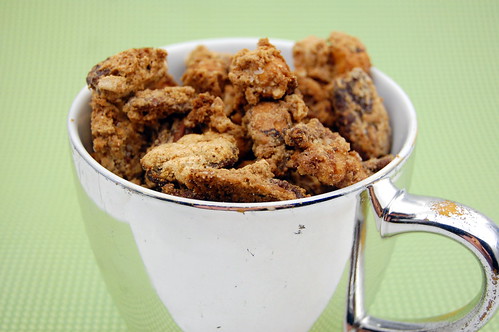
Salted Cocoa-Roasted Nuts


If you are looking for a fun and festive addition to your holiday gift baskets, look no further!  If you are looking for something to munch on while you cook, bake, or decorate, look no further!  If you are looking for something to eat for no reason....look no further!  These are insanely addictive.  And seriously yummy.  Its no secret that I'm a big fan of the sweet/salty combo, and these nuts are exactly that.  The coating is egg whites, and it keeps the nuts feeling kind of light and fluffy.  I used a combination of hazelnuts, pecans, and walnuts, but I think next time I'll just use hazelnuts and pecans.  They were my favorite, anyway.  Next time I might add a bit of cinnamon to give them even more flavor!

These babies are getting packaged up as part of my holiday gift baskets.  I'm also going to have several bags ready to go for all the parties we will be attending in the next few weeks.  They'd make great hostess gifts.  Or great to give to last minute visitors that stop by. 


Salted Cocoa-Roasted Nuts
from Joy the Baker, adapted from Essence of Chocolate
  • 3 cups mixed nuts (I suggest hazelnuts and pecans)
  • 8 Tablespoons (1 stick) unsalted butter, cut into chunks
  • 2 large egg whites
  • 1 cup sugar
  • 1 Tablespoon unsweetened cocoa powder
  • 1 teaspoon kosher salt
Preheat oven to 325.  Spread nuts in a single layer on a baking sheet, and bake for 10 minutes, or until slightly browned and fragrant.  Transfer to a large bowl and allow to cool.

Scatter the chunks of butter on the baking sheet, and return to oven to melt the butter.  This will only take a few minutes, so keep a close eye on it.  Remove from oven and tilt the pan to spread the butter all over.

Meanwhile, beat the egg whites in the bowl of a stand mixer over medium-low/medium speed.  When the egg whites are just starting to hold their shape, add the sugar and increase the speed to medium-high for 2 minutes.  They will be shiny and sticky, and a little thinner than meringues. 

Sift the cocoa over the egg whites, and fold in. Mix the egg white mixture into the nuts, and spread onto the baking sheet. 

Bake for 10 minutes, then gently stir.  Return the nuts to the oven and bake another 10 minutes.  Stir again, and sprinkle the salt over the nuts.  Return for another 10 minutes, then remove.  Give the nuts one final stir, breaking up chunks as you go.  When done, the coating should be crisp, and the butter absorbed by the nuts. 

Allow to cool completely.  They can be stored in an airtight container up to 1 week.


BLOG DESIGN BY: SHERBET BLOSSOM DESIGNS