Wednesday, September 29, 2010

Pumpkin Bagels

 
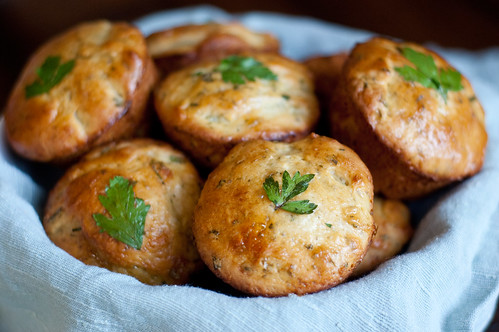
Woohoo, I made bagels!!  I actually kind of surprised myself when I made these - one minute I was deciding whether I should fold laundry or mop my kitchen floor, and the next thing I knew I was making pumpkin bagels!   At any point over the past year or so, if you'd asked me the number one item I wanted to attempt, I would without a doubt have said bagels.  And just like so many things that seem intimidating - I don't know what I was so scared of!  I do admit that these are not really "authentic" bagels.  I'll actually even go so far as to call them cheater bagels - no overnight stint in the refrigerator, no sponge, etc.  Which I think is part of what led me to finally make the leap.  From start to finish, these took just a few hours, so I didn't feel like it was a huge undertaking.

Like so many others, I become obsessed with pumpkin during the fall months, and my absolute favorite bagel flavor is pumpkin, so I really wanted to make a pumpkin bagel.  Having never made bagels before, I can't say if they were harder to work with than plain, but I can say that they weren't any more challenging than a loaf of bread or dinner rolls.    The flavor was spot on when comparing to other pumpkin bagles I've had in the past - dare I say better even?


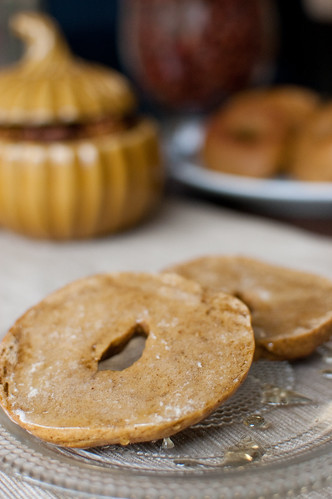
As I added the spices to the dough, I was a little skeptical because it seemed like a LOT, especially cloves and allspice, which are so strongly flavored and usually only used in very small quantities.  But the final product was a perfectly spiced bagel, with a great pumpkin flavor.

I sprinkled a cinnamon-sugar mixture over the tops of half the bagels, and I liked it so much I wish I'd topped them all with it!  I enjoyed these with honey-butter one day, pear-ginger jam one day, and finally almond butter, a sliced pear, and a drizzle of honey.  I would recommend all three, and I would also suggest honey-walnut cream cheese.  mmmm.

I definitely plan to make these bagels again, but next time I'm going to try to go more authentic.  And I'm also super excited to try the many, many flavor variations I have bookmarked over the past few years!


Pumpkin Spice Bagels
adapted from CDKitchen
makes 8 bagels
  • 1/2 cup + 2 Tablespoons warm water (100-110 degrees)
  • 3 1/4 tsp instant yeast
  • 1/4 cup + 2 Tbs brown sugar
  • 1 tsp salt
  • 1/2 cup canned pumpkin
  • 1 1/2 tsp ground cinnamon
  • 1/4 tsp ground cloves
  • 1 1/2 tsp nutmeg
  • 3/4 tsp allspice
  • 3 cups bread flour
To Cook:
  • 3 quarts water
  • 2 Tbs sugar
  • 1 tsp cinnamon
  • 1 egg, for egg wash
Combine all the ingredients for the dough, through allspice, in the bowl of a stand mixer fitted with a paddle attachment.  Mix to combine, then add the flour.  Mix on low speed to just combine, and switch to the dough hook.  Knead on medium speed for 12-15 minutes, then turn out onto a lightly floured surface and knead a few times.  Turn into a lightly-oiled bowl, cover with plastic wrap, and allow to rise for about an hour. 

Punch down the dough.  Divide into 8 equal parts, and roll into balls.  Use your thumb to form a hole in the center, then stretch smooth the dough to form an even shape.  Place on a baking sheet and continue with the remaining dough.  Cover the baking sheet with a clean kitchen towel, and allow to rise until puffed, about 45 minutes.

In a large saucepan, bring the water and 1 Tablespoon of sugar to boil.  Preheat the oven to 400 degrees.  Sprinkle a baking sheet with cornmeal.  Whisk together 1 egg plus 1 teaspoon of water or milk in a small bowl.

Working a few bagels at a time, boil the bagels 1-2 minutes per side.  Remove from the water and place on a rack to dry for about 1 minute, and repeat with remaining bagels.

Transfer the bagels to the prepared baking sheet, then brush with egg wash.  Sprinkle with cinnamon-sugar if using.

Bake 15 minutes, or until bagels are golden-brown.


Tuesday, September 28, 2010

Chorizo, Potato, and Mushroom Tacos


I both love and hate it when I rediscover a cookbook.  I love it because it inspires many delicious dinners, but I hate it because I think of all I've been missing out on.  Such has been the case for Rick Bayless's Mexican Everyday. Between these tacos and the roasted tomatillo salsa, my love for this cookbook has been reawakened.  So expect to see more from Rick Bayless for a while :-)

Now on to the tacos.  They are in the top three of my favorite dinners ever.  Something about the combination of chorizo, potatoes, and mushrooms had me going back for more, and more and more.  I seriously couldn't get enough.  Topped with fresh cilantro and roasted tomatillo salsa, this dinner was so delicious that I'm actually having trouble describing it.  And for a dinner that comes together in less than 30 minutes... well that is just about the definition of perfection to me.


Chorizo, Potato, and Mushroom Tacos
Rick Bayless, Mexican Everyday
serves 4
  • 12 ounces fresh Mexican chorizo, casings removed
  • 1 medium white onion, halved and sliced into rings
  • 6 ounces shiitake mushrooms, stemmed and sliced about 1/2 inch thick
  • 12 ounces potato, grated on the large holes of a grater (red skin, yukon gold, or russet)
  • salt
  • 1/2 cup loosely packed chopped cilantro
  • 12 warm corn tortillas
  • about 3/4 cup Roasted Tomatillo Salsa
Crumble the chorizo into a large nonstick skillet set over medium heat.  Cook, stirring often to break up large clumps, until some of the fat starts to render and the sausage looks half-cooked, about 4 minutes.

Increase the heat to medium-high, and add the onions and mushrooms.  Cook, stirring constantly, until they begin to soften, about 3 minutes.

Sprinkle the grated potato over the mixture, and cook until the potatoes are soft, about 3 minutes, stirring often.  Reduce the temperature if the potatoes start to brown before they soften.  Taste and season if necessary - some chorizo is seasoned highly.

Scrape the mixture into a serving bowl and sprinkle with the chopped cilantro.   Serve with warm tortillas and salsa.


Monday, September 27, 2010

Roasted Tomatillo Salsa


Not to sound dramatic, but I'm pretty sure I've found the perfect salsa.  And not to brag or anything, but I do consider myself to be a bit of a salsa snob/aficionado/expert.  I just love salsas of all kinds, and even better, I love making it.  I don't think I've ever made the same salsa twice, but for this one, I most surely will.  I served this as an accompaniment to what is now one of my top 5 favorite meals (to be shared tomorrow), and the whole dish left me so happy and satisfied.

A few summers ago, back when I was on a salsa-making spree, I started making green salsa, and it was always my favorite.  Some of my family thought it was a little weird, but I absolutely LOVE the combination of tangy tomatillos, spicy jalapenos, and fresh limes and cilantro.  I just can't get enough.  I always made mine with raw tomatillos, but roasting them gives the salsa so much more flavor and depth. 

Even though this salsa has an extra step to roast the tomatillos, jalapeno, and garlic, the whole thing still come together quite quickly, and I wouldn't recommend skipping that step. 


Roasted Tomatillo Salsa
adapted from Rick Bayless, Mexican Everyday
  • 4-5 medium tomatillos, husked, rinsed, and halved (about 8 ounces)
  • 2 large garlic cloves, peeled
  • 1 jalapeno
  • about 1/3 cup loosely packed, roughly chopped cilantro
  • 1/2 small white onion, chopped
  • juice of 1/2 lime
  • salt
Heat a large, nonstick skillet over medium-high heat.  lay the garlic, tomatillos, and jalapeno in a single layer, laying the tomatillos cut-side down.  Cook for 3-4 minutes, or until the tomatillos are well-browned.  Turn everything over and brown the other side (the tomatillos should be very soft).  Remove the tomatillos and garlic and add to a food processor or blender, and cook the jalapeno on all sides before removing to a cutting board.

When the jalapeno is cool enough to handle, peel the shriveled blackened skin, halve, and remove ribs and seeds.  Roughly chop and add to the food processor as well.

Add 1/4 cup of water, onions, and cilarntro to the food processor, and blend to a coarse puree.  Pour into a dish and add more water if necessary, to give the salsa an easily spoonable consistency.  Add lime juice and salt to taste (usually about 1/2 tsp salt). 


Sunday, September 26, 2010

PPQ: (Rebecca's) Favorite Chocolate Chip Cookies


For many basic things, like pasta, rolls, chocolate cake, buttercream, pasta sauce, banana bread, and chocolate chip cookies, we all have our "go-to" recipes.  I know for me, when I see a recipe for any of those things, I pretty much just skim right over and and don't look back - I have recipes that I stand by and trust, why would I try something new? 

Personally, my favorite chocolate chip cookie recipe is from Cook's Illustrated.  I realize I've never blogged them, but let's face it - the recipe can be found on pretty much any food blog out there.  It is hands down the best chocolate chip cookie I've ever had - homemade or from a bakery.  So I wasn't super excited to try a new recipe, though if anyone could sway me, it would be the Pastry Queen.

In the interest of full disclosure, I'll admit to you guys that my first batch was an epic failure.  I thought I left plenty of space between each cookie, but they still spread into each other.  So much in fact, that it looked like a giant cookie cake.  Not that I'm hating on cookie cake, but there were pockets of raw dough and patches of overcooked cookie... just a big mess.

So I set out to correct my mistakes this morning.  I had better luck by leaving plenty of extra space between each cookie.  I also decreased the baking soda just a tad because I could still taste it a bit in my first batch.  And finally, I used a mixture of toffee bits and chocolate chip cookies... just to mix things up a bit.

The result?  Well, I still prefer Cook's Illustrated's, but these were tasty nonetheless.  The were pretty thin, and not quite as soft and chewy as I like.  Still - it was a fun experiment to try something new, and valuable to make mistakes and move forward to correct them.  I always like a good learning experience (nerd alert)!  And let's be honest:  it's never a bad thing to have more than one recipe for chocolate chip cookies in your arsenal!

For the original recipe, check out Kalyna's blog.  And check back next week - its my pick again, and I chose Pear-Maple Cobblers!

One Year Ago:  Arnold Palmer Pie


Friday, September 24, 2010

Apple-Horseradish Glazed Salmon


There are so many things I want to say about this dish that I don't know where to start.  Ok well first off, I'll say that its absolutely delicious, and one of my favorite dinners ever.  Secondly, this was one of my favorite single-girl meals when I was first out of college (and finally had money to buy seafood!).  Until that is, I met Joey.  This was the first meal I ever cooked for him, and I wouldn't be lying if I said its part of why he fell madly in love with me :-). 

And finally, it has come full circle, because Caroline could NOT get enough.  I was actually a little sad - in the past, she hasn't been the biggest fan of salmon, so I only bought enough for Joey and myself.  But since I'm militant about her trying new foods, I gave her a bite of mine.  And she asked for more.  Then more.  Then some more.  And then I had no more salmon left.  I'm afraid our grocery bill just skyrocketed - this girl loves Alaskan wild-caught salmon.

I think the sweet-spicy glaze is what kept Caroline coming back for more.  Its  sweet from the apple jelly, but it has a nice kick from the horseradish, and the glaze really complements the buttery salmon.  I served this with roasted broccoli (which is my favorite way to eat broccoli - and Caroline thinks its hilarious to eat "trees"), and herbed couscous.  Perfect perfect meal.  One of my all-time favorites.

One Year Ago:  Chicken Tortilla Casserole - another family favorite!


Apple and Horseradish-Glazed Salmon
adapted from Cooking Light, May 2004
  • 1/3 cup apple jelly
  • 1 Tbs chopped fresh chives
  • 3 Tbs prepared horseradish
  • 1 Tbs white wine vinegar
  • 1/2 tsp kosher salt
  • 4 (6-oz) salmon fillets, skin removed
  • 1/4 tsp freshly ground pepper
  • 2 tsp olive oil
Preheat the oven to 350.

In a small bowl, whisk together the jelly, chives, horseradish, vinegar, and 1/4 tsp of the salt.

Heat oil in a large oven-safe skillet over medium heat.  Sprinkle salmon on both sides with remaining salt and pepper.  Lay in a single layer, being careful not to crowd, and cook for 3 minutes.  Carefully flip the salmon fillets, and brush the tops with half the glaze.

Transfer the skillet to the oven and bake for 5 minutes, or until the meat flakes easily with a fork.  Remove from oven and brush with remaining glaze.  Serve immediately.


Thursday, September 23, 2010

Beer-Glazed Black Beans


You know that episode of Friends where Rachel makes the Thanksgiving dessert and she puts beef in the trifle?  That is one of the most quoted episodes in our house, and one of our favorite lines is "Custard?  Good.  Jam?  Good.  Meat?  Gooood."  I kind of felt that way about this dinner.  "Beans?  Good.  Beer?  Goood."  It does have molasses in it, which might cause you to scratch your head a little, just like meat in a trifle might, but trust me on this one and just go with it.  It provides a nice subtle sweetness to the dish.

I added some extra spices and flavors, and it should go without saying that we loved this meal.  I served the beans over rice, with jalapeno-cheddar cornbread on the side.  And just so you know, I ate the leftovers over a sweet potato topped with salsa, Greek yogurt, and cheddar, and that now holds the title for my favorite lunch ever.

One Year Ago:  Summer Squash Bruschetta


Beer-Glazed Black Beans
adapted from My Recession Kitchen, originally from Mark Bittman
  • 1 Tbs olive oil
  • 1/2 large onion, chopped
  • 1 jalapeno pepper, seeds and ribs removed, minced
  • 2 cloves garlic, minced
  • 2 tsp chili powder
  • 1 tsp cumin
  • 1/8 tsp cayenne pepper
  • 1 cup beer
  • 3 cups cooked black beans (about 2 cans)
  • 1 Tbs molasses
  • 1/2 tsp kosher salt
  • 1/4 cup roughly chopped cilantro
  • 2-3 cherry tomatoes, quartered
  • shredded cheese, for garnish
Heat the oil over medium heat in a large skillet.  Add the onion and jalapeno, and cook until softened and translucent, 5 minutes.  Add the garlic, chili powder, cumin, and cayenne, and cook until fragrant, 30 seconds to 1 minute.

Add the beer, beans, molasses, and salt, and bring to a simmer.  Cook, stirring occasionally, until most of the beer has evaporated and the mixture has thickened, about 15 minutes.

Stir in the cilantro and tomatoes, and season to taste with additional salt and pepper, if needed.


Wednesday, September 22, 2010

Caramel Apple Cheesecake Pie


Fall is officially here, and regardless of the fact that its going to be 90 degrees today, I guess it's time to embrace the season.  And embrace it I did with this cheesecake/pie/dessert/God-send.  Let's  break down this dessert piece by piece, shall we?  First, you start with a cinnamon-spiced graham cracker crust.  Top that with a thin layer of caramel and toasted pecans, followed by a layer of brown sugar-cinnamon apples.  Next comes a cheesecake layer, then the whole thing is finished off with freshly whipped cream and more caramel.  Reminiscent of a candy-apple on crack, this pie is insane - but in the best possible way.

Nothing is very challenging, though the whole thing does require a bit of time - the crust needs to cook and cool, apples need to be cooked, cheesecake cooked, then the whole thing needs to chill for several hours before serving.  But don't let any of that deter you from making this.  Just take it step by step, and allow yourself plenty of time.  Its a really fun dessert to make, and even more fun to eat. 

Though I have a love-hate relationship with fall (love the actual season, but hate that it means winter is around the corner), there's nothing not to love about this pie.

One Year Ago:  Oatmeal Raisin Cookies


Caramel-Apple Cheesecake Pie
adapted from Ezra Pound Cake, originally from Mimi Hodges, as seen on Annie's Eats


For the crust:
  • 1½ cups graham cracker crumbs
  • 3 tbsp. sugar
  • ½ tsp. cinnamon
  • 5 1/3 tbsp. unsalted butter, melted
  • ½-¾ cup caramel 
  • 1 cup chopped pecans
For the apple filling:
  • 5 tbsp. unsalted butter
  • ½ cup light brown sugar, tightly packed
  • ¼ tsp. salt
  • 1 tsp. cinnamon
  • 5-6 Granny Smith apples, peeled, cored and thinly sliced
For the cheesecake:
  • 8 oz. cream cheese
  • ¼ cup sugar
  • 1 tsp. vanilla extract
  • 1 large egg
  • 1 tbsp. freshly squeezed lemon juice
For the topping:
  • ¾ cup heavy cream
  • 3-4 tbsp. confectioners’ sugar
  • ¼-½ cup caramel

Preheat the oven to 375° F. 

Spray a 9-inch round springform pan with cooking spray.  In a medium bowl, combine the graham cracker crumbs, sugar, cinnamon and melted butter.  Toss with a fork the ingredients are combined and the crumbs are moistened.  Transfer the mixture to the prepared pan and press the crumbs in an even layer over the pan bottom and about half to two-thirds of the way up the sides of the pan.

Bake for 6-8 minutes, until golden in color.  Cool for about 10 minutes.  Pour a layer of caramel into the bottom of the crust and sprinkle evenly with the chopped pecans.  Refrigerate the crust while you prepare the filling.


For the apple filling, melt the butter in a large skillet over medium heat.  Add the brown sugar, salt, and cinnamon, and cook for 1 minute, or until it begins to bubble.  Add the apples and toss to combine well, then allow to cook 15-20 minutes, or until they are softened and most of the liquid has been absorbed.  Pour into the springform pan and set aside.


To make the cheesecake layer, decrease the oven temperature to 350.  Cream the sugar and cream cheese in the bowl of a stand mixer fitted with a paddle attachment until smooth, about 1 minute.  Add the egg, vanilla, and lemon, and continue to mix until fully incorporated.  Pour over the apples, and use a spatula to smooth the top.  Bake until just set but not browned, about 30 minutes.  A knife inserted into the center will come out clean with its done.  Allow to cool to room temperature, then chill for at least 4 hours before topping with whipped cream and serving.


To make the whipped cream, combine the heavy cream and confectioner's sugar into a clean bowl fitted with the whisk attachment.  Beat over medium-high speed just until stiff peaks form.  Be careful not to over-whip.  Carefully spread over the cheesecake layer, then drop caramel by dollops on top.  Use a knife to swirl into the whipped cream.  Serve.


Monday, September 20, 2010

Spicy Citrus Shrimp Tacos


I know fall is upon us, but it is still over 90 degrees here in Atlanta; so I am still cooking like its summer (sort of - desserts are now fall-themed.  Check back tomorrow for a fun one!).  If I'm being honest, I actually kind of hate this time of year.  Summer produce is on its way out, but its not cool enough to start cooking soups and winter squash recipes.  So I feel kind of stuck.  I just threw all caution to the wind over the weekend though, and decided that hey, its still blazing hot, and I am grilling.


I made these shrimp tacos on Friday night, and I was amazed by how quickly this meal came together.  The marinade takes minutes to combine, the shrimp are given just a few minutes to soak in it, and then they cook up on the grill in under 5 minutes.  I whipped up the sauce and shredded some lettuce as the shrimp were marinating, and just threw the corn on the grill a few minutes before the shrimp.  Super easy, super flavorful.

Though the title claims that these tacos are spicy, I didn't think they were overwhelmingly so.  The sauce has a little bit of a kick, but its tamed a bit by the Greek yogurt (or sour cream, if that's what you decide to use).  Grilled corn with cilantro-lime butter was a fabulous accompaniment, and when I'm eating meals like this, it doesn't bother me at all that its still over 90 degrees in late September. 

One Year Ago:  Red Wine Spaghetti


Spicy Citrus Shrimp Tacos
loosely inspired by Southern Living, August 2008
serves4
  • juice of 1 orange
  • juice of 1 lemon
  • juice of 1 lime
  • 2 chipotle chile sen adobo
  • 1 tsp adobo liquid
  • 2 Tbs vegetable oil
  • 1 tsp honey
  • 1 tsp ground cumin
  • 1 tsp chili powder
  • 1 jalapeno, ribs and seeds removed, roughly chopped
  • 2 cloves garlic
  • pinch red pepper flakes
  • salt and pepper
  • 1 pound shrimp, peeled and deveined
  • 1 cup shredded iceberg lettuce or cabbage
  • 8 small (6-inch) flour tortillas
  • 1/2 lime, cut into wedges or slices
Southwest Cream Sauce
adapted from Southern Living, August 2008
  • 1 cup Greek yogurt or sour cream
  • 1 garlic clove, minced
  • 1 tsp chili powder
  • 1/2 tsp cumin
  • 1/4 tsp cayenne pepper
  • 1/4 tsp salt
  • juice of 1 lime
  • 2 Tbs chopped fresh cilantro

 Prepare grill. 

In the bowl of a food processor, combine all the ingredients for the marinade, through the salt and pepper, and process until smooth and well combined.  Pour over shrimp in a medium bowl, cover, and refrigerate for at least 10 minutes, but no longer than thirty.

Meanwhile, whisk together all the ingredients for the southwest cream sauce.

Thread the shirmp onto skewers, and grill on a well-oiled grate 1-3 minutes per side, until opaque and cooked through.  Use the grill to heat the tortillas as well.

Remove tails from shrimp, and divide among tortillas.  Top with shredded lettuce and cream sauce, with lime wedges.


Friday, September 17, 2010

Sausage and Pesto Pizza


Its Friday - so pizza for everyone!  When I made this pizza, I had originally planned to making calzones, but I got kind of lazy - so pizza it was!  It was kind of a thrown-together recipe, but I swear sometimes those make the best dinners.

I obviously love grilling pizza, but feel free to make it in the oven if you prefer.  This was a hit with everyone in our house, and I was the lucky one who got to eat the leftovers. 

I made my own pesto because I think its fun, but feel free to use store-bought.  I also used turkey Italian sausage to cut the fat a bit.  However, I used full-fat smoked mozzarella from a local dairy, and I feel zero guilt for it - it was that good.

One Year Ago:  Cheesy Creamed Corn and Caramelized Chipotle Chicken


Turkey Sausage and Pesto Pizza
a Pink Parsley Original
  • pizza dough
  • 3/4 cup prepared pesto
  • 2 links turkey Italian sausage, casings removed
  • 1 large tomato, cored, seeded, and chopped
  • 6 oz fresh mozzarella, shredded
  • olive oil, for brushing crust
Prepare grill to high heat (450-500 degrees) or preheat oven.

Heat a medium skillet over medium heat, and cook the sausage, breaking up any large clumps, until no longer pink.  Remove from heat and set aside.

Press the pizza dough into a large circle, and brush with olive oil.  Transfer to the grill, oiled side down.  Brush the top with oil.  When the underside of the dough is browned, carefully flip the crust. Working quickly, spread the pesto over the crust, then sprinkle with the sausage, tomato, and mozzarella.  Close grill lid and allow cheese to melt and the crust to cook through.

Carefully transfer the pizza to a large platter, allow to cool slightly, then slice and serve.


Wednesday, September 15, 2010

Herbed Dinner Rolls


For those from the south, these are actually Sally Lunn dinner rolls.  And if you have no idea who or what that  is, Sally Lunn is pretty much a southerner's challah - slightly sweet, moist, slightly chewy bread with a crisp golden crust.  So take that description, then add in a big handful of fresh herbs, and you have my new favorite dinner roll recipe. 

This is without a doubt one of the easiest yeasted bread recipes that I've ever made.  You mix all the ingredients into a stand mixer, then walk. away.  For 2 hours the dough rises, then you just portion it out into muffin tins, let them rise a bit longer, and bake.  Easy peasy. 

I first made these a few weeks ago to go along with the Gruyere and Spinach souffle, and they were a great part of a fabulous late-summer meal.  I've since made them again for my mother-in-law's book club, and from what I heard, they went over quite well.  And just so you know, I plan on making these again and again this fall and winter - how awesome would these be with a minestrone or tomato soup??

One Year Ago:  Pumpkin-White Chocolate Blondies


Herbed Dinner Rolls
adapted from Williams-Sonoma, as seen on Annie's Eats
makes about 18 rolls
  • 4 eggs
  • 2 teaspoons kosher salt
  • 4 1/2 teaspoons instant yeast (2 packets)
  • 1/3 cup sugar
  • 1 cup warm milk (105-110 degrees F)
  • 8 Tbs (1 stick) butter, melted
  • 4 cups bread flour
  • 1/2 cup minced fresh herbs (I used a mixture of basil, parsley, thyme, chives, oregano, and rosemary)
  • 1 egg, for egg wash
  • 1 Tbs milk, for egg wash
Combine the eggs and salt in the bowl of a stand mixer fitted with the paddle attachment.  Beat at medium-high speed until pale yellow and fluffy, about 5 minutes.

Add the yeast, milk, melted butter, sugar, and flour, and mix to form a dough.  Sprinkle in the herbs and mix at low speed until just combined.  Cover with plastic wrap, and allow to rise in a warm place until doubled in bulk, about 2 hours.  Meanwhile, generously butter muffin tins.

Punch down the dough and scoop into muffin tins.  Cover with a kitchen towel and allow to rise another 45 minutes, until slightly puffed. 

Preheat the oven to 350, and whisk together the egg and milk, then brush each roll with the mixture.  If desired, gently press a whole fresh herb into the top of each roll. 

Bake 20-25 minutes, or until the rolls are golden-brown and a toothpick inserted into the center comes out clean.  Remove from muffin tins (you may need to run a paring knife around the edges to loosen the rolls), and serve.


Tuesday, September 14, 2010

Chorizo and Lentil-Rice Salad


After rediscovering lentils over the winter, I pledged to use them more and more in my cooking, and then... I didn't.  On the one hand, I kind of just forgot about them, but on the other hand, they seem more like a winter grain if there is such a thing.  I think of lentils as being parts of stews, soups, and hearty winter meals.

This dish however, is a great example of how lentils can be used in a salad.  Lentils are cooked with rice, then tossed with cucumber, chorizo, red onion, herbs, and a smoky-spicy chipotle dressing.  Served on a bed of spinach, this was such a wonderfully comforting dinner, and the leftovers made for a fantastic lunch.  I loved how the spiciness of the chorizo and chipotle dressing played off the coolness of the cucumber and the warmth of the lentils and rice.

The original recipe called for ham, but we are much bigger fans of chorizo, so I went with that.  I also subbed a roasted poblano for the red bell pepper.  This was a super easy meal to put together, its healthy, delicious, and perhaps the best part - my 2 year old gobbled it right up!

As an aside, check out the Featured Recipes page - I've updated it with lots of fun foods for football season!

One Year Ago:  Chicken Mole


Lentil-Rice Salad with Chorizo, Cucumber, Red Onion, and Herbs
adapted from Rick Bayless, Mexican Everyday
serves 4
  • salt
  • 2/3 cup lentils (Le Puy or brown)
  • 1/2 cup long-grain rice
  • 4 ounces chorizo, cassings removed
  • 1 small red onion, very thinly sliced
  • 1 medium cucumber, peeled and seeded, cut into 1/4-inch cubes
  • 1 medium poblano pepper, roasted, peeled, and diced
  • 8 ounces salad spinach, long stems removed, roughly chopped
  • 2 Tablespoons chopped fresh cilantro or scallions
Chipotle Dressing:
  • 2/3 cup vegetable oil
  • 1/4 cup balsamic vinegar
  • 1-2 canned chipotle chiles en adobo
  • 1 teaspoon chipotle canning sauce
  • 1 Tablespoon fresh oregano
Fill a large saucepan with about 2 quarts of water and set over high heat.  Add 1 Tablespoon of salt, and when the water boils, stir in the lentils and rice.  Reduce the heat slightly, but keep the water at a brisk boil, and cook until the lentils and rice are tender (no chalkiness inside) but aren't falling apart, about 15 minutes.  Pour into a strainer and drain completely.

Meanwhile, crumble the chorizo into a pan set over medium-high heat, and cook, breaking up large pieces with a wooden spoon, until the meat is cooked through.  Drain off excess fat and set aside.

Combine the oil, vinegar, chile, canning sauce, oregano, and a scant teaspoon of salt in a food processor.  Process until smooth and set aside.

Scoop the lentil-rice mixture, red onion, and the chorizo into a large bowl.  Pour in about 1/4 cup of the dressing and toss well.  Add the ham, cucumber,  and roasted poblano to the mixture and toss to combine.  Taste and season with additional salt if necessary.

In another large bowl, add the spinach, and drizzle on about 3-4 tablespoons.  Toss to combine, and divide the greens among serving plates, roughly forming nests.  Scoop a portion of the lentil salad into the center of each, sprinkle with cilantro or scallions, and serve.


Sunday, September 12, 2010

PPQ: Seventh Heaven Chocolate Truffle Cake


This week's Project Pastry Queen recipe was a doozy.  This was one of the first desserts that jumped out at me while flipping through The Pastry Queen for the first time, and I eagerly awaited an opportunity to make a cake that contains 5 sticks of butter, 2 pounds of chocolate, 9 eggs, and 3 cups of heavy cream.  The opportunity presented itself back in March, for my wonderful mother-in-law's birthday.  I honestly have no idea why I never blogged it - I guess the pictures got lost somewhere and somehow - somehow - I forgot about this insane cake.

Well, thanks to the fabulous Sarah of 20-Something Cupcakes, I'm finally getting around to blogging it, and I have to say, its about time.  This is the perfect cake for a special occasion (such as a chocoholic's birthday).  I was a little intimidated to make this because of the multiple steps and components, but it wasn't difficult at all. If I recall, the only glitches I ran into was transferring the layers of cake - one of them broke, but I just put it together in the cake and sealed the cracks with a little extra truffle filling.  No big deal there! :-)

Thanks again to Sarah for forcing me to finally blog this cake.  Check out her blog for the full recipe - now I'm off to search the picture archives, and see what other lost recipes I may have waiting!

One Year Ago:  Poached Salmon with Corn and White Wine Butter Sauce


Tuesday, September 7, 2010

Spicy Eggplant Fritters


I always joke with my baby sister about her being a picky eater.  Because she is.  So anytime she comes to visit, I make it my mission to force her to try something new.  These spicy eggplant fritters are the latest installment in "Operation Expand Hope's Horizons."  Sometimes my mission fails miserably (Operation Scallop was not well-received), but this one was a success!

One of the nice things about eggplant is that it can really just take on the flavors of whatever you add to it.  Some people complain that it tastes bitter, but I think that's from not removing extra moisture.  For these fritters, the eggplant is first roasted whole, then the "meat" is drained, mixed with all kinds of yummy spices and flavors, coated in bread crumbs (or panko, if you're out of bread crumbs), then pan-fried.  It is a little labor-intensive, but the fritters are really really delicious.  Though the title has the word "spicy," the spice is really just a subtle lingering burn.  While the recipe says to serve with lemon wedges, I served them with marinara, and we really enjoyed them that way.


The yield for this recipe is 12, but I didn't get that many.  First of all, my eggplant weighed less than a pound, and I also made the fritters a bit larger than called for.  Next time I make these, I will probably err on the side of a larger eggplant, probably closer to 1 1/2 pounds.

These would also be great made into bite-sized fritters and served as an appetizer, or atop a bed of tomatoes, cucumbers, and greens for a salad.  I only with we had leftovers so I could try that out!

One Year Ago:  French Toast Kabobs  and Cornbread Salad


Spicy Eggplant Fritters
The Complete Italian Vegetarian Cookbook
makes 9-12 fritters
  • 1 large eggplant (1 1/2 pounds)
  • 3 medium garlic cloves
  • 1/4 cup fresh basil leaves
  • 1/2 teaspoon dried hot pepper flakes
  • 1 cup plain bread crumbs, plus more as needed
  • 1/2 cup grated Parmesan cheese
  • 1 egg, lightly beaten
  • salt
  • olive oil
Preheat oven to 425 degrees.  Place the eggplant on a baking sheet, and bake until soft and collapsed, about 40 minutes.  Cool to room temperature

Trim and discard the stem and peel away the skin.  Place the eggplant flesh in a strainer set over a medium bowl and mash gently with a fork, picking out and discarding large clumps of seeds.  Drain for 15 minutes, stirring and shaking periodically.

Combine the garlic, basil, and red pepper flakes in the bowl of a food processor, and pulse several times, scraping down the sides as needed, until the ingredients are finely chopped.  Add the drained eggplant and process until smooth.

Scrape the mixture into a large bowl, and add 1/2 cup bread crumbs, egg, and cheese.  Stir to combine well.  If the mixture seems sticky, stir in more bread crumbs.  Add salt to taste.

Spread the remaining bread crumbs on a large plate.  Heat about 1/4-inch of oil over medium-high heat in a large skillet.

Take 2 tablespoons of the eggplant mixture and form into a 2 1/2 inch flat patty.  Coat both sides with breadcrumbs and place on a large platter.  Repeat with remaining eggplant mixture and bread crumbs.

Heat the oven to 200 degrees.

Add as many fritters as will fit comfortably in the skillet, cooking 4 minutes per side, until the bottom turns a rich golden-brown, turning carefully.

Transfer the cooked fritters to a baking sheet and keep warm in the oven while you fry the remaining fritters.  Serve immediately.


Friday, September 3, 2010

Recipe Remix: Spinach & Gruyere Souffle


Last fall, the Barefoot Bloggers made Ina Garten's Blue Cheese Souffle.  I remember commenting that it would be great with different types of cheese, but the idea of this particular souffle was born out of an impulse to add spinach.  I thought it would be a great way to add more veggies, and then I remembered that I had some Gruyere to use up.  And in what case is adding Gruyere a bad idea?

I know my souffle isn't tall in the pic, but it had already fallen by the time I carried it to the table.  Oh well, it certainly didn't affect the taste, and this was even delicious as leftovers.  I made this when my wonderful friend Annie came over for dinner, and I served it along with grilled vegetables and herbed dinner rolls, with the mocha-almond-meringue tarts for dessert.  I for one thought it was a great dinner, and I hope she did too!


Spinach and Gruyere Souffle
adapted from Ina Garten's Blue Cheese Souffle, Barefoot in Paris
  • 3 Tbs unsalted butter, plus more for greasing the dish
  • 1/4 cup grated Parmesan cheese, plus more for sprinkling in the dish
  • 3 Tbs all-purpose flour
  • 1 cup hot milk
  • kosher salt and freshly ground black pepper
  • pinch nutmeg
  • pinch cayenne
  • 4 large egg yolks, at room temperature
  • 1 cup shredded Gruyere cheese
  • 10 oz frozen spinach, thawed, drained well, and chopped (fresh spinach is fine too - just wilt, drain, and chop)
  • 5 large egg whites, at room temperature
  • 1/8 tsp cream of tartar
Preheat the oven to 400 degrees.  Butter the inside of a souffle dish (about 7 inches in diameter and 3-4 inches deep).  Sprinkle the butter with Parmesan.


Melt the butter in a small saucepan over low heat. With a wooden spoon, stir in the flour and cook, stirring constantly, for 2 minutes, until golden. Off the heat, whisk in the hot milk, 1/2 teaspoon salt, 1/4 teaspoon black pepper, the cayenne, and nutmeg. Cook over low heat, whisking constantly, for 1 minute, until smooth and thickened.

Remove from heat and one at a time, whisk in the egg yolks.  Stir in the gruyere, spinach, and parmesan, and transfer to a large bowl.

In the bowl of a stand mixer fitted with the whisk attachment, combine the egg whites, cream of tartar, and a pinch of salt.  Beat over low speed for 1 minute, medium heat for 1 minute, then increase to high and beat until they form firm, glossy peaks.

Whisk in about 1/4 of the egg whites to lighten the yolks, then carefully fold in the rest.  Pour into the prepared souffle dish, and use a spatula to smooth the top.  Draw a circle on top with a knife or spatula to help the souffle rise evenly, then place in the middle of the oven.  Decrease the heat to 375, and bake 30-35 minutes, without peeking (!), until the top is golden brown.  Serve immediately.


Wednesday, September 1, 2010

BB: Mixed Berry Cheesecake Dip


I got lazy this month with Barefoot Bloggers.  I just didn't have it in me to make (or resist eating) a giant cheesecake.  And I was too lazy to do the calculations to make a small one.  So I turned it into a dip that is both easy and obviously still delicious.  And portable!  I took it to a party last weekend, and I think it would be a wonderful addition to a tailgate spread.

I used graham crackers as the cheesecake vehicle, but I think gingersnaps would be really good too.  And if you really want to go crazy... oreos?  Though my stomach hurts just thinking about that one!

Thanks to Natalie of Snowball Jewelry for choosing Ina's cheesecake this month. 


Mixed Berry Cheesecake Dip
adapted from Ina Garten
  • 1 pound cream cheese, softened
  • 2/3 cup confectioner's sugar
  • 1/4 cup sour cream
  • 1 Tablespoon lemon zest
  • 1 teaspoon vanilla extract
  • 2-3 Tablespoons heavy cream
  • 2-3 cups mixed berries (diced strawberries, blueberries, raspberries, etc)
  • 1/3 cup red jelly (strawberry, raspberry, currant, etc)
In the bowl of a stand mixer fitted with the paddle attachment, cream the cream cheese and sugar at medium-high speed until light and fluffy, about 3-5 minutes. Reduce speed to medium and add the sour cream, lemon zest, vanilla, and heavy cream.  Beat until well incorporated, then add more heavy cream if the consistency is too thick.  Pour into a 9-inch pie plate and use a spatula to spread and smooth the top.

Place the jam in a medium bowl, and heat in the microwave until melted, stirring every 30 seconds.  Fold in the berries, and spoon over the cheesecake filling.  Chill until ready to serve, and serve with graham crackers or ginger snaps.


BLOG DESIGN BY: SHERBET BLOSSOM DESIGNS