Wednesday, September 28, 2011

Green Chile Cheeseburgers


We're big fans of burgers around here, so when I found some elusive New Mexico Hatch chiles, I knew I wanted to incorporate them into a burger.  And when I think of chiles, I think of Bobby Flay - that guy will add chiles to anything.  He actually did a Throwdown for Green Chile Cheeseburgers, and while he didn't win, his version still looked insanely delicious. 

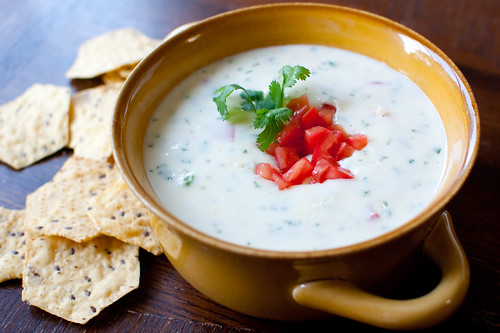
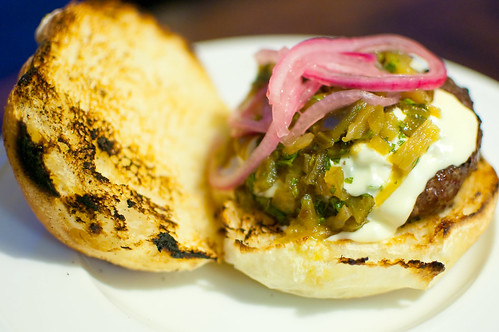
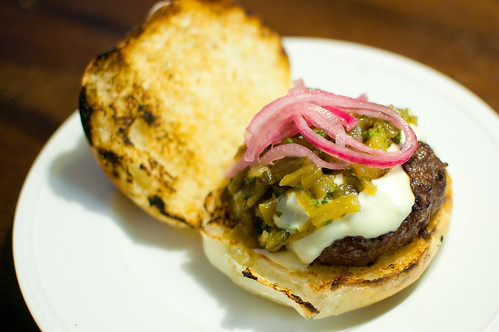
You start with a grilled burger, then top it with queso sauce, green chile relish, and pickled red onions.  The chile relish contains not only Hatch chiles, but also a poblano and a serrano.  They are roasted and mixed with some vinegar, honey, and cilantro.  The result is a tangy and spicy condiment that I could pretty much eat by the spoonful.  The picked red onions are also an awesome component.  I had never pickled anything but cucumbers, but I am now officially a convert.  We enjoyed the leftover onions on everything from sandwiches, to pizza, to salads, to quesadillas.  I think I want a jar of these in my refrigerator at all times from now on.  And finally, the burgers are smothered in queso.  Which I'm not even going to elaborate on because well.. it's queso.  No other description is needed. :-)

These could quite easily be my new favorite burger.  We not only loved them the day we made them, but I used one of the leftover patties to make quesadillas another night - I just crumbled the patty and topped a tortilla with monterrey jack cheese, some of the onions, and the green chile relish.  And we enjoyed those almost as much as the burgers themselves. 


Green Chile Cheeseburgers 
adapted from Bobby Flay's Throwdown!
makes 4 burgers

Pickled Red Onions
  • 1 1/2 cups red wine vinegar
  • 2 Tbs sugar
  • 1 Tbs kosher salt
  • 1 red onion, peeled, halved, and thinly sliced
Green Chile Relish
  • 1 medium poblano chile
  • 2 Hatch chiles, or 2 Anaheim chiles
  • 1 serrano chile
  • 1/4 cup red wine vinegar
  • 1 Tbs honey
  • 2 Tbs extra virgin olive oil
  • 1/4 cup chopped fresh cilantro leaves
  • kosher salt and freshly ground black pepper
 Burgers
  • 1 1/2 lbs ground beef
  • kosher salt and freshly ground black pepper
  • 1 Tbs Worcestershire sauce
  • 2 garlic cloves, minced
  • 1/4 tsp red pepper flakes
To serve
  • 4 hamburger buns, split and lightly toasted
  • 8 Tbs Queso sauce
To make the pickled onions, combine the vinegar, 1/4 cup water, the sugar, and the salt in a small saucepan; bring to a boil.  Remove from heat and allow to cool for 10 minutes.  Put the onions in a medium heat-proof bowl and pour the vinegar over them.  Cover and refrigerate for at least 4 and up to 48 hours.

For the green chile relish, roast the chiles:  Heat the broiler to high heat and place a baking sheet with the chiles on it 6 inches from the heating element.  Use tongs to turn the chiles every few minutes, until they are blackened all over.  Add the chiles to a medium bowl and cover tightly with plastic wrap.  Allow to cool about 10-15 minutes, then peel the chiles.  Remove the seeds and ribs and chop into small pieces.

Combine the vinegar, honey, olive oil, and cilantro in a medium bowl, and whisk to combine.  Stir in the diced chiles and season with salt and pepper.  Allow to sit at room temperature for at least 30 minutes.

For the burgers, preheat the grill.  In a large bowl, combine the beef, salt and pepper, Worcestershire sauce, garlic, and red pepper flakes.  Lightly mix to combine and shape into 4 patties, each about 1 1/2 inches thick.  Grill the burgers to desired doneness, flipping once.

To serve, place a patty on the bottom side of each bun, then top each with about 2 tablespoons of queso, green chile relish, and pickled red onions.  Top with the other half of the bun and serve.


Sunday, September 25, 2011

Fresh from the Oven....


I'd like to introduce you all to our new baby boy!  After a very fast and easy delivery, Smith Patrick was born last Thursday, September 22, at 5:55 pm.  He is a big boy, weighing in at 8 lbs 13 oz. 


I didn't think it was possible to love another baby as much as we love Caroline, but he has definitely stolen all of our hearts.  Caroline in particular is completely smitten, and just wants to be around him all the time.  We are all adjusting very well, and I am already itching to get back into the kitchen!


Wednesday, September 21, 2011

Restaurant Style Queso Blanco


I've pretty much been a giant goody-goody my entire life, though I did have one "rebellious" streak in high school.  Our dress code dictated that all shoes must have a strap across the back - so no flip flops, mules, etc.  Well all my cute shoes were backless, so sometimes I'd wear them anyway.  Most of my teachers didn't really enforce the rule, especially because I was a good student and never caused problems anyway, but one particular history teacher was a stickler.  So one day when my best friend Emilie and I both dared to defy the system and wear backless sandals, we were sent home to change. 

Since it was during this history teacher's class and we were in no hurry to get back to school after changing shoes, so we decided to have an early lunch out.  We went to our favorite Mexican restaurant and had chips, salsa, and queso.  Lunch of champions.  So that's pretty much the extent of my teenage rebellion.

Even now, anytime we go out for Mexican food, I like to order queso.  And I always wondered what exotic hard-to-find cheese they must use to achieve that perfect flavor and consistency.  It turns out that they use White American.  Incredibly exotic and hard to find, right?

One of the best things about queso is that you can change it up as much as you want according to your tastes and preferences.  And there are so many delicious uses for it (besides drinking it of course):  nachos, cheese fries, poured over tacos or burritos, served over a baked potato... the possibilities are endless.  And I have an especially delicious use for it to share in the next few days...

Make it as mild or as spicy as you'd like by adding extra jalapenos.  Or get really crazy and use a habanero instead.  Add extra cilantro and tomatoes if you want, make it more substantial with some crumbled chorizo... again, the possibilities are endless.

This makes a pretty good amount of dip, so you can either make less or save the extra for later snacking.  it reheats well in the microwave - I just add a little extra milk or water and stir it every 15 seconds or so until it's the right consistency and temperature. 

Just like it's restaurant counterpart, homemade queso dip is definitely worth skipping school for ;-)

Restaurant-Style Queso Dip
barely adapted from Confections of a Foodie Bride
  • 1 Tbs canola or vegetable oil
  • 1/4 cup minced white onion
  • 1-2 jalapenos, seeds and ribs removed, minced
  • 12 oz white American cheese (I ask the deli to just give it to me in a big block vs slicing it), shredded
  • 4 oz Monterrey Jack or Pepperjack cheese, shredded
  • 1/2-1 cup milk, half-and-half, or heavy cream
  • 1-2 roma tomatoes, seeds removed, diced
  • 2-3 Tbs chopped fresh cilantro
  • salt to taste
In a 12-inch skillet, heat the oil to medium heat and saute the onion and jalapenos until softened, 3-5 minutes. 

Reduce the heat to medium-low.  Adding a little cream and a handful of cheese or so at a time, stir constantly until the cheese is mostly melted.  Continue adding cheese and cream, stirring constantly, until all the cheese has melted.  Add extra milk or cream until you reach your desired consistency.  I actually add a little extra milk at this point to thin it out even more.  Since it thickens upon standing, I make it a little thinner than I'd like so that when it's time to eat, it is the perfect consistency.

Stir in the tomatoes and cilantro, and season with salt.  Serve immediately.


Sunday, September 18, 2011

Grilled Chicken Caesar Salad


Even though there is a chill in the air and fall is jussssst around the corner, I still love eating a big salad for dinner.  Over the course of two weeks, I think I ate chicken Caesar salads 5 times.  It started when we were out for dinner with Joey's family, and nothing really appealed to me on the menu.  And then the next time I went out for lunch I ordered one.  Then we went out to dinner a few days later and I ordered another one.  And then I made it for dinner one night, and subsequently enjoyed salads for lunch for a few days afterward.  That's the beauty of this recipe.  All of the components can be prepped in advance, then when it's time to eat it's just a matter of throwing it all together. 

Traditionally, Caesar salad dressing is made with raw eggs, but given the fact that I'm pregnant, I decided to go with a version using a combination of mayo and Greek yogurt instead.  I also knew that I wanted the dressing to stay fresh for a few days in the refrigerator, and I don't feel comfortable eating raw eggs over the course of several days.

Even though there are several components to the salad, it really does come together pretty quickly if you use your time efficiently.  As the grill and oven preheat, you can make your dressing, prep the bread for croutons, and prep the chicken for grilling.  And then while the chicken and croutons cook, wash and chop your lettuce and shave the Parmesan.  The chicken should be done a few minutes before the croutons, so you have a few minutes to let it rest before slicing it.  Then you just throw it all together and you're ready to eat!

I know that a lot of people are turned off my anchovies, but I really think they are important for the flavor in this dressing.  Personally, I'm not a fan of chopping them up, and since I usually only use small amounts at any given time, I like to use anchovy paste.  It is very stable in the refrigerator, and you can just squeeze out as much as you need for any given recipe.  I usually use 1 teaspoon of anchovy paste for each anchovy that a recipe calls for.

If you are always on the lookout for lunch ideas, this would be a good one.  Just prep everything Sunday night and pack a salad each day. 


Grilled Chicken Caesar Salad


Croutons
adapted from Annie's Eats, originally from Savory Sweet Life
  • 3-4 cups cubed bread, from a baguette
  • 3 Tbs butter, melted
  • 1 tsp garlic powder
  • 1 Tbs fresh minced parsley
  • salt and pepper to taste
Caesar Dressing
adapted from Annie's Eats, originally from The Parsley Thief
  • 1/3 cup lemon juice
  • 3-4 Tbs water
  • 1/4 cup light mayonnaise
  • 1/2 cup plain Greek yogurt
  • 3 cloves garlic, minced
  • 1/2 cup freshly grated Parmesan cheese
  • 1-2 tsp anchovy paste
  • 2 Tbs chopped fresh parsley 
  • salt and black pepper to taste
Salad
  • 1 head of Romaine lettuce
  • 2-4 boneless, skinless chicken breast halves
  • shaved Parmesan cheese
  • kosher salt and freshly ground black pepper
Preheat the grill.  Preheat the oven to 300 degrees.

Meanwhile, cut the bread into 3/4-inch cubes and place in a medium bowl.  In a small bowl, whisk together the butter, garlic, parsley, salt, and pepper, and pour over the bread cubes.  Toss to coat well, and arrange in a single layer on a rimmed baking sheet.  Bake 15 minutes, and check to see if they are golden and crispy.  If not, bake up to an additional 15 minutes, stirring and checking every few minutes.

Meanwhile, make the dressing.  Combine all the ingredients in a blender or food processor and combine until a smooth dressing forms.  Add additional water if necessary, to achieve your desired consistency.  Taste and season with salt and pepper if needed.

Measure out 2-3 tablespoons of the dressing, and brush the chicken breasts with the mixture.  Grill the chicken about 7 minutes per side, or until cooked through and no longer pink in the center.  Set aside to rest 5-10 minutes.

As the chicken and croutons cook, wash and chop the romaine and use a vegetable peeler to shave the Parmesan cheese.  When ready to serve, toss the lettuce with as much dressing as you'd like, portion the salad out onto plates, and top with chicken, Parmesan, and croutons.  Sprinkle kosher salt and freshly ground black pepper over the salads before serving.


Thursday, September 15, 2011

Vanilla Latte Cupcakes


Without a doubt, my biggest pregnancy craving has been iced vanilla lattes.  I could probably drink 2-3 a day, though I limit myself to one (decaf) a few times a week.  And then I started making my own, and it was all over.  So one afternoon I had a hankering to make cupcakes, and it seemed like an obvious choice to recreate my favorite drink as a dessert.


The cake portion of the cupcake was so good that I ate two naked ones.  And I'm totally a frosting girl, so that just goes to show you how delicious it was!  And then the icing... oh the icing.  I debated between doing a buttercream and a flavored whipped cream, and I ended up going with a vanilla bean and coffee flavored Swiss Meringue Buttercream.  One of the things I love the most about Swiss meringue is that despite the crazy amount of butter in it, it always tastes so light.  American buttercream can be cloyingly sweet, and can overpower the other flavors.  But Swiss Meringue is a great base frosting that allows your flavors to shine.

Joey called these "breakfast cupcakes" because he said they tasted like morning.  I just called them my favorite cupcakes ever.


Vanilla Latte Cupcakes
adapted from Cook Like a Champion, originally from  Cupcake Bakeshop

makes about 18 cupcakes


Coffee Cupcakes
  • 3/4 cup (1 1/2 sticks) unsalted butter, room temperature
  • 1 1/2 cups sugar
  • 3 large eggs, room temperature
  • 2 cups all-purpose flour
  • 1 tsp baking powder
  • 1/8 tsp salt
  • 1 Tbs dark roast coffee grounds
  • 1/2 cup strong brewed coffee
  • 1/4 cup milk or buttermilk
  • 2 Tbs Coffee Liqueur or milk if non alcoholic
Preheat the oven to 350 degrees and line cupcake pans with liners.

In the bowl of a stand mixer fitted with a paddle attachment, beat the butter at medium speed for about 30 seconds.  Add the sugar and beat until light and fluffy, about 3 minutes.

Add the eggs, one at a time, beating well after each addition.

In a medium bowl whisk together the flour, baking powder, salt, and coffee grounds.  In a liquid measuring cup, combine the brewed coffee, milk, and liqueur.

Starting and ending with the flour, in a few additions alternately add the flour and milk mixture to the mixer, mixing on low speed until just incorporated.

Divide the batter between 18 cupcake liners, filling each cup about 2/3 to 3/4 full. 

Bake 18-22 minutes, or until a toothpick inserted in the center comes out clean.  Cool in the pan for 5 minutes, then transfer to a wire rack to cool completely before frosting.


Vanilla Espresso Swiss Meringue Buttercream
adapted from Sweetapolita


  • 3 large egg whites
  • 1/2 cup  granulated sugar
  • 3/4 cup1  (1 1/2 sticks) unsalted butter, softened but cool, cut into cubes
  • 1/2 teaspoon  pure vanilla extract
  • 1 vanilla bean, split & scraped OR 1 tablespoon  vanilla bean paste
  • 1 tablespoon instant espresso powder (or to taste) dissolved into 2 teaspoons boiling water
  • Pinch of salt
 Combine the egg whites and sugar in the clean, dry bowl of a stand mixer.  Place over a pot of simmering water, and heat, whisking constantly, until the sugar dissolves and the mixture reaches 160 degrees.

Attach the bowl to the mixer (fitted with the whisk attachment).  Starting at low speed and gradually increasing to medium-high, beat the mixture until the bottom of the bowl cools to room temperature and the egg whites are thick and glossy and form soft peaks.

While mixing, add the butter, a few tablespoons at a time, until it has all been incorporated.  Continue mixing until the frosting comes together.  Switch to the paddle attachment and over medium speed, add in the vanilla extract, vanilla bean, coffee mixture, and salt.  Beat until well combined and taste and adjust flavorings as necessary.

Frost cupcakes as desired

*Note - this frosting recipe makes just  enough to frost the 18 cupcakes as shown, so if you like to pile it on, I would make 1.5 times the recipe.


Tuesday, September 13, 2011

Oatmeal Buttermilk Sandwich Bread


Even though I don't do it every week, I love making homemade bread for sandwiches for lunches and quick dinners, not to mention toast for breakfast.  Caroline especially loves having toast, and she even has a "toast dance" that she does whenever I make it for her.

I'm not loyal to any particular recipe; rather I like trying different ones and mixing things up.  I've had this one bookmarked for quite some time, and I'm so glad I finally got around to trying it.  The oatmeal and the whole wheat flour keep it a little healthier than a standard white bread, and the buttermilk and honey give it a great depth of flavor.  The most noteworthy thing about this bread however, is its size.  I usually bake bread in my 9x5 inch loaf pan, but I used the 10-inch one.  And it still rose insanely high!  As I ate my first sandwich made from it (a pimento cheese BLT, in case you're wondering), I was full after eating only half.  And then I realized that the slices of bread are so big, I had already eaten almost a full normal-sized sandwich! 

As far as the recipe goes, this is a really standard sandwich bread.  The only "weird" step is that the oatmeal needs to be soaked in boiling water for about 10 minutes before you start the dough - though this is a standard practice for oatmeal breads.  Other than that, it's just mix, knead, rise, shape, rise, bake.  And then you are left with a wonderful sandwich bread - and speaking from experience, it makes not only great BLTs, but also peanut butter and jelly, cheese toast, grilled cheese, peanut butter toast, pimento cheese... and I wouldn't have turned down French toast either :-)


Oatmeal Buttermilk Bread
barely adapted from Confections of a Foodie Bride, originally from Macrina Bakery and Cafe Cookbook
makes 1 10-inch loaf
  • 1 1/2 cups rolled oats
  • 1 cup boiling water
  • 1/4 cup warm water
  • 2 tsp + 2 Tbs honey
  • 2 tsp instant yeast
  • 1 1/2 cups buttermilk
  • 1/2 cup extra virgin olive oil
  • 2 1/2 cups whole wheat flour
  • 2 1/2 cups all purpose flour
  • 2 tsp salt
Set aside 1/4 cup of the rolled oats, and stir the remaining 1 1/4 cups into the boiling water.   Allow to soak for 10 minutes, stirring frequently.

Whisk 2 teaspoons of the honey into the warm water in the bowl of stand mixer fitted with a paddle attachment.  Stir in the yeast, then add the soaked oats, buttermilk, and olive oil.  Stir to combine.  With the mixer on low speed, add the flours, 1 cup at a time, until a soft and shaggy dough forms.  Add the salt, mix to combine, and switch to the dough hook attachment.

Increase the speed to medium, and knead for about 10 minutes.  Add more flour or water as necessary, but I don't think I added any extra of either.

Transfer the dough to a large, lightly-oiled bowl, and cover tightly with plastic wrap.  Allow to rise in a warm place 60-90 minutes, or until it has doubled in size.

Turn the dough out onto a lightly floured surface, flatten it with your hands, and press into a 12x6 inch rectangle, positioned so the long side is facing you.  Fold the 2 short halves to meet in the center. Starting with the end closest to you, roll the dough into a tight log, and allow it to sit on its seam for about 5 minutes.

Transfer the log to a well-oiled 10-inch loaf pan, and press the dough into all the corners.  Mix the remaining 2 tablespoons of honey with 1/2 teaspoon of very hot water.  Brush the top of the dough with the mixture, then sprinkle the top with the remaining oatmeal.  cover lightly with plastic wrap or a lint-free kitchen towel, and allow to rise 35-45 minutes, or until it clears the top of the loaf pan.

Bake at 385 degrees for 1 hour, or until the top is well-browned and the center is cooked through.  Allow to cool completely before slicing.


Sunday, September 11, 2011

PPQ: King Ranch Chicken


The past week has been unseasonably cool here in Atlanta.  I am not normally one to be wishing away summer, but the break in heat was actually pretty nice - especially being 9 months pregnant.  We were still feeling the effects a tropical storm, so the weather was drizzly and cool, and comfort food was in order.  So this was actually a really great choice for this week's Project Pastry Queen recipe.

I'd heard of King Ranch Chicken before, but never really had the desire to make it myself - until I saw Rebecca Rather's completely-from-scratch version.  She even goes so far as to make her own chicken stock for it!  I didn't go that far, since I had just made 32 cups of chicken stock a few weeks ago.  So I took the easy way out and used that and just bought a rotisserie chicken.

King Ranch Chicken Casserole is essentially a chicken tortilla casserole - it is creamy, spicy, and cheesy.  How bad could that be?  You build a cream sauce from scratch instead of opening a can of cream of whatever soup.  It starts with a stick (!) of butter, then peppers, onions, and mushrooms are sauteed.  You add flour to thicken the sauce, then whisk in chicken stock and some cream (or milk, or half-and-half) and let it simmer to thicken a bit.  The sauce is then layered with corn tortillas, cheese, and chopped chicken.  After baking, you are left with a completely comforting casserole.

The recipe makes a 9x13 inch casserole, but I split it up and froze half for an easy meal for when the baby comes.  I'd also like to note that it calls for New Mexican Hatch Chiles, and while normally I would just use a poblano instead,  they are in season right now and The Fresh Market is awesome, so I was able to get my hands on some.  We loved the tangy-spicy flavor they contributed, and I plan to go buy more to roast and freeze so I can enjoy them year-round.

Jody of Savory to Sweet has the full recipe posted if you're interested in making this.  And you should be, because it is pretty awesome!


Thursday, September 8, 2011

Overnight Cinnamon Rolls


A few weeks ago I woke up one morning and just had to have a cinnamon roll.  It was bad.  And while I sadly didn't get one that day, I decided that I'd make them for the following morning.  I've made and shared a few cinnamon roll-ish things before, but I'd never made classic, straight up cinnamon rolls.  In my opinion, Peter Reinhardt is the authority on all things bread, so I turned to him for what I knew would be a fool-proof recipe.

And it was!  While this is a time-consuming recipe if you look at the total time, the vast majority is inactive time - refrigerate overnight, allowing the dough to rest, proofing the shaped rolls... I would say there is less than 30 minutes of active prep time involved.

This is the second time I have used a Reinhardt recipe (the first was when I made Cheese Danish), and it is probably my favorite dough.  It is so soft, silky, and smooth.  And it rolls out so easily and beautifully.  You have the option to add raisins and/or nuts to the filling, but I opted to K.I.S.S. (The Office, anyone?) and just go with a classic cinnamon-sugar filling.

Since I've never made cinnamon rolls before, I can't compare these to other popular recipes (Alton Brown, Pioneer Woman, Cook's Illustrated...) but I can say that they were pretty darn delicious.  Soft and sweet, with just the right amount of spice from the cinnamon and nutmeg, and the cream cheese frosting definitely  added the perfect touch.  Now that I have a great base recipe, I can't wait to try countless variations for add-ins and flavorings.

This recipe makes 24 rolls, and while I briefly considered halving or even quartering the recipe, I ended up making the whole thing and freezing about half.  Now I can have an (almost) fresh cinnamon anytime the craving strikes!


Overnight Cinnamon Rolls
barely adapted from Peter Reinhardt's Artisan Breads Every Day
makes 24 cinnamon rolls

Dough
  • 6 1/4 cups (28 oz) all-purpose flour
  • 1 Tbs kosher salt
  • 6 Tbs granulated sugar
  • 5 tsp instant yeast
  • 2 cups + 2 Tbs lukewarm milk
  • 1/2 cup melted butter (unsalted)
  • zest of 1/2 lemon
Filling
  • 3 Tbs ground cinnamon
  • 3/4 cup sugar
  • 1/4 tsp ground nutmeg
  • up to 4 Tbs melted butter, for brushing
Cream Cheese Frosting
  • 4 oz cream cheese, softened
  • 1/4 cup melted unsalted butter
  • 1 cup confectioners' sugar, sifted
  • 1 tsp vanilla extract
  • 2-3 Tbs heavy cream (more or less depending on how thick you want your icing)
  • pinch of salt
To make the dough, combine the flour, salt, and sugar in the bowl of stand mixer.  Whisk the yeast into the milk until dissolved, then pour the mixture into the dry ingredients, along with the butter and lemon zest.  Use the paddle attachment to mix the ingredients on the lowest speed for about 1 minutes, or until the dough starts to form a soft, shaggy ball.

Switch to the dough hook and mix on medium-low speed for about 4 minutes, adding more flour or milk as needed to create a smooth, soft, slightly sticky ball of dough.

Increase the speed to medium and mix for an additional 2 minutes, or until the dough is very soft, supple, and tacky, but not sticky.

Transfer the dough to a lightly floured surface and knead for about 1 minute, then form it into a ball.  Place the dough in a large, lightly oiled bowl, cover tightly with plastic wrap, and refrigerate overnight or up to 4 days.

On baking day, remove the dough from the refrigerator about 3 hours before you plan to bake.  Divide the dough in half and form each half into a ball.  Cover with plastic wrap or a lint-free kitchen towel, and allow to rest for about 20 minutes.

On a well-floured work surface, foll each ball of dough into a 12x15 inch rectangle.  To form a rectangle, roll from the center to the corners, then out to the sides.  If the dough starts to resist or is shrinking back, let it rest for 1 minute then continue rolling.  The dough should be between 1/4 and 1/2-inch thick.

Make the cinnamon-sugar mixture by whisking the cinnamon and nutmeg into the sugar.  Brush the surface of the dough with the melted butter over the dough, and sprinkle the cinnamon-sugar over the surface, leaving a 1/4-inch border.

Roll up the dough like a rug, rolling from the long-side of the rectangle to form a tight log.  Use your hands to compress/shape the log into a 12-inch long log, and use a sharp knife or (unflavored) dental floss to cut into 1-inch slices.  Place the rolls on a parchment-lined baking sheet (or in 2 round cake pans), spacing them about 1 1/2 inches apart.

Repeat the rolling, topping, and shaping with the other ball of dough.

Mist the tops with spray oil and cover loosely with plastic wrap.  Let rise at room temperature for 90 minutes to 2 hours, or until the dough swells noticeably and the buns begin to expand into each other.

About 15 minutes before baking, preheat the oven to 350 degrees.

Bake for 10 minutes, then rotate the pan and bake for an additional 5 to 15 minutes, or until the buns are golden-brown.

Meanwhile, make the topping.  Combine the cream cheese, butter, and sugar in a mixing bowl.  Stir vigorously for 2-4 minutes, or until all the ingredients are evenly incorporated and smooth.  Add the vanilla, salt, and 1 tablespoon of the heavy cream and mix to incorporate.  Add additional heavy cream, about 1 teaspoon at a time, until you reach your desired consistency.  I wanted to pipe the frosting vs spreading it, so I wanted mine a bit thinner, so I added more heavy cream.

Allow the buns to cool for 5 minutes, then top with the glaze. 


Tuesday, September 6, 2011

Spicy Chicken & Rice Casserole


I'm getting pretty close to my due date (less than 3 weeks go to!), and over the past month or so I've been stocking my freezer for when we bring the baby home.  I have a few casseroles and baked pasta dishes, but for the most part I've been stocking it with things to make mealtimes easier and faster - pizza dough, smoothie kits, shredded chicken and pork, chicken stock, beans...

In general, we don't eat a lot of casseroles, but I think they certainly have their place - they can be frozen, feed you for several meals, reheat well, and they are usually cheesy and comforting.  This particular casserole is full of some of my favorite flavors and ingredients - cheese, chipotles, black beans, corn... and then it's topped with a buttery, crunchy, tortilla chip topping.  I made the full recipe, but I split it into two 8x8 inch baking dishes.  I baked one for dinner that night (and then subsequently enjoyed the leftovers for several days following), and froze the second one.

This is a bit more work than what you may be used to for a simple casserole, and it's a fairly lengthy ingredient list, but I didn't mind spending the time to make it when I took into account the number of times it would feed us.  And when I pull the second one out of the freezer, it will be a meal that requires zero effort on my part.  A definite plus when I have a newborn at home!


Chicken and Rice Casserole with Chiles, Corn, and Black Beans
adapted from Cook's Illustrated, The Best Make-Ahead Recipes
  • 4 Tbs unsalted butter
  • 2 medium red bell peppers, stemmed, seeded, and chopped medium
  • 1 medium onion, diced
  • 2 jalapeno chiles, seeds and ribs removed
  • kosher salt
  • 3 garlic cloves, minced
  • 1-2 chipotle chiles en adobo, minced
  • 1 tsp ground cumin
  • 1 tsp chile powder
  • 1/4 cup flour
  • 6 cups low-sodium chicken broth
  • 1 cup heavy cream or half-and-half
  • 2 lbs boneless, skinless chicken breasts (4-5 breast halves), trimmed of excess fat
  • 1 1/2 cups white rice
  • 4 oz Pepperjack cheese, shredded (about 1 cup)
  • 4 oz cheddar cheese, shredded (about 1 cup)
  • 1 (15.5 oz) can black beans, rinsed and drained
  • 1 1/2 cups frozen corn
  • juice of 2 limes
  • ground black pepper
  • 1/4 cup minced scallions
  • 1/2 cup chopped fresh cilantro, divided
Corn Chip Crumb Topping
  • 6 oz corn tortilla chips
  • 2 Tbs unsalted butter, melted
  • 2 Tbs minced fresh cilantro
  • salt and black pepper
Melt the butter in a Dutch oven over medium heat.  Add the bell peppers, onion, jalapenos, and 1 teaspoon of salt.  Cook until softened, 8 to 10 minutes.  Stir in the garlic, chipotles, cumin, and chile powder and cook until fragrant, about 30 seconds.  Stir in the flour and cook, stirring constantly, until golden, about 1 minute.  Slowly whisk in the broth and cream.

Add the chicken and bring to a simmer.  Reduce the heat to low, cover, and cook until the chicken is cooked all the way through, reading 160 degrees on an instant-read thermometer, 10-15 minutes.

Remove the chicken and set aside to cool.

Stir the rice into the pot, cover, and continue to cook on low heat, stirring often, until the rice has absorbed a good bit of the liquid and is just tender, 20 to 25 minutes (mine was still pretty soupy, but the rice was cooked all the way through - it will absorb and thicken more as it bakes in the oven).

As the rice cooks, shred the chicken into bite-sized pieces, and make the crumb topping:  pulse the corn chips with the butter in a food processor to coarse crumbs, about 10 pulses.  Toss with cilantro and season with salt and pepper.

Remove the pot from heat and stir in the chicken, black beans, corn, cheese, and lime juice and season with salt and pepper to taste.  Stir in the scallions and half the cilantro.

Pour the mixture into a 9x13 inch baking dish and sprinkle with the crumb topping.


To bake immediately:  Bake the casserole in a 400 degree oven, uncovered, until the sauce is bubbling and the crumbs are crisp, 25 to 35 minutes.  Sprinkle with the remaining cilantro before serving.


To store:  Wrap the dish tightly with foil and then plastic wrap, and refrigerate for up to 2 days or freeze up to 1 month (If frozen, thaw the casserole completely in the refrigerator before baking).  Bake at 400 degrees, covered with foil, about 1 hour.  Remove the foil and bake an additional 15 to 20 minutes longer.


Sunday, September 4, 2011

PPQ: Texas Pecan Pie Bars


How do you pronounce "pecan?"  Do you say puh-con, pee-con, or pee-can?  I personally go with puh-con, but when talking about pie, I say pee-can pie.  Though for some reason I call these puh-con pie bars.  No reason, it's just the way it comes out.  I'm not sure if the different pronunciations are regional, or if they are just a personal thing.  But either way, pecan pie is definitely a popular and well-loved dessert.  And just like any dessert, turning it into portable portions is always a hit.

These bars start with a shortbread crust, and are then topped with a sweet, sticky filling that's studded not only with pecans, but with shredded coconut as well.  The coconut doesn't really contribute much flavor, but adds a great texture.  And as they bake, the top forms a nice crackly crust.

These are super sweet, and I'm sure you could decrease the sugar quite a bit.  But the whole point of pecan pie is to be sweet and sticky, so I don't think I'll change a thing next time I make these.  I took a platter of them to a neighborhood potluck, and everyone seemed to enjoy them.  And serving them out of cupcake liners definitely helps with the sticky filling!

This week's recipe was chosen by Beth of The Powdered Plum.  She has the full recipe posted on her blog if you are interested!


Thursday, September 1, 2011

Back to Basics: Pimento Cheese


So often on my blog I post twists, variations, and "amped up" versions of classic dishes.  But recently I've been getting requests for my favorite recipes for things like sandwich bread, pizza dough, chocolate chip cookies, etc.  And while I do make these things quite often, for some reason I never feel compelled to post them.  I've always assumed that everyone else has their own "go-to" recipes for these things, so would they really care to see mine?  Well maybe not, but I've decided to share them with you anyway :-).  So I've started a new series called "Back to Basics," in which I'll be highlighting my favorite recipes for.... the basics.  Or what I consider to be basics for my kitchen in any case.

I realize that some people may think pimento cheese is a weird dish to start out highlighting for this series, but for me, it really is a basic recipe.  I have made this countless times, and it is my go-to appetizer to serve when we have friends over, go to potlucks, or just to keep in the fridge for when the craving strikes.  Oftentimes I've made a dish using pimento cheese, or highlighting it in a different way, so I thought I'd share my base recipe.  For those of you unfamiliar with this southern delicacy, pimento cheese is simply extra sharp cheddar mixed with pimentos (or roasted red peppers), just enough mayonnaise to hold it together, and a few seasonings.  It is most classically enjoyed on a sandwich or spread on crackers, but I've made it my life's mission to find as many other ways to serve it as well.

One of the many wonderful things about pimento cheese is that it's open to so many adaptations:
  • make it extra spicy by using half pepperjack cheese, and a roasted poblano pepper instead of pimentos
  • add crumbled bacon
  • substitute some of the cheddar for goat cheese
  • add some fresh herbs
  • add a spoonful of horseradish for a kick
  • add some chopped dill pickles or relish
  • shred an apple and add that to the mix for a sweet-savory combo
My version of pimento cheese doesn't really call for anything special, aside from the addition of Greek yogurt.  Because I'm not a huge fan of mayo, I like to cut the flavor with the yogurt, plus it makes it a tad bit healthier.  As I said, this is just my base recipe, so feel free to adjust the seasonings and spices to your taste. 


Pimento Cheese, My Way
Pink Parsley Original
  • 8oz. extra sharp cheddar, shredded
  • 4 oz. diced pimientos
  • 2 Tbs Greek yogurt
  • 2 Tbs mayonnaise (light is fine)
  • 1/4-1/2 tsp crushed red pepper flakes
  • 1/2 tsp Worcestershire sauce
  • 1/8 tsp chili powder
  • squeeze of lemon juice
  • salt and pepper to taste
Drain the pimientos and pat dry with a paper towel.

In a medium bowl, combine all the ingredients, and use a rubber spatula to combine.  Taste and adjust seasonings to your preference.  Before serving, refrigerate at least 1 hour to allow the flavors to meld.


BLOG DESIGN BY: SHERBET BLOSSOM DESIGNS