Sunday, October 28, 2012

Chicken Saltimbocca Spaghetti


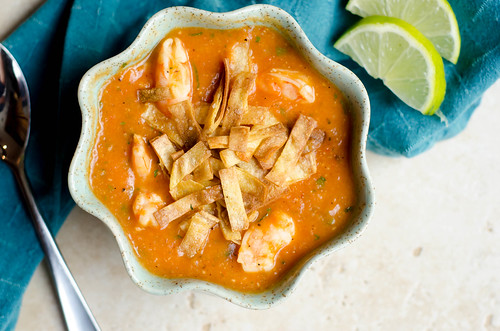
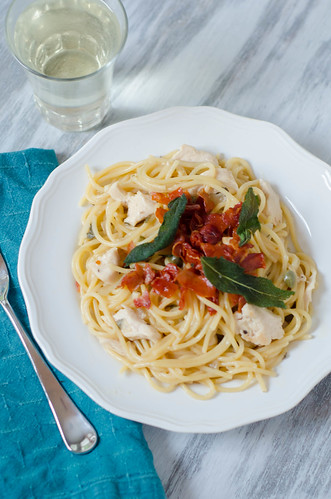
If you ask Caroline what her favorite food is, she'll tell you "spadetti and mac & sheese."  She's a carb-loving girl after my own heart.  So when I set a bowl of this chicken saltimbocca spaghetti in front of her, I wasn't expecting her to tell me that "This is NOT spadetti."  I replied that it's just a different kind, and she seemed happy enough with that answer.  And once she tried it, she was definitely a fan.  So spaghetti still reigns as her favorite food, huzzah!

This is a deconstructed version of chicken saltimbocca, so there are the usual suspects:  chicken, crispy prosciutto, and sage.  But since it's served as a one-pot pasta dish, you also have tender and flavorful noodles that are cooked in the skillet in a mixture of chicken broth, white wine, and water.  There's plenty of garlic, a good dose of lemon for some brightness and freshness, and it's finished off with some briny capers.

Between the capers and the prosciutto, it seems like this may be too salty, but just be careful when seasoning the dish.  By itself, it may seem a little bland, but with the garnishes it is perfect.  Adding too much extra salt would definitely make it too salty.

I absolutely loved this dinner - way more than I expected too, since I'm typically not a huge fan of capers or sage - it's easy to go from "pleasantly herbal" to "Christmas tree" with sage.  But pan-frying in a little oil made the leaves crispy and perfect.  I could have just eaten them all on the spot.  And the little briny bits of capers were a pleasant addition as well.  This was a fairly quick and very comforting meal that celebrating so many of the homey flavors of fall.  I hope you enjoy it as much as we did - and if you're in the northeast, I hope you're faring okay in the midst of Sandy!  Stay safe!

Chicken Saltimbocca Spaghetti
adapted from Pasta Revolution

  • 3 Tbs olive oil
  • 4 oz thinly sliced prosciutto, sliced crosswise into 1/3-inch strips
  • 8 large fresh sage leaves, plus 3 Tbs minced
  • 1 lb boneless skinless chicken breasts, trimmed of excess fat and pounded to uniform thickness
  • kosher salt and freshly ground black pepper
  • 1 medium onion (or 1/2 large onion), chopped fine
  • 4 cloves garlic, minced
  • pinch of red pepper flakes
  • 2 tsp all purpose flour
  • 1 cup dry white wine
  • 3 cups low-sodium chicken broth
  • 1 1/2 cups water
  • 12 oz dried spaghetti noodes, broken in half
  • 3 Tbs capers, rinsed and chopped (optional)
  • 2 Tbs unsalted butter
  • 1/2 tsp lemon zest + 3 Tbs juice
Heat 2 Tbs of the oil in a 12-inch nonstick skillet over medium-high heat.  Add the prosciutto and cook until crispy, about 5 minutes.  Add the sage leaves and continue to cook until the leaves are crisp, 20-30 seconds.  Use a slotted spoon to remove the prosciutto and sage, and transfer to a paper towel-lined plate.

Reduce the heat to medium.  Pat the chicken dry and season with salt and pepper.  Arrange in a single layer in the now-empty skillet and cook until browned and cooked through, about 5-7 minutes per side.  Transfer to a cutting board and cover loosely with foil.

Add the remaining tablespoon of olive oil to the skillet, and stir in the onion.  Cook over medium heat until softened and golden, 5 to 7  minutes.  Stir in the garlic, minced sage, and red pepper flakes and cook 30 seconds.  Stir in the flour and cook 1 minute, then whisk in the wine and simmer until reduced by half, about 1-2 minutes.

Slowly whisk in the broth and water, then stir in the pasta.  Increase heat to medium-high and cook at a vigorous simmer, stirring often, until the pasta is tender and the sauce has thickened, 12-15 minutes.  While the pasta cooks, shred or slice the chicken into bite-sized pieces.

Once the pasta has cooked, stir in the chicken, capers, butter, lemon zest, and lemon juice.  Cook until the butter melts and the chicken is heated through.  Off heat, season lightly with salt and pepper.  Divide the spaghetti among serving bowls, and sprinkle each serving with crisped prosciutto and sage leaves (I liked the sage leaves crumbled over the top so you could get some in every bite!).


Thursday, October 25, 2012

Smith's Rookie of the Year Birthday Party


My sweet sweet baby boy turned one!  Smith, or as Caroline refers to him, Baby Sniff, has been such a wonderful and fun addition to our family.  I absolutely love love loved having a girl, so I was initially admittedly a little worried about being a mom to a boy.

(while I could never be a Twins fan (1991 World Series, anyone?) I couldn't resist wearing this shirt for his party)

But I honestly can't even imagine it any other way.  He is most definitely a momma's boy.  He loves to snuggle with me (for 0.35 seconds anyway, before he's off on another adventure).  He's hilarious.  He's inquisitive, daring, adventurous, and basically all-boy.  I love it.  


Like most guys, Joey played baseball growing up.  And I've been a huge baseball fan my entire life (Go Braves!)  So a baseball party seemed like a great theme - and then to make it even more awesome cheesy, I called it a "Rookie of the Year" party.  It was so much fun to plan the party, and all of our friends and family loved the theme as well.  


As soon as I decided on the theme, I knew I wanted the invitation to be a baseball card.  I had a good friend of mine design it, and I love how it turned out.  And I laughed every time I looked at his "stats."


The menu was super easy to finalize.  If you throw a baseball themed party, you must serve stadium food.  As much as I love to go all-out and make things complicated, I managed to successfully reign it in here.  We served:

Hot dogs with ketchup and mustard
Soft Pretzels  (I made a quadruple batch, and they were all gone by the end of the party!)
Nachos with cheese
Popcorn
Cotton Candy
Roasted Peanuts
Cracker Jack
Red Velvet Cupcakes
Ice Cream Sundaes


I also put together a little area for more snacks, which included a giant fruit tray (not pictured), pretzel bites, applesauce tubes, extra Crackerjack and popcorn, and some goldfish.  Since we had a lot of small kids at the party, I thought it would be nice to have some more familiar, slightly healthier, and less messy options for them.


Perhaps Joey's favorite detail of the party, however, was the ice cream sundae bar.  As soon as we decided to have a baseball party, he threw out the idea of ordering those baseball helmets like we used to get at Dairy Queen growing up.  At first we were going to order all Braves ones, but he liked the idea of having all the teams represented.  Pretty much everyone in attendance commented that they loved getting ice cream in those helmets when they were kids.  And it was a fun favor for them to take home as well.  And as excited as Joey was over the helmet bowls, I was just as excited about these super cute spoons!


While I initially had so many cute ideas for the decor, I ultimately just didn't have the time or energy to execute it all.  We had moved into our house just 2 1/2 weeks prior to the party, so things kind of just got stripped down to the basics.  I loved the green "turf" tablecloth for the food table though, and we made a banner out of baseball cards to display as well.  Joey also had several baseball player figurines and old gloves, balls, and hats to scatter around.  And I put together these super simple centerpieces on a few tables that were just vases filled with peanuts and cute little flags.  They served double duty because everyone liked to munch on the peanuts while sitting around.


And of course what kind of first birthday party would it be without cake??  A baseball smash cake seemed like the obvious choice, and since I am no cake decorator, I just used the star tip to pipe the frosting.  When the time came for him to dig in, however, Smith was not a fan.  I really wonder sometimes if he is even my child?!  He picked at the icing for a few minutes, then just cried until I took him out of his high chair and held him.  


But of course the most important part of the party is who you're celebrating!  Smith had tons of friends and family there to help us celebrate his big day, and I think it's safe to say that a good time was had by all!


Sources
Braves Onsie:  Little Ones Baby Boutique Etsy Shop
Wooden Spoons:  Sucre Shop (Etsy)
Red and White Snack Cups:  TomKat Studios
Cracker Jack, Popcorn Boxes, Striped Straws:  Amazon
Flags, Tablecoth, Baseball Cards, Candles, Ballons:  Party City


Wednesday, October 24, 2012

Very Berry Applesauce


People often ask me for "kid friendly" dinner and snack ideas.  While I hate to be unhelpful, the truth is, we don't really differentiate between kid meals and adult meals.  For the most part, Caroline and Smith eat what we eat.  I'm glad that so far we've managed to avoid the curse of the picky eater, and hopefully we'll continue to be lucky in that regard with all of our kids.  However, some foods are definitely really big hits with Caroline and Smith.  This berry applesauce was one such snack.  I threw this together on a whim the night I made the roasted veggie-stuffed potatoes, and Caroline and Smith both had seconds of the applesauce.

Since berries are no longer in season (sad face), I used a bag of frozen mixed berries.  I believe it was raspberries, blueberries, and blackberries.  And since the berries tend to be pretty sweet on their own, I used tart Granny Smith apples for the applesauce.  It was super simple to throw together, and with no added sweeteners, it's a super healthy snack or dessert option for little ones.  I think Caroline, Smith, and I had a bowl of this for our afternoon snacks every single day until it ran out.  Plus, it's super cute when Caroline asks for "Vewy Bewwy Applesauce."


But the fun doesn't have to stop with berry applesauce.  In the past, I have used a wide variety of fruits and even veggies as add-ins.  Butternut squash, sweet potatoes, carrots, pears, pumpkin puree, and peaches have all been big hits in our house.  Feel free to play around with any of the above fruits, or get crazy and make-up your own combination.  Brussels Sprouts Applesauce, anyone? ;-)

Very Berry Applesauce
a Pink Parsley Original

We like a slightly chunky texture because it makes it easier for caroline to feed herself without drips.  If you prefer or need a thinner texture, then use a food processor or blender, then strain it through a colander.  This would also be a good method if the seeds from the berries bother you.

  • 5-6 medium-large apples, peeled, cored, and roughly chopped (I used Granny Smith)
  • 1 (16-oz) bag frozen mixed berries, thawed, with juices reserved
  • 1 tsp ground cinnamon
  • pinch of salt
  • splash (maybe 1/4 cup) apple cider or water
Combine all the ingredients in a large saucepan set over medium heat.  Cook, stirring occasionally, until he apples are softened, about 15-20 minutes.  Use an immersion blender to puree the sauce, leaving a few chunks of the apples and berries.

If the applesauce seems too thin, bring to a boil and allow to cook until it's thickened to your liking.  Allow to cool to room temperature before serving.  Store in an airtight container in the refrigerator, or portion it into freezer bags and freeze.


Monday, October 22, 2012

Roasted Vegetable-Stuffed Potatoes


Twice baked potatoes are by far one of my favorite foods.  I honestly think I could eat them every single night for dinner, and never get tired of them.  Chubbier, yes.  Burned out, no.  With the weather turning cooler, I have been all about comfort food, and found myself craving their carby, cheesy goodness.  And while it's tempting to use the excuse that "I'm eating for three," I try to reign it in and abide by the moderation rule (besides this weekend.  I think I ate about 25 cupcakes.  More on that later though).

These twice-baked potatoes stuffed with roasted vegetables were a perfect compromise.  The potatoes are rubbed with olive oil, salt, and pepper, and baked like normal.  For the last 15 or 20 minutes, I threw in some chopped veggies to get those tender and caramelized.  I then scooped out the filling of the potatoes, and mashed it with some Greek yogurt, herbs, and Gruyere cheese.  I stuffed the filling back in and topped the potatoes with the roasted veggies and a little more Gruyere.  After a brief stint in the oven, they emerged as a healthier, hearty version of my beloved twice baked potatoes.

Feel free to play around with the vegetables and use any combination that you like.  I used onions, broccoli, brussels sprouts, and carrots.  All vegetables that I knew Caroline and Smith would eat, and the combo worked really well together in my opinion.  Also feel free to use any combo of herbs.  I believe I used rosemary, sage, thyme, and parsley.  Just use whatever you have on hand and sounds good.

These were a big hit with Caroline and Joey.  Smith loved the carrots and brussels sprouts, but he's not the biggest fan of broccoli yet, unfortunately.  I served these as the main course with some apple and pear slices, but if you need something more substantial, they'd be great as a side dish to any array of proteins - steaks, roasted chicken, pork loin... really anything.  And you can feel good knowing that you're getting a healthier version of the steakhouse favorite.

Roasted Vegetable-Stuffed Potatoes
a Pink Parsley Original

  • 2-3 Russet potatoes, scrubbed and dried
  • olive oil
  • kosher salt and freshly ground black pepper
  • 3-4 cups bite-sized chopped vegetables, for roasting (I used carrots, broccoli, brussels sprouts, and onions.  Just be sure they are all about the same size so they cook evenly).
  • 6 oz.  Greek yogurt or low-fat sour cream
  • 1/2 tsp garlic powder
  • 1/4 cup milk 
  • 1 cup Gruyere cheese, divided
  • 1 tsp chopped fresh parsley
  • 1 tsp chopped mixed fresh herbs (any herbs)
Preheat the oven to 425 degrees.  Rub the potatoes with olive oil and season with salt and pepper.  Use a fork to poke a few holes in the top of each one, then place on a baking sheet.  Bake until cooked through, about an hour (it all depends on the size of your potatoes though - start checking them after 45 minutes).

Toss the vegetables with olive oil, salt, and pepper and arrange in a single layer on a rimmed baking sheet.  Transfer to the oven and cook on the shelf below the potatoes until the veggies are browned and crisp-tender, about 15-20 minutes, stirring halfway through.

Remove the potatoes and the vegetables from the oven and allow the potatoes to cool until they are cool enough to handle, about 20 minutes or so.  Slice the potatoes open, and scoop out as much of the filling as you can, being careful not to tear the skin.  

Add the filling to a medium bowl and mash with the Greek yogurt and milk until mostly smooth, but a few chunks still remain.  Stir in the garlic powder, 3/4 cup of the Gruyere cheese, and the herbs.  Season to taste with salt and pepper, and return the filling to the potatoes.  

Divide the roasted vegetables among the potatoes, and sprinkle with the remaining 1/4 cup of Gruyere cheese.

Return to the oven and bake 15-20 minutes, until the cheese has melted and the filling is heated through.  Serve.


Tuesday, October 16, 2012

Chicken and Biscuits


Is there a dinner more comforting that chicken and biscuits?  I think not.  It is the ultimate comfort food:  tender chicken, a salty, creamy filling, just enough veggies to make you think you're healthy... and then the top is studded with flaky, buttery, biscuits.  The bottoms get kind of soft, and the tops are crunchy and flaky.  So so good!

A few weeks ago, my in-laws took a trip to Hong Kong.  Their return trip was almost 24 hours long, so I thought they'd appreciate a home-cooked meal upon their arrival home.  I also knew they would probably be REALLY ready for some simple, American, comfort food.  I made the chicken and biscuits, a harvest pear salad, and an apple galette for dessert, and had them just stop by on their way home to pick it all up.  My mother-in-law said it was just what they needed and wanted after traveling so much, and the homey comfort food totally hit the spot.  I can't say my motives were totally selfless though - I actually made it in two dishes and kept one for our own dinner (and a few lunches)!  This was just as big of a hit with the little ones as it was with us - though in my opinion, you'd be hard-pressed to find anything more comforting and delicious!


Chicken & Biscuits 
adapted from The Barefoot Contessa, Family Style
serves 8-12

The original recipe calls for 2 teaspoons of salt, but I decreased it and "only" used 1 1/2 teaspoons.  I still thought it was pretty salty, so if you're sensitive to salt, then definitely decrease it even more.  I'd probably recommend 1 - 1 1/4 teaspoons.  

For the Chicken Stew:

  • 4-6 cups of cooked and shredded or chopped chicken (2 rotisserie chickens work well here)
  • 3 1/2 cups chicken stock
  • 2 chicken bullion cubes
  • kosher salt and freshly ground black pepper
  • 12 Tbs (1 1/2 sticks) unsalted butter
  • 2 large onions, chopped
  • 2 cups diced carrots (3-4 carrots)
  • 1 1/2 cups diced celery (2 stalks)
  • 3/4 cup all-purpose flour
  • 1/4 cup heavy cream
  • 1 (10-oz) package frozen peas (about 2 cups)
  • 1/2 cup minced fresh parsley
For the Biscuits
  • 2 cups all-purpose flour
  • 1 Tbs baking powder
  • 1 tsp kosher salt
  • 1 tsp sugar
  • 8 Tbs cold, unsalted butter, diced
  • 3/4 cup half-and-half
  • 1/2 cup chopped fresh parsley
  • 1 egg + 1 Tbs water, for egg wash
Preheat the oven to 375 degrees.  Lightly grease a large baking dish (or 2 smaller dishes) and set aside.

In a small saucepan, combine the chicken stock and the bullion cubes.  Heat over medium heat, stirring occasionally, until the bullion cubes have dissolved.

Meanwhile, in a large pot or Dutch oven, melt the butter over medium-low heat.  Add the onions, carrots, and celery and cook 10-15 minutes, stirring often, until softened and translucent.  Stir in the flour and cook 2 minutes, stirring constantly.  Whisk in the chicken stock and cook until thickened, another 1-2 minutes. Add 1 - 1 1/4 teaspoons of salt, 1/2 teaspoon of pepper, the chicken, and the heavy cream.  Bring to a simmer and cook until the mixture is thickened, about 10 minutes.  Stir in the frozen peas.

Pour the stew into the prepared dish(es), place the baking dish on a sheet pan, and bake 10-15 minutes.

Meanwhile, make the biscuits.  Combine the flour, baking powder, salt, and sugar in the bowl of stand mixer fitted with the paddle attachment.  Add the butter and mix on low speed until the butter is the size of peas.  Add the half and half and parsley and combine on low speed until a cohesive dough forms.

Dump the dough out on a well-floured surface and roll out to 3/8-inches thick.  Cut out 12 circles with a 2 1/2 inch round cutter.

Remove the stew from the oven and arrange the biscuits on top of the filling.  Brush them with egg wash and lightly sprinkle with salt and pepper.  Return the dish to the oven and bake another 20-30 minutes, or until the biscuits are golden-brown and the stew is bubbly.


Sunday, October 14, 2012

Black Bean & Sweet Potato Quinoa


Call me a bandwagon cook, but I have been all about quinoa lately.  The possible combinations for add-ins to make a quick dinner are endless, it makes great leftovers, and it's super healthy.  I'm also obviously a big fan of Mexican food, so I decided to make a Mexican-ish quinoa.  This version uses the popular combo of sweet potatoes and black beans, with some red onion, cilantro, feta, and avocado mixed in.  I tossed it with a cumin-lime dressing, and we all really really loved it.  Joey specifically told me as we sat down for dinner that he had a big lunch, and was glad we were having a lighter dinner.  He then proceeded to eat seconds.  Caroline had seconds, I had seconds... and then thirds while I stood over the serving bowl eating spoonfuls as I cleaned the kitchen... it was a hit all around.  The slight sweetness of the sweet potatoes goes really well with the smoky-spiced dressing and the cool avocado and feta cheese.

The sweet potatoes are cubed and tossed in chile powder, salt, and pepper, and roasted in the oven.  As they roast, the quinoa is cooked, and you can prep the rest of the ingredients - drain and rinse the black beans, chop the rest of the veggies, and mix up the dressing.  By the time the sweet potatoes are done, the salad is ready to be mixed up and served.  It's easy, it's healthy, and it's very family friendly.  And as a bonus, the leftovers make for a perfect lunch!

Black Bean and Sweet Potato Quinoa with Cumin-Lime Dressing
a Pink Parsley Original

  • 1 med-large sweet potato
  • 1 Tbs olive oil
  • 1/2 tsp chile powder
  • kosher salt and freshly ground black pepper
  • 1 cup quinoa, rinsed well
  • 2 cups chicken or vegetable broth
  • zest of 1/2 lime
  • juice of 1 lime
  • 1-2 cloves garlic
  • 1/2 tsp chile powder
  • 1/2 tsp ground cumin
  • pinch of cayenne
  • 2 Tbs canola oil
  • 1/3 cup thinly sliced red onion
  • 2-3 Tbs chopped fresh cilantro
  • 1 can black beans, drained and rinsed 
  • 1/2 cup crumbled feta cheese or queso fresco
  • 1 avocado, peeled, pitted, and chopped
Preheat the oven to 400 degrees.  Peel the sweet potato and cut into 1-inch cubes (you want about 2 1/2-3 cups of chopped sweet potato.  Toss with the oil, salt and pepper, and chile powder and arrange in a single layer on a baking sheet.  Bake 15-20 minutes, tossing halfway through, until they are lightly browned and tender.

Meanwhile, bring the quinoa and broth to a boil in a a medium saucepan.  Reduce heat and simmer 15-20 minutes, or until the quinoa is tender and cooked through.  Remove from heat and allow to rest 5-10 minutes.  Fluff with a fork.

As the quinoa and sweet potatoes cook, mix up the vinaigrette.  In a large bowl, whisk together the lime zest and juice, garlic, chile powder, cumin, cayenne, and oil.  Taste and season with salt and pepper.

Add the quinoa to the bowl with the dressing and stir well to combine.  Lightly stir in the cooked potatoes, red onion, cilantro, black beans, and feta.  Taste and season with more salt and pepper if needed.  When ready to serve, top each serving with avocado.


Thursday, October 11, 2012

Four-Ingredient White Bean Chicken Chili (Crockpot)


Of all the dinners I make, this is probably the one that makes the most appearances on our table.  Throughout winter, I'd venture to guess that we eat this about once a month.  That's heavy rotation in our house, considering that I rarely repeat recipes.  So what makes this so special?  For one, it's ridiculously easy.  Four ingredients:  chicken breasts, white beans, salsa, and cheese.  No prep is required other than literally dumping it all in the crockpot.  And when you're ready to eat, just shred the chicken breasts, return it to the crockpot, give it a good stir, and enjoy!

I shared this recipe back in the very early days of my blog, but the picture was in desperate need of an upgrade, and I added more salsa since the chili was quite thick before.  I've also experimented a bit with using dried beans - if you soak them in water overnight, then proceed with the recipe as written, they'll be soft and tender after spending the day in the crockpot.  I usually just add a cup or so of water or chicken broth at the onset.  I've also used salsa verde before, and I LOVE it that way as well.  It's so creamy, comforting, and delicious that it's hard to screw it up.

If this seems too plain for you, feel free to mix and match the types of beans, add some corn, try different types of salsa, add some jalapeños, play around with the cheese... really the possibilities are endless.  I like serving the chili with tortilla chips, and if I have one available, chopping an avocado over the top.  I made this on the first chilly day we've had this fall, and it was the perfect way to welcome the cooler weather.  And I know for a fact that we'll be enjoying this all winter long.  This is a big hit with my whole family, and it's pretty much my go-to when taking a meal to a new mom, leaving dinner for the babysitter, weekend football watching, whatever.  It doesn't get any easier or tastier than this!


Crockpot White Bean Chicken Chili

I prefer my chili to be on the thicker side, but if you like it thinner/more like soup, then I'd suggest adding a cup or so of chicken broth.

  • 4 (15-oz) cans white beans, drained and rinsed
  • 2-3 boneless, skinless chicken breasts, trimmed of fat
  • 8 ounces Pepper jack cheese, cut into cubes
  • 3 cups salsa (any heat level you prefer)
Combine the beans, cheese, and salsa in a crockpot. Nestle the chicken breasts into the mixture, and cook on low 6-8 hours. Remove chicken breasts, shred with a fork, and return to crockpot. Stir to combine, and serve with desired garnishes.


Tuesday, October 9, 2012

Pumpkin Spice Latte Blondies


Ahhh the pumpkin spice latte.  People impatiently wait for it all year long, and once Labor Day hits, it's all the rage.  You can make your own at home.  You can turn it into a cupcake.  Or even ice cream!  And now you can make pumpkin spice latte blondies too.

I took an old favorite recipe - pumpkin blondies - and gave them the PSL treatment.  A hefty dose of instant coffee (or espresso powder), some extra cinnamon flavor, and I topped them with a dollop of whipped cream.  The result is a deliciously pumpkiny blondie with that addictive spice from the cinnamon and nutmeg, and a subtle taste of coffee.  And the best part?  A baked good based on a coffee drink is a perfectly acceptable breakfast.

Pumpkin Spice Latte Blondies
adapted from Martha Stewart's Pumpkin Blondies
makes an 8x8 pan

I used cinnamon chips, which I know can be really hard to find.  If you can't find them, just leave them out and add some extra cinnamon.

Two teaspoons of instant coffee produces a blondie that has a subtle coffee flavor.  If you want a stronger flavor, increase the amount.  Or use instant espresso powder.

  • 2 cups all-purpose flour 
  • 2 tsp pumpkin-pie spice
  • 1/2 teaspoon baking soda
  • 1/4 teaspoon salt
  • 2 tsp instant coffee powder (add more or less depending on how much of a coffee taste you want)
  • 1/2 cup (1 stick) unsalted butter, room temperature
  • 1/2 cup + 2 Tbs sugar
  • 1 large egg
  • 1 tsp vanilla extract
  • 1/2 cup canned pumpkin puree
  • 1/2 cup cinnamon chips
  • whipped cream, for serving
Preheat oven to 350 degrees.
Line bottom and sides of an 8x8 inch baking pan with foil, leaving an overhang on all sides. Spray foil and sides of pan with cooking spray.
In a medium bowl, whisk together flour, pie spice, baking soda, coffee, and salt; set aside.
With an electric mixer, cream butter and sugar on medium-high speed until smooth; beat in egg and vanilla until combined. Beat in pumpkin puree (mixture may appear curdled). Reduce speed to low, and mix in dry ingredients until just combined. Fold in cinnamon chips.
Spread batter evenly in prepared pan. Bake until edges begin to pull away from sides of pan and a toothpick inserted in center comes out with just a few moist crumbs attached, 25 to 35 minutes. Cool completely in pan.
Lift cake from pan (using foil as an aid). Peel off foil, and use a serrated knife to cut into squares.


Sunday, October 7, 2012

Shrimp Tortilla Soup


Chicken tortilla soup is one of my favorite soups of all time.  As a matter of fact, sometimes I'll order it when we go out for Mexican because I love it so much.  And though it's been a while since I've made it, this is my all-time favorite recipe.  However, when I saw a recipe for shrimp tortilla soup, it stopped me in my tracks.  How smart!  I think shrimp and tomatoes go well together already, and the smoky, spicy soup that's finished with a good dose of lime juice just works.  It somehow feels a little lighter than chicken tortilla soup, even topped with the crispy and crunchy tortilla strips.

The base is made up of onions, chipotle chiles, tomatoes, and hominy.  After simmering a bit, it's pureed and returned to the stovetop.  There, the lime, cilantro, and shrimp are added.  The shrimp cooks really quickly in the broth, and before you know it you're enjoying a big bowl of comfort.

We've all been battling what feels like a never-ending cold, and this spicy soup was both comforting and restorative.  I kept it simple and served it with cheese quesadillas - which coincidentally were great dipped into the broth.  This soup is homey, it's comforting, it's healthy... pretty much the perfect combination.  If you're into making soups ahead of time and freezing, I would just make the tomato-base, freeze, then add the shrimp to cook as you reheat the soup.

Shrimp Tortilla Soup
adapted from America's Test Kitchen, Simple Weeknight Favorites
serves 6-8

  • 4-5 (6-inch) corn tortillas, halved and sliced into 1/4-inch thick strips
  • 2 Tbs vegetable oil
  • salt and pepper
  • 1 large onion, chopped
  • 4 garlic cloves, minced
  • 1 tsp cumin
  • 1 tsp chile powder
  • 2 Tbs minced canned chipotles in adobo sauce (remove the seeds if you're sensitive to heat)
  • 5 cups low-sodium chicken broth
  • 2 (15-oz) can hominy, drained and rinsed
  • 1 (14.5 oz) can diced tomatoes (preferably fire-roasted)
  • 1 1/2 lbs shrimp, peeled, deveined, and tails removed, halved crosswise if large
  • 1/4 cup chopped fresh cilantro
  • 2 Tbs fresh lime juice, plus lime wedges for serving
Heat the oven to 435 degrees.  Toss the tortilla strips with 1 tablespoon of oil and salt.  Arrange in a single layer on a baking sheet and cook until deep-golden brown and crispy, 10-12 minutes, tossing halfway through.  Season with additional salt and pepper to taste and transfer to a paper towel-lined plate.

Meanwhile, heat the remaining tablespoon of oil in a large pot or dutch oven over medium-high heat.  Add the onion and cook until softened, about 4 minutes.  Add the garlic, cumin, chile powder, and chipotles.  Stirring constantly, cook until fragrant, about 30 seconds.  Add the broth, hominy, and tomatoes.  Bring to a simmer, reduce heat to low, cover, and cook about 15 minutes to allow the flavors to meld.

Working in batches, puree the soup in a blender or food processor until smooth.  Return the soup to the pot and bring to a simmer.  Add the shrimp and cook, stirring occasionally, until they are just cooked through and opaque, about 2-3 minutes.  Remove from heat and stir in the cilantro and lime juice.

Ladle into bowls and top with tortilla soups.  Serve with lime wedges.


Thursday, October 4, 2012

A Tour of My New Kitchen!


When we first went under contract for our new house, the first question people asked me was "So, is the kitchen amazing?"  Knowing I love to cook and entertain, it seems logical that we'd only buy a house with an awesome kitchen.  However, at the time, the kitchen was actually my least favorite room in the house.  As a matter of fact, we almost put an offer on another house purely because I liked the kitchen better (really glad that didn't happen though!).  Going from a galley kitchen to a "real" kitchen seemed like it'd be an immediate upgrade, but I wasn't a fan of the new kitchen from a cosmetic standpoint.  The wall color was unappealing to me, I didn't like the curtains, I thought the cabinets were really ugly, the light fixtures weren't my style... etc etc.
But I loved the rest of the house so much, that we decided to to a mini-makeover upon moving in.  Since I spend so much time in the kitchen, it was really important for me to love the space.  The first order of business was initially to paint both the walls and the cabinets.  However, the quotes we received for re-staining the cabinets were more than we had planned to spend, so we decided to paint the walls first and see if the cabinets looked better.  One coat of Benjamin Moore's Tranquility later, and it was a whole new kitchen!  After it was done I just kept saying over and over "I LOVE the new color, it looks SO GOOD!!"  In some light it looks grey, sometimes it looks blue, and sometimes it looks aqua.  Such a pretty color - I almost painted the rest of the house the same color, I loved it so much!  It also made the cabinets much less orangey, which was a big plus.  We may eventually have them painted, but for now they are fine, and they've definitely grown on me since we moved in.

We took down all the curtains, and while I initially planned to replace them, I kind of like the windows bare for now.  It looks clean, and I don't have to worry about toddlers pulling down drapes.


Next we replaced the light fixtures.  I am totally head-over-heels in love with this chandelier from Pottery Barn, and I thought it'd look great over the island.  When I showed it to Joey, he suggested trying a DIY version (his suggestion had nothing to do with the $400 price tag, I'm sure).  Since the pendants were already in place, we simply drilled holes in the lids of mason jars and replaced the shades.  SO easy.  SO cheap!  As an aside, is there any interest in a how-to post for this?


I also used an extra mason jar to keep all of my wooden spoons together.  And I ordered this super fun print on seasonal eating from concrete lace on Etsy.  It lists what produce is in season for what time of year.  This is actually our region, so it's accurate for my area.  So neat!


We have another set of cabinets and a small counter on the opposite wall, and the top cabinet is perfect for keeping most of my blogging dishes and props together!


And finally, what is perhaps my favorite part of the kitchen - the dining area!  As we were shopping for new living room furniture, we happened upon this farmhouse style table, and I instantly fell in love.  We had originally planned on adding some built-in seating to the breakfast area, but when I saw this table, I HAD to have it.  I loved the rustic look, but I also loved how minimalist and modern it is at the same time.  We opted for 2 benches and 2 chairs, so this monster of a table will seat at least 8 adults (or 12 Carolines).  I love the rustic and casual look of the benches - perfect for piling lots of kids at the table!


Behind the table, I had Joey install a long shelf along the top of the wall to house my cookbook collection.  Which, I have to add is now considerably smaller - I did a big purge before we moved, and these are my VERY favorites ones.  I hemmed and hawed over what to put on the wall below the books, and then I decided to use some photos that I took at the Charleston Farmer's Market when I attended the food photography workshop back in May.  I love having a bit of my own photography in the kitchen, and every time I look at the prints I remember what a fabulous weekend that was.

It wasn't initially planned this way, but as bits and pieces started to come together in the kitchen, it took on kind of a "modern farmhouse" theme - from the mason jars, to the seasonal eating print, the farmhouse table, to the farmer's market prints, I think it really embodies my style and my love for cooking, food, and photography.  And a bonus:  what was once my least favorite room in the house is now my favorite!


Tuesday, October 2, 2012

Bacon, Brussels Sprouts, and Goat Cheese Pizza


Food blogging has introduced me to many things - some great friends, a renewed love of seasonal cooking, turning any baked good into red velvet, bacon in everything imaginable, and cookie dough treats galore.  However, one thing that I didn't expect to gain from food blogging is my love of brussels sprouts.  Just two years ago, not only had I never even tried a brussels sprout, but I wrinkled my nose at the mere mention of them.  I know, I know, unfounded bias.  But they are always the veggie that people use as an example of something gross.  Then I saw tons of bloggers share recipes for brussels sprouts that actually looked... tasty.  So I figured I should practice what I preach with my children and actually try it before I declare my hatred.  So I kept it simple and just roasted them with salt, pepper, and olive oil.

And then something funny happened... I liked them!  I couldn't wait to try out tons of new recipes that featured the cute little cabbages.  But sadly, Joey wasn't a fan.  He is always a good sport and tries anything, likes most foods, etc.  So I try to honor it if he doesn't like a specific food. For the most part I relegated them to a side dish for me, while I roasted a pan of broccoli for Joey.  Or I waited until he wasn't home for dinner to make a brussels sprouts-centric dish for Caroline and me.

But when Courtney posted a pizza featuring brussels sprouts, I decided to try again.  I figured if anything would convert Joey to a brussels sprouts lover it would be pizza.  With bacon.  And cheese.  Sadly, he said that it wasn't his favorite pizza ever... though he did still eat 3 pieces.  And Caroline and Smith both loved it, so I'd consider that a win.

The brussels sprouts are tender, but they also get that super tasty char around the edges.  Before being added to the pizza, they are tossed with some olive oil, a touch of vinegar, garlic, shallots, and red pepper flakes to give them even more flavor.  The original recipe called for cheddar, mozzarella, and feta, but I went with cheddar, Parmesan, and goat cheese.  I think many combos would be great, including blue cheese (oh how I miss you...).  Or if God-forbid, you aren't a fan of brussels sprouts, I think many other veggies would work well here - broccoli, cauliflower, zucchini, corn, mushrooms... whatever you have on hand and love is sure to produce a fabulous pizza.

Brussels Sprouts, Bacon, and Goat Cheese Pizza
adapted from Shutterbean, via Cook Like a Champion

  • 1 lb pizza dough
  • 4 pieces of bacon, chopped
  • 5-6 Brussels sprouts, halved lengthwise and thinly sliced
  • 1 Tbs olive oil, plus more for brushing the dough
  • 1 Tbs balsamic vinegar
  • 3 cloves of garlic, thinly sliced
  • pinch of red pepper flakes
  • 1 large shallot, thinly sliced
  • salt and pepper
  • 1/2 cup shredded sharp aged white cheddar
  • 1/3 cup freshly grated Parmesan cheese
  • 1/3 cup crumbled goat cheese
Place a pizza stone or sheet pan in the oven and preheat to 500 degrees for about 30 minutes.

Meanwhile, cook the bacon in a medium skillet, stirring often, until just crispy and lightly browned, 4-6 minutes.  Use a slotted spoon to transfer the bacon to a paper towel-lined plate.  Reserve the bacon grease for another use.

In a medium bowl, toss the brussels sprouts with the shallots, garlic, oil, vinegar, and red pepper flakes. Season with salt and pepper.

On a piece of parchment paper lightly dusted with cornmeal, stretch the pizza dough into a 14-inch circle.  Brush the perimeter with olive oil.

Sprinkle the dough with the cheddar and parmesan, leaving a thin border around the edge.  Evenly distribute the brussels sprouts mixture, then top with the bacon and goat cheese.

Carefully transfer the pizza and parchment to the stone in the oven, and bake 10-12 minutes, or until the crust is browned and the toppings are cooked through.  Remove from the oven and allow to cook 5-10 minutes before slicing and serving.


BLOG DESIGN BY: SHERBET BLOSSOM DESIGNS