Sunday, October 18, 2015

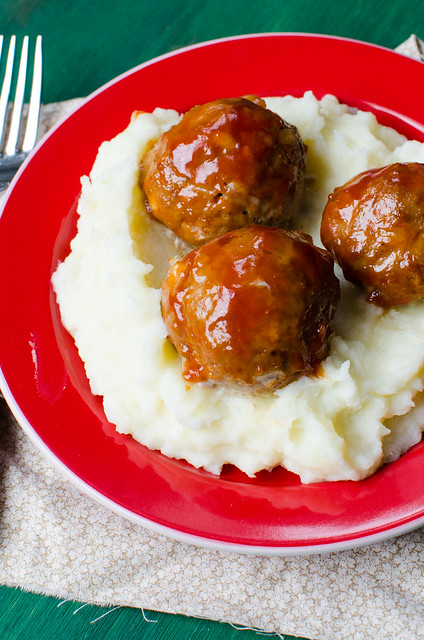
Turkey Meatloaf Meatballs

Turkey Meatloaf Meatballs 

Thank you all so very much for your kind words, comments, emails, stories, messages, and support in response to my last post.  I've been trying to write this post for the last three and half weeks, but I can't ever seem to find the right words to express my gratitude. I've finally realized that all I really have to say in response is "thank you."  It means so much to me that so many of you reached out to me following Henry's autism diagnosis, and I really just cannot put my gratitude and love into words.  Our family has been so touched by the support we've received from my internet friends, and we're so humbled and thankful for the community we have here.  Truly, you guys have brought tears to my eyes, a smile to my face, and happiness to my heart.

Oftentimes when I lack the words like this, I allow food to speak for me.  Cooking and baking for others is definitely how I show my love and friendship, so I can think of nothing better to share with you now than pure comfort food -- in the form of meatloaf meatballs.  To me, meatloaf is the quintessential comfort food.  However, it's not the healthiest meal out there, and it's not very practical for a weeknight unless you prep it ahead of time.  Enter -- turkey meatloaf meatballs!

These meatballs are healthier than traditional meatloaf, since they are made with ground turkey, and they are faster to assemble and cook as well.  For some reason my kids are more likely to eat a meatball than a meat-loaf, so they were a BIG hit with the little ones as well!

For a brief moment, I considered keeping this dinner really healthy, and serving the meatballs over cauliflower puree…. but I quickly came to my senses and affirmed that mashed potatoes just aren't optional when it comes to eating meatloaf.  A side of roasted brussels sprouts rounded out this meal, and we all left the table with happy bellies and happy hearts.

Turkey Meatloaf Meatballs
glaze from Cook's Illustrated

  • 1 lb ground turkey
  • 1/2 large yellow onion, finely diced
  • 2 cloves garlic, minced
  • kosher salt and freshly ground black pepper
  • 2 tsp finely minced fresh parsley
  • 1 Tbs worcestershire sauce
  • 1/4 cup panko breadcrumbs
  • 1 egg, lightly beaten
Glaze
  • 1/4 cup ketchup
  • 1/2 tsp hot sauce
  • 1 1/2 tsp brown sugar
  • 2 Tbs apple cider vinegar
  • 1/4 tsp ground coriander
Preheat the oven to 400 degrees and line a baking sheet with a sheet of aluminum foil.  Spray it lightly with cooking spray.

In a large bowl, combine the ground turkey, onion, garlic, 3/4 tsp salt, 1/2 tsp pepper, parsley, Worcestershire sauce, tomato paste, breadcrumbs, and the egg.  Gently but thoroughly use your hands to combine the mixture and incorporate all the ingredients.

Use an ice cream scoop or 1/4 cup measure to form meatballs, and arrange them in a single layer on the prepared baking sheet.

Bake the meatballs for 11 to 12 minutes.

Meanwhile, combine all the ingredients for the glaze in a small saucepan.  Bring to a boil then reduce to a simmer and cook until it's thickened and syrupy, about 5 minutes. Divide the glaze between 2 small bowls.

Using half the glaze, brush the meatballs all around.  Return them to the oven and cook an additional 4 to 5 minutes.  Remove from the oven and brush with the remaining glaze.  Serve the meatballs over mashed potatoes.


Sunday, September 20, 2015

Different, not less.

DSC_2920

For months, I've been trying to figure out the best way to share this, or whether it was even appropriate to share at all.  This is part of why I've been quiet the past few months, and why the posting has been infrequent.  But especially over the past week, I've felt a strong pull to let you into our life.   I feel inauthentic by not talking about this, and I feel as though I'm faking it by pretending that everything is status quo.

For almost the past year, I've alluded to family issues, developmental delays, emotional times, and busy busy weeks.  All of those are simply euphemisms and roundabout ways to get to the point without saying the words.  The truth is -- our sweet Henry was diagnosed with autism this summer.

It wasn't a surprise; we expected this news.  He's nonverbal with a whole host of sensory, behavioral, and social issues.  Yet I still experienced pretty much every emotion under the sun when I heard those words.  I cried both tears of relief and tears of sadness.  Relief because it meant that we now had a diagnosis for what we've known all along, and we could begin to move forward with a real plan in place.  Sadness because, of course I was sad!  Since his diagnosis, I've continued to experience all sorts of conflicting emotions.  But one thing has grown stronger, and that's my love for Henry.  Yes, being diagnosed with autism is indeed life-changing news.  But it did not change our life.  We go on like we always have -- laughing and loving.


Henry has the sweetest soul you've ever known.  If you want to witness pure innocence, just look into his big brown eyes.  When he engages with you, it will melt your heart; whether its a fist bump, a high five, or the rare kiss. Henry is my hero.  Life is not easy for him, and he has a long road ahead of him.  But he wakes up smiling every morning, and he loves life in a way that I've never seen before.  His spirit is strong, and I know he's going to be okay.

Love needs no words, and I feel and see true, unadulterated love every time I look at Henry and anytime he looks at me.  Caroline already knew that Henry was different,  and that his brain works differently from ours; she knew that Henry doesn't use words, and he doesn't always "know how to make good choices."  When we explained Henry's autism to Caroline, we did so with the help of the book My Brother Charlie.  There is a page that I've since bookmarked.  As Caroline read this passage aloud, she replaced "Charlie" with "Henry," and said that this is how she feels about him.  It's how we all feel.

I've learned from Henry that love doesn't always come from what you say.  It can also come from what you do.  And so we do right by Henry.  We love him strong.  And we watch over him with the might of angels.  We have to.

DSC_2916 

Part of my initial sadness was due to the fact that he's a twin.  He's forever being compared to Tucker, and I felt like it wasn't fair to Henry to live in that comparison for his whole life.  Until I realized something: he has an advocate and protector in Tucker.  They might not be on the same path, but Henry has Tucker (and Caroline and Smith) as built in advocates for life.  I truly feel that they are a gift for us and Henry in that way.  Caroline has already assumed that role; she is fiercely protective of him, and she has made it her mission to educate her friends on autism.

I don't intend to sugar coat this.  It's not a fun road we're on.  We have some really bad moments.  He struggles every. single. day.  We garner a lot of stares and disapproving looks, and have already encountered many people who simply think we need to do a better job of disciplining him.  Some days I feel good about the hand we've been dealt, and I feel good about our plan.  But some days I count down the hours until I can crawl into bed and cry myself to sleep.  At the unfairness of it all; for us, and for the millions of other families who are going though the same thing, in this club that none of us asked to join.

We don't know what the future holds for Henry.  We are hopeful that with the intensive early interventions we are doing, he will be able to use words to communicate and grow to be independent and highly functional.  In a few weeks, he'll be starting at an autism therapy-focused preschool, so we are very excited to see the progress he will make there.  For now, we live and we love Henry, and we've adopted this song by Phillip Phillips as our anthem to him.  These are the word I wish he could understand. Because if nothing else, I want him to always know how very loved he is.

Hold on to me as you go
As we roll down these unfamiliar roads
And though this wave is stringing us along
Just know you're not alone
I'm gonna make this place your home.

Settle down, it'll all be clear
Don't pay no mind to the demons they fill you with fear
The trouble - it might drag you down
If you get lost you can always be found
Just know you're not alone
I'm gonna make this place your home.


Sunday, September 13, 2015

Sweet Corn Queso Dip

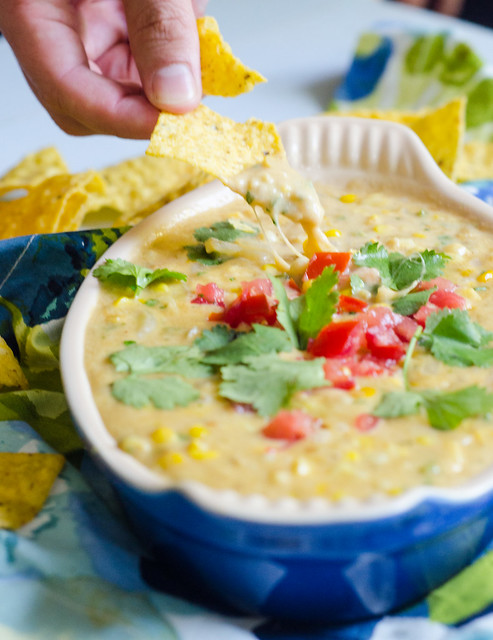
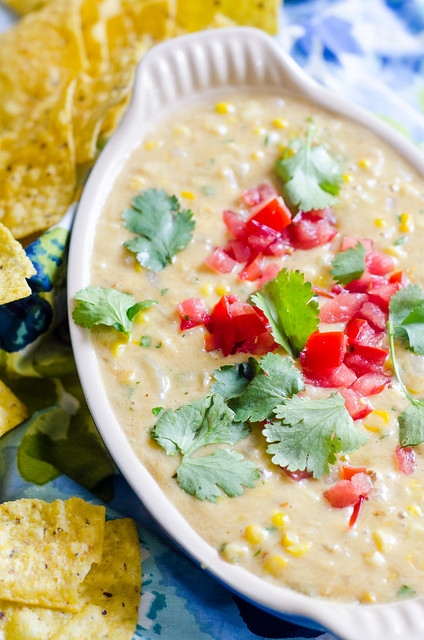
Sweet Corn Queso Dip 

Normally as we round the corner into the fall, I'm digging in my heels and refusing to acknowledge the end of summer.  I'm definitely not one of those people who turns into PUMPKIN EVERYTHING in mid august… or mid September even.  Up until September 23rd, I'm firmly still in summer-mode.  Thus, while bloggers everywhere are bringing you pumpkin and apples, I'm bringing you sweet corn queso dip.  I might not be a cool, up to the minute blogger, but I'm living in the now.  And the now is gorgeous weather, football, corn, and queso.  Queso is always in the now.

This queso is a little more than just corn mixed into queso.  You puree some of the kernels, then mix in whole kernels; thus creating a perfect corny bite.  While this is an ode to summer corn, it's also pretty much a perfect snack for watching football, cooking out, or just sitting outside and enjoying the perfect weather with a margarita.

I'm pretty much a sucker for any queso dip, but combining it with some of my favorite summer produce was revolutionary.  We all huddled around this scooping, dipping, and munching until the dish was scraped clean.  So whether you are a fall-lover or a stage five summer-clinger, this dip will definitely make you happy!  Long live queso!

Sweet Corn Queso Dip

Sweet Corn Queso Dip
adapted from Food and Wine, December 2013

While you can definitely use frozen corn for this, I'd highly recommend that you use fresh corn when it's in it's peak!  

  • 3 cups fresh corn kernels (4-5 ears).
  • reserved cobs from corn
  • 2 Tbs canola oil
  • 1 poblano chile, stemmed, seeded, and diced
  • 1/2 medium onion, diced
  • 2 cloves garlic, minced
  • kosher salt
  • 1 tsp chile powder
  • 8 oz Monterey Jack cheese, shredded
  • 2 Tbs minced fresh cilantro
  • cilantro, tomatoes, onions, jalapeño slices, etc for garnish
Cut the kernels from the cob.  Using the back of a spoon, scrape the spent cobs to "milk" them.  

In a blender, combine half the corn kernels, the corn milk, and 1/3 cup of water.  Puree until smooth.

In a medium skillet, heat the oil over medium heat.  Add the poblano and onion, and cook until softened, stirring often, about 5 minutes.  Stir in the remaining corn, a big pinch of salt, garlic, and chile powder.  Cook an additional 2 to 3 minutes.

Add the corn puree and stir to combine.  Bring to a simmer.  Cook until slightly thickened, about 2 minutes.

Reduce the heat to low and stir in the cheese, a little at a time, until it is melted and incorporated.  Remove from heat and stir in the cilantro, then season with additional salt if needed.  Garnish with diced tomatoes, more cilantro, jalaponeo slice, etc.  Serve immediately with tortilla chips.


Tuesday, August 25, 2015

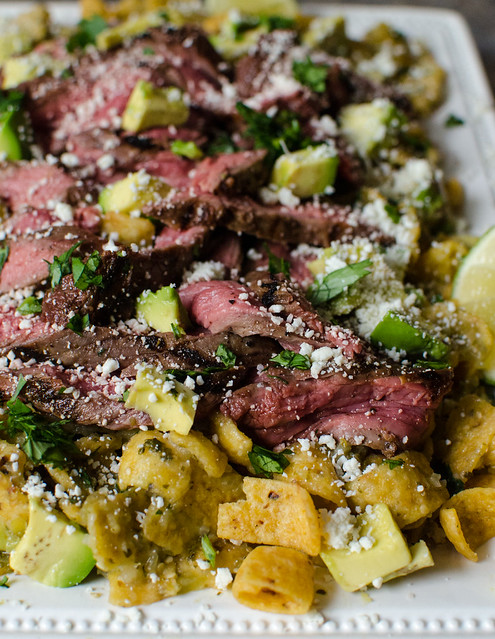
Cola-Grilled Flank Steak with Fritos Chilaquiles

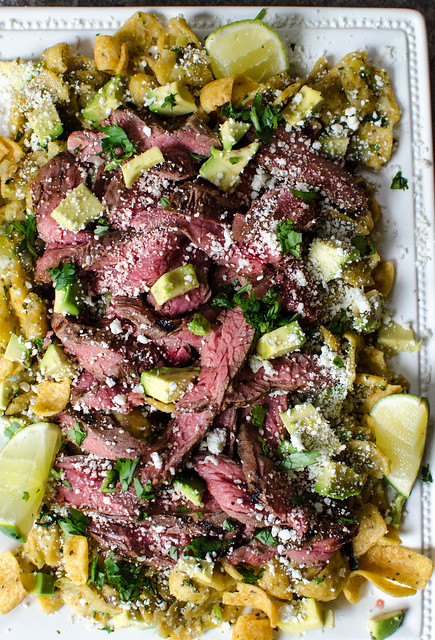
Coke-Marinated Flank Steak over Fritos Chilaquiles

Do you need a minute here?  A minute to process this?  It's crazy, I know.  When I told Joey what I was making for dinner, he asked if it was a "gas station food challenge." It was not. But what it was, was an irresistible recipe that I couldn't stop thinking and daydreaming about from the moment I saw it.  I have a not-so-secret love of Fritos, so Fritos, cooked in salsa?  Uh, yeah.  Sounds right up my alley.

This was a really fun dinner, and one that I would actually love to serve to company.  How kitschy  and cute is this?  A big platter of Fritos cooked in salsa, topped with a sweet and spicy grilled steak?  It's a little out there, but in the best way possible.  What a conversation starter this dinner is!

Because this is from Food and Wine, they give a wine pairing recommendation, but I'm hard pressed to serve this with anything other than a jack and coke or a forty of beer. ;)

Coke-Marinated Flank Steak over Fritos Chilaquiles 

Cola-Grilled Flank Steak with Fritos Chilaquiles
adapted from Food and Wine
serves 4 to 6

  • 4 cups of coca-cola, preferably made with cane sugar (instead of HFCS)
  • 1 Tbs This green curry paste
  • 1 jalapeño chiles, thinly sliced
  • 1 1/2 lbs flank steak, trimmed and cut lengthwise and crosswise to make 4 steaks
  • 1 Tbs canola oil, plus more for brushing
  • kosher salt and freshly ground black pepper
  • 2 cups salsa verde
  • 8 oz Fritos, divided
  • 1/2 cup chopped fresh cilantro
  • 2 avocados, diced
  • 3 Tbs Cotija or queso fresco cheese
  • lime wedges
In a 9x13 inch baking dish, whisk the coke with the green curry paste and jalapeños.  Add the flank steaks and turn them several times to thoroughly coat them with the marinade. Allow to stand at room temperature for 30 minutes.  

Meanwhile, light and prepare the grill.  

Remove the steaks from the marinade and brush with oil and season generously with salt and pepper.  Grill, turning once, until medium-rarre, about 6 to 8 minutes total.  Transfer to a cutting board, tent loosely with foil, and allow rest for 10 minutues.

As the steaks rest, prepare the chilaquiles.  

Heat 1 tablespoon of the oil in a large skillet over medium heat.  Add the salsa verde and bring to a simmer.  Cook until slightly reduced and thickened, about 4 minutes.  Add half of the fritos and cook, stirring constantly about 2 minutes.  Remove from heat, stir in the remaining fritos, along with 1/4 cup of the cilantro and half of the avocado and cheese.   Transfer the chilaquiles to a platter.

Sice the steak thinly across the grain, and arrange it over the chilaquiles, along with any accumulated juices.  Scatter the remaining avocado, cilantro, and cheese over top, and serve with lime wedges.


Monday, August 17, 2015

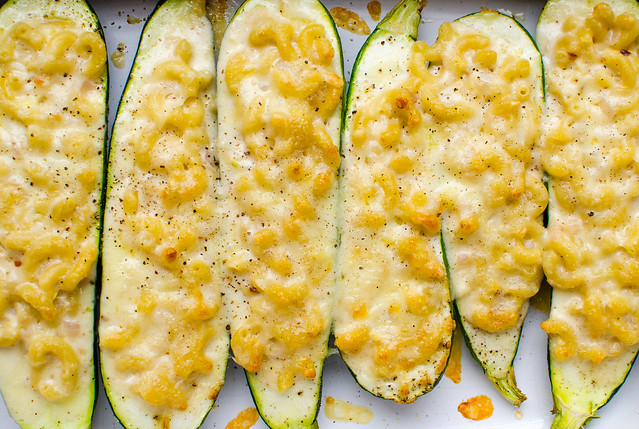
Macaroni and Cheese-Stuffed Zucchini Boats

Mac and Cheese Stuffed Zucchini Boats

Oh boy.  There's a lot to love about these babies.  Creamy, cheesy, mac and cheese baked inside tender, sweet zucchini?  Yeah, sign me right up.

Just because there's half a zucchini in every serving, I'm not fooling myself (or you guys) into thinking this is healthy.  BUT.  It is built in portion control.  And there's a serving of veggies along with your carbs and cheese.  Thus, it's not the most indulgent calorie bomb in the world, but rather a nice treat that you don't have to feel super totally guilty about enjoying.  Really you can use any mac and cheese recipe you'd like; I'm just sharing what I did this time… but feel free to mix it up or add some extras!  Bacon would be great, as would tomatoes, shredded zucchini, chicken, or an infinite number of cheeses as well.

My kids are mac and cheese aficionados… er, addicts.  So I fully expected them to just scoop out the mac and cheese and leave the zucchini, but surprisingly, they ate up the zucchini as well!  I've made countless variations of stuffed zucchini - sausage and cheese, chili, enchiladas, etc.  The mac and cheese was a new one for me, but it's definitely going into my rotation.  Do you have zucchini coming out of your ears these days?  If so, stuff it with some mac and cheese!

Macaroni and Cheese-Stuffed Zucchini Boats
inspired by Melt, by Stephanie Stiavetti & Garrett McCord

  • 3-4 medium zucchini (about 3 lbs)
  • olive oil, for brushing
  • 5 oz elbow macaroni or other small pasta shape
  • 1 Tbs butter
  • 1 shallot, finely minced
  • 1 clove garlic
  • 1/4 tsp dry mustard powder
  • pinch cayenne pepper
  • 1 Tbs flour
  • 1 cup milk or half-and-half
  • kosher salt
  • freshly ground black pepper
  • 4 oz Swiss or Gruyere cheese, shredded
  • 3 oz sharp cheddar cheese, shredded
Preheat the oven to 400 degrees.

Halve each zucchini lengthwise, and use a large spoon of scrape out the seeds and filling, leaving a thin border on all sides.  Brush the inside lightly with olive oil and sprinkle with salt and pepper.  Arrange in a single layer, cut side-down, on a baking sheet or 9x13 inch baking dish.  Cook 5 to 7 minutes, and remove from the oven.

Decrease the oven temperature to 350 degrees.

Meanwhile, bring a large pot of salted water to a boil.  Add the pasta and cook until just al dente, about 8 to 9 minutes (or according to the package instructions).

In a medium saucepan, melt the butter over medium heat.  Add the garlic, shallot, mustard powder, and cayenne pepper and cook, stirring constantly, about 1 minute.  Add the flour and cook, again, stirring constantly, until the flour is golden-brown, 2 to 3 minutes.  Slowly pour in the milk, whisking constantly.  Bring to a simmer, reduce heat, and cook until the mixture is slightly thickened, about 4 minutes.  

Remove from heat and stir in the cheese, one handful at a time, until it's melted and the sauce is smooth.    Reserve about 1/4 cup of the shredded cheese for topping.  Season to taste with salt and pepper.  Stir in the cooked pasta.

Using a large spoon, fill each zucchini boat with the macaroni and cheese, and arrange the boats in a single layer in a 9x13 inch baking dish.  Sprinkle the reserved cheese over the top.  

Bake 25 to 30 minutes, or until the mac and cheese is bubbly and the zucchini is tender and cooked through.  Serve.


Monday, August 10, 2015

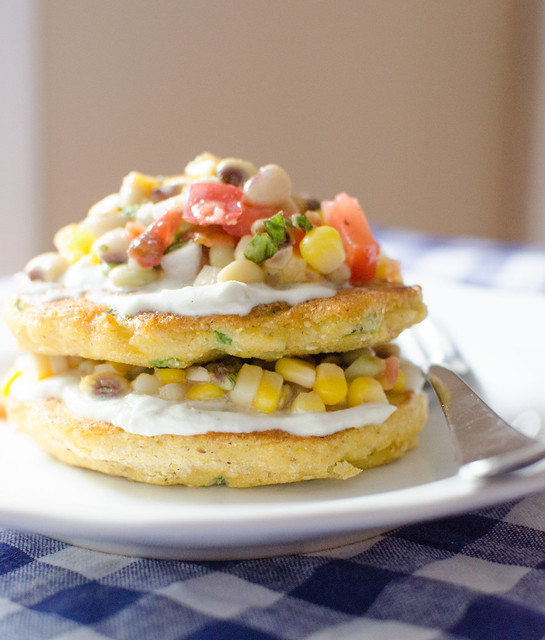
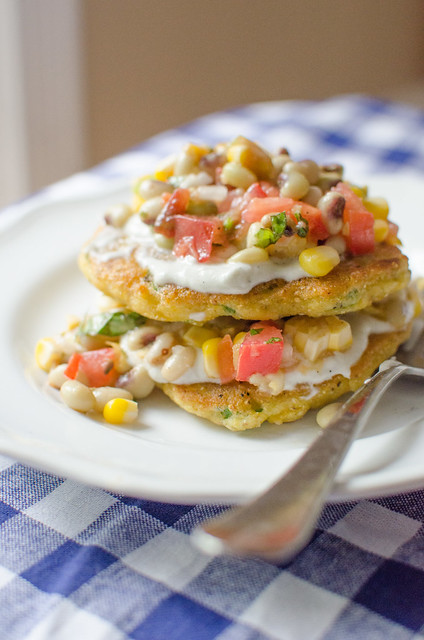
Okra-Cornmeal Cakes with Whipped Goat Cheese

Okra Cornmeal Cakes with Whipped Goat Cheese and Black Eyed Pea Salad

I'm not always the best at "going with the flow, " and I don't particularly consider myself to be easy going.  I like order.  I like plans.  And I like to know what's coming and what to expect.  I only like surprises if I didn't know the surprise was coming (as in, don't tell me "I have a surprise for you!"  and then make me wait!). Oh, right.  I'm also impatient.

Thus, cooking on the fly is not really my thing.  Sure, I make up and develop my own recipes, but it's always with a plan in place already, or at the very least, a general idea of what I'm going for.  Never do I start cooking dinner without having at least a vague idea of what I want to end up eating.

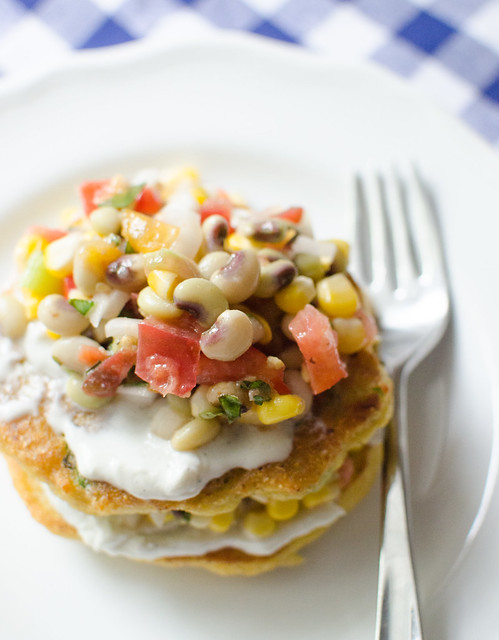
Okra Cornmeal Cakes with Whipped Goat Cheese and Black Eyed Pea Salad 

 But maybe I should.  Because that's what I did when I created this dinner.  I picked up a bounty of beautiful produce that morning at the farmer's market, with no real intention or plan for any of it.  I knew I wanted to make a veggie-heavy dinner that night, but that's all the direction I had.  So I started by cooking my black eyed peas and chopping some veggies.  I thought about making some sort of bean burger with the black eyed peas, a southern vegetable risotto, a hash topped with a runny egg, or a simple veggie-heavy salad.  But then I struck gold when I recalled these okra-cormeal pancakes I've had saved for ages.  And I thought they'd go well with my black eyed pea salad.  I was done!  Or so I thought… I'd picked up a wheel of the most amazing aged goat cheese that morning at the market, and I decided to incorporate that as well.

I ended up creating a napoleon of sorts… or rather, stacks of deliciousness if you don't want to use fancy terminology.  Buttery, crisp okra cornmeal pancakes, topped with whipped goat cheese and black eyed pea salad… repeat layers.  Absolutely incredible, and for sure one of the highlights of my summer cooking.   This dinner totally hit the spot, and we were exclaiming and "mmm-ing" with every bite.  My picky toddlers even ate the pancakes, okra and all!

So lesson learned:  sometimes it's nice to loosen the reigns a bit, and just cook through improv. And while I'm at it, maybe I should apply that same advice to my life.  It can't hurt, right?!

Okra Cornmeal Cakes with Whipped Goat Cheese and Black Eyed Pea Salad 

Okra-Cornmeal Cakes with Whipped Goat Cheese
cakes adapted from Basic to Brilliant, Y'all; Whipped Goat Cheese from Smitten Kitchen

  • 2 cups yellow cornmeal
  • 2 tsp baking powder
  • 1 tsp sea salt
  • 1 egg, lightly beaten
  • 2 Tbs melted butter
  • 1 1/2 cups water, plus more if needed
  • 8 oz okra, stems trimmed, sliced 1/2 inch thick
  • 1 jalapeño, cored, seeded, and finely chopped
  • 1 clove garlic, minced
  • canola oil, for frying
  • 3 Tbs heavy cream
  • 4 oz goat cheese, softened
  • black eyed pea salad
Line a baking sheet with paper towels or a lint-free kitchen towel, and set aside.  

Prepare the batter by whisking together the cornmeal, baking powder, and salt in a large bowl.  Combine the egg, butter, and water in a large liquid measuring cup.  Pour into the dry ingredients and whisk until just incorporated.  Add the okra, jalapeño, and garlic, and stir to combine, using a wooden spoon (The batter is thick, but not dry.  Add water if needed, a few tablespoons at a time).

Heat half of the oil over medium heat in a 12-inch skillet, preferably cast iron.  Scoop 1/4 cup of batter into the skillet, and use the back of a spoon or the measuring cup to press the batter into an even layer.  Repeat with more batter to make as many pancakes as you can fit into a single layer without crowding (likely 3-4 per batch).  Cook until the bottoms of the cake are brown and bubbles begin to form on the tops, about 2 to 3 minutes.  Use a spatula to turn the cakes, and cook on the second side, an additional 2 to 3 minutes.  Transfer to the lined baking sheet, sprinkle with salt and pepper, and repeat with the remaining batter and oil.  

Meanwhile, use an electric mixer to whip the heavy cream until peaks form.  Add the goat cheese and beat until the cheese is light and fluffy.

To assemble, spread about a tablespoon of the whipped goat cheese on an okra cake, and top that with a spoonful of the black eyed pea salad.  Repeat with another okra cake, more goat cheese, and finally a healthy spoonful of salad.  Serve.


Monday, August 3, 2015

Summer Tomato and Black Eyed Pea Salad

Summer Tomato and Black Eyed Pea Salad 

I'd like to introduce you to one of my favorite dishes of all time.  This salad is pretty much on repeat for me all summer long.  Fresh black eyed peas are one of my favorite summer treats, and they really shine in this salad.  The creamy peas, fresh tomatoes, sweet corn, and tangy vinaigrette all come together in perfect summer vegetable harmony.  I make a big batch of it to go with dinner one night, then eat it in various ways throughout the week - as is, over greens for lunch, over chicken or fish, rolled up into a wrap with turkey and cheese, and my personal favorite, as a salsa with tortilla chips for a snack.  Most recently I used this salad in an absolutely killer dish, and I'll be sharing the details of that later this week!

This salad is not only versatile, but the flavor combinations are endless as well.   As written here, it is very simply and neutrally seasoned, but I sometimes like to use lime juice, cilantro, and add some jalapeños to the mix as well.  I've also been known to mix in a little crumbled bacon.  A huge variety of veggies work well here too -- green beans, okra, shredded zucchini, bell peppers… really anything you find at the farmer's market this time of year will work beautifully.  What grows together, goes together!

Summer Tomato and Black Eyed Pea Salad
barely adapted from Bon Appétit,Y'all, by Virginia Willis

  • 3 ears of corn, shucked
  • 2 cups fresh or frozen black eyed peas (or lady peas, or any other field pea)
  • 2 large tomatoes, cored, seeded and chopped
  • 1/2 sweet onion, preferably Vidalia, finely diced
  • 1 stalk of celery, finely diced
  • 1 clove garlic, minced
  • 1/2 cup basil, chopped
  • 3 Tbs fresh parsley, chopped
  • 2 Tbs apple cider vinegar
  • pinch of sugar
  • 1 tsp Dijon mustard
  • 1/4 cup canola oil
  • kosher salt and freshly ground black pepper
Bring a large pot of salted water to a boil.  Add the corn and cook until tender, 2 to 3 minutes.  Use tongs to remove from the pot, and drain them on a paper towel-lined plate.

Return the water to a boil and add the black eyed peas.  Simmer until they are tender but not mushy, 15 to 20 minutes (cooking time will depend on their freshness, so start checking by tasting around 12 to 15 minutes).

Meanwhile, use a sharp knife to cut the corn kernels off the cob.  Place them in a large bowl, and add the tomatoes, onion, celery, garlic, and basil.  

Once the peas are cooked, drain them in a colander and rinse well with cold water.  Drain them very well, shaking to remove as much water as possible, then add them to the bowl with the other vegetables as well.

To make the dressing, whisk together the oil, mustard, and sugar in a small bowl.  Whisking constantly, slowly stream in the oil.  Season with salt and pepper.

Gently stir the dressing into the salad, taste, and season with additional salt and pepper as needed. 


Tuesday, July 21, 2015

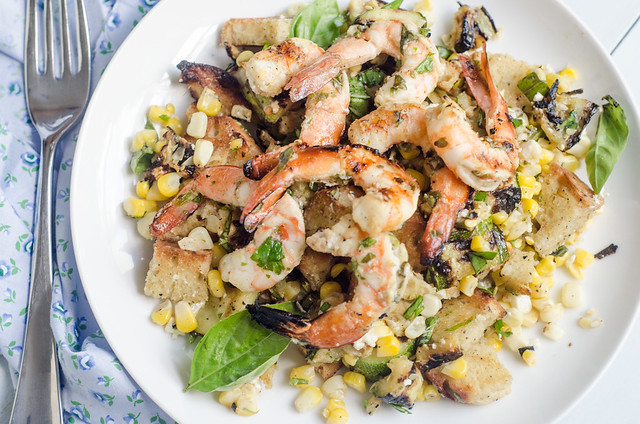
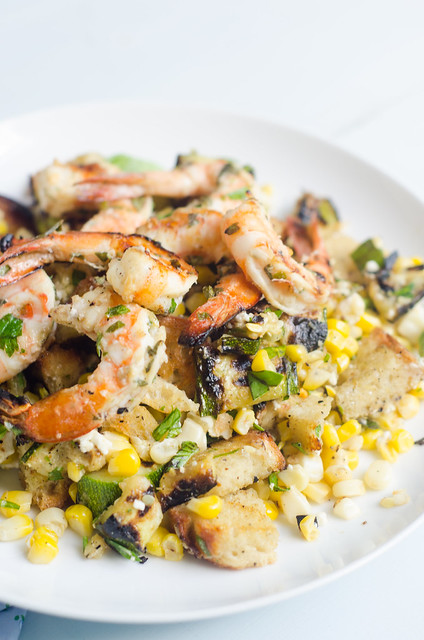
Grilled Shrimp and Summer Vegetable Panzanella

Grilled Shrimp and Summer Veggie Panzanella 

This summer has brought about a new family tradition.  On Friday evenings, we meet a few other neighborhood families at the pool, grill our dinner, and engage in general merriment with the kids.  It's something that I very much look forward to all week long.  Because I am who I am, I spend most of the week thinking about what we'll grill and eat, what cocktail I'll mix up, and what we'll eat for dessert.  Sometimes we go simple - burgers or hotdogs, chips, and watermelon.  Sometimes we go REALLY simple and order pizza.  And sometimes I get inspired and end up creating one of my favorite dinners of the summer.

Obviously I'm talking about this salad.  I planned to use my favorite recipe for grilled shrimp, and serve it alongside a simplified zucchini and corn salad, along with some grilled garlic bread.  In a moment of inspiration, I turned it into a grilled shrimp and bread salad.  I was so excited and enamored with the final dish that I made it again a few days later.

This was not only a big hit with Joey and me, but it was a huge hit with the kids as well .  They were especially obsessed with the grilled shrimp and bread, and couldn't get enough.

I have revamped and remixed my chopped summer veggie salad in several ways, spanning numerous cuisines and seasons, but this may be my favorite yet.  When I've made this, I just keep it to the veggies, shrimp, and bread, and leave out the grilled romaine.  I certainly think it would be a great addition though!  If you're looking for a side for this salad, I'd recommend that you keep it simple - a plate of sliced tomato with salt and pepper is perfection here!

Here's to summer grilling and dinner at the pool!


DSC_1430

Grilled Shrimp and Summer Veggie Panzanella

Herb-Grilled Shrimp
adapted from Ina Garten
  • 1 1/2 lbs large shrimp, peeled and deveined, but tails left on
  • 3 cloves garlic, minced
  • 1 medium yellow onion, minced
  • 1/4 cup minced fresh parsley
  • 1/4 cup minced fresh basil
  • 1 teaspoon dry mustard
  • 2 teaspoons Dijon mustard
  • 1 1/2 teaspoons kosher salt
  • 1/2 teaspoon fresh black pepper
  • pinch of red pepper flakes
  • 1/4 cup olive oil
  • 1 lemon, juiced
Combine all the ingredients and toss to coat the shrimp.  Allow to marinate at room temperature for 1 hour, or in the refrigerator for up to 24 hours.
Summer Vegetable and Grilled Bread Salad
  • 1/3 cup extra virgin olive oil, plus more for dressing
  • 3 cloves garlic, minced
  • kosher salt and freshly ground black pepper
  • 1/4 tsp red pepper flakes
  • zest of half a lemon
  • 2 ears corn, husk and silks removed
  • 3 medium zucchini, sliced lengthwise into 1/2-inch-thick planks
  • 6-8 slices baguette or other crusty bread (I used a roasted garlic loaf and it was really really good!)
  • 2 Tbs chopped fresh basil
  • 1/2 cup crumbled feta cheese (about 2 oz)
Prepare the grill to cook at medium-high heat.  Allow to preheat at least 15 to 20 minutes.

Meanwhile, whisk together the oil, garlic, 1/2 teaspoon of salt, 1/2 teaspoon of pepper, lemon zest, and red pepper flakes.

Brush the zucchini, bread slices, and corn with the oil mixture. Reserve the remaining oil mixture to use for the dressing.

Clean the cooking grate, then place the zucchini, corn, and bread slices on the grill.  

For the corn, grill, turning every 2 to 3 minutes, until the kernels are lightly charred all over, about 10 minutes total.

For the zucchini, grill it until it is well-browned and tender (but not mushy), about 4 to 5 minutes per side.

For the bread, grill it 1 to 2 minutes per side, or until it is lightly charred.

Meanwhile, prepare the dressing.  Add enough oil to the remaining oil-garlic-pepper mixture to reach a volume of 1/4 cup, then whisk in the lemon juice.  Taste and season with salt and pepper as needed.

Prepare grill. 

 Thread the shrimp on skewers.

Grill the shrimp for about 2 minutes, then flip skewers and grill until cooked through, an additional 1-2 minutes.  Remove from the grill and cover lightly with foil as you prepare the rest of the salad.

Once everything is off the grill, begin building the salad.    Cut the kernels off the corn and add them to a large bowl.  Cut the zucchini crosswise into 1/2 inch-thick slices, and add those as well.  Slice or tear the bread into bite-sized pieces.  Crumble the feta into the bowl, and top with the chopped basil.  Drizzle the dressing over the top, then toss well to combine.  

Divide among plates, then lightly sprinkle each serving with salt and freshly ground pepper.  Top each serving with several shrimp, and serve.


Tuesday, July 7, 2015

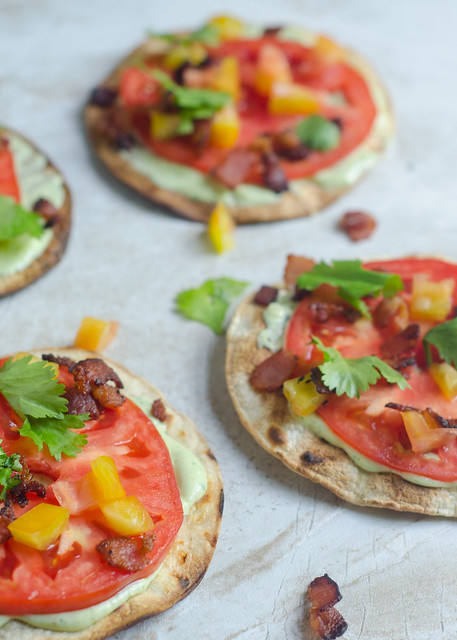
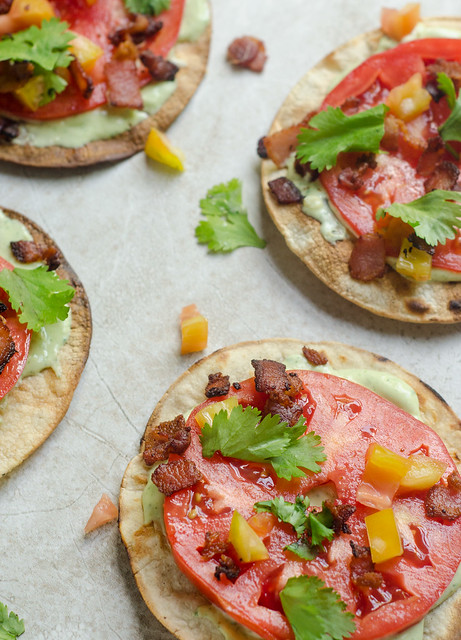
Grilled BLT Tostadas

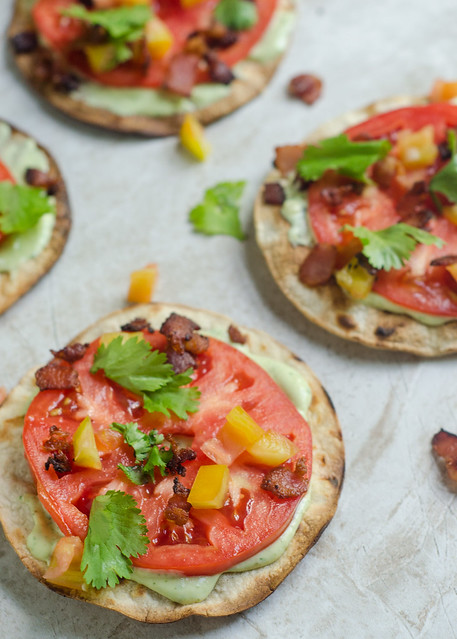
Grilled BLT Tostadas

My favorite summer meal is a simple one:  a BLT sandwich, watermelon, and chips.  Because I love the BLT combo so much, I like to try out different variations and vehicles for the B, the L, and the T.  Thus, when a mexican-inspired BLT was brought to my attention, I'm pretty sure I gasped aloud and headed straight into my kitchen to whip it up.

This ingenious dish comes from none other than the Mexican food genius himself, Rick Bayless.  So it comes as no surprise that it is absolutely amazing and out of this world good.  These are also super quick and easy, which is another requirement for an ideal summer meal.  

DSC_1437 

Corn tortillas are brushed with bacon fat (yes!), then quickly grilled to crisp them up.  You slather them with an avocado-lime cream sauce, then top with tomatoes, crumbled bacon, and cilantro.  Finish with a sprinkle of salt and a squeeze of fresh lime juice, and you have Mexican BLT perfection.  I served these with grilled Mexican street corn, watermelon slices, and of course watermelon margaritas.  No Mexican summer meal is complete without those!  This was one of my favorite dinners of the summer, and one I'll for sure be making many times before fall!

The avocado cream sauce makes more than you'll likely need, but you can store it for a few nights in the refrigerator (just know it may discolor a bit).  The leftovers are great for making… more BLT tostadas, proper BLTs, or just using as a dip for veggies or tortilla chips.

DSC_1442 

Grilled BLT Tostadas
adapted from More Mexican Everyday, by Rick Bayless
serves 4 to 6
  • 12 corn tortillas
  • 1 cup Mexican crema* 
  • juice of 1/2 lime, plus more for serving
  • 1/2 jalapeño, seeds and ribs removed
  • 1/4 cup chopped cilantro, plus more for garnish
  • 1/2 an avocado, roughly chopped
  • salt
  • 6-8 slices thick-cut bacon, cut cross-wise into 1/2 inch pieces
  • 1 lb heirloom tomatoes
Prepare the grill to medium-high heat.

Meanwhile, lay the tortillas in a single layer and let them dry for about 30 minutes.  This will help them crisp up on the grill, rather than fall apart.

As the tortillas dry, combine the cream, lime juice, jalapeño, cilantro, avocado, and 1/4 tsp salt in a food processor or blender.  Puree until the mixture is smooth and creamy.  Taste and adjust the lime juice and salt to your preference.  Scrape the cream sauce into a bowl, cover, and set aside.

Cook the bacon in a large skillet, stirring often, until it is crispy and browned.  Use a slotted spoon to remove it from the skillet and drain on a paper towel-lined plate.  Pour the fat into a small heatproof bowl and set aside.

Core the tomatoes.  Choose one tomato (probably the largest) to slice, and slice into 1/2-inch slices.  Seed and chop the rest of the tomatoes.  
Brush the tortillas on both sides with the reserved bacon fat.  Transfer them to the grill and cook, turning and rotating every 30 seconds or so, until the tortillas are golden brown and crisp.  This will probably take 5 to 10 minutes.  

Remove the tortillas to a serving platter, and spread each one with  avocado sauce.  Top with the sliced tomato, and sprinkle with bacon, cilantro, and diced tomatoes.  Lightly sprinkle each tostada with salt, and a squeeze of lime juice.  Serve immediately.
*a half-and-half mixture of sour cream and mayonnaise can also be used here, but try and find crema if you can!  My local Kroger and Publix both carry it, for what that's worth!


Sunday, June 28, 2015

The Porch Swing

The Porch Swing

I'm feeling a little rusty as I sit down to write this post.  Two posts on June, two in May… things have been quiet around here.  This summer has been quite busy, and I just needed to step away and focus on my family and other obligations for a bit.  But what better way to make my triumphant return than with a festive drink?

I never thought I'd see the day when my beloved margaritas were replaced as my go-to summer cocktail of choice.  But here we are!  I've made this drink countless times over the past month or so, with no signs of stopping.  It's so low-maintenance and easy too -- no prep work, just pour, mix, drink!

DSC_1416 

I realize the name "The Porch Swing" gives no insight into the drink, so here's what we've got:  gin, Pimm's No. 1 (which is a liqueur), lemonade, a splash of sprite, and cucumber garnishes.  It is super light and refreshing, and is actually somewhat reminiscent of sweet tea -- which is definitely a win in my book!  While the combination might seem a little strange, it totally works.  After seeing me make these for a few weeks, Joey got curious and asked me to mix one up for him too -- and he totally loved it!  That's huge for him because he doesn't like gin or cucumbers.  I usually make them one at a time, but I'm also including the measurements for a pitcher as well, which makes them party-ready!
If you're looking for a fun cocktail to serve at a cookout for the Fourth, then this one would be great.  And on a related note, I'll be back later this week with some festive menu ideas for the holiday as well.

Cheers to Monday!

DSC_1402 

The Porch Swing
barely adapted from Mix Shake Stir

makes one drink
  • 1 1/2 oz gin
  • 1 1/2 oz Pimm's No. 1
  • 4 oz lemonade
  • ice
  • 3 slices cucumber, cut into half-moons
  • splash of sprite, 7-Up, or ginger ale
  • fresh mint, for garnish
In a tall glass, combine the gin, Pimm's, and lemonade.  Stir well, then fill the glass with ice.  Add the cucumbers, top with a splash of soda, stir, and enjoy!

makes enough for 8 drinks:
  • 1 1/2 cups gin
  • 1 1/2 cups Pimm's No. 1
  • 4 cups lemonade
  • 1/2 cucumber, sliced and cut into half-moons
  • ice
  • sprite, 7-Up, or ginger ale
In a large pitcher, combine the gin, Pimm's, lemonade, and cucumber.  Mix to combine, then chill until ready to serve.  To serve, fill glasses with ice, fill most of the way with the drink, and top off each drink with a splash of soda.


Tuesday, June 2, 2015

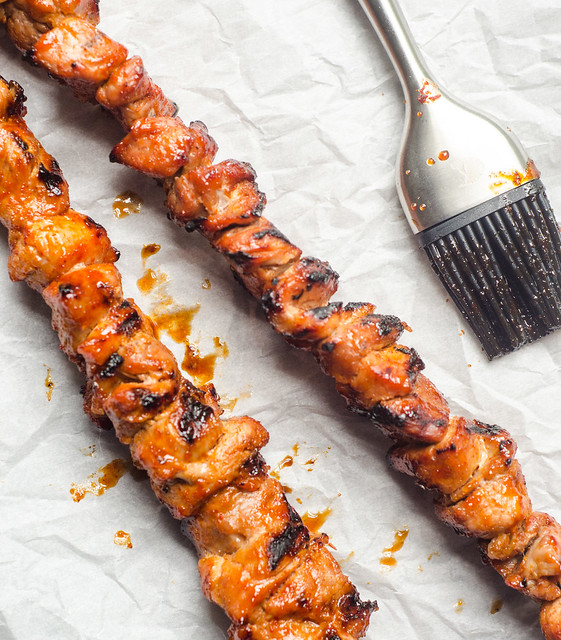
Sweet Sriracha-Glazed Pork Skewers

Sweet Sriracha-Glazed Pork Skewers

"Sweet Sriracha Glaze" won me over with this one.  Once I read those words in the latest Cook's Illustrated, I was powerless; and I added them to my menu immediately.  But if you aren't one to be wooed by just a few words, I'll give you a few more reasons why you should add these skewers to your summer grilling repertoire.  They are super easy and low-maintenance, which minimizes indoor kitchen prep time, and maximizes outdoor fun time.  The recipe also calls for pork tenderloin, which is a healthy and relatively inexpensive cut of meat.  And finally, isn't it just more fun to eat food off a stick?

The combination of brown sugar and Sriracha chile sauce give the pork that super addictive and crave-worthy sweet heat.  The glaze is pretty fantastic, and I'm already envisioning many other ways to use it:  grilled shrimp, steak, chicken, or even brussels sprouts all sound pretty fantastic to me!

We grilled these for Memorial Day, and I also served them with grilled corn on the cob, these amazing broccoli rabe cheese toasts, and of course fresh watermelon.  As usual, I'm totally grill-obsessed, so be on the lookout for more grilled favorites soon!  Maybe I should change my blog name to Grilled Parsley?

Sweet Sriracha-Glazed Pork Skewers
adapted from Cook's Illustrated, May/June 2015
serves 4

  • 2 pork tenderloins, trimmed and cut into 1-inch chunks
  • 1 tsp kosher salt
  • 3 Tbs packed brown sugar
  • 2 Tbs Sriracha sauce
  • 1 tsp cornstarch
  • cooking spray
Toss the pork and salt together in a large mixing bowl and let sit at room temperature for 20 minutes.

Meanwhile, whisk together the brown sugar, Sriracha sauce, and cornstarch.

Prepare grill.

Set aside 2 tablespoons of the glaze, and add the rest to the pork, mixing well with a rubber spatula.

Thread the pork onto 4 to 5 12-inch metal skewers.  Spray both sides of the meat with the cooking spray.

Place the skewers on the grill and cook until well charred, about 3 to 4 minutes.  Use tongs to flip the skewers and brush with half the reserved glaze.  Grill an additional 2 minutes, flip the pork back to the original side, brush with the remaining glaze, and grill one more minute.

Transfer the skewers to a serving platter, tent loosely with aluminum foil, and let rest for 5 minutes before serving.


Tuesday, May 12, 2015

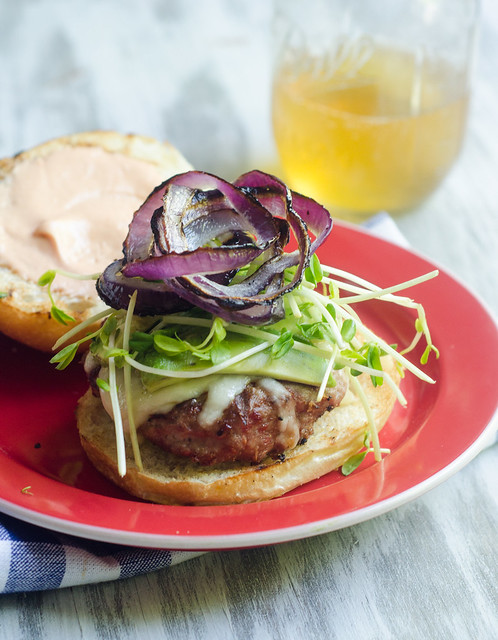
California-Style Turkey Burgers

California-Style Turkey Burgers

It's mid-May and officially grilling season.  Yeah!  I make it my personal mission to cook dinner on the grill as much as I can throughout the week.  It turns cooking dinner from a chore into an event - drink in hand, the kids running around outside, hanging out with Joey on the deck… it makes my heart happy.  And then to enjoy a wonderful dinner?  Again, outside; again, drink in hand; again, the kids playing in the yard.  Perfection.

These burgers were a last-minute dinner decision.  I'd originally planned to make a different ground turkey recipe, but it was 70 degrees, sunny, and gorgeous outside.  What would YOU do in a situation like that?  The grill was just begging to be lit up.

So California-Style Turkey Burgers it was!  These are a pretty simple burger, amped up by loads of tasty toppings and an addictive sauce.  The patties are piled high with Monterey Jack cheese, avocado slices, sprouts (or in my case pea shoots, because I'm obsessed), and grilled red onion.  It's a great combination of textures and flavors, and these burgers have quickly skyrocketed to a favorite dinner in my house.

I threw some asparagus on the grill to serve alongside the burgers, but you can bet your britches that in the summer I'll be serving them with watermelon and grilled corn on the cob.

Have you dusted off your grill yet??

California-Style Turkey Burgers
adapted from ATK's Quick and Easy Grilling
makes 4 burgers

  • 2 Tbs ketchup
  • 2 Tbs mayonnaise
  • 1/4 tsp smoked paprika
  • 1 tsp pickle juice and/or relish
  • 1 1/2 lbs ground turkey (NOT ground turkey breast)
  • kosher salt and freshly ground black pepper
  • vegetable oil
  • 1 red onion, sliced into 1/4-inch rings
  • 4 hamburger buns, split and brushed with oil
  • 1 cup freshly grated Monterey Jack cheese (or pepperjack if you want a kick)
  • 1 avocado, halved, pitted, and sliced
  • 1/4 cup alfalfa sprouts or pea shoots
Prepare grill.

In a small bowl, whisk together the ketchup, mayonnaise, smoked paprika, and pickle juice/relish.  Set aside.

Shape the ground turkey into four 3/4-inch thick patties, and season both sides liberally with salt and pepper.  Brush the onion slices with oil and season with salt and pepper.

Grill the patties until browned and cooked through, 5 to 7 minutes per side.  Sprinkle each burger with the cheese during the last 2 minutes of cooking.  Transfer the burgers to a plate and tent with foil.  Meanwhile, grill the onions 3 to 4 minutes per side, or until softened.  Grill the buns 1 to 2 minutes, or until toasted.

To assemble the burgers, place the patties on the bun bottoms and top with the avocado, sprouts, and onions.  Spread about 1 tablespoon of sauce on the top bun, and serve.


Friday, May 1, 2015

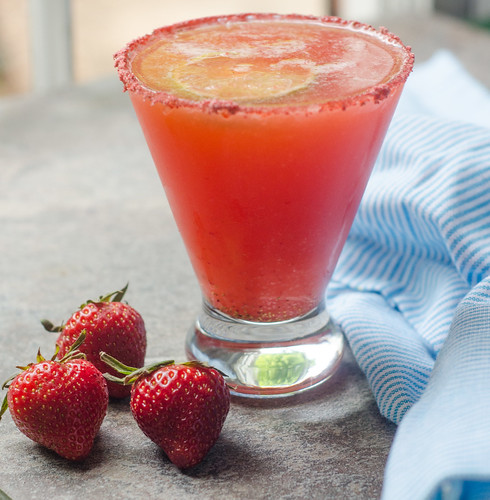
The Ultimate Strawberry Margarita

The Ultimate Strawberry Margarita 

Fruity margaritas can be a hard sell.  Make it too fruity and sweet, and it's off-putting for margarita purists.  Make it not fruity or sweet, and it's off-putting to everyone else.  Strawberries can also be hard to incorporate into drinks because they can be bland and watery if not in their prime season.  So while a strawberry margarita seems like a good idea in theory, they are often either boring and underwhelming, or cloyingly sweet with artificial strawberry flavor.

Of course, leave it to the incomparable Rick Bayless to work out all the kinks.  His strawberry margarita is far and away the best one I've ever had.  Sweet and luscious strawberry flavor, a nice boozy kick from the tequila, and just enough lime juice to balance out the sweetness.

He has a few tricks up his sleeve that help to put this margarita over the top.  The first is using aperol as a supporting player.  The sweetness of the strawberries is nicely tempered by this dry, slightly bitter liqueur.  Strawberry puree gives you the most pure, fresh, and natural strawberry flavor, and finally, the strawberry sugar rim pushes the whole thing to a new level.  You use freeze-dried strawberries mixed with sugar to create the rim, and the result is what MAKES this the ultimate strawberry margarita.  freeze-dried strawberries, not to be confused with regular dried strawberries, are pulverized with the sugar in a food processor to create the powder for the rim.  I am normally a fan of salt with my margaritas, but the sweet and slightly tart strawberry rim makes this just over the top amazing.

Our street is having a Cinco de Mayo block party tomorrow, and I will be bringing a pitcher of these babies.  I hope you all celebrate Cinco de Mayo this weekend with a strawberry margarita!

The Ultimate Strawberry Margarita 

The Ultimate Strawberry Margarita
from Frontera by Rick Bayless
makes 8 cocktails

  • 3 cups hulled and halved fresh strawberries
  • 1/2 cup sugar
  • 1 1/2 cups tequila blanco
  • 3/4 cup fresh lime juice
  • 1/2 cup Aperol
  • 1/2 cup orange liqueur
  • 1 lime wedge
  • strawberry sugar (recipe follows)
  • ice cubes
In a food processor, combine the strawberries and sugar and puree until smooth.  Strain the puree through a fine-mesh sieve and refrigerate until ready for use.

In a pitcher, combine 1 1/2 cups of the strawberry puree, tequila, lime juice, aperol, and orange liqueur. Stir well and refrigerate until chilled, about 2 hours.

Use a lime to moisten the rims of 8 6-oz cocktail glasses, and dip the rims into the strawberry sugar.  Fill a cocktail shaker halfway with ice, then pour in a little over 1 cup of the chilled margarita. Shake and strain into 2 of the sugar-crusted glasses.  Repeat with the remaining margaritas.  Garnish with fresh strawberries or limes if desired, and serve.

Strawberry Sugar

  • 1 oz freeze dried strawberries (can be found at Trader Joe's, Whole Foods, or other well-stocked grocery stores)
  • 1 oz granulated sugar
Combine the strawberries and sugar in a coffee grinder or small food processor and pulverize until a coarse powder forms.  Set aside until ready to use.


Tuesday, April 28, 2015

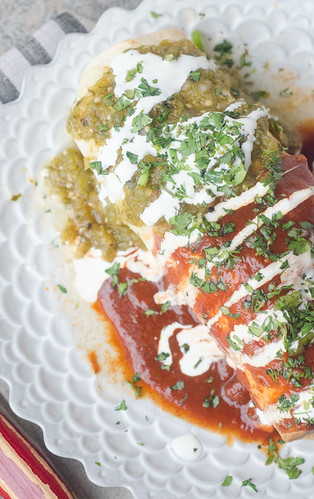
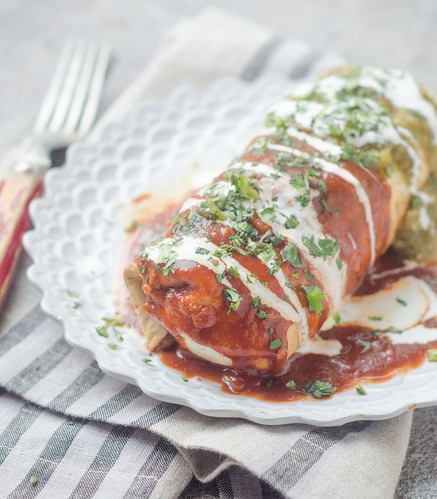
Chicken Burritos Mojados (Mexican Flag Burritos)

Burritos Mojados (Mexican Flag Burritos)

I told you guys I had an insane recipe to share this week, and this is it.  These burritos.  Oh man, they are something special.  They are filled with chicken, beans, rice, cheese, and avocado, then draped in three sauces that are inspired by the colors of the Mexican flag.  The red sauce is homemade red chile enchilada sauce, the green is roasted tomatillo salsa, and the white is Mexican crema.  Together they form perfect Mexican food harmony.  The smoky spiciness of the enchilada sauce complements the bright fresh tanginess from the salsa verde, and the smooth and creamy crema ties everything together.  I'm pretty sure that after every bite, I proclaimed these to be one of the best things I've ever made, and kept telling Joey "it's just like we're at a mexican restaurant!"

Burritos Mojados (Mexican Flag Burritos) 

These do take a bit of prep work, but it's all pretty well streamlined, and none of it's difficult or tedious.  You could even prep these in advance - make the salsa (or buy it, I promise I won't tell), make the sauce, cook and shred the chicken, and cook the rice.  Then just assemble and bake when you're ready.  The assembled burritos can also be prepped a few hours in advance as well.

I hope you're planning an all-out feast for Cinco de Mayo, and I think these burritos should be required.  They are something different than the typical tacos or fajitas, and totally worthy of a big celebration.  Margaritas not optional!

Burritos Mojados (Mexican Flag Burritos) 

Chicken Burritos Mojados (Mexican Flag Burritos)
adapted from ATK's The Best Mexican Recipes
serves 6

  • 2 1/4 cups chicken broth
  • 3/4 cup long grain white rice, rinsed
  • 1 (15-oz) can pinto beans, rinsed and drained
  • 4 Tbs chile powder
  • salt and pepper
  • 2 scallions, thinly sliced
  • 2 Tbs vegetable oil
  • 1/2 large white onion, diced
  • 3 cloves garlic, minced
  • 1 tsp cumin
  • 2 (8-oz) cans tomato sauce
  • 1 1/2 lbs boneless, skinless chicken breasts
  • 1/4 cup minced fresh cilantro
  • 6 (10-inch) flour tortillas
  • 2 avocados, halved, pitted, and cut into 1/2inch pieces
  • 8 oz monterey jack cheese, shredded
  • 1 1/2 cups tomatillo salsa
  • water, as needed
  • 1/2 cup Mexican crema (or sour cream)
Bring 1 1/4 cups of the broth, rice, beans, 2 teaspoons of chile powder, and 1/2 teaspoon of salt to boil in a medium saucepan over medium-high heat.  Cover, reduce heat to low, and cook until the rice is tender and the broth is absorbed, about 20 minutes.  Remove from heat, and allow to sit for 10 minutes, covered.  Stir in the scallions and set aside.

Meanwhile, heat the oil in a large saucepan over medium-high heat.  Add the onion and cook until it's just softened, 4-5 minutes.  Stir in the garlic, remaining 3 Tbs chile powder, and cumin, and cook until fragrant, about one minute.  Stir in the tomato sauce and remaining 1 cup of broth and bring to a simmer.  Nestle the chicken breasts into the sauce, cover, and reduce heat to medium-low.  Cook until the chicken is cooked through and registers 160 degrees, about 10 to 15 minutes, flipping halfway through.  Transfer the chicken to a cutting board, and once it's cool enough to handle, shred or chop into bite-sized pieces.  Taste the red sauce and season with salt and pepper as needed.

Preheat the oven to 350 degrees.  Line a baking sheet with foil and spray lightly with cooking spray.

In a large bowl, combine the rice and beans mixture, chicken, 1/4 cup of the red sauce, 2 Tbs of the cilantro, and cheese.  Season with salt and pepper and stir well.  

Wrap the tortillas in a damp kitchen towel and microwave until they are warm, about one minute.  

Working 1-2 tortillas at a time, mound 1 cup of the chicken and rice mixture in the center of each tortilla  Sprinkle with 2 tablespoons of avocado.  Fold the sides then the bottom of the tortilla over the filling, pulling back on it to tighten around the filling.  Roll tightly into a burrito.  Place the burrito seam side-down on the prepared baking sheet, and repeat with the remaining tortillas.  Cover rightly with foil, and bake until heated throughout, 20 to 30 minutes.

As the burritos are cooking, whisk a little water into the tomatillo salsa if it's thick.  Microwave until hot, about 1 minute.

To serve, distribute the burritos to individual plates.  Pour the tomatillo sauce over half of each burrito, and pour the red sauce over the other half.  Drizzle with cream, sprinkle with cilantro, and serve.


Sunday, April 26, 2015

Hibiscus Margaritas

Hibiscus Margaritas

As Americans, we are really good at taking other countries' holidays and turning them into an opportunity for binge drinking.  And of these commandeered holidays, Cinco de Mayo is my favorite.  But only until we turn Bastille Day into a chance to drink lots of wine and eat cheese and bread though.  In the meantime, pass the margaritas and queso!

I have some really awesome recipes lined up to share with you this week, including TWO margarita recipes!  I'm starting with the hibiscus margarita, so that you have time to order some dried hibiscus flowers from amazon before the weekend!  They are relatively cheap, and you will pretty much have a lifetime supply, good for more cocktails, tea, glazes, desserts, etc.  So go ahead and order them now -- I'll wait!

These margaritas were kind of an experiment, but it was a wildly successful one.  I've had hibiscus cocktails before, but never margaritas, so I wasn't quite sure how they would turn out.  It was a fun recipe to make because you infuse tequila with the flowers, a technique that was new to me.  I liked this because it gives you a strong hibiscus flavor without watering down the tequila.  No one likes watered down tequila.

The resulting margarita is a gorgeous deep red hue, with a slightly floral, slightly spicy taste, well-tempered by the lime and orange juices.  This margarita had a wonderful complexity, without being too fussy or out there.  If you're looking for a unique margarita for Cinco de Mayo, give this one a try.  And stay tuned this week, I have more fun ideas and recipes coming at you!

Hibiscus Margaritas
adapted from chow.com
makes 6 margaritas

  • 16 oz tequila blanco
  • 2 oz dried hibiscus flowers (about 1 heaping cup)
  • 5 oz orange liqueur
  • 4 oz freshly squeezed lime juice (from about 6-7 limes)
  • 5 oz freshly squeezed orange juice (from 2 oranges)
  • 2 oz simple syrup
  • ice
  • lime wedges, for serving
In a medium saucepan, combine the tequila and hibiscus flowers.  Over medium-low heat, bring to 160 degrees, or until the tequila is just beginning to steam, 5-6 minutes.  Immediately remove from heat, cover, and allow to steep for 15 to 20 minutes.  

Place a fine-mesh strainer over a heat-resistant, quart-sized measuring cup or pitcher, and strain the tequila from the dried hibiscus flowers, pressing on them with a wooden spoon to extract as much liquid as possible.  Discard the flowers.

Stir the orange liqueur, lime juice, orange juice, and simple syrup into the tequila.  Cover and chill for at least an hour.

Serve over ice, with a lime wedge.


Wednesday, April 15, 2015

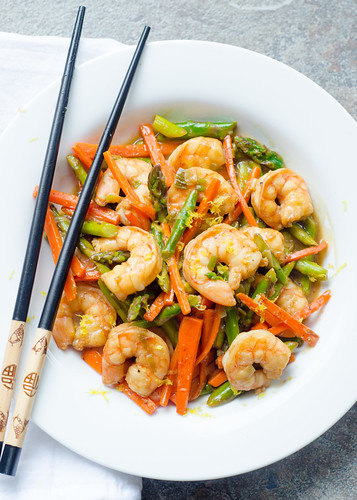
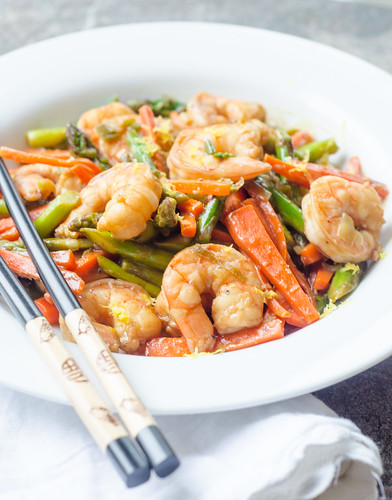
Shrimp and Asparagus Stir-Fry in Lemon Sauce

Shrimp and Asparagus Stir Fry in Lemon Sauce

I've had two obsessions this spring (well, three if you count tequila, but that's a year round thing).  My NEW spring obsessions are shrimp and asparagus.  We've been eating them both at least once a week for the past month, and I recently decided to combine their forces for a really awesome dinner.

I'm not generally a fan of Chinese takeout, but I do like the flavors of Chinese food.  Is that weird to say?  Oftentimes takeout leaves me feeling heavy and tired, and honestly a little sick to my stomach.  But take-out fake-out?  I'm always game.   Having control over the ingredients and sodium level makes all the difference for me.

This particular stir-fry is an ode to spring produce and flavors, and it couldn't be any further from the greasy, heavy Chinese food you're used to.  The asparagus, carrots, lemon, and shrimp pair wonderfully together.  As is the case with most stir fries, this does take a bit of prep work, what with the chopping, mixing, etc.  But it can all be done well in advance, and the dinner itself is cooked really quickly.  However, even if you do it all at once, you're still looking at dinner on the table in about half an hour; which in my book qualifies as a pretty solid weeknight meal.

Shrimp and Asparagus Stir Fry in Lemon Sauce 

Shrimp and Asparagus Stir Fry in Lemon Sauce
serves 4
  • 1 lb large shrimp, peeled, deveined, and tails removed
  • freshly ground black pepper
  • 2 tsp low-sodium soy sauce
  • 2 tsp dry Sherry or dry white wine
  • 3 scallions, minced
  • 3 cloves garlic, minced
  • 1 Tbs grated fresh ginger
  • 5 tsp canola oil, divided
  • 1 lb asparagus, woody ends trimmed, sliced on the bias into 2-inch pieces
  • 2 medium carrots, peeled and cut into matchsticks
  • Lemon Sauce (recipe follows)
  • zest of 1/2 a lemon
In a large bowl, toss the shrimp with the pepper, soy sauce, and sherry.  Cover with plastic wrap and refrigerate for at least 10 minutes, or up to 1 hour.

As the shrimp marinates, prepare the lemon sauce (recipe below).  This is also a good time to trim and slice the asparagus, and peel and chop the carrots.

In a small bowl, combine the garlic, ginger, and 1 teaspoon of the oil.

Heat 2 teaspoons of the oil in a 12-inch nonstick skillet over high heat.  Add the shrimp, arranging them into a single layer as best you can.  Cook about 1 minute, stirring halfway through.  They should be lightly browned but not fully cooked.  Remove to a medium bowl and set aside.

Return the skillet to high heat, and add the remaining 2 teaspoons of the oil.  Add the asparagus and carrots and cook 3 to 4 minutes, or until they are just barely tender, stirring constantly.

Stir in the garlic-scallion mixture and cook until fragrant, 30 seconds to 1 minute.

Return the shrimp, along with any accumulated juices, to the skillet.  Shake the sauce to recombine, then pour it over the mixture.  Simmer, tossing and stirring constantly, until the shrimp re cooked through and the sauce has thickened, about 1 minute.  Remove from heat and stir in the lemon zest.  Serve immediately .

Lemon Sauce
  • 6 Tbs low-sodium chicken broth
  • 1/4 cup freshly squeezed lemon juice (from about 2 lemons)
  • 2 Tbs mirin
  • 2 Tbs dry sherry
  • 2 Tbs low-sodium soy sauce
  • 2 tsp sugar
  • 2 tsp cornstarch
  • 1/4 tsp pepper
Combine all the ingredients into a pint-sized jar, and shake to combine.  Use as directed above.


Sunday, April 12, 2015

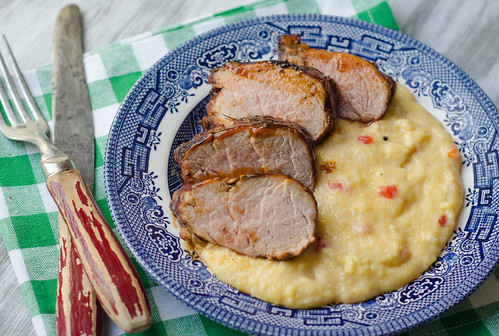
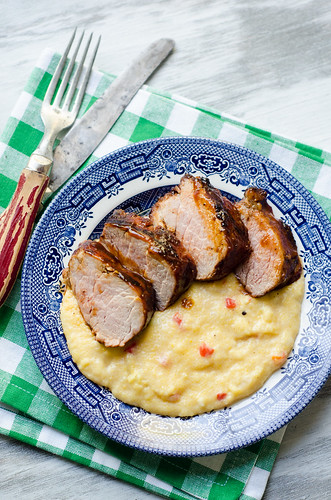
BBQ Glazed Pork Tenderloin over Pimento Cheese Grits

BBQ Glazed Pork Tenderloin over Pimento Cheese Grits 

Any southern lady worth her salt has a good recipe for pimento cheese in her back pocket.  Traditionalists hold strong to the idea that pimento cheese should be used only for dipping crackers and spreading on white bread.  I myself am a bit liberal when it comes to my pimento cheese consumption, and firmly believe that the sky's the limit!  I mean, I made pimento cheese macarons last year.   Clearly I'm no traditionalist.  So while pimento cheese grits aren't that out there, they are a fun spin on both grits and pimiento cheese -- two of my favorite southern delicacies.  And to top it with grilled and glazed pork tenderloin?  Pure southern perfection.

I'm imagining serving this at a dinner party.  Start with fried green tomatoes.  Serve grilled or cornmeal-crusted okra on the side.  And finish with an Arnold Palmer Layer Cake or Peach Cobbler.  To drink?  If you can find it, La Peche Mode, a peach saison by Three Taverns Brewery here in Atlanta.  This beer pairs perfectly with the spicy pork and creamy grits.

I realize that some parts of the country are still blanketed in snow, but please.  The minute you can, dust off your grill and make this dinner.  You'll be so happy, and I'll grant you all southerner cards for the day!

BBQ Glazed Pork Tenderloin over Pimento Cheese Grits 

BBQ Glazed Pork Tenderloin over Pimento Cheese Grits

  • 1 lb pork tenderloin, trimmed of excess fat
  • 3 Tbs BBQ Spice Rub (recipe below)
  • 1 Tbs canola oil
  • 1/2 cup BBQ sauce
  • 2 Tbs butter
  • 1/2 cup chopped onion
  • 2 cloves garlic
  • 1/4 tsp dry mustard powder
  • 1/8 tsp cayenne pepper
  • kosher salt and freshly ground black pepper
  • 1 cup stone-ground grits
  • 2 cups water
  • 2 cups milk
  • 1 1/2 cups extra sharp cheddar cheese
  • 4 oz diced pimentos, drained (or 1/2 roasted red pepper, diced)
  • 2 Tbs heavy cream or half and half
Prepare the grill to cook over medium-high heat.  Brush the grates with cooking oil.

In a small bowl, combine the BBQ spice rub and the canola oil to form a paste.  Rub over the pork tenderloin.

Place on the grill and cook, turning every 4-5 minutes, until the meat registers 140 degrees in the center.  For the last 5-6 minutes, brush with the bbq sauce.  Remove the tenderloin from the grill, cover with foil, and allow to rest for 5 to 10 minutes.  Brush once more with bbq sauce, and slice.

As the pork is cooking, make the grits.  Melt the butter in a medium saucepan over medium heat.  Add the onions.  Cook, stirring often, until they are softened and translucent, 5 to 6 minutes.  Add the garlic, mustard powder, cayenne pepper, 3/4 teaspoon of kosher salt, and 1/2 teaspoon of pepper.  Cook for an additional minute, then slowly whisk in the water and milk.  

Bring to a boil and whisk in the grits.  Reduce the heat to medium-low, and cook until the grits are creamy, about 20 to 25 minutes.  Whisk often to keep lumps from forming and to keep the grits from sticking to the bottom of the pan.

Remove the saucepan from heat and stir in the cheese, pimentos, and cream.  Taste and season with additional salt and pepper as needed.

To serve, spoon the grits onto a plate and arrange a few slices of pork over the top.  


BBQ Spice Rub
America's Test Kitchen, Healthy Family Cookbook

  • 3 Tbs brown sugar
  • 3 Tbs smoked paprika
  • 2 Tbs dry mustard powder
  • 2 Tbs pepper
  • 1 Tbs onion powder
  • 1 Tbs garlic powder
  • 1 Tbs ground cumin
  • 2 tsp kosher salt
  • 1/2 tsp cayenne pepper
Combine all the spices in a small bowl and stir to combine well.  This can be stored at room temperature in an airtight container for about a month.


Thursday, April 9, 2015

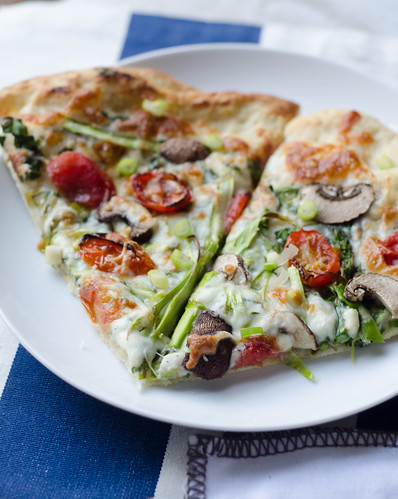
Pizza Primavera

Pizza Primavera

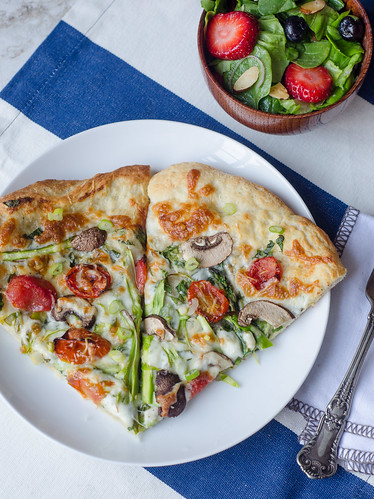
Every year, around this time, I wax poetic about my love for spring.  You guys can all have fall, I'll take spring year round if I could.  I went for a run today in 85 degree weather, and it made me SO happy.  Despite the oppressive pollen counts, the kids and I have been spending as much time as possible outside, and again, it makes me SO happy.  And finally, what makes me most happy of all, spring produce!  I love incorporating spring veggies into as many of my meals and dishes as possible.  I'm a big fan of pasta primavera, so naturally, in my pizza-loving world, the next step was pizza primavera.

Y'all, this pizza.  It's really amazing.  It basically combines several of my favorite pizzas into one amazing, veggie-loaded pizza.  We start with a garlicky white sauce, then top it with shaved asparagus, roasted cherry tomatoes, onions, spinach, and mushrooms.  I used a combo of mozzarella and parmesan cheese, but I think fontina and/or goat cheese would be absolutely fabulous here too.  I sprinkled the finished pizza with fresh herbs, and this went down in history as one of my favorite pizzas ever.  Coincidentally, Caroline proclaimed it to BE her favorite pizza ever, and laid claim to the leftovers for her lunch.  This veggie pizza puts all other veggie pizzas to shame.  Served with a strawberry-spinach salad, you have spring dinner perfection.

Spring, we welcome you with open arms!  I hope you guys are as enamored with spring produce as I am, because I have a huge backlog of recipes, just waiting to be shared!

Pizza Primavera 

Pizza Primavera
makes 1 pizza
  • 1 cup halved grape or cherry tomatoes
  • olive oil
  • kosher salt and freshly ground black pepper
  • 1 Tbs butter
  • 1 Tbs flour
  • 3/4 cup milk (low fat is fine)
  • 2 garlic cloves, smashed
  • 1 cup Parmesan cheese, divided
  • 1 lb pizza dough
  • 4-5 thick spears of asparagus, shaved into ribbons with a vegetable peeler
  • 2/3 cup chopped fresh spinach
  • 1/3 cup thinly sliced vidalia onion
  • 3-4 baby portobello mushrooms, sliced
  • 1 cup freshly shredded mozzarella cheese
  • 1 scallion, thinly sliced
  • 1 Tbs fresh minced basil

Preheat the oven to 400 degrees.  Arrange the tomatoes in a single layer on a foil-lined baking sheet, and sprinkle lightly with salt and pepper. Bake 15-20 minutes, tossing halfway through.  Remove from the oven, place a pizza stone in the oven, and increase the temperature to 500 degrees.

Meanwhile, make the white sauce, melt the butter in a small saucepan over medium heat.  Add the flour, and cook, whisking constantly, until golden and bubbly, about 1 minute.  Whisk in the milk, and add the garlic cloves.  Cook, stirring often, until the mixture thickens and bubbles.  Remove from heat, season with salt and pepper, and stir in 1/3 cup of the parmesan cheese.  Discard the garlic.

To prepare the pizza, sprinkle a large square of parchment paper with cornmeal or semolina flour.  Roll and stretch the dough into a 14-15 inch circle or oval, and brush the perimeter with olive oil.  

Spread a thin layer of the white sauce over the dough, leaving a border all the way around (you will have some sauce leftover -- it's great for dipping the pizza into!).  Scatter the chopped spinach over the sauce, then sprinkle 2/3 cup of the mozzarella over the spinach.  Arrange the shaved asparagus over the cheese, then top with the roasted tomatoes, onions, and mushrooms.  

Finish by sprinkling the remaining mozzarella and parmesan cheese over the top.  Carefully transfer the pizza + parchment to the oven and bake 10-12 minutes, or until the crust is golden-brown and the cheese is melted and bubbly.  

Sprinkle with the scallions and basil, slice, and serve.


Tuesday, April 7, 2015

Chicken with Chorizo Salsa

Chicken with Chorizo Salsa 

Is there an ingredient that will without fail, cause you to make a recipe?  For me, it's chorizo.  Include that spicy, smoky sausage in basically any dish, and I'm powerless against it.  Lately I've been adding it to scrambled eggs in the morning, along with shredded zucchini and fresh cilantro.  It's quickly become my favorite breakfast, and my mouth is watering just thinking about it.

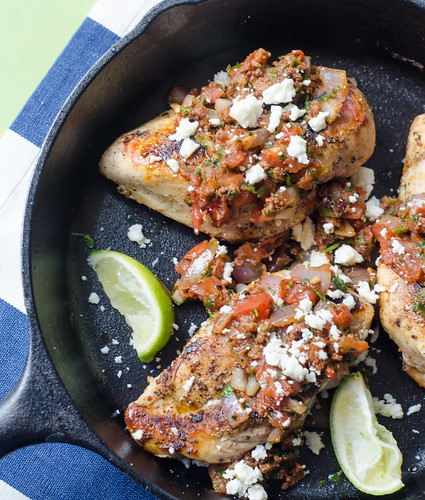
BUT I'm not here to talk about that breakfast today, I'm here to tell you about this chicken with chorizo salsa.  Yes, chorizo salsa.  This stuff is a revelation, and I pretty much want to eat it every day with every meal from now to eternity.  Sound good?

This is also a super easy and quick weeknight dinner.  You make the chorizo salsa, then cook the chicken in the drippings, giving you even more chorizo flavor.  I served this chicken over a bed of Mexican-style zucchini, and it made for such a wonderful, satisfying, and healthy meal.  Mexican food tends to be heavy and calorie-laden (at least the things I love are!), so having a nice and light Mexican dinner was a nice change of pace.  I enjoyed the leftovers all chopped up and stuffed into lettuce wraps for lunch the next day, so I highly recommend that you save some for that!

Chorizo = love.

Chicken with Chorizo Salsa
adapted from Cooking Light, Jan/Feb 2015
serves 4

  • 2 oz (1 link) Mexican pork chorizo
  • 4 (6-oz) boneless, skinless chicken breast halves, pounded to even thickness
  • kosher salt and freshly ground black pepper
  • 1/4 tsp ground cumin
  • 1 1/2 tsp canola oil
  • 1 cup seeded and chopped tomato (1 large)
  • 1/4 cup chopped fresh cilantro
  • 2 Tbs finely chopped red onion
  • juice of 1/2 lime
  • 1/4 cup crumbled queso fresco
Heat a large skillet over medium-high heat.  Remove the chorizo from its casing and crumble into the pan.  Cook, stirring constantly, for about 4 minutes.  Transfer the chorizo to a small bowl.

In a small bowl, combine 1/4 tsp of salt, 1/4 tsp of pepper, and the ground cumin.  Sprinkle the mixture over the chicken breasts.

Return the skillet to the stovetop and add the oil to the drip pins in the pan, swirling to coat.  Add the chicken to the pan and cook 5 minutes per side, or until it's cooked through (reaching 165 degrees as the internal temperature).  Remove the chicken from the pan, and cover with foil.

Once again, return the pan to the stovetop.  Add the tomato, cilantro, and onion, and cook, stirring constantly 1 to 2 minutes.  Add the chorizo, then stir in the lime juice.  Season to taste with salt and pepper and transfer the salsa to a small bowl.

To serve, place 1 chicken breast on each plate and top with about 2 tablespoons of the salsa and 1 tablespoon of cheese.  


Monday, March 23, 2015

Asparagus Noodle Skillet Lasagna

Asparagus Noodle Skillet Lasagna

 Guys, I have such a fun post for you today!  Over the past few months, I've been loving zucchini noodles, and have been quite taken with my spiralizer.  I've even begun to branch out -- cucumber noodles are great in salads, sweet potato noodles make yummy curly fries… and beet noodles, anyone?

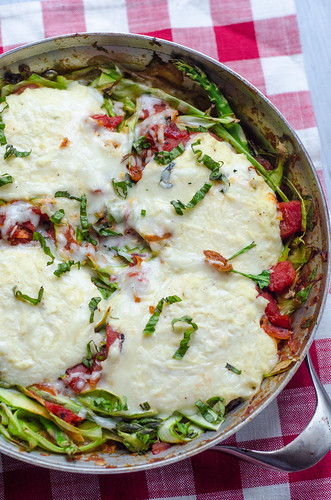
A few weeks ago I had planned to make skillet lasagna using zucchini noodles, but as I was buying groceries, I had the idea to use shaved asparagus instead.  It was a bit of a gamble, but it turned out to be one of the best meals I've cooked in a while!  The noodles were perfectly tender, without being mushy, and they imparted a wonderful mild and fresh flavor to the dish.  The texture was closer to that of fresh pasta than any veggie noodle I've had previously, and my kids absolutely devoured it.

I've been a bit hesitant to share recipes using the spiralizer here, since they do require a specialty kitchen tool.  But all you need for the asparagus noodles is a veggie peeler!  I was so excited by the success of this recipe, that I've been dreaming up other asparagus noodle ideas.  I never thought I'd be so excited about a vegetable, but with asparagus coming into season, get ready to see a lot of it around here!

Asparagus Noodle Skillet Lasagna


Asparagus Noodle Skillet Lasagna
heavily adapted from Inspiralized, by Ali Maffucci
serves 4

  • 1 lb asparagus
  • 2 tsp olive oil
  • 1 shallot, minced
  • 2 garlic cloves, minced
  • pinch of red pepper flakes
  • 1/4 tsp dried oregano
  • 1 (14.5 oz) can fire-roasted diced tomatoes
  • 4 oz tomato sauce
  • salt and pepper
  • 1/4 cup chopped fresh basil
  • 1/4 cup freshly grated parmesan cheese
  • 3/4 cup ricotta cheese
  • 1/3 cup shredded mozzarella cheese, divided
  • 1 egg, lightly beaten
  • 3 cups baby spinach
Preheat the oven to 375 degrees. 

To prepare the shaved asparagus, Lay each spear flat on the cutting board and hold by the woodsy end.  Moving from the base of the stalk to the tip, shave thin slices using a vegetable peeler.  It's okay if they are different thicknesses. 

Heat the oil in a 12-inch nonstick, oven safe skillet over medium heat.  Add the shallot and cook until it's just softened, 3 minutes.  Add the garlic, red pepper flakes, and oregano, and cook until fragrant, stirring constantly, about 1 minute.

Increase the heat to medium-high and stir in the tomatoes plus their juices and the tomato sauce.  Season generously with salt and pepper and bring to a boil.  Reduce the heat and simmer for 10 minutes.  Stir in the basil.

Meanwhile, make the filling.  In a medium bowl, combine the parmesan cheese, ricotta, 1/4 cup mozzarella, and the egg.  Season with salt and pepper and stir to combine.

Remove half the sauce from the pan, and set it aside in a small bowl.  Stir the spinach into the remaining sauce, and cook over low heat until it is wilted.  Spread the sauce evenly on the bottom of the skillet.  Pile the shaved asparagus over the sauce, then pour the remaining sauce over the asparagus. Drop large spoonfuls of the filling over the top, then sprinkle the remaining mozzarella cheese on top.

Cover with foil and bake 15 minutes.  Remove the foil and bake an additional 5 to 10 minutes, or until the noodles are soft and cheese is melted.  Serve.


BLOG DESIGN BY: SHERBET BLOSSOM DESIGNS