Wednesday, March 30, 2011

Pasta Primavera


First of all, I'd like to thank everyone for the kind words in my pregnancy announcement!  Like I said, we are very excited, despite the 1st trimester nausea.  I really shouldn't complain though - overall it has been much milder than when I was pregnant with Caroline.  I'm pretty sure I didn't cook for 6 straight weeks back then!  This time around I felt marginally better, but more than anything I struggled to eat plenty of fruits and veggies, since the thought pretty much turned my stomach.  The best way to get around that?  Mix them up with carbs!

Pasta Primavera is aptly named for its plethora of spring vegetables.  While it's certainly not low-calorie, it is full of vegetables.  This particular version contains asparagus, green beans, peas, zucchini, mushrooms, and tomatoes.  While this dinner isn't challenging, it is a bit time and labor-intensive.  First, the vegetables are blanched (cooked briefly in boiling water).  The mushrooms are cooked with the tomatoes and cream to form a rich sauce, the noodles are cooked, and then finally, it's all combined and finished with basil, lemon juice, and Parmesan cheese.

This was a hit with our whole family - Caroline especially liked the noodles, but she ate the veggies with gusto as well.  So as I said, it's not necessarily a healthy dish, but any dinner that will get Caroline (and me) to eat this many vegetables is definitely a winner in my book!


Pasta Primavera
serves 6 as a main course
adapted from Cook's Illustrated, The New Best Recipe
  • salt
  • 6 oz green beans, cut into 3/4-inch pieces
  • 12 medium asparagus spears, tough ends snapped off, halved lengthwise, and cut into 3/4-inch pieces
  • 1 medium zucchini, cut into 1/2-inch dice
  • 1 cup frozen peas, thawed
  • 6 Tbs unsalted butter
  • 8 oz mushrooms, sliced thin
  • 4 large plum tomatoes (about 1 lb), cored, peeled, and chopped medium*
  • 1/4 tsp red pepper flakes
  • 2/3 cup heavy cream
  • 1 lb dried fettuccine
  • 3 medium garlic cloves, minced
  • 1/4 cup shredded basil leaves
  • juice from 1/2 lemon
  • freshly grated Parmesan, for serving
Bring 3 quarts of water to a rolling boil in a large saucepan, and add 1 tablespoon of salt.  Fill a large bowl with ice water and set aside.  Add the green beans to the boiling water and cook 1 1/2 minutes.  Add the asparagus and cook 30 seconds.  Add the zucchini and cook 30 seconds.  Finally, add the peas and cook 30 seconds.  Drain the vegetables and submerge in the ice water to stop the cooking.  Let sit until chilled, about 3-5 minutes.  Drain well and set aside.

Bring a large pot of water to a boil for the pasta.

Heat 3 tablespoons of the butter in the new-empty saucepan over medium-high heat.  Add the mushrooms and cook until browned, 8-10 minutes.  Add the tomatoes and red pepper flakes, reduce the heat to medium, and simmer until the tomatoes begin to lose their shape, about 7 minutes.  Add the cream and simmer until slightly thickened, about 4 minutes.  Cover to keep warm and set aside.

Add 1 Tablespoon of salt to the boiling water and add the pasta.  Stir to separate the strands, and cook until al dente. 

As the pasta cooks, melt the remaining 3 tablespoons of butter in a large skillet over medium heat.  Add the garlic and saute until fragrant and very lightly colored, about 1 minute.  Add the vegetables and cook until heated through, about 2-3 minutes.  Season with salt to taste; set aside.  Bring the tomato-mushroom mixture back to a simmer over medium heat.

Drain the pasta and add it to the skillet with the vegetables.  Add the mushroom-tomato sauce, and over low heat, gently toss well to coat and distribute the vegetables.  Add the basil and lemon juice, and season with salt and pepper  to taste.  Toss well and divide the pasta among individual serving bowls.  Serve immediately, passing the cheese separately.

*to peel the tomatoes, cut a small "x" in the bottom of the tomato, and cook in boiling water 30 seconds-1 minute, or until the skin begins to crack.  Submerge in an ice bath, then peel the skin.


Sunday, March 27, 2011

Sparkling Strawberry Lemonade + A Special Announcement


One of my favorite things to do when the weather warms up is to sit outside on our deck and drink a glass of wine, a beer, or a yummy cocktail.  However, this spring and summer I'll have to settle for a nonalcoholic option... because I'm pregnant!  That's right, Caroline is going to be a big sister!


I am due in September, and Joey and I are over the moon with excitement.  I have to admit that keeping up a variety of new recipes for my blog has been difficult with morning (all day) sickness, but I'm hoping that with the second trimester, things will improve.

So while this isn't a yummy cocktail, it is a pretty delicious mocktail.  With this pregnancy, I have taken to making mocktails quite often.  See, drinking too much water causes me to feel sick, and juice is way too sweet for me, but sparkling water really helps settle my stomach.  So I've made several variations of sparkling water + a splash of juice.  It makes me feel fancy, plus keeps me from getting sick.  Win-win!

This sparkling lemonade takes advantage of all the beautiful Florida strawberries that are starting to flood the markets, and the sweetness of the strawberries are nicely tempered by the tartness from the lemon.  The addition of sparkling water gives the lemonade a fun fizzy finish, and the sugar on the rim really made me feel like I was enjoying a fun drink.

I personally thought the lemon flavor could have come through a bit more (I really love super tart lemonade), so I've given a range for the amount of lemon juice.  And if you don't want to have a fizzy drink, just use regular water instead of sparkling.  I am already excited about trying new variations of this - I think blueberry or raspberry will be especially delicious this summer!


Sparkling Strawberry Lemonade
adapted from Willow Bird Baking, originally from The Sweet Melissa Baking Book
makes 6-7 cups of lemonade


Strawberry Syrup
  • 1 heaping cup chopped strawberries
  • 2 Tbs sugar
  • 1 tsp lemon juice
  • pinch salt
  • 2 Tbs cold water
Lemonade
  • 2/3 cup sugar
  • 1 cup very hot water
  • 1-1 1/4 cups freshly squeezed lemon juice
  • 4 1/2 cups cold sparkling water or seltzer
 To make the strawberry syrup, combine the strawberries, sugar, lemon juice, salt, and water in a food processor or blender.  Puree until smooth.  Pour through a strainer into a medium bowl to remove the seeds, pressing down to extract as much liquid as possible.

To make the lemonade, combine the hot water and sugar in a pitcher and stir to dissolve the sugar.  Add the lemon juice, strawberry syrup, and water.

To serve, rub a lemon wedge around the rim of a glass, then dip in sugar.  Fill with ice, then the lemonade.  Garnish with fresh strawberries or lemon slices.  Serve immediately.


Thursday, March 24, 2011

Chipotle-Grilled Pork Tacos


While looking through my recent posts, as well as my backlog of recipes waiting to be posted, I realized that we have been eating a LOT of Mexican and Mexican-inspired food lately!  I guess it's the warm weather - it makes me crave those bold flavors! 

These tacos are full of just that - pork tenderloin is slathered in a sweet-spicy wet rub, then grilled.  They are then topped with a crunchy and spicy pineapple slaw, and rolled up into a warm corn tortilla.  When I tasted the slaw on its own, I thought it was a bit too spicy for my taste.  However, in combination with the pork and tortilla, all the flavors are nicely balanced.

I was a bit hesitant to make this recipe, as it contains mayonnaise, which I really don't like.  I was tempted to use Greek yogurt instead, but I wasn't sure how it would hold up to the high heat of the grill.  The mayo ended up being great though; I think more than anything it just provides a base for the other flavors.  The pork tenderloins are halved lengthwise, so they cook quite quickly, and since you have more surface area, you're left with more of that delicious crispy outside.  I really really loved this pork.  So much that I kept sneaking bites as I sliced it. 

I served these tacos with the strawberry, mango, and avocado salad, plus chips and leftover roasted tomatillo salsa.  This was the first dinner of the year that we enjoyed on our deck, and I can't wait to enjoy many more this spring and summer.


Chipotle-Grilled Pork Tacos
adapted from The Best Simple Recipes
serves 4
  • 1/4 cup mayonnaise
  • 1 (8-oz) can pineapple chunks in juice, drained and chopped fine, 1/4 cup juice reserved
  • 1/4 cup minced fresh cilantro
  • 4 garlic cloves, minced
  • 1 Tbs minced chipotles in adobo + 2 tsp adobo sauce
  • 1 (8-oz) bag broccoli slaw mix
  • 4 scallions, sliced thin
  • juice of 1/2 lime, plus wedges for serving
  • 2 pork tenderloins, trimmed and sliced in half lengthwise
  • kosher salt and ground black pepper
  • 12 corn tortillas
Prepare grill over medium-high heat.  Oil grates.

Whisk mayonnaise, pineapple juice, cilantro, garlic, and chipotle + adobo sauce in a large bowl.  Reserve 1/4 cup of the mixture, then add the pineapple chunks, lime juice, scallions, coleslaw mix, and 1/2 tsp salt to the bowl.  Toss to combine.

Pat the pork dry and season with salt and pepper.  Rub the remaining mayonnaise mixture over the tenderloins, and grill until browned all over and meat registers 145 degrees, about 6 minutes, turning once.  Transfer to a cutting board, tent with foil, and let rest 5 minutes.

Grill tortillas until lightly charred and warmed through, about 15-30 seconds per side. 

Slice pork thinly on the bias, arrange on tortillas, and top with pineapple slaw.  Serve with lime wedges.


Tuesday, March 22, 2011

Strawberry, Mango, and Avocado Salad


Now that spring has (finally) arrived, I am phasing out of roasted veggies, and phasing in fresh salads.  We have been grilling a good bit lately, and with that comes the desire for low-maintenance sides dishes.  I really hate running back and forth from the grill to the kitchen to babysit our side dish, which is one reason why this is such a great option.
I know that the combination of avocado, mango, and strawberry might seem odd, but it really does work.  The sweetness from the fruit plays nicely off the creaminess of the avocado.  And the dressing ties all the flavors together.  I knew I would love it because I pretty much love all sweet and savory, but I was surprised by how much Joey enjoyed it as well.  He typically isn't as enthusiastic as I am about "weird" food.  And of course Caroline will eat anything we put in front of her, so she devoured it. ;-)

I first served this with the green chile crab cakes, and we enjoyed it so much that I made it again the very next night with some grilled pork tacos (recipe to be shared soon!).  Now between this, the cherry tomato salad, and the Mexican corn salad, I don't know what my go-to side for Mexican food will be this summer!

And if you are as excited for spring as I am, check out the Featured Recipes Page.  I've updated it with some of my favorite spring dishes!


Strawberry, Mango, and Avocado Salad
inspired by epicurious.com
  • 1 mango, peeled, pitted, and cut into 1-inch cubes
  • 1 cup chopped strawberries
  • 1 Tbs honey
  • 1/2 Tbs balsamic vinegar
  • 2 Tbs orange juice
  • juice of 1/2 lime
  • pinch cayenne
  • 1 Tbs minced fresh cilantro
  • 1 avocado, pitted and cut into 1-inch cubes
  • kosher salt
In a medium bowl, whisk together the honey, vinegar, orange juice, lime juice, cayenne, salt, and cilantro.  Toss with the strawberries and mango, and allow to sit for at least 15 minutes.  When ready to serve, gently mix in the avocado.  Season with salt to taste and serve immediately.


Sunday, March 20, 2011

PPQ: Green Chile Crab Cakes with Tomatillo Salsa


There are certain flavors and ingredients that will automatically make me gravitate towards a recipe.  Some include (but are not limited to) tomatillos, roasted poblano peppers, and crab will always make want to drop everything and make it.  So imagine my delight when this week's Project Pastry Queen recipe choice was Green Chile Crab Cakes with Tomatillo Salsa.  I have almost picked these for my choice every single time, but I have always been lured away by sweets and desserts.

This is a pretty standard recipe for crab cakes, with just a few fun twists:  Roasted poblanos are added to the mix, along with jalapeno, cilantro, lime juice, and red bell pepper.  They are then served with roasted tomatillo salsa, which is pretty much my favorite condiment ever.

I stayed pretty true to the recipe, however I did add some jalapeno, cilantro, and lime juice to the salsa.  The original recipe makes 8 crab cakes, but I only made 4 since they were just for Joey and me.  I kicked myself afterward, because leftover cakes would have been great on a salad, or better yet, as a burger with some melted pepperjack cheese and extra salsa.  Next time...

Tara of Smells Like Home has the full recipe posted on her blog.  Next week we have another doozy of a desset:  Toffee Bar Brownie Torte.


Friday, March 18, 2011

Blueberry Muffins


Last summer, my sister gave me a gallon of freshly picked frozen blueberries.  I was so excited because I would have access to beautiful summer blueberries all winter long, and yet there they sit in my freezer, with barely a dent made into them.  I've used handfuls here and there for smoothies, and I think I made waffles once, but other than that they have been sorely neglected.

As I was browsing Cook's Illustrated's website one day, I came across a recipe for "Best" blueberry muffins.  Since most everything they put out is awesome to me, if they label something as being the best, then it makes me want to try it!  They had a variation for using frozen blueberries, so I was set.

There are a few noteworthy comments on this recipe.  Other than just adding the blueberries to the batter, the blueberry flavor is two-fold.  First, a quick blueberry jam is made, and it is swirled into the top of the muffins.  Second, the tops are sprinkled with a lemon zest-sugar mixture, which not only gives them a nice sweet crunch, but also a nice subtle burst of lemon flavor.

These muffins were just coming out of the oven as Joey came home from work, and he immediately asked if they were ready to eat.  Even though I was already starting on dinner, he ate 2 right then and there.  Warm from the oven, slathered with a little butter, these were just awesome.  But reheated for about 15 seconds in the microwave, they are still just as delicious.  They are tender and sweet, with juicy berries in every bite.  And the lemon sugar positively makes them.  I still have almost a full gallon of blueberries to use, so I have a feeling I'll be making these very often from now on.


Blueberry Muffins
Cook's Illustrated, May 2009
makes 12 muffins


Lemon-Sugar Topping
  • 1/3 cup granulated sugar
  • 1 1/2 tsp grated lemon zest
Blueberry Muffins
  • 2 cups frozen blueberries
  • 1 cup + 2 Tbs + 1 tsp sugar
  • 2 1/2 cups all-purpose flour
  • 2 1/2 tsp baking powder
  • 1 tsp salt
  • 2 large eggs
  • 4 Tbs (1/2 stick) unsalted butter, melted and cooled slightly
  • 1/4 cup vegetable oil
  • 1 cup buttermilk
  • 1 1/2 tsp vanilla extract
 For the topping, stir together the sugar and lemon zest in a small bowl.  Set aside.

Preheat the oven to 425 and adjust the oven rack to the upper-middle position.  Generously spray a muffin tin with cooking spray, and set aside.

In a small saucepan, combine 1 cup of blueberries with 1 teaspoon of the sugar.  Cook over medium heat, stirring and mashing the blueberries often.  Continue to cook until the mixture has thickened and reduced to about 1/4 cup, 5-6 minutes.  Set aside to cool slightly.

Rinse the remaining blueberries, drain and pat dry.

Whisk together the flour, baking powder, and salt in a large bowl.  Toss the dried blueberries into the flour mixture.  In a medium bowl, whisk together the eggs and remaining sugar until thick and homogeneous, about 45 seconds.  Whisk in the butter and oil, buttermilk, and vanilla extract.  

Using a rubber spatula, gently fold the wet ingredients into the flour-blueberry mixture, being careful not to overmix.  There should be lumps remaining and the batter should be just moistened.

Using an ice cream scoop or large spoon, portion the batter into the muffin tins.  Drop a scant teaspoon of the blueberry jam onto the top of each muffin, and use a toothpick to swirl into the batter.  Sprinkle the lemon-sugar over the top of each muffin.

Bake 17-19 minutes, rotating once, until the tops are golden and firm.  Cool in the muffin tin 5 minutes, then transfer to a wire rack before serving.


Wednesday, March 16, 2011

Classic (Make-Ahead) Macaroni and Cheese


I have posted several fun variations on macaroni and cheese here, but I have actually never posted my favorite:  just a classic mac & cheese.  If you are anything like me, you have searched far and wide for the perfect recipe.  For me, this one is it.  There are always problems with other recipes I've tried:  the cheese sauce is too rich, there isn't enough cheese, it's grainy, or it's dry.  This recipe solves all of those problems.

It does use quite a bit of cheese (1 1/2 pounds), but it is thinned out by a combination of milk and chicken broth.  You also prepare more sauce than you think you need.  Since the noodles are only cooked halfway,  they finish cooking in the oven, thereby absorbing the excess cheese sauce.  This also uses a combination of extra sharp cheddar and Colby Jack to avoid the graininess.  When using cheddar alone, the sauce can be grainy, but the colby jack leaves it silky-smooth.  And finally, the flavor is amped up by the addition of garlic, mustard, and just a pinch of cayenne.

This version is topped with a fresh breadcrumb topping, but I also use ritz crackers when I don't have access to a food processor.  Both are great, but I personally prefer the breadcrumbs.

I have made this macaroni and cheese so many times that I pretty much have the recipe memorized by now. I have made it and served right away, and stored to bake later.  There is no deterioration in flavor, and I love it either way.   It really is one of my favorite dishes of all-time, and I hope you enjoy it as much as I do!


Baked Macaroni and Cheese
serves 6-8
barely adapted from Cook's Illustrated's The Best Make-Ahead Recipes
  • 1 recipe Toasted Bread Crumb Topping (follows)
  • salt
  • 1 pound pasta shapes
  • 6 Tbs unsalted butter
  • 2 medium garlic cloves, minced
  • 1 tsp dry mustard
  • 1/4 tsp cayenne pepper
  • 6 Tbs all-purpose flour
  • 2 1/4 cups low-sodium chicken or vegetable broth
  • 3 1/2 cups milk (low-fat is fine)
  • 1 pound colby jack cheese, shredded (about 4 cups)
  • 8 oz extra-sharp cheddar, shredded (about 2 cups)
  • ground black pepper
Preheat the oven to 400 degrees.

Bring water to a boil in a large dutch oven set over high heat.  Add 1 tablespoon of salt and the pasta, and cook, stirring occasionally, until the pasta is just beginning to soften, about 5 minutes.  Drain the pasta and leave in the colander.

Wipe the pot dry, and add the butter, and set it over medium heat until melted.  Stir in the garlic, mustard, and cayenne, and cook until fragrant, about 30 seconds.  Stir in the flour, and cook, stirring constantly, until golden, about 1 minute.  Slowly whisk in the chicken broth and milk, and bring to a simmer.  Whisking often, cook until large bubbles form on the surface and the sauce is slightly thickened, about 15 minutes.  Remove from heat and stir in the cheeses until completely melted.  Season with salt and pepper to taste.

Stir the drained pasta into the cheese sauce, breaking up any clumps, until well combined.  Pour into a lightly greased 9x13 inch baking dish and sprinkle with crumb topping.

Bake uncovered, until the sauce is bubbling and the crumbs are crisp, 25-35 minutes.


To store and serve later:  Wrap the dish tightly with foil, and refrigerate for up to 2 days.  To serve, bake in a 400 degree oven until the filling is hot throughout, about 40-45 minutes.  Remove the foil and continue to cook until the crumbs are crisp, 15-20 minutes.


Bread Crumb Topping
  • 4 slices white sandwich bread, quartered
  • 2 Tbs unsalted butter, melted
  • 2 Tbs minced fresh parsley
  • salt and pepper
Preheat the oven to 300 degrees. 

Pulse the bread and butter in a food processor to coarse crumbs, about 6 pulses.  Spread the crumbs out over a rimmed baking sheet.  Bake, stirring occasionally, until golden and dry, 20-30 minutes.  Let the crumbs cool, then toss with parsley and season with salt and pepper to taste.


Sunday, March 13, 2011

PPQ: Peanut Butter-Banana Cream Pie with Hot Fudge Sauce


I went to college at Georgia Tech, so I am pretty comfortable with my lot in life as a nerd.  And as a nerd, I know that Pi is 3.14159...  However, I distinctly remember a tutor my freshman year sitting at a white board writing out probably dozens of the digits.  That he had memorized.  In his spare time.  For fun.  So call me a nerd, but in college, I like to think I was actually kind of cool (compared to the rest of my school, that is). 

So why am I talking about Pi?  Well March 14th is 3/14, which is affectionately referred to as "Pi Day."  Our college also hosted a road race called the "Pi Mile,"  which was, you guessed it, 3.14 miles.  I told you I went to a nerdy school.

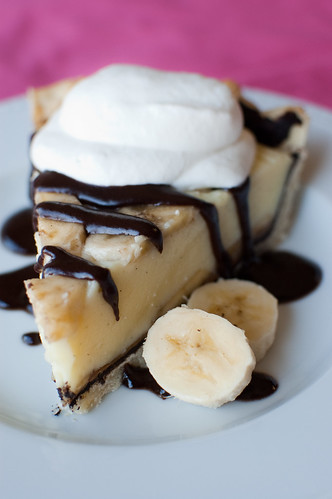
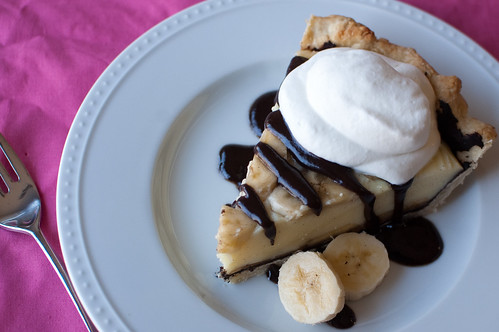
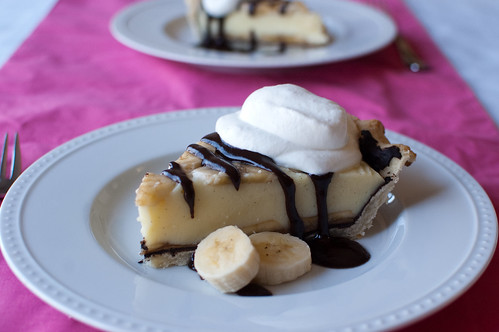
Around the blog world, fellow nerds like to celebrate Pi Day by baking a pie.  And wouldn't you know, my turn to host Project Pastry Queen fell on 3/13.  I have been dying to make this pie, and I thought this would be the perfect opportunity.  This pie is kind of a big undertaking.  Let's break down what we have here:  A homemade pie crust, topped with melted chocolate, peanut butter, a vanilla-bean-banana custard filling, homemade hot fudge sauce, and freshly whipped cream.  That is a lot of components.  And it dirties a lot of dishes - just ask Joey, my trusty dish washer.


But again, let's look at what we have here.  How could that not be the best pie ever?  The crust is one of the flakiest crusts I've ever made, and I think this will be my standard pie crust from now on.  After the crust is baked and cooled, it is brushed with bittersweet chocolate, then that is topped with a layer of peanut butter and sliced bananas.  The real star here though, is the custard filling.  It is a typical vanilla bean custard, but it is stabilized by gelatin that has been dissolved in banana liqueur.  I had never used it in a recipe before, but it was actually kind of fun - it smells like banana laffy taffy (which I happen to love.  Don't judge)!  The pie is then topped with more bananas and chilled overnight.  When you are ready to serve, you make hot fudge sauce and whip some cream, and you are good to go.

Even though there seems to be a lot going on here, it all works well together and all the flavors play harmoniously off each other.  Peanut butter, bananas, and chocolate are all made to go together, so this pie is truly (and incredibly rich and decadent) work of art.

Check out how everyone else liked this pie, and come back next week for Rebecca's take on crabcakes!


Franny's Fave Peanut Butter-Banana Cream Pie with Hot Fudge Sauce
The Pastry Queen, by Rebecca Rather


Crust
  • 2 cups all-purpose flour
  • 1/2 tsp salt
  • 2 Tbs sugar
  • 2/3 cup (11 Tbs) chilled unsalted butter
  • 4-5 Tbs ice water
Filling
  • 1/4 cup banana liqueur, such as creme de banane
  • 1 envelope + 1/2 tsp unflavored gelatin
  • 1 vanilla bean
  • 2 3/4 cups milk
  • 4 large egg yolks
  • 3/4 cup sugar
  • 3 Tbs corn starch
  • 3 oz bittersweet chocolate
  • 2 ripe bananas
  • lemon-lime soda
  • 1/4 cup creamy peanut butter, at room temperature
Hot Fudge Sauce
  • 1 cup heavy cream
  • 1/4 cup firmly packed brown sugar
  • 2 Tbs unsalted butter
  • 1 cup semisweet chocolate chips
  • 6 oz bittersweet chocolate, chopped
  • pinch salt
  • 1-2 Tbs whiskey (optional)
Whipped Cream Topping
  • 2 cups chilled heavy cream
  • 1/2 cup powdered sugar
3/4 cup roasted peanuts, coarsely chopped


To make the crust:  Preheat the oven to 425 degrees.  Using a mixer fitted with the whisk attachment, combine the flour, salt, and sugar on low speed for about 30 seconds.  Cut the chilled butter into 1/2-inch cubes.  Add the butter to the flour mixture and combine on low speed for 1-2 minutes, until the mixture looks crumbly, with bits of dough the size of dried currants.  Add 4 tablespoons of ice water, 1 tablespoon at a time, mixing on low speed for 10 seconds after each addition.  After the last addition, the dough should start to stick together.  If not, continue to mix about 10 more seconds.  If it is still dry and crumbly, add the remaining tablespoon of water.  Gently mold the dough into a disk, wrap in plastic wrap, and refrigerate at least 1 hour.

Unwrap the dough and transfer to a lightly floured work surface.  Roll it into a 1/8-inch thick circle large enough to cover the bottom and sides of a 9-inch pie plate (I actually had quite a bit of dough left over after I trimmed it).  To keep the dough from sticking, gently pick up the dough periodically as you roll it out and rotate it in place, adding more flour as necessary.

Wrap the dough lightly over the rolling pin and set it in the ungreased pie plate.  Press it into place and crimp the outside edges with your fingers or a fork.  Use a fork to prick the bottom of the unbaked crust.  cover the bottom and sides of the crust with a sheet of parchment paper, and fill with pie weights or dried beans.

Bake for 10 minutes.  Remove the parchment and weights.  If the crust isn't golden-brown, return to the oven for 1-3 minutes.  Cool on a rack until the custard filling is ready.


To make the filling:  Pour the banana liqueur into the bowl of a double boiler, and sprinkle the gelatin on top.  Allow to soften for 5 minutes.  Set the bowl over a small saucepan filled with 2 inches of simmering water and warm the gelatin until it has completely dissolved and looks clear.  Remove from heat and set aside.

Cut the vanilla bean pod in half lengthwise.  Combine with the milk in a small saucepan and bring to a boil.  Remove from heat, cover, and let the vanilla steep in the milk while preparing the yolk mixture.

In a large bowl, whisk the egg yolks.  Add the sugar gradually, whisking constantly until the mixture lightens in color to a lemony hue.  Whisk in the cornstarch.  Pour the milk through a strainer into a glass measuring cup or a pitcher with a spout.  Slowly pour the milk into the egg yolk mixture, whisking constantly.  Pour the mixture into a clean saucepan set over medium heat and whisk constantly until it begins to thicken and coats the back of a spoon.  Reduce the heat and whisk for 2 more minutes.  Remove from heat and whisk in the gelatin mixture, being sure to incorporate it thoroughly.  Let the filling cool completely, about 30 minutes.

In the meantime, melt the chocolate in a small bowl in the microwave, cooking 20-30 seconds at a time.  Using a pastry brush, evenly coat the bottom and sides of the crust with the chocolate.  Refrigerate the pie crust while the chocolate hardens and sets, 10-15 minutes.

Slice the bananas diagonally and brush them with lemon-lime soda to prevent discoloration.  Spread the peanut butter evenly over the bottom of the baked crust.  Layer on half the banana slices, all the filling, and the remaining slices.

Cover the pie with plastic wrap, making sure the plastic comes in direct contact with any custard that isn't covered by a banana.  Refrigerate the pie overnight before serving.


To make the fudge sauce:  Heat the cream and brown sugar in a medium saucepan over medium heat.  When the sugar is dissolved, stir in the butter, chocolate chips, and bittersweet chocolate.  Stir over medium-low heat until the chocolate is melted and the mixture is smooth.  Stir in the salt and remove from heat.  Stir in the whiskey and cover to keep warm until ready to serve the pie.  The sauce can be reheated in the microwave or on the stovetop over low heat.


To make the topping:  Using a mixer fitted with a whisk attachment, whip the cream until soft peaks form, about 1-2 minutes (do not overbeat).  Whip in the powdered sugar.

To serve the pie, cut it into wedges, add a dollop of whipped cream, and top with hot fudge sauce.  Sprinkle with peanuts if desired (I forgot to do this!).


Friday, March 11, 2011

Vegetable and Bean Tostadas


Any Mexican meal is sure to be a hit with everyone in my house, so I'm always on the lookout for new recipes.  I especially keep my eyes peeled for vegetarian meals, since I try to incorporate at least 2-3 vegetarian dinners into my meal plan each week.  These tostadas met both of these criteria, so I was excited to try them.  They are also relatively healthy, which is also a huge plus.

You start with a crispy baked corn tortilla, then top it with a lightly spiced bean mixture, sauteed peppers and onions, cheese, and a light salad.  The crunchy tortilla with the spicy beans, fresh veggies, and crisp slaw make for a great great dinner.  I served these with the Mexican cherry tomato salad, and we all thoroughly enjoyed dinner. 

Since these tostadas have a few components, this isn't the fastest meal to put together, but none of the components are especially difficult or time-consuming.  I made a few small changes along the way based on our preferences and what I had on hand, so my changes are reflected below. 


Vegetable and Bean Tostadas
adapted from Cook's Illustrated, Light and Healthy
serves 6
  • 12 (6-inch) corn tortillas
  • cooking spray
  • 2 green bell peppers, stemmed, seeded, and sliced thin
  • 1 red bell pepper, stemmed, seeded, and sliced thin
  • 2 onions, halved and sliced thin
  • 1 jalapeno, stemmed, seeded, and diced
  • 2 Tbs canola oil
  • salt and pepper
  • 4 garlic cloves, minced
  • 1/2 tsp cumin
  • 4 Tbs fresh lime juice
  • 2 (15-ounce) cans pinto beans - do not drain
  • 1 Tbs finely chopped jarred picked jalapenos, plus 1/4 cup jalapeno brine
  • 1 (10-ounce) bag coleslaw mix
  • 4 ounces pepperjack cheese, shredded (about 1 cup)
  • 1/2 cup low-fat Greek yogurt
  • 2 Tbs minced fresh cilantro
  • 2 Tbs minced fresh scallion
  • lime wedges, for serving
Preheat the oven to 450 degrees.  Arrange half the tortillas in a single layer on a baking sheet and lightly coat both sides with the cooking spray.  bake 8-10 minutes, until they are lightly browned and crisp.  Remove from oven and repeat with remaining tortillas.

Meanwhile, heat 1 tablespoon of the oil in a 12-inch skillet over medium-low heat.  Add the peppers, onions, and jalapenos, and season with 1/4 teaspoon of salt.  Stir to combine, cover, and cook until softened, 8-10 minutes.  Uncover, increase the heat to medium-high, and continue to cook, stirring occasionally, until lightly browned, 4 to 6 minutes longer.

Stir in the garlic and cumin and cook until fragrant.  Remove from heat and stir in 1 tablespoon of lime juice.  Transfer the vegetables to bowl and cover to keep warm.

Add the remaining 1 tablespoon of oil to the skillet and heat over medium heat until shimmering.  Add the beans with their canning liquid, pickled jalapenos, and 1 tablespoon of the brine.  Cook, mashing the beans with a potato masher or fork, until the mixture is thickened, about 5 minutes.  Season with salt and pepper to taste, remove from heat, and cover to keep warm.

Toss the coleslaw mix with the remaining 3 tablespoons of jalapeno brine, sour cream, remaining 2 tablespoons of lime juice, cilantro, scallions, and salt and pepper to taste.

To assemble the tostadas, spread the bean mixture evenly over the crisp tortillas, then top with cheese, vegetables, and slaw.  Serve with additional lime wedges.


Wednesday, March 9, 2011

Pistachio Cake with Honey-Vanilla Frosting


So my birthday was last week (the big 29!), and my wonderful mother-in-law offered to keep Caroline for the afternoon so I could have the day to myself.  The way I saw it, I had 3 options:  take a nap, go shopping, or bake a cake. After much debate, I ended up baking a cake.  I'd had my eye on this pistachio cake from Baked:  Explorations for quite some time, and since I had everything on hand, I was set to go.

The cake itself is a little more complicated than a standard layer cake, but not overly so.  Some of the pistachios are ground to a fine powder, while some are only roughly chopped.  This infuses the entire cake with pistachio flavor, and still gives you some crunch and texture.  The cake is also lightened by egg whites, which results in a light, soft, and airy cake.  It is slightly sweet, but the pistachios give it a bit of a savory note as well.


The real star of this cake however, is the frosting.  The buttercream has a subtle honey flavor, which play off of the pistachios quite well.  It is also made using an interesting technique that I had never done before.  Milk, cream, flour, and sugar are boiled together, then whipped until cool.  Butter is then added, and the frosting is mixed until it comes together.  It is then flavored with honey and vanilla.  I was a little concerned as I made the buttercream, as it was very thin and was an unappetizing gray color.  However, after a few minutes, it magically thickened up and turned into the lovely off-white color you see here.

Not only was this cake fun to make, it was delicious as well.  Definitely something a little different from your standard layer cake, and certainly a great birthday cake!


Pistachio Cake with Honey-Vanilla Frosting
Baked:  Explorations


Pistachio Cake
  • 1 cup shelled pistachios (plus 1/3 cup for decorating)
  • 2 1/2 cups cake flour
  • 3/4 cup all-purpose flour
  • 1 tablespoon baking powder
  • 1 teaspoon baking soda
  • 3/4 teaspoon salt
  • 1/2 cup (1 stick) unsalted butter, softened
  • 1/2 cup vegetable shortening
  • 1 3/4 cups sugar
  • 1 tablespoon. vanilla extract
  • 1 large egg
  • 3 large egg whites, at room temperature
  • 1 1/2 cups ice cold water
  • 1/4 tsp. cream of tartar
Honey-Vanilla Buttercream:
  • 1 1/2 cups sugar
  • 1/3 cup all-purpose flour
  • 1 1/2 cups whole milk
  • 1/3 cup heavy cream
  • 1 1/2 cups (3 sticks) unsalted butter, soft but cool, cut into small pieces
  • 1 teaspoon pure vanilla extract
  • 1/4 cup honey

Make the cake: Preheat the oven to 325° F. Butter three 8-inch round cake pans, line the bottoms with parchment paper and butter the parchment. Dust parchment with flour and knock out excess flour.

In the bowl of food processor, pulse the pistachios until they are coarsely chopped. Transfer about 2 tablespoons’ worth of the coarse pistachios to a large bowl. Continue to process the rest of the pistachios until they are almost powdery- but not a superfine dust. Stir the pistachio powder into the reserved coarse pistachios. Sift the flours, baking powder, baking soda and salt, together over the large bowl containing the pistachios mix. Stir to combine.

In the bowl of a standing mixer fitted with the paddle attachment, beat the butter and shortening on medium speed until creamy, 3 to 4 minutes. Add the sugar and vanilla and beat until fluffy, about 3 minutes. Scrape down the bowl, add the whole egg, and beat until just combined. Turn the mixture to low.

In a measuring cup, make 1 1/2 cups ice water. Add the flour mixture to the mixer in three parts, alternating with the ice water, beginning and ending with the flour mixture. For each addition, turn the mixer to low to add ingredients, then up to medium speed for a few seconds until incorporated. Scrape down the bowl, then mix on low speed for a few more seconds.

In a medium bowl, whisk the egg whites and cream of tartar until soft peaks form (You can do this by hand. Don’t be intimidated, it should only take 2 to 3 minutes). Do not overbeat. Gently fold the egg whites into the batter.

Divide the batter among the prepared pans and smooth the tops. Bake for 35-45 minutes, rotating the pans halfway through the baking time, until a toothpick inserted into the center of the cake comes out clean. Transfer the pans to a wire rack and let cool for 20 minutes. Turn the cakes out onto the rack and let cool completely. Remove the parchment paper.


Make the honey vanilla buttercream: In a medium heavy-bottomed saucepan, whisk the sugar and flour together. Add milk and cream and cook over medium heat whisking occasionally, until the mixture comes to a boil and has thickened, about 10 to 15 minutes.

Transfer the mixture to the bowl of a standing mixer with paddle attachment. Beat on high speed until cool (this takes at least 7 to 9 minutes of mixing) then add the butter; mix until thoroughly incorporated. Increase the speed to medium-high and beat until frosting is light and fluffy, 1 to 2 minutes.

Add the vanilla and honey and continue mixing until combined. If the frosting is too soft, put the bowl in the refrigerator to chill slightly, then beat again until it is proper consistency. If the frosting is too firm, set the bow over a pot of simmering water and beat with a wooden spoon until it is the proper consistency.

Assemble the cake: Place one cake layer on a serving platter. Trim the top to create a flat surface, and evenly spread about 1 1/4 cups frosting on top. Add the next layer, trim and frost it, then add the third layer. Spread the sides and top of the cake with the remaining frosting. Garnish the cake with crushed pistachios and refrigerate it for 15 minutes to it firm up before serving.

This cake will keep beautifully in a cake saver at room temperature for up to 3 days, if the weather is humidity free. Otherwise, put it in a cake saver and refrigerate it for up to 3 days. Let the cake sit a room temperature for at least 2 hours before serving.


Tuesday, March 8, 2011

Mexican Cherry Tomato Salad


As I've mentioned before, I feel like I struggle with sides when it comes to Mexican food.  Oftentimes all I really want is chips and salsa, but since I try to serve well-rounded meals, I usually incorporate some veggies into the side dish.  Not to mention that Mexican food can tend to be calorie and cheese-laden, so I feel better eating a big enchilada or burrito if I'm eating a salad on the side. :-)

This recipe is a riff on a cherry tomato salad that I've been making for quite some time.  It is originally from Cook's Illustrated, and the base recipe gives variations for both Greek and Italian inspired flavors. The key to this salad is draining the excess liquid from the tomatoes, and then using that liquid in the dressing.  It is boiled down so as to concentrate the tomato flavor, then mixed with seasonings and flavorings to form the vinaigrette. 

I had the idea to turn this into a Mexican-inspired salad, and kind of made it up as I went along.  I knew I wanted to include black beans and corn, and while I thought cojita or queso fresco would have been great choices for the cheese, I ended up going with Pepperjack because I had it on hand.  It was a great choice because it gave the salad just a little kick.  I just added herbs and spices that would complement Mexican flavors, and it turned out wonderfully!

I knew I would love this salad, but I didn't expect Joey to enjoy it as much as I did.  It turns out, he actually preferred it to our main course!  Between this and the Mexican Corn Salad, I will never have to fret about sides for Mexican food again!


Mexican Cherry Tomato Salad
inspired by Cook's Illustrated
serves 4-6
  • 2 pints cherry tomatoes, rinsed and quartered
  • kosher salt
  • 1/2 tsp sugar
  • 2 garlic cloves, minced
  • pinch red pepper flakes
  • 1 medium shallot, minced
  • 1 Tbs cider vinegar
  • 2 Tbs vegetable oil
  • juice of 1/2 lime
  • black pepper
  • 1 can (about 2 cups) black beans, drained and rinsed
  • 1 cup corn (frozen or canned, drained and rinsed)
  • 2 scallions, sliced thinly
  • 1/4 cup cilantro, chopped
  • 1/2 cup shredded Pepperjack cheese
Toss the tomatoes, 1/2 teaspoon salt, and sugar in a medium bowl; let stand for 30 minutes.  Transfer to a salad spinner, and spin until seeds and excess liquid have been removed about 1 minute. Stir to redistribute tomatoes several times during spinning.

Return tomatoes to the bowl and set aside.  Strain the tomato liquid through a fine-mesh strainer into a liquid measuring cup, pressing down to extract as much liquid as possible from the solids.  You should have 1/2 cup liquid.  Discard any excess.

Add the liquid to a small saucepan with the garlic, red pepper flakes, shallot, and vinegar.  Bring to a simmer and cook until the liquid has reduced to 3 Tablespoons, 6 to 8 minutes.  Transfer mixture to a small bowl, and allow to cool about 5 minutes.  Whisk in the oil and lime juice, and season with salt and pepper.

To the bowl with the tomatoes, add the black beans, corn, scallions, cilantro, and pepperjack.  Toss with the dressing and serve.


Monday, March 7, 2011

PPQ: Apple-Almond Chicken Salad


I am a big fan of chicken salad.  Served on a croissant, it is one of my favorite lunches ever.  And to be honest, I don't understand why anyone would eat it any other way.  I also don't bother eating it if it doesn't have fruit and toasted nuts in it.  I just love the crunch and the sweetness.  I realize there are some crazy people out there who don't like fruit in their chicken salad, but that is just crazy talk to me!

Though I make chicken salad quite often, I have never thought to blog it.  I don't use a recipe really, just more of a method:
  1. Cut the mayo by at least half with Greek yogurt
  2. Add lots of extra dijon
  3. Use some sort of fresh herb (parsley, chives, basil, thyme...)
  4. Something for sharpness (onion, scallion, shallot...)
  5. Have at least 1 fruit.  I prefer apples and grapes, but have used both peaches and pineapple in a moment of desperation.
  6. Dried raisins or cranberries
  7. toasted nuts (almonds, pecans, walnuts, pistachios, pine nuts....)
  8. And my "secret" ingredient is a big squirt of honey.  It gives the whole salad a little sweetness vs just getting it when you bite into the fruit.
So when Shawnda chose apple-almond chicken salad with homemade mayonnaise for her Project Pastry Queen choice,  I immediately flipped to the recipe to see if it fit my criteria.  And it did meet most of my guidelines!  I could easily (and dramatically) increase Dijon, and add honey and dried cranberries.  However, I ended up changing her recipe up so much that I really shouldn't say I even participated this week. 

I didn't make my own mayo.  Since I always use at least half Greek yogurt, I didn't really feel like going through the trouble.  I would like to make my own at some point though, in hopes that it will make me actually like mayonnaise instead of abhorring it.  I also didn't have celery or red onion on hand, so I just omitted the celery, and I used shallot instead of the onion.  And finally, I didn't have any parsley, so I added a combination of chives, fresh oregano, and basil.

Even though I pretty much butchered the recipe, I still loved this chicken salad.  I loved the sweetness from the apples, the crunch from the toasted almonds, and the hit of fresh herbs.  Once I made all of my adjustments, it really was my perfect chicken salad.

Head over to Confections of a Foodie Bride for the full (and correct) recipe, and check back next week for my choice!


Friday, March 4, 2011

BBQ Chicken Burgers


I hate to rub it in to the northerners, but we have been having awesome weather here in Atlanta over the past week.  We've had temperatures in the 60's and sunshine, which to me mean's one thing:  outside!  Not only has Caroline been getting a lot of play time, but so have I.  And playtime to me means grilling. 

When my sister was visiting last weekend, I originally planned a dinner of chicken, potatoes, and vegetables, but my grill was just begging to be used... so while at the grocery store, I decided to make burgers.  I have been loving barbecue lately, so I decided to make a bbq chicken burger.  I seasoned the burgers with spices that I would use in a rub for pulled pork, and then I glazed them with more bbq sauce as they cooked.  But the real key to these burgers is the pork.  Joey and I had eaten out the night before, and we had some leftover pulled pork.  I chopped it up very finely and added it to the mix.  Since ground chicken tends to be pretty lean, adding the pork helped keep the meat from drying out.  It also gives the burgers that smoked bbq flavor.  I topped them with some sharp cheddar and grilled onions slices, and I think grilled pineapple would be a great addition as well.  I loved these burgers so much that I'm pretty sure I said "This is a really good burger" after every single bite! 

We are smoking a pork shoulder this weekend, and I'm going to set some pulled pork aside purely so I can make these burgers again next week!  Happy grilling!

One Year AgoCoconut Cupcakes


Grilled BBQ Chicken Burgers
Pink Parsley original
makes 4 burgers
  • 1 lb ground chicken 
  • 1/2 cup crumbled cornbread or 1/4 cup cornmeal
  • 1 scallion, minced
  • 1 Tbs minced fresh cilantro
  • 1/2 tsp paprika
  • 1/4 tsp garlic powder
  • 1 tsp dry mustard
  • 1/2 tsp kosher salt
  • pinch cayenne
  • 2 tsp brown sugar
  • 2/3 cup chopped pulled pork
  • 5 Tbs bbq sauce, divided
  • 1/2 red onion, sliced into rings
  • 4 slices extra sharp cheddar
  • 4 burger buns
  • olive oil
Prepare grill.

In a large bowl, combine the chicken, cornbread, scallion, cilantro, paprika, garlic, mustard, salt, cayenne, brown sugar, pork, and 2 tablespoons of the bbq sauce.  Lightly but thoroughly mix with your hands to incorporate all the ingredients.  Add the remaining 3 tablespoons of bbq sauce to a small bowl.

Form the mixture into 4 equal-sized patties.  Brush the grates of the grill with olive oil.  Place the burgers and onions on the grill, and cook the burgers 5-6 minutes, then flip.  Turn the onions as well.  Brush the cooked sides with half the reserved bbq sauce.  After 3-4 minutes, flip the burgers again. glazing the other side with the remaining bbq sauce.  Place a slice of cheese on each pattie, and lay the buns, cut side down, on the grill.  Close the lid and allow the cheese to melt and the buns to toast. 

Remove all the food from the grill, assembling the burgers as desired.  Serve with additional bbq sauce if desired.


Wednesday, March 2, 2011

Cinnamon Crescents for Kelsey


I hope you guys aren't getting tired of these virtual parties, because we have another fun one today!  My friend Kelsey is getting married in less than two weeks, and we are all so happy for her.  She is one of the sweetest, kindest, and most genuine people I know, so to hear how much joy and love she has in her life is so heart-warming.  I can't wait to see pictures and hear all about the big day - she is going to be such a beautiful bride!

Now on to my dish!  I wanted to contribute a dessert, but I was indecisive and had several ideas floating around.  So I settled in with some of my favorite cookbooks and websites, and I found these cinnamon crescents.  I knew I wanted to make these as soon as I saw them.  I love serving bite-sized food at parties and showers, and I love the cinnamon-sugar combo.

Oftentimes it seems like yeasted baked goods are more work, but this one was so easy and low-maintenance.  The dough is mixed the night before, then left to rise overnight in the refrigerator.  It is then rolled out in cinnamon-sugar, cut into triangles, stuffed with booze-soaked golden-raisins and rolled into crescents.

These little treats are reminiscent of churros, but without the deep-fried guilt.  The outside is sweet and crispy, and the inside is soft and chewy.  The raisins add a nice burst of sweetness, and the orange zest combined with Grand Marnier contribute a nice fresh flavor as well.

Amy of Sing for Your Supper hosted this fabulous shindig, so head over to her's or Kelsey's blog to check out the rest of the dishes - this is one incredible spread!  And be sure to stop by An Apple a Day and wish Kelsey all the best!


Cinnamon Crescents
slightly adapted from The Pastry Queen  Parties
makes about 32 crescents
  • 1 cup (2 sticks) unsalted butter
  • 1 package instant yeast (2 1/4 tsp)
  • pinch of sugar
  • 1/4 cup warm water (105-115 degrees F)
  • 2 1/2 cups all-purpose flour
  • 2 large eggs, lightly beaten
  • zest of 1 medium orange
  • 1/4 tsp salt
  • 1 cup golden raisins
  • 1/4 cup Grand Marnier
  • 1 cup sugar
  • 2 Tbs ground cinnamon
Melt the butter and cool for 15 minutes.  Meanwhile, dissolve the yeast and sugar in 1/4 cup warm water (if it doesn't bubble or increase in volume, the yeast is dead.  Open a new package).

Place 2 cups of the flour in a large bowl and make a well in the center.  Into the well, pour the beaten eggs, yeast mixture, and melted butter.  Mix together with a wooden spoon.  Add the remaining 1/2 cup of flour, orange zest, and salt, and mix thoroughly to form a soft, smooth dough.  Gently pat it into a ball, cover with plastic wrap, and refrigerate overnight.

In a small bowl, toss the raisins with the orange liqueur, cover, and refrigerate overnight.

Preheat the oven to 350 degrees.  Line 2 baking sheets with parchment paper, or spray with cooking spray.  Combine the sugar and cinnamon in a bowl.

Remove the dough from the refrigerator and divide it into 4 equal portions.  Dust a work surface liberally with the cinnamon-sugar mixture.  Knead the dough briefly in the cinnamon-sugar, then roll out into a 1/4-inch thick circle, flipping the dough after each stroke with the rolling pin, and rotating the dough 90 degrees between each stroke as well.  Add more cinnamon-sugar to the work surface as needed.

Cut the circle into 8 equal triangles (as you would cut a pizza).  Sprinkle a thin layer of cinnamon-sugar on each triangle and scoop 1 teaspoon of the raisins onto the wide end of each triangle.  Roll up the dough, starting with the wide end.  Place the crescents on the prepared baking sheet and repeat with the remaining dough.  Bake until they are lightly golden-brown, 15-20 minutes.


BLOG DESIGN BY: SHERBET BLOSSOM DESIGNS