Tuesday, July 30, 2013

Spicy Cilantro-Grilled Chicken


Cilantro is most definitely a divisive ingredient - definitely a "love it or hate it" thing.  There's not much in between.  Interestingly enough, it's more than just a personal preference - there are studies that show that some people have a genetic predisposition to hating the herb.  And it could be tied to evolution and your lineage.  Science is so cool.

According to cilantro-haters, it tastes like "soapy, dead bugs."  According to cilantro lovers, it tastes like the best thing in the world.  I pretty much double the cilantro in any recipe I come across, and if I ever happened upon a cilantro scented candle, I would probably buy a dozen of them.

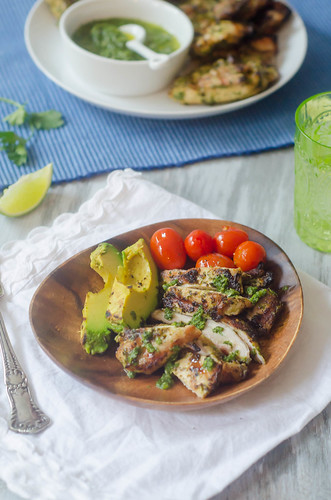
So let me state the obvious with this chicken:  it is awesome.  And what's better?  It's super easy.  It's healthy.  It's super versatile - eat it as is, shred it and use for tacos, nachos, or quesadillas, use it in a grilled chicken salad, sandwich it between some bread... the sky's the limit here.  This has been my go-to meal of the summer.  And I'm pretty sure I've served it with corn on the cob and watermelon every single time.  I've made it at least three times, and I figured it was high time I got a picture so I could share with you all.  Most recently, I grilled some cherry tomatoes and avocado, and they were great accompaniments to the chicken as well.  And all of the leftovers made for a ridiculous salad the next day for lunch.

The chicken is briefly marinated in a mixture of cilantro, garlic, jalapeños, and lime juice.  Then you just grill and go.  Dinner is served.

Spicy Cilantro-Grilled Chicken
adapted from Southern Living, April 2013
makes 4-6 servings

Adjust the number of jalapeños to suit your spice-preference.  Using 2 jalapeños will give you a super flavorful, yet still mild chicken.  Obviously using 4 jalapeños will give you a spicier final product.  Keep in mind that the spice will mellow a bit on the grill.

  • (up to) 4 jalapeños, halved, seeds and ribs removed, roughly chopped
  • 4 cloves of garlic, roughly chopped
  • 2 bunches of cilantro (3-4 loosely packed cups)
  • 1 tsp kosher salt
  • 1/2 tsp freshly ground black pepper
  • juice of 1 lime
  • 2/3 cup canola oil
  • 12 skinless boneless chicken thighs, trimmed of excess fat
  • lime wedges, for serving
Prepare the grill to medium-high heat.

Meanwhile, combine the jalapeños, garlic, and cilantro in the bowl of a food processor.  Puree until the ingredients are finely chopped, then add the cilantro, salt, pepper, lime juice, and canola oil.  Puree until  smooth, scraping down the sides as needed.  Measure out 1/4 cup of the marinade and set aside for serving.

Add the chicken to a large bowl, and pour the remaining marinade over it.  Mix to distribute evenly, cover, and refrigerate 15 minutes.

Brush the grates with oil, sprinkle the chicken with salt and pepper, and grill 5-6 minutes per side, or until cooked through.  

Cover the chicken with foil and allow to rest 5 minutes.  Serve with the reserved marinade.


Sunday, July 28, 2013

Crab & Corn Cakes with Mango Salsa and Avocado Cream


Typically, I'm pretty good about sticking with my weekly menu plan.  Sure, things may get pushed back to the following week, or we may skip a planned dinner here or there for leftovers or take-out, but as a general rule, I make what I plan.  So there I was, doing my weekly grocery shopping, and I happened to see crab legs on sale for a ridiculous price.  I immediately threw some in my cart, and there went my planned dinner for that night.  I honestly had no idea what I wanted to do with them:  steam and dip into melted butter, make some sort of taco or pizza?  salad?  risotto?  pasta?  Eventually, I decided to stay pretty classic, and make crab cakes.  But of course, not just any crab cakes.  Summery crab cakes.  Filled with fresh sweet corn.  And topped with mango salsa.  Oooh and avocado cream!  It was a great decision, and it resulted in a pretty killer dinner.

As is my M.O. these days, I prepped this dinner while the boys napped.  I picked the crab, mixed and formed the crab cakes, threw together the salsa, and then just pan-fried the cakes and made the avocado cream when it was dinner time.  I actually think chilling the crab cakes helps them stay together better - I've yet to make a crab cake that didn't require using the utmost care when flipping them.

Seafood goes really well with mangos, and avocados (Exhibit A.  Exhibit B.).  And while these may seem like they have a lot/too much going on, the crab really does shine.  The slight sweetness of the corn plays really well off the crab, and the little kernels provided a great textural contrast in the crab cake.  I also really loved how the kernels on the outside of the crab cake got nice and crispy in the pan.  The sweet and spicy mango salsa is a great complement to the crab cake, and the avocado cream gives the whole thing a creamy, rich finish.

Crab & Corn Cakes with Mango Salsa & Avocado Cream
a Pink Parsley Original
makes 4 crab cakes, with enough salsa and cream leftover for chips and dip.

  • 8-10 oz crab meat, picked over for errant shells and cartilage
  • 1 egg
  • kernels from 1 ear of corn
  • 2-3 Tbs minced fresh cilantro
  • 1/2 jalapeño, seeds and ribs removed, minced
  • 1/4 cup dried bread crumbs
  • 2 Tbs mayonnaise
  • 1 green onion, minced
  • kosher salt and freshly ground black pepper
  • 3 Tbs vegetable oil
Combine all the ingredients in a medium bowl, and gently mix with a spatula.  With wet hands, divide the mixture into 4 parts, then form into patties that are about 2-3 inches across.  Arrange in a single layer on a parchment-lined baking sheet, cover with plastic wrap, and refrigerate for at least 1 hour.

When you're ready to cook the crab cakes, heat the oil in a large nonstick skillet over medium-high heat.  Very carefully transfer the cakes to the skillet, and cook 3-4 minutes per side, flipping very carefully with a metal spatula.  Serve immediately.

Mango Salsa
  • 2 mangos, peeled and diced into 1/2-inch cubes
  • 1/4 cup chopped red or green bell pepper
  • 1/2 jalapeno, ribs and seeds removed, diced
  • 2 T diced red onion
  • juice of 1 lime
  • 1/8 tsp chili powder
  • 2 Tbs minced fresh cilantro
  • salt and pepper to taste

To prepare the mango salsa, combine all the ingredients in a medium bowl.  Taste and season with more salt, lime, or hot sauce if necessary.


Avocado Crema
  • 1 avocado, pitted 
  • 1-2 Tbs plain yogurt
  • 1 Tbs sour cream
  • juice of 1/2 lime
  • hot sauce to taste
  • salt and pepper to taste


For the avocado crema, use a fork to mash the avocado in a medium bowl.  Add the yogurt, sour cream, hot sauce, and lime, and continue mashing to form a smooth sauce.  Add more yogurt or sour cream to achieve your desired consistency, and season with salt and hot sauce.


Tuesday, July 23, 2013

Pizza with Corn, Tomatoes, and Mozzarella


This pizza.  You guys.  It's pretty amazing. Admittedly, it's a little out there.  And you might be wrinkling your nose.  But stay with me.  Here's the breakdown:  fresh pizza dough - please, no canned dough (ever)!  Fresh tomatoes, mozzarella, corn, and basil.  And here's the crazy part:  instead of traditional red sauce, you use a puree of fresh corn, garlic, and Parmesan.  And it is ridiculously good.  It's basically creamed corn on a pizza.

As I've mentioned before, pizza night is one of my favorites because Caroline always helps me roll out the dough, spread the sauce, and add the toppings.  And of course sneak a few samples in the process.  When we made this pizza, she thought it was so funny that we were using corn instead of sauce.  "Corn  pizza sauce?!  Get out of town!"  But she ended up loving it just as much as I did.

This pizza is definitely a celebration of summer - there truly is nothing like summer produce.  Fresh sweet corn, heirloom tomatoes, fresh basil... it doesn't get any better than this.  Branch out and get crazy with your next pizza night - you definitely will not be disappointed.

Pizza with Corn, Tomatoes, and Mozzarella
adapted from Martha Stewart Living, August 2012
makes 1 12-14 inch pizza

If you are opposed to turning on your oven during the summer, this can easily be made on the grill.  Just have all of your toppings at the ready when you start, because it will cook quickly.

Since tomatoes, corn, and mozzarella all have high water contents, I like to lightly salt the tomatoes and then blot them with paper towels before adding them to the pizza.  I also gently remove some of the seeds and pulp from the slices.  But since the pizza cooks at such a high temperature, most of the water will evaporate anyway.  If there are any visible "puddles" when you take it out of the oven, just blot them with a a paper towel before serving.

  • 1 lb pizza dough
  • cornmeal, for sprinkling
  • 2 large ears of fresh corn
  • 1/2 oz Parmesan cheese, shredded (about 1/4 cup)
  • 1 large garlic clove, minced
  • 2 Tbs olive oil, plus more for brushing the dough
  • kosher salt
  • 1 large or 2 small heirloom tomatoes (a mixture of red and yellow tomatoes is the most visually appealing)
  • 6 oz fresh mozzarella, thinly sliced
  • 2 Tbs shredded fresh basil
Preheat the oven (with a pizza stone in it)  to 500 degrees Farenheit for at least 30 minutes.

Sprinkle a large square (about 14-16 inches) of parchment paper with cornmeal, and pull and stretch the dough into a large circle, oval, or rectangle.  Brush the outer edge with olive oil and set aside.

In a food processor, combine 1 1/2 cups of the corn, the parmesan cheese, garlic, olive oil, and 1/2 tsp of kosher salt.  Puree until mostly smooth, but leaving a few smaller chunks of corn.  Reserve any remaining corn for adding to the pizza.

Slice the tomatoes into 1/2-inch rounds.  If the tomatoes are large, cut each slice in half.  Arrange in a single layer over a kitchen towel or paper towel, and sprinkle lightly with salt.  Allow to sit 5 minutes, then gently blot with another towel.  Gently "poke out" as many of the seeds and pulp as you can from each slice.

Spread the corn puree over the dough, then top with the sliced tomatoes.  Arrange the mozzarella evenly over the top, then sprinkle the reserved corn over the mozzarella.  Season with salt and pepper to taste.

Transfer the pizza and parchment to the oven and cook 10-12 minutes, or until the cheese is melted, and the crust is browned.   Remove from the oven and allow to cool 5-10 minutes.  Scatter the basil over the top, slice, and serve.


Thursday, July 18, 2013

Cheesy Potato & Tomato Casserole


How do you define comfort food?  For me, cheese must be involved.  And a lot of it.  I also need some sort of carb - be it pasta, potatoes, whatever.  Anything else is just a bonus, but those are my main requirements.  So this potato bake is some major comfort food.  It has thinly sliced potatoes, seasoned with garlic, rosemary, and salt, and layered with chopped tomatoes, mozzarella, and parmesan cheese.  After baking, you are left with what I would consider a pretty awesome dish.   There is a blanket of perfectly crispy potatoes covering a bed of soft, creamy, cheesy potato goodness.  The rosemary and tomatoes give the dish a nice burst of freshness.  I couldn't decide if I liked the crispy top layer or the creamy interior.  Because if there is anything better than a crispy, salty potato, it would be a soft, creamy, cheesy potato.  

This is one of those dishes that I kept sneaking bite after bite as I cleaned the kitchen that night.  I had originally planned to save enough to serve with breakfast - how fabulous would this be topped with a poached egg?!  But alas, Joey and I couldn't keep our forks out of this, and um, we finished the whole thing.  Sorry not sorry.


Cheesy Potato & Tomato Casserole
serves 4-6 as a side.  Or 2-3 as a main dish, apparently.
  • 1/4 cup olive oil
  • 1 Tbs minced fresh rosemary leaves
  • 2 large cloves of garlic, minced
  • 1 tsp kosher salt
  • 1/2 tsp freshly ground black pepper
  • 2 lbs potatoes, scrubbed 
  • 6 oz mozzarella cheese, shredded
  • 1 oz parmesan cheese, shredded
  • 1 1/4 lbs plum tomatoes, cored, seeded, and chopped (about 5-6 medium)
Preheat the oven to 400 degrees Fahrenheit.  Brush 1 tablespoon of the oil over the bottom and sides of a 9x13 inch baking dish.  Set aside.

Combine the remaining 3 tablespoons of the oil with the rosemary, garlic, salt, and pepper.

Slice the potatoes as thinly as you can - preferably 1/8-inch.  Using a food processor with the slicing blade attachment works really well, as does a mandolin.  But a sharp knife works just fine.

Place the potatoes in a large bowl and toss with the oil mixture, coating them evenly.  

Line the bottom of the baking dish with one third of the potatoes, slightly overlapping the slices.  Sprinkle with half the mozzarella, half the parmesan, and half the tomatoes.  Repeat the layering of potatoes, cheese, and tomatoes one more time, then finish by topping with the remaining potatoes.  If there is any of the oil mixture pooled at the bottom of the bowl, drizzle it over the top.  Sprinkle very lightly with salt.  (At this point, the casserole can be covered and refrigerated overnight.  Bring to room temperature before baking).

Cover with foil and bake 40 minutes.  Remove the foil and bake an additional 20 minutes, or until the top layer of potatoes is golden-brown.  Allow to cool 5 to 10 minutes before serving.


Tuesday, July 16, 2013

Chicken Enchilada-Stuffed Zucchini Boats


The most popular post on this little blog is by FAR the chicken enchiladas.  And for good reason - they are freaking awesome.  After four years, they still rank as one of my favorite dinners, and just about any time I take a meal to a friend, it's the chicken enchiladas.  I've made them dozens of times, and I'm pretty sure I could make them in my sleep.  Over the years, I've reinvented the enchiladas a few different ways - as nachos, pizza, dip, and quesadillas.  However, this is probably the most unique twist on them.

I saw these on Pinterest, and immediately knew they would be a hit.  I just used the idea from Skinny Taste, but I stuffed the boats with my standby recipe for the filling.  Between our CSA and the farmer's market, we always have an overabundance of zucchini in the summer.  While I love eating it simply grilled as a side dish, it's always fun to find a new and inventive way to serve the ubiquitous summer veggie.  These boats definitely fit the bill.  Zucchini boats aren't really that revolutionary or groundbreaking, but stuffing them with this cheesy, spicy, enchilada chicken filling definitely is.  And while I doubt I'll ditch the tortillas for good, it's really nice to have a different, lighter way to serve the enchiladas.  You still get all the cheesy, spicy goodness, but you also get a bonus serving of veggies.  Win, win.


Chicken Enchilada-Stuffed Zucchini Boats
inspired by Skinny Taste, filling adapted from America's Test Kitchen


  • 1 medium onion, chopped fine
  • 2 jalapenos, seeded and chopped fine
  • 1 teaspoon canola oil
  • 3 medim cloves garlic, minced
  • 3 Tablespoons chili powder
  • 2 teaspoons ground cumin
  • 1-2 teaspoons sugar
  • 1 15-oz can tomato sauce
  • 1 cup water
  • 1 pound boneless, skinless chicken breasts (2 large breasts)
  • 4-6 medium zucchini
  • 3/4 cup extra sharp white cheddar, shredded
  • 3/4 cup monterey jack cheese, shredded
  • 1/2 cup minced fresh cilantro


Combine the onion, jalapeno, 1/2 teaspoon salt, and oil in a large saucepan.  Cover and cook over medium-low heat, stirring often, until the onions and peppers have softened, 8-10 minutes. Stir in the garlic, chili powder, cumin, and sugar, and cook until fragrant, less than 30 seconds. Stir in the tomato sauce and water, and bring to a simmer.  Allow to cook 5-6 minutes, or until the sauce is slightly thickened.

Nestle the chicken into the sauce. Cover, and cook until chicken is cooked through (thickest part reaches 160 degrees), about 12-20 minutes. Transfer the chicken to a plate, and set aside to cool.

Meanwhile, preheat the oven to 400 degrees.  Halve each zucchini lengthwise, and use a spoon to scrape out the seeds and filling, leaving a thin border on all sides.  Brush the inside and outside with a little oil, and sprinkle lightly with salt and pepper.  Arrange in a single layer in a 9x13 inch baking dish, and cook 4-5 minutes.  Remove from oven and set aside.
Strain the sauce through a strainer into a medium bowl, pressing the onion mixture to extract as much liquid as possible. Transfer the onions to a large bowl and set aside. Season sauce with additional salt and pepper to taste.

Shred the chicken into bite-sized pieces. Add to the onion mixture, and add 1/2 cup of the enchilada sauce, 1 cup cheese, and the cilantro. Toss to combine.

Remove the cooked zucchini from the baking dish and spread 1/2 cup of the sauce on the bottom.  Using a spoon, fill each zucchini boat with the filling and arrange in a single layer in the baking dish, packing them tightly if necessary.  Drizzle each boat with 1-2 tablespoons of the reserved sauce, and sprinkle 1-2 tablespoons of cheese over each boat.

Cover with foil and bake 25 minutes, then remove foil and bake an additional 5-10 minutes.  Sprinkle with cilantro, and serve, drizzling each serving with some of the sauce from the bottom of the baking dish.


Depending on the size of your zucchini, you will most likely have some filling leftover.  Don't throw it away!  It freezes very well, so you could freeze it to use later in these zucchini boats, or in the actual enchiladas.  But my personal favorite use for it is to mix with a little enchilada sauce, top with cheddar cheese, bake it until it's nice and bubbly, and dig in with a bag of tortilla chips.  Yum!


Sunday, July 14, 2013

Black Bean & Corn Quinoa Bowls with Peach Salsa


Now that peach season is finally here, I can resoundingly proclaim that summer's officially here as well.  It's definitely not summer in the south until you bite into your first ripe, juicy peach.  My kids love them,  I'm obsessed with them... I am a born-and-raised Georgia girl, after all.  I love using them in both sweet and savory applications - anything from an appetizer, to a main dish, to a dessert, to a cocktail - anything is fair game.  Pssst, if you're as obsessed as I am with peaches, check out the Pinterest board I've created.  You will feel like you've died and gone to peach heaven.

So on to this fantastic use for peaches.  This dinner is pretty much my favorite way to eat.  It's light and healthy, uses lots of fresh and seasonal produce, and it's full of flavor and quite filling.  I started with a bowl of fluffy quinoa, then layered on a mixture of spiced and seasoned black beans and corn.  Finally, I topped the bowls with plenty of fresh peach salsa and a small sprinkle of queso fresco cheese.  You have plenty of varying textures, flavors, you have sweet, salty, spicy... it's good stuff here.

This is super fast and easy, which is definitely a must for me these days. As the quinoa cooks, prepare  the peach salsa and mix up the black bean mixture.  You can even prep all the components ahead of time, and just store it all separately. Assemble when you're ready to serve.  Or if you're making this for a group, let everyone make their own bowls - I went easy on the spice, but I think some pickled or fresh jalapeños would be really great sprinkled on top as well.  We all really loved this dinner, and the leftovers were great for lunch the following day.

I love peaches so much that I can't pick a favorite recipe or way to eat them, but what's yours?

Black Bean and Corn Quinoa Bowls with Peach Salsa
adapted from A Couple Cooks

Peach Salsa

  • 4 ripe peaches, peeled, pitted, and chopped
  • 1/2 medium red onion, minced
  • 1/2 jalapeño pepper, ribs and seeds removed, chopped
  • juice of 1 lime
  • 2-3 Tbs minced fresh cilantro (more or less to taste)
  • 1 large tomato, cored, seeded, and chopped
  • Kosher salt
Combine all the ingredients in a medium bowl and gently stir.  Allow to sit 10-15 minutes before serving, to let the flavors meld.

Black Bean and Corn Quinoa Bowls
  • 1 1/2 cups quinoa, rinsed well and drained
  • 2 1/2 3 cups water or broth (chicken or veggie)
  • 1 can black beans, rinsed and drained (or 2 cups cooked black beans)
  • 1-2 ears corn, shucked, and the kernels cut off the cob (about 1 cup of kernels)
  • 3-4 green onions, sliced (white and light green parts only)
  • 1/2 tsp cumin
  • 1/2 tsp chili powder
  • 2 Tbs minced fresh cilantro
  • juice of 1 lime
  • kosher salt and freshly ground black pepper
  • 1/2 cup crumbled queso fresco cheese (or cojita or feta)
To cook the quinoa, add it to a medium saucepan with the water or broth.  Bring to a simmer and cook, covered, about 15 minutes.  Remove from heat and allow to sit for 5 minutes, then fluff it with a fork before serving.

Meanwhile, combine the beans, corn, onions, cumin, chili powder, cilantro, and lime juice in a medium bowl.  Stir to combine, then season with salt and pepper as needed.

To serve, layer the quinoa, black beans, and peach salsa.  Sprinkle about a tablespoon of cheese over the peach salsa, and serve.


Monday, July 8, 2013

Chicken Parmesan Meatballs


Weather-wise, this has been a really weird summer.  First, it was cold for.ev.er.  And then we had a brief glimpse of wonderful, glorious, summer heat.  Then it rained for approximately two weeks straight.  I won't even tell you how many hilariously original people were making Noah's Ark jokes on Facebook.  So it's been kind of strange and confusing for my appetite as well.  I don't really like to eat big, heavy meals when it's 800 degrees outside.  We eat a lot of grilled meat, veggies, salads, and lots of fruit throughout the summer.  But it's practically impossible to grill when there's a flash flood or thunderstorm warning every night.  Thus, I've been craving comfort foods.  But like I said, it's been weird because it's still hot outside, so the thought of meatloaf or something equally as heavy isn't at all appetizing.  I know my thought process is confusing and random, but stay with me.

Enter these chicken parmesan meatballs.  Comfort food at it's best, but on the lighter side.  They aren't as heavy as traditional meatballs, or traditional chicken parmesan.  But they taste familiar and comforting, you'll still feel all warm and fuzzy inside.  These are super easy to put together, and they were a big hit with the whole family.  We love chicken parmesan in practically any incarnation, so that's no surprise.  I served these over pasta with marinara, but I think they would be really great as meatball subs as well.  Or serve them on their own as an appetizer or part of a spread of party foods.


Chicken Parmesan Meatballs
adapted from Dinner, A Love Story, via Tracey's Culinary Adventures
makes about 12 meatballs


  • 1/4 cup dried breadcrumbs
  • 3 Tbs grated onion
  • 1 Tbs chopped fresh parsley
  • 1 Tbs chopped fresh basil
  • 1/2 cup Parmesan cheese
  • 3/4 tsp salt 
  • 1/4 tsp black pepper
  • 2 garlic cloves, minced
  • 1 large egg, lightly beaten
  • pinch of red pepper flakes
  • 1 1/4 lb ground chicken
  • 1/4 cup marinara sauce, divided
  • mozzarella or provolone cheese slices, for topping the meatballs
Preheat the oven to 400 degrees Farenheit.  Line a baking sheet with foil, and spray with nonstick cooking spray or brush lightly with oil.

In a large bowl, stir together the dried breadcrumbs, onion, parsley, basil, Parmesan, salt, pepper, garlic, egg, and red pepper flakes.

Add the ground chicken, and gently mix with your hands to incorporate the seasonings with the meat.  Do not over mix.

Scoop the meat into 1/4 cup portions (an ice cream scoop works really well for this).  Roll into a ball with your hands, and arrange in a single layer on the prepared baking sheet - having your hands a little wet will help form them and keep the meat from sticking to your hands.

Add 2 tablespoons of marinara sauce to a small bowl, and use a pastry brush to brush the top of each meatball with a little sauce.

Bake 11-12 minutes, then use the remaining marinara sauce to brush the meatballs again.  Lay a slice of cheese over the top of each meatball.  Return to the oven and cook an additional 3-4 minutes, or until the cheese is melted and the meatballs are cooked through (they should read 160 degrees on an instant-read thermometer).  Remove from oven and serve.


Monday, July 1, 2013

Chocolate Sheet Cake with Triple Berry Buttercream


We've been joking that this has been the "Summer of Caroline."  She's been to art camp, princess camp, VBS, preschool camp... and we capped off the month of June with a surprise birthday trip to the happiest place on earth.  Disney World!  We left the boys with family and took her on a solo vacation, and of course she had the time of her life.  Meeting princesses, having breakfast with Mickey Mouse, hanging out with one of our favorite families ever, and basically having her dreams come true - yeah, it was pretty awesome.  We came home just in time to celebrate her FIFTH birthday the following day, then celebrated with a birthday party on Saturday.  This weekend we're attending my cousin's wedding, where she'll be a flower girl, and in the following weeks we'll be taking a family vacation to the beach, she'll go to music camp, and then get ready to start kindergarten (sob).  Summer of Caroline indeed.

When we woke up on her birthday, I asked her what she wanted to do that day.  Without missing a beat, she said that she wanted to help me bake a cake.  I was totally down with that.  She requested chocolate with strawberry frosting, and I was more than happy to oblige..  mostly.  We didn't have enough strawberries for the frosting - we had two, actually.  So instead, I used a mixture of raspberries, blueberries, and blackberries to create an out of this world delicious buttercream.

Since I had a five year old helping me, I decided that we'd go the easy and "rustic" route, baking up a sheet cake and then just slathering the frosting on.  There are times when I love beautiful and meticulously frosted cakes, but sometimes it's fun to let loose a little and just slap it on.  I topped the whole thing with a huge pile of fresh berries, and let me tell you - the berries MADE it.  The combination of the rich chocolate cake, sweet and decadent buttercream, and bright and fresh berries was just wonderful.  I made sure to get at least one berry in every bite. :)

I know that the frosting is purple, but this would still be a pretty fabulous dessert for the Fourth of July -  not every dessert has to be red, white, and blue, after all.


Chocolate Sheet Cake with Triple Berry Buttercream
cake adapted from Hershey's
buttercream adapted from Martha Stewart's Strawberry Buttercream


  • 2 cups sugar
  • 1 3/4 cups all-purpose flour
  • 3/4 cup unsweetened cocoa powder
  • 1 1/2 tsp baking soda
  • 1 1/2 tsp baking powder
  • 1 tsp salt
  • 2 eggs
  • 1 cup buttermilk
  • 1/2 cup vegetable oil
  • 2 tsp vanilla extract
  • 1 cup hot coffee
Preheat the oven to 350 degrees.  Butter and flour a 9x13 inch baking dish, and/or line with parchment paper.

In the bowl of a stand mixer fitted with the paddle attachment, whisk together the sugar, flour, baking soda, baking powder, cocoa powder, and salt.  Stir the ingredients together over low speed.  Add the eggs, buttermilk, vegetable oil, and vanilla.  Mix at medium speed until well-combined, about 2-3 minutes.  Carefully add the coffee and beat on the lowest setting to combine.  Remove bowl from the mixer and stir with a rubber spatula until well-combined.


Pour the batter into the prepared pan, and bake 35-40 minutes, or until a toothpick inserted into the center comes out clean.  Allow to cool 15 minutes in the pan, run a knife around the edge, then carefully invert onto a cooling rack to cool completely before frosting.


Triple Berry Buttercream


  • 1 cup mixed berries
  • 2 egg whites
  • 3/4 cups sugar
  • pinch of salt
  • 3/4cup (1.5 sticks) unsalted butter, cut into tablespoons, at room temperature
Puree the berries in a food processor. Strain through a fine-mesh sieve to remove as many seeds as possible, and set the puree aside.

Combine the egg whites, sugar, and salt in the bowl of a stand mixer set over a small pan of simmering water.  Whisk constantly by hand until the sugar has dissolved (the mixture should feel completely smooth when rubbed between your fingertips).

Attach the bowl to the stand mixer and fit with the whisk attachment.  Starting on low speed and gradually increasing to medium-high speed, mix until stiff (but not dry) peaks form.  Continue mixing until until the mixture is light, fluffy, glossy, and completely cool (test by touching the bottom of the mixing bowl), about 10 minutes.

With the mixer on medium-low speed, add the butter 2 tablespoons at a time, mixing well between each addition.  Scrape down the sides of the bowl, increase the speed to medium, and mix until the buttercream comes together (it can take up to several minutes, but it will come together eventually).  Switch to the paddle attachement and beat at medium-low speed to remove air bubbles, about 2 minutes.  Gradually add the strawberry puree a few tablespoons at a time, and mix to combine.

Frost the cake as desired, and top with additional berries before serving.


BLOG DESIGN BY: SHERBET BLOSSOM DESIGNS