Pizza night is one of my very favorite nights. Not only because I love pizza, but because Caroline and Smith love helping me make it. Caroline helps me from start to finish - shaping the dough, spreading the sauce, scattering on the toppings - the whole shebang. Smith helps by dumping handfuls of cheese and other toppings onto the dough, then eating any toppings he can get his little hands on. But I remember when that was the extent of Caroline's contribution, and now she can practically make a pizza all by herself! Having the kids help me in the kitchen is most definitely one of my favorite past times, and I think it's safe to say that they love it even more. Before I can even finish the sentence "Caroline, do you want to help me make dinner?" she's dragging the step stool up to the counter.
This pizza was one such joint effort. It's a simple premise - chopped tomatoes, mozzarella, basil, and shrimp. But it's so delicious in it's simplicity. I guess it's effectively just a margherita pizza with shrimp, but call it whatever you want - it's delicious either way. Simple dinners like this are one of the best things about summer - enjoy this pizza as a main dish with a green salad and a glass of wine, or set it out as a hearty appetizer or first course. It's light, fresh, and perfect for a relaxed dinner on the porch.
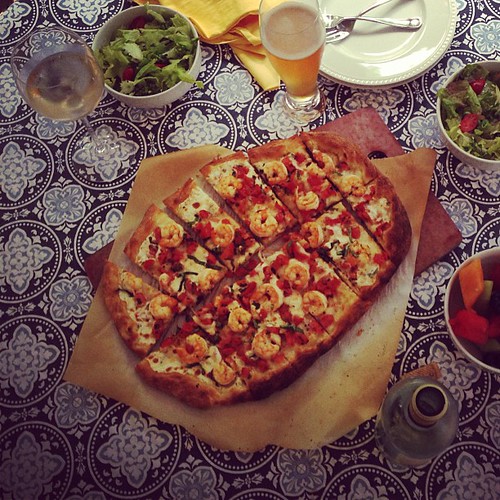
Shrimp Caprese Pizza
- 1 lb. pizza dough
- cornmeal, for sprinkling
- olive oil
- kosher salt and freshly ground black pepper
- 2 cups shrimp (deveined, peeled, and tails removed) - halved if they are jumbo shrimp or exceptionally large
- 1 large clove garlic, minced
- 1 heaping cup of chopped tomatoes (seeds and pulp removed from the tomatoes)
- 1 heaping cup torn or diced mozzarella cheese
- 1/4 cup shredded fresh basil, divided
Place a pizza stone or baking sheet in the oven and preheat to 500 degrees Fahrenheit for at least 30 minutes.
Sprinkle a large square of parchment paper (about 14-16 inches) with cornmeal, and pull and stretch the pizza dough into a large circle or rectangle. Brush the entire thing with olive oil, and sprinkle with salt, pepper, and the garlic.
Pat the shrimp dry with paper towels and season liberally with salt and pepper. Preheat 2 teaspoons of olive oil in a large nonstick skillet over medium-high heat, and cook the shrimp 1 minute per side. Remove from the pan and set aside.
Scatter the tomatoes, mozzarella, and 3 tablespoons of the basil over the dough. Arrange the shrimp in an even layer over the toppings - you may not use all the shrimp, so feel free to snack on the leftovers - cook's treat!
Cook 10 minutes, or until the crust is golden-brown and the cheese is melted and bubbly. If the mozzarella and/or shrimp have released any water, just use a paper towel to carefully blot it up.
Allow to cool about 5 minutes, then sprinkle with the remaining basil, cut into slices, and serve.