Tuesday, July 31, 2012

Summer Corn Pudding


Before I had Smith, I used to ask parents of multiple children if they secretly have a favorite.  I always kind of thought they were lying and just embarrassed to admit it when they all insisted that they didn't.  But now that I have two kids, I can honestly understand it.  Sure, sometimes I get more frustrated with one over the other, or have an easier time getting one to sleep, but they are both so fun and awesome in their own ways.  

So if someone were to ask me if I could pick my favorite summer produce, I'm pretty sure I'd go back and forth for days between corn ... tomatoes ... peaches ... cherries ... okra ... berries ... too hard to choose!  So how's this:  Favorite summer produce prepared as a savory "pudding" with super sharp cheddar, basil, and ricotta?  Corn would win!

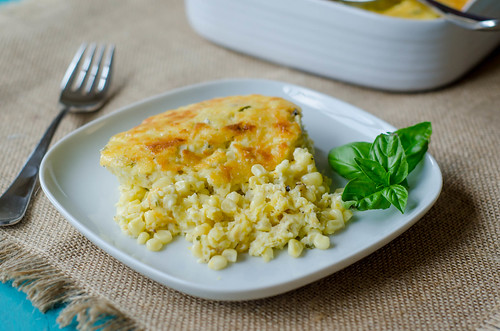
Corn casserole is a popular side dish pretty much year round, but this is so much better than that - it uses fresh corn, and you just can't beat that flavor.  It also doesn't use a can of creamed corn (ick) or prepared cornbread mix.  Everything here is super fresh - and the final dish is really fantastic.  I served this as a side to pan-seard steaks, and it says a lot when I'm more excited about the side dish than I was about the main course.  It also reheats very well, so paired with a salad, this made for some killer lunches the rest of the week.

So maybe I can't pick a favorite child.  And maybe I can't pick a favorite summer vegetable.  But I can pick a favorite side dish featuring corn!

Summer Corn Pudding
adapted from Barefoot Contessa Family Style, by Ina Garten
serves 8
  • 6 Tbs unsalted butter
  • 5 cups fresh corn kernels, cut off the cobs (6 to 8 ears)
  • 1 cup chopped yellow onion
  • 4 eggs
  • 1 1/2 cups milk
  • 1/2 cup half-and-half
  • 1/2 cup yellow cornmeal
  • 1 cup ricotta (part skim is fine)
  • 1/4 cup chopped fresh basil leaves
  • 1 Tbs sugar
  • 2 tsp kosher salt
  • 3/4 tsp black pepper
  • 1 cup (8 oz) grated extra-sharp cheddar cheese
Preheat the oven to 375 degrees.  Lightly grease an 8 to 10-cup baking dish.

Melt the butter in a large skillet over medium-high heat.  Saute the onion until just softened, about 4 minutes.  Add the corn and sauté an additional 4 minutes or so.  Remove from heat and cool slightly.

Meanwhile, whisk together the eggs, milk, and half and half in a large bowl.  Whisk in the cornmeal and then the ricotta, then stir in the basil, sugar, salt, and pepper.  Add the corn and onion mixture and 3/4 cup of the grated cheddar and mix to combine.  Pour into the prepared baking dish and sprinkle the top with the remaining 1/4 cup cheddar.

Bake the pudding 35 to 45 minutes, until a knife inserted into the center comes out clean and the top begins to brown.  Allow to cool about 10 minutes before serving.


Sunday, July 29, 2012

Blueberry Biscuits


Biscuits have been and will always be one of my favorite breakfasts.  Flaky, buttery, deliciousness.  Typically I go for the savory route - flaky buttermilk biscuits, biscuit sandwiches with bacon and/or eggs, cheesy garlic and herb biscuits... but for the past few weeks I have had blueberry biscuits on my mind.

I started with my favorite recipe for buttermilk biscuits.  In an effort to make them slightly healthier, I used half whole wheat flour and low-fat buttermilk.  I added a touch more sugar, a pinch of cinnamon, and folded some blueberries into the dough.  Fresh out of the oven, with a smear of cinnamon-honey butter... these biscuits were pretty great.  Blueberries are at their peak right now, so these biscuits are a wonderful way to celebrate summer.  Caroline and Smith especially loved them, and I foresee many blueberry biscuits in our future breakfasts :)


Blueberry Biscuits
adapted from these Flaky Buttermilk Biscuits (The Lee. Bros Southern Cookbook)

  • 1 cup all-purpose flour
  • 1 cup whole wheat flour
  • 1 Tbs baking powder
  • 2 Tbs sugar
  • 3/4 tsp salt
  • 1/4 tsp cinnamon
  • 6 Tbs cold unsalted butter, cut into several pieces
  • 3/4 cup cold buttermilk
  • 1/2 cup fresh blueberries
  • 2 Tbs melted butter, for brushing
Preheat the oven to 400 degrees.

In the bowl of a food processor, combine the flour, baking powder, sugar, salt, and cinnamon.  Pulse several times to combine well.  Add the butter and continue to pulse in 2-second increments, until the mixture resembles coarse crumbs with a few pea-sized pieces (about 5 pulses).  This can also be done using a pastry blender or 2 forks if you don't have a food processor.

Transfer the mixture to a medium bowl, pour the buttermilk over it, and use a fork to mix for about 1 minute, or until the dough just comes together.

Turn the dough out onto a floured surface, knead with floured hands, and pat into a rectangle about 6x10 inches and 1-inch thick.  Sprinkle the blueberries over the dough, and lightly press into the dough using your hands.

Fold the dough like a business letter (the righmost third over the center third, then the left third on top).  Turn the dough a quarter of a turn, pat it into another 6x10 inch rectangle, and fold it upon itself in thirds again.  Repeat one more time, then pat the dough into a 6x10 inch rectangle a final time.

Using a floured 2-3 inch biscuit cutter, cut the biscuits from the dough and place them about 1 1/2 inches apart on an ungreased baking sheet.  Pat the scraps into a 1-inch thick rectangle and cut more biscuits.

Brush the tops with half the melted butter, and bake 15-20 minutes, or until the tops are just beginning to brown.  Brush the tops again with the remaining butter and serve warm.


Thursday, July 19, 2012

Okra Tacos


I'm a firm believer that pretty much anything can be a taco.  Agree or disagree?  While I've never had it, there is a restaurant here in Atlanta that even serves mac & cheese tacos.  Carbs wrapped in more carbs does seem a bit overkill to me, but hey - why not?

So I fully realize that okra tacos may seem a bit out there for some.  But here's my argument:  we eat veggie tacos all the time, so how is this any different?  The okra is pan-fried with a crispy cornmeal coating, and I topped it with some fresh pico de gallo and homemade ranch dressing.  I wanted to add a corn relish as well, but our corn didn't look so great.  And after the fact, I thought of topping with pimento cheese queso instead of the ranch for a truly southern taco - next time!

These hit pretty much all the taste buds and preferences - soft flour tortillas, crispy, crunchy okra, spicy pico de gallo, creamy ranch dressing.... it's all here.  I have a new favorite taco.


Okra Tacos
a Pink Parsley Original

Fill each tortilla with okra and pico de gallo.  Drizzle the top with ranch dressing and serve.


Wednesday, July 18, 2012

Cornmeal-Crusted Okra


There doesn't seem to be much of a middle ground when it comes to okra - people either love it or hate it.  I happen to love it - fried, grilled, toasted, in soups and stews, mixed into fritters, in a salad, pickled... any way, any time, I love it.  So when it's in season and abundant during the summer, I buy a basket from the farmer's market every weekend.  Usually it ends up being thrown on the grill or dry-roasted.  While fried okra is one of my favorite things ever, it is a bit labor-intensive, not to mention messy and yes, very unhealthy.

This cornmeal-crusted okra is a great alternative to fried okra.  It is somewhat healthier, makes little-to-no mess, is very low-maintenance, and comes together quite quickly.  It's still crispy like fried okra, yet the okra really shines here since it's not battered and deep-fried.  Joey loved it, and suggested that I start making it like this for snacks.  Smith couldn't get enough either!


I did something kind of crazy and unconventional with this okra, so check back tomorrow - it was definitely a successful experiment!  So okra:  love it or hate it?  

Cornmeal-Crusted Okra
barely adapted from Bon Appetit, Y'all, by Virginia Willis

  • 6 Tbs canola or peanut oil 
  • 2 lbs okra, sliced into 1/2-inch pieces, stems and tips discarded
  • kosher salt and freshly ground black pepper
  • 1/2 cup fine yellow cornmeal
In a large skillet (preferably nonstick), heat 3 tablespoons of the oil over medium-high heat.  Add the okra, stir to coat, and cover.  Reduce the heat to medium and cook, stirring frequently, until the okra is bright green, 10-12 minutes.  

Season generously with salt and pepper, then sprinkle the cornmeal over the okra.  Stir to coat, and drizzle the remaining 3 tablespoons of oil over the top.  Continue cooking, stirring frequently, until the okra is tender, browned, and crispy, 5-10 minutes.  Taste and season with more salt and pepper if necessary.  Serve immediately.


Monday, July 16, 2012

Chicken Tortilla Casserole


Someone recently asked Joey if he wished I repeated recipes more often.  Being the loyal husband that he is, he of course said "no way, I love trying new things every night!"  Truthfully, I'm sure that he does tire a bit of me asking him every night, "What do you think?  Is it too spicy?  Bland?  Would you want me to make it again?  How's this picture?"  But he is my #1 fan and my biggest supporter in this blogging thing, so maybe he actually likes the constant questions during mealtime....


So while many meals don't get repeated very often no matter how much we liked them, this is one that is a regular in the rotation.  I've probably made it more than any other recipe on my blog.  If it looks familiar, then you must be a long-time reader!  I posted this back in the early days, but I thought it could use a little makeover.  

Casseroles sometimes have a bad reputation, and I can see why:  they oftentimes are full of sodium-packed convenience products, soggy meat, and lots of cheese (not that that's ever a bad thing in my book though).  This one however, bucks tradition.  First off, it's all made in one dish - less dishes to wash - score!  All of the ingredients are fresh and "real."  And it comes together in under 30 minutes.  The chicken is cooked perfectly, there's crunch from the tortilla chips, a hint of spice from the chipotle peppers, freshness from the tomatoes and cilantro, and of course there's still plenty of cheese.  Let's not go too crazy here.

Chicken is seared on both sides, then shallots, garlic, and chipotle peppers are briefly sautéed.  The chicken is returned to the pan, along with chicken broth and half the tortilla chips.  The chips pretty much dissolve into the broth, and the chicken stays nice and moist as it cooks.  The chicken is shredded and returned to the skillet, the remainder of the chips are then mixed in along with cilantro and tomatoes, and it's topped with plenty of cheese.  After a brief stint under the broiler, the cheese is melted, the top is crispy and crunchy, and you're left with one of my all-time favorite dinners.

Best of all, it's open to so so many adaptations.  I've added black beans and corn before in lieu of the chicken, subbed a jalapeño for the chipotle in a pinch, used some pico de gallo or fresh salsa instead of the tomatoes... really you can play around with this however you like and it will still be pretty darn tasty.

Chicken Tortilla Casserole
adapted from Cook's Illustrated, Cooking for Two

*if you don't have an oven-safe skillet, just transfer to a lightly-greased 9-inch square baking dish.
  • 2 boneless, skinless chicken breasts, trimmed
  • 2 Tablespoons vegetable oil
  • about 3 tablespoons minced shallot or red onion
  • 2 garlic cloves, minced
  • 1-2 tablespoons minced chipotle peppers in adobo sauce
  • 1 3/4 -2 cups chicken broth
  • 5 cups tortilla chips, broken into pieces
  • 1 tomato, cored, seeded, and chopped
  • 4 ounces sharp cheddar or Pepperjack cheese, shredded (1 cup)
  • 2 Tablespoons chopped fresh cilantro
Pat the chicken dry and season with salt and pepper. Heat 1 Tablespoon of oil in a 10-inch oven safe skillet over medium-high heat until smoking. Add the chicken and cook on both sides until golden-brown, 5-7 minutes total. Transfer to a plate and set aside.

Add the remaining oil, shallot, garlic, chipotle, and 1/4 teaspoon of salt, and cook until fragrant, about 30 seconds. Add broth and scrape of browned bits, then bring to a simmer.

Stir in half the tortilla chips. Nestle the chicken into the broth and cook over medium heat until cooked through (reading 160 on a thermometer), about 10-15 minutes. Transfer to a cutting board, and when cool enough to handle, shred or chop into bite-sized pieces.

As the chicken cooks, preheat the broiler and adjust the oven rack to about 6 inches below the heating source.

Return the shredded chicken to the skillet with the tomato, 1/2 cup cheese, and 1 tablespoon of the cilantro. Stir in the other half of the tortilla chips until they are incorporated and moistened.

Sprinkle the remaining cheese on top and broil until the cheese is melted and browned, 2-3 minutes.   Allow to cool about 5 minutes, then top with remaining cilantro and serve.


Wednesday, July 11, 2012

Tomato-Basil Quinoa


In the summer, my weekly meal plan could quite easily be:
Monday:  tomato-basil _________
Tuesday:  tomato-basil _________
Wednesday:  tomato-basil __________

You get the the picture.  It's just such a timeless and perfect combination that I could combine it with pretty much any protein, carb, or veggie and be pretty pleased with the results.  Since I've been all about quinoa lately, it only seemed natural to combine my two current obsessions into one kick-butt dish.

This tomato-basil quinoa was kind of thrown together using what we had in the pantry, and it turned out really well.  I had originally intended for it to be kind of like a salad, but it ended up being more reminiscent of a pasta dish.  It really reminded me of pasta with a simple marinara sauce.   I loved it and kept going back to to the pot for spoonfuls as we cleaned up the kitchen.  Caroline loved it, and Joey loved it too.  I even pureed some for Smith, and it was a hit with him as well!

If you're looking for a fresh and fast summer side dish, this is a great option.  It would be great with pretty much any grilled meat - steak, chicken, Italian sausage, fish, etc.  Or if you're looking to a healthier alternative to spaghetti, this is a great choice.  Customize it by mixing in some grilled veggies for a complete meal, stir in some cubes of mozzarella for a caprese-like dish... the possibilities are pretty much endless!

Tomato-Basil Quinoa
a Pink Parsley Original

  • 2 tsp olive oil
  • 1/2 yellow onion, diced
  • 2 cloves garlic, minced
  • kosher salt and freshly ground black pepper
  • 8 oz. can tomato sauce
  • 1 cup water
  • 1 cup quinoa, rinsed and drained
  • 2/3 cup shredded Parmesan cheese
  • 1-2 tomatoes, cored, seeded, and diced
  • 2 Tbs chopped fresh basil
Heat the olive oil in a medium saucepan over medium heat.  Add the onion and cook, stirring frequently, until softened, about 5 minutes.  Add the garlic and cook, stirring constantly, until fragrant, about one minute.  Season with salt and pepper.

Add the tomato sauce and water to the saucepan and stir in the quinoa.  Bring to a boil, stirring occasionally.  Reduce the heat, cover, and cook until the quinoa is tender but still chewy, and white spiral-like threads appear around each grain, about 15 minutes.

Remove from heat and allow to sit about 5 minutes.  Stir in the Parmesan cheese, tomatoes, and basil, and season with salt and pepper if necessary.  Serve.


Sunday, July 8, 2012

Cheesy Chicken & Basil Stuffed Potatoes


Twice-baked potatoes have long been a favorite of mine.  Usually served as part of a steak dinner, they almost always overshadow the meat for me.  However, up until a few years ago, I never even would though about stuffing them with anything other than cheese, bacon, and scallions.  Times have definitely changed though, because now I love experimenting - chipotle-cheddar stuffed potatoes, twice-baked sweet potatoes stuffed with gruyere, sage, and brown butter....not to mention the variations that I love but have never shared on here - pulled pork stuffed sweet potatoes, broccoli-cheddar stuffed potatoes... I seriously think I could just live off of twice-baked potatoes.

So when my friend Jessica posted these twice-baked potatoes stuffed with chicken and basil, I knew we would love them.  I have a bad habit of not thoroughly reading the directions and ingredient lists before doing my shopping, so I didn't have everything that I needed.  But I improvised, and we still ended up with a fabulous meal.

These potatoes are stuffed with shredded chicken, lots of basil, parmesan, and ricotta cheese.  They are just as good as you might think - creamy, cheesy, and majorly comforting, with a hit of freshness from the basil.  I served these with some lemon-garlic roasted green beans, and it made for a wonderful summer meal.


Cheesy Chicken and Basil Twice-Baked Potatoes
adapted from Sunny Side Up in San Diego

  • 2-3 Russet potatoes, scrubbed clean
  • Olive oil and kosher salt for coating
  • 1 Tbsp Olive oil  
  • 1/2 small onion, diced
  • 2 garlic cloves, minced
  • 1/2 cup ricotta cheese
  • 1/2 cup chicken broth
  • 1/2 cup lightly packed fresh basil, chopped
  • 2/3 cup Parmesan cheese, divided
  • salt and pepper to taste
  • 1 chicken breast, cooked and shredded 
Preheat the oven to 425.  Rub the potatoes with olive oil and sprinkle with salt.  Prick a few times with a fork, and arrange them on a baking sheet.  Bake until tender and cooked through, about an hour to an hour and a half.  Remove from oven and allow to cool slightly.

As the potatoes are cooling, heat 1 tablespoon of olive oil in a small skillet over medium heat.  Add the onion and cook until softened, stirring often, 5-7 minutes.  Add the garlic and cook until fragrant, about one minute.  Remove from heat.

When the potatoes are cool enough to handle, slice them in half lengthwise, and use a spoon to scoop  the flesh into a medium bowl, being careful not to tear the outside.  Return the shells to the baking sheet.

Mash the potato until mostly smooth, then mix in the sautéed onions and garlic, ricotta cheese, chicken broth, basil, 1/2 cup parmesan cheese, and salt and pepper.  If the mixture seems too dry, add a little more broth as needed.  Fold in the shredded chicken.  Taste and season with additional salt and pepper if necessary.  

Divide the mixture evenly among the potato shells, and sprinkle with the remaining parmesan cheese.  Return to the oven and cook 15-20 minutes, or until the filling is heated through and the tops are beginning to brown.  Turn on the broiler for the last few minutes if the tops aren't browning.

Serve immediately.


Monday, July 2, 2012

Barbecue Pasta Salad


A few weeks ago, we spent a week on St. George Island, Florida with Joey's parents.  We had a wonderful vacation - plenty of time for playing in the waves, reading outside on the porch, walks on the beach, and of course plenty of ice cream was consumed nightly. :)


Whenever we go on vacation with Joey's family, I get to be in charge of the food, and I had a great time planning the week's meals.  This year I only cooked 3 nights, and the other nights we either went out or ate leftovers.  It was a good balance for us - I didn't end up in the kitchen for hours every evening, and we were still able to enjoy some local cuisine, but we still enjoyed home-cooked leisurely meals in our beach house.  What I cooked this year:

Spicy Grilled Shrimp Po' Boys, Cajun-Grilled Corn on the Cob, Watermelon Slices
Pimento Cheeseburgers, BBQ Pasta Salad, Watermelon, Toasted Okra
Grilled Chicken Fajitas, Beans and Rice, Chips, Salsa, and Guacamole
also on the menu but we didn't get around to it - Grouper with Garlic-Shrimp Sauce, Mashed Potatoes, Sautéed Zucchini


The BBQ pasta salad was one of my favorite dishes, and what's even better - I was able to eat the leftovers for lunch throughout the week.  It's a step up from your basic creamy pasta salad.  Barbecue sauce is added, as are some fun spices and flavors - cider vinegar, chili powder, garlic, hot sauce, scallions, and a little honey.  And since I like a lot of "stuff" in my pasta salad, I added chopped onion, fresh corn, grape tomatoes, and shredded cheddar cheese.  If you really want to get crazy you could sprinkle it with crumbled bacon before serving.  It's a fun twist on the traditional, and often boring, pasta salad.  And one that would definitely be well-received at a cookout this week!

BBQ Pasta Salad
adapted from Cook's Illustrated, Summer Grilling 2009
serves 8 to 10

  • 1 lb elbow macaroni, or other pasta shape
  • salt
  • 1/2 cup diced sweet onion
  • 4 scallions, sliced thin
  • 2 Tbs cider vinegar
  • 1 tsp hot sauce, plus more for serving
  • 1 tsp chili powder
  • 1/8 tsp garlic powder
  • pinch cayenne pepper
  • 2 tsp honey
  • 1 cup mayonnaise (light is fine), or any combination of mayo and Greek yogurt to make 1 cup
  • 2/3 cup BBQ Sauce
  • 3 ears of corn, cooked as desired (roasting or grilling is my method of choice), kernels cut off
  • 1 1/2 cups shredded sharp cheddar cheese
  • 2 cups quartered grape tomatoes
Bring a large pot of water to a boil.  Add 1 tablespoon of salt and the pasta and cook until almost tender, about 5-7 minutes.  Drain in a colander and rinse with cold water until cool, then drain briefly, so that the pasta is still moist.  Transfer to a large bowl.

Stir in the onion, scallions, vinegar, hot sauce, chili powder, garlic powered, cayenne, and honey.  Let sit until the flavors are absorbed, about 2 minutes.  Stir in the mayonnaise and barbecue sauce, and sit unitl the salad is no longer watery, about 5 minutes.  Gently stir in the corn, cheese, and tomatoes, season with salt and pepper as needed, and serve.  

Salad can be covered and refrigerated for up to 2 days.  If the salad becomes dry from sitting, stir in a few tablespoons of water or barbecue sauce just before serving.


Sunday, July 1, 2012

Red Velvet-Berry Cobbler


It's always an exciting day when a new magazine comes in the  mail, and I probably look forward to Southern Living the most.  So when I checked the mail and spied the new issue, I was already excited.  But then I stopped dead in my tracks when I saw the cover.  Red.  Velvet.  Berry.  Cobbler.  For real.  Smith and Caroline were both napping, otherwise I would have dragged them to the grocery store and bought everything I needed right then and there.


I used to be one of those poor, misguided people who doesn't like red velvet cake.  I thought it just tasted like a chocolate cake that needed more chocolate.  I guess it turns out that I never had a good one - because one day it all changed for me when I tried a REAL red velvet cake.  It's slightly chocolatey, yes.  But with less sugary sweetness, and a subtle tang from the buttermilk.  So the slightly chocolatey flavor just enhances the buttermilk.  And the buttermilk enhances the chocolate.  It's a symbiotic relationship at its best.  And it's so fun to "red velvet-ize" other desserts:  brownies, cheesecake, oreos... the works. 

Never in a million years would I have thought to red velvet-ize cobbler though.  But why not?  Red velvet goes really well with sweet berries, and look how pretty it is!  Any combination of berries can be used - I used raspberries, blackberries, and blueberries.  Strawberries or cherries would work really well too, I think.  It takes about 5 minutes to prep for the oven, and then an excruciating hour to smell it cooking, but it's well worth the wait.  I served this in little mason jars, but I think it would be super adorable to actually cook individual servings in mason jars.  How fun would that be for a Fourth of July party?  However you choose to serve it though, ice cream is not optional.  Vanilla was great, but if you are feeling super ambitious, cheesecake ice cream would be a killer combination with the cobbler.  Happy Fourth!


Red Velvet-Berry Cobbler
Southern Living, July 2012
serves 6 to 8
  • 1 Tbs cornstarch
  • 1 1/4 cups sugar, divided
  • pinch of salt
  • 6 cups assorted fresh berries
  • 1/2 cup butter, softened
  • 2 large eggs
  • 2 Tbs red food coloring
  • 1 tsp vanilla extract
  • 1 1/4 cups all-purpose flour
  • 1 1/2 Tbs unsweetened cocoa powder
  • 1/4 tsp salt
  • 1/2 cup buttermilk
  • 1 1/2 tsp white vinegar
  • 1/2 tsp baking soda
Preheat the oven to 350 degrees and lightly grease an 11x7 inch baking dish.

In a medium bowl, whisk together the cornstarch, 1/2 cup sugar, and a pinch of salt.  Toss in the berries and gently mix to combine.  Spoon into the bottom of the prepared baking dish.

With an electric mixer beat the butter at medium speed until fluffily,  Add the remaining 3/4 cup of sugar in a slow steady stream, continuing to beat until it's well combined.  Add the eggs one at a time, mixing well after each addition.  Stir in the red food coloring and vanilla and mix until just combined.

In a small bowl, whisk together the flour, cocoa powder, and salt.

In a liquid measuring cup that measures at least 1 1/2 cups, combine the buttermilk, vinegar, and baking soda and stir to combine.  It will bubble and rise (yay, science!).

Beginning and ending with the flour, alternate mixing the flour mixture and buttermilk mixture into the butter mixture.  Mix until just combine, then spread the batter over the berries.

Bake 45 to 50 minutes, or until a toothpick inserted into the center comes out clean.  Cool on a wire rack for at least 10 minutes before serving.


BLOG DESIGN BY: SHERBET BLOSSOM DESIGNS