Sunday, October 30, 2011

PPQ: Southern Comfort Caramel Apple Pie


I am so excited by Caroline's current favorite book.  I loved the Amelia Bedelia series when I was growing up, and I recently bought Caroline Amelia Bedelia's First Apple Pie She loves the book, and we pretty much have it memorized because we've read it so many times.  So a few weeks ago when she asked if we could make "Caroline's first apple pie," I was all about it.  I started looking up some recipes, when I remembered that we had this one coming up for Project Pastry Queen. 


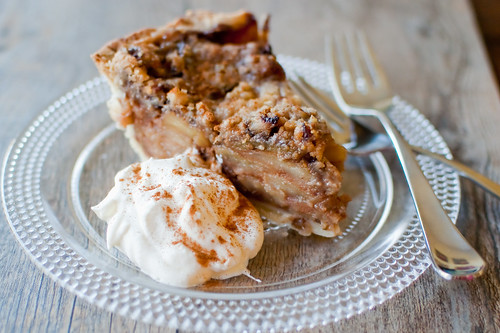
This was a fun activity for us to do together.  She loves helping me in the kitchen, and she was especially excited to make this pie.  And of course we had a great time baking it together, but the best part was obviously eating it together.  O.M.G. this was awesome.  The apples are first sauteed in lots of brown sugar, butter, and cinnamon, and then the juices are mixed with Southern Comfort and heavy cream to make a caramel sauce.  The apples are then mixed with the caramel, poured into a pie shell, covered with a streusel topping of butter, brown sugar, and pecans, and baked.  Obviously your house will smell amazing while this bakes.  And the resulting pie is nothing short of amazing as well. The apples are sweet and spicy, and the caramel sauce has such a wonderful sweetness and warmth thanks to the Southern Comfort.  And the streusel topping is great as well - buttery, sweet, and crunchy.

I ate this several ways:  straight out of the pie plate, with some whipped cream, and with vanilla ice cream.  All were equally great, so it is up to you how you serve it up.  I think cinnamon ice cream would be an especially great accompaniment as well.  Or if you wanted to get really decadent, top it with ice cream and some caramel.

Sarah of 20-Something Cupcakes chose this week's recipe, and she has the full version on her blog.  The only changes I made were to add some nutmeg to the filling and topping, and I made my pie crust in my food processor instead of by hand.  Check out the Project Pastry Queen webpage to see how everyone else fared with this pie.  I think it's a safe assumption that it was a hit all-around!


Thursday, October 27, 2011

Crock Pot Tequila-Lime Turkey Chili


Not to sound like a total lush, but I really really missed margaritas when I was pregnant.  And it's not like I drank them all the time before, but knowing that I couldn't have one made me want one that much more.  Forbidden fruit and all, I guess.  I finally got to enjoy one when Smith was a few weeks old, and it was deeelicious. 

This chili is a basic turkey chili, but with the added flavors of tequila and lime - kind of a "margarita chili" if you will.  But way less weird than it may sound.  The tequila is definitely subtle, but it adds a great depth of flavor.  And the addition of lime juice and zest adds a nice bright freshness.

This is a pretty standard crock pot chili recipe, but in true America's Test Kitchen style, it does have a few unorthodox ingredients and steps.  The ground turkey is mixed with a paste that's made with milk and bread, called a panade, before it is browned.  This helps keep the meat tender throughout the long cooking time.  In order to boost the meaty flavor, soy sauce is added.  Honey helps to bring out a little sweetness from the tequila.  And the tequila is added in two places:  at the onset of cooking, to infuse the chili with a great base of flavor, and then again just before serving to give it a nice finish. Feel free to add a "floater" to your individual portion if the mood strikes. ;-)

We really liked this chili - it had just enough spice to keep it interesting, with just a touch of sweetness.  The leftovers just got better as the week went on, and I enjoyed it for lunch every day.  Any time I can get away with tequila at noon is a good day by me!


Tequila-Lime Turkey Chili
adapted from America's Test Kitchen, Slow Cooker Revolution
  • 1 slice sandwich bread, torn into pieces
  • 2 Tbs milk (lowfat is fine)
  • 1 lb ground turkey
  • salt and pepper
  • 2 Tbs vegetable oil
  • 1 large onion, minced
  • 1 bell pepper, diced
  • 1 jalapeno, ribs and seeds remove, minced
  • 2 Tbs chili powder
  • 2 Tbs tomato paste
  • 4 cloves garlic, minced
  • 2 tsp ground cumin
  • 2 tsp minced fresh oregano, or 1/2 tsp dried
  • 1 15-oz can tomato sauce
  • 1 14.5-oz can fire-roasted diced tomatoes
  • 1 (15-oz) can pinto beans, drained and rinsed
  • 1/4 cup tequila, plus more as needed
  • 2 Tbs low-sodium soy sauce
  • 1 Tbs honey
  • 1 tsp minced chipotle en adobo
  • 1 tsp grated lime zest
  • 1 Tbs fresh lime juice, plus more for serving
  • 1/4 cup minced fresh cilantro
For serving:
  • fresh cilantro
  • Pepperjack cheese
  • diced avocado
  • tortilla chips
Mash the bread and milk into a paste in a large bowl using a fork.  Mix in the ground turkey, 1/4 tsp salt, and 1/4 tsp pepper.

Heat the oil in a large skillet over medium-high heat.  add the onion, bell pepper, and jalapeno, and cook until they are softened, 5-7 minutes. Add the chili powder, tomato paste, garlic, cumin, and oregano and cook an additional 3-5 minutes.

Stir in the turkey and cook, breaking up any large pieces with a wooden spoon, until no longer pink, about 3-5 minutes.  Stir in the tomato sauce, scraping up any browned bits.  Transfer the mixture to the slow cooker.

To the slow cooker, add the diced tomatoes with their juices, beans, 3 tablespoons of the tequila, soy sauce, honey, and chipotles.  Cover and cook on low until the turkey is tender, 4 to 6 hours.

Turn off the slow cooker and allow the chili to settle about 5 minutes.  Use a large spoon to skim the fat off the surface.  Break up any remaining large pieces of turkey with a spoon.  Stir in the remaining tequila, lime zest, lime juice, and cilantro.  Taste and season with additional salt, pepper, tequila, and lime juice as desired. 


Tuesday, October 25, 2011

Snack-o-Lantern Fruit Cups


Even though Halloween's main focus is candy candy candy, when it comes to snacks for kids, I like to keep it (fairly) healthy when I can.  Rest assured they will eat plenty of the junky stuff on Halloween night, so for a snack or party, why not offer a healthier option?  I was in charge of sending in snacks for Caroline's preschool class this week, and since they are talking about pumpkins all week, I wanted to tie it in.  I could think of tons of great ideas for pumpkin themed desserts and not-so-good-for-you snacks, but I was having trouble coming up with something healthy.

These cute little snack-o-lanterns definitely fit the bill though.  It is simply an orange that has been hollowed out and filled with fruit.  Super adorable, and actually not that difficult.  The sky's the limit when it comes to the faces.  We thought it'd be fun to do a different face on each one.  And they really are nothing more than a super cute vessel to hold fruit salad.  You can definitely fill them with any fruit you want - I used a mix of strawberries, blueberries, and grapes, since I knew those fruits are well-liked by toddlers. 

I was kind of dreading making these because I thought it would be incredibly tedious and take forever.  But with Joey's help, I think we were done and the kitchen was cleaned in under an hour.  I scooped and cleaned out the oranges, and left the creativity to Joey - he had a lot of fun coming up with different faces.  That day I had actually bought a pumpkin carving kit, so I used the small serrated knife to cut the faces.  It worked really well, though I think you could use a paring knife or exacto knife as well.

As far as scooping out the insides, I first used a knife to cut out a big cone from the orange, and then used my fingers to pull out the rest of the fruit.  I found that if you could get your fingers into the pith, it would pull up the segments much easier and cleaner. And if you don't get every little piece of orange, its okay.  Just do the best you can.

When I showed them to Caroline, she was so excited.  After I picked her up from school that day and asked her if she liked the snack, she said she did, but "We don't eat the pumpkin, just the fruit inside.  Nooooo"  It makes me wonder who tried to eat the orange peel :-)  So I think all of her friends at school enjoyed the snack, and I'm planning to make these again for Halloween night.  We are having dinner with a few neighbors and their kids, so these would be a fun and nutritious snack to eat before gorging themselves on candy ;-)


Snack-o-Lantern Fruit Cups
adapted from Disney Family Fun, via Pennies on a Platter

Slice the top off of each orange.  Discard it or save it for serving with the cups. Use a sharp knife to cut a cone out of the orange, then use a spoon and/or your fingers to scrape out the remaining orange segments.  Rinse the outside of each orange under cold water, then set upside down on a clean kitchen towel.

Cut out the eyes, nose, and mouth as you like.

Cover and refrigerate until ready to use.  Fill with desired fruit up to 2-3 hours before serving.


Sunday, October 23, 2011

Mini Triple-Treat Cupcakes


How can you make a Reese's Peanut Butter Cup even better?  Encapsulate it in a peanut butter cupcake!  These cute little cupcakes are a super fun fall treat, and make a festive Halloween dessert.  And if you should happen to have leftover Reese's from trick-or-treating, this dessert would be a good use for them.  These call for candy corn to be used as decoration, but if you don't care for it, I think Reese's Pieces would be really cute as well.  Or you could just use some festive sprinkles.

Every year I like to make at least one fun Halloween treat, and this year I went pretty low-maintenance.  These come together really quickly - the most time-consuming step is unwrapping all the candy!  These would also be a fun treat to make with your kids.  They would also be a great treat to send it for their Halloween party at school, or to give to neighbors, etc.  Quick, easy, festive, and yummy - what else do you want in a holiday dessert?

And since I'm writing a post about Halloween, I can't help but to share a photo of me with my little pumpkins from the weekend.  We took a day trip to the north Georgia mountains for a picnic and a visit to the pumpkin patch.  It made me so excited for Halloween, and I can't wait to take Caroline (and Smith) trick-or-treating next week!As much as I dread the end of summer every year, fall is so much fun too.  Now if only we could skip winter and go straight to spring....

More fun Halloween Treats:
Halloween Candy Bark
Creepcakes
Pumpkin Yumkins
Pumpkin Pie Poptarts

Mini Triple-Treat Cupcakes
adapted from Everyday Food, October 2011
makes 48 mini cupcakes
  • 1 cup all-purpose flour
  • 1/2 tsp baking powder
  • 1/4 tsp salt
  • 1/2 cup peanut butter
  • 6 Tbs unsalted butter, softened
  • 1/2 cup brown sugar, packed
  • 1 large egg
  • 1 large egg yolk
  • 1/4 cup buttermilk
  • 1/2 tsp vanilla extract
  • 48 miniature Reese's peanut butter cups
  • 48 pieces candy corn
Preheat the oven to 350 degrees and line two 24-cup mini muffin pans with paper liners.

In a medium bowl, whisk together the lour, baking powder, and salt. 

In the bowl of a stand mixer fitted with the paddle attachment, beat together the peanut butter, butter, and brown sugar until pale and fluffy.  Beat in the vanilla, egg, and egg yolk, scraping down the bowl as needed.  With the mixer on low, beat in the flour mixture and the buttermilk just until combined. 

Place 2 teaspoons of batter into each muffin cup, then press a peanut butter cup into the center until the batter aligns with the top edge of the candy.

Bake until puffed and set, about 10 minutes.  Immediately press the candy corn into the top of each cupcake.  Let cool completely in the pans on wire racks before serving.


Thursday, October 20, 2011

Biscuits and Gravy


"It smells like my grandmother's house in here" is possibly one of the greatest compliments you could hear from your husband.  That's what Joey said as I cooked this breakfast - biscuits baking in the oven, sausage browning in the cast iron skillet on the stove...  it's definitely homey and comforting.  Biscuits and gravy is one of my favorite breakfasts, but I hadn't indulged in it in probably 7 years.  However, when I saw my friend Courtney post this, I suddenly NEEDED to make them.  Immediately.

I have two biscuit recipes that I toggle between, these fluffy buttermilk biscuits and easy drop biscuits.  But I decided to make the ones Courtney posted because I was intrigued by cream biscuits.  They use heavy cream as the fat source instead of butter, but they were somehow still light, flaky, and buttery.  And they came together very quickly, which is always a plus.  The sausage gravy is really easy too - just brown the sausage, then use the rendered fat as the base for the gravy.  I started browning the sausage as the biscuits were cooking in the oven, and it was all done around the same time.

I love comfort foods as the weather cools down, and this is a great breakfast for lazy weekend mornings.


Cream Biscuits
adapted from The New Best Recipe, via Cook Like a Champion
makes 8 biscuits
  • 2 cups all-purpose flour, plus extra for dusting your work surface
  • 2 tsp sugar
  • 2 tsp baking powder
  •   3/4tsp kosher salt
  • 1 1/2 cups heavy cream

Place oven rack in the upper-middle position and preheat oven to 425ยบ. Line a baking sheet with parchment paper.

In a medium bowl, whisk together flour, sugar, baking powder and salt. Stir in 1 1/4 cups of cream with a wooden spoon until a dough forms, about 30 seconds. Turn the dough out onto a lightly floured surface, leaving behind any flour left in the bottom of the bowl. Use the remaining 1/4 cup of cream to moisten any flour left in the bowl and add to the dough. Gather into a ball and knead for about 30 seconds or until smooth.

Use your hands to shape the dough into a 3/4-inch thick circle. Using a 2 1/2-inch floured cutter, cut the biscuits into rounds and place on prepared baking sheet. Reshape the dough once to cut additional biscuits.To make ahead of time, wrap the baking sheet in plastic and refrigerate for up to 2 hours before baking. Bake biscuits until golden brown, about 15 minutes, rotating the pan halfway through baking.

Sausage Gravy
adapted from Food Network, via Cook Like a Champion
  • 12 ounces bulk pork sausage
  • 2 Tbs all-purpose flour
  • 2 cups milk (low-fat is fine)
  • Salt and freshly ground black pepper, to taste

Heat a medium skillet (preferably cast iron) over medium-high heat. Add the sausage and cook until well-browned, about 7 minutes, breaking it up with a wooden spoon. Using a slotted spoon, transfer to a plate and set aside, keeping the rendered fat in the pan.


Sprinkle the flour into the skillet and whisk for about 1 minute. Continue whisking while slowly adding the milk. Bring to a boil, then reduce heat and simmer for about 2 minutes. Add a generous pinch of salt and pepper to taste. Stir in sausage and serve immediately over split biscuits.


Tuesday, October 18, 2011

Crockpot Korean Beef Tacos


As we are adjusting to life with a newborn + a toddler, I've been on the lookout for quick and low-maintenance dinners.  Smith could want to eat at any time, and I don't want to have to stop cooking at a time-sensitive point.  So right now, crockpot meals are really practical and nice.  They also usually produce enough food for several meals, so that's another win!

Though in all honesty, even if I didn't have time restraints, I would still make this dinner.  It.  Was.  Awesome.  I try not to be overly effusive on here unless a meal was really just over-the-top awesome, and this one definitely was.  You know it's going to be good when you lift the meat out to shred it and it just falls apart.  The short ribs were amazingly tender, and the Asian flavors were spot on - perfectly spicy, sweet, and tangy.  Piled on a tortilla and topped with fresh cilantro, a crunchy cucumber slaw, and a healthy squirt of Siracha, this is now my favorite taco.   Make these soon.  You won't be sorry.


Crock Pot Korean Beef Short Rib Tacos
  • 6 1/2 pounds short ribs (or other ribs)
  • 1 1/2 cups low sodium soy sauce
  • 1 1/3 cups packed brown sugar
  • 10 cloves garlic
  • 2-3 inch piece of fresh ginger, peeled
  • 6 tablespoons rice vinegar
  • 2 tablespoons dark sesame oil
  • 1-2 teaspoons crushed red pepper flakes
Cucumber Slaw
  • 1 hot house cucumber
  • 4 teaspoons rice vinegar
  • 1 teaspoon sugar
  • 2 pinches of salt
  • crushed red pepper flakes to taste
To serve:
  • 6-inch flour tortillas
  • fresh cilantro
  • extra Siracha
In the bowl of a small food processor, pulse the garlic and ginger until finely chopped (you can do this with a knife or on a microplane as well, but it was really fast and easy in my mini food processor).

Add the ribs to the crock pot.  In a medium bowl, whisk together all the ingredients for the cooking liquid.  Pour over the ribs. 

Set the crock pot to low and cook about 8 hours. When ready to serve, remove the bones from the ribs, and shred into bite-sized pieces.

Skim the fat off the top of the liquid and add to a small saucepan.  Simmer over medium-low heat until thickened and reduced.  Pour over the shredded meat and serve.

For the cucumber slaw, slice the cucumber as thinly as possible, using a mandoline if you have one.  In a medium bowl, whisk together the vinegar, sugar, salt, and red pepper flakes.  Toss the cucumbers in the mixture and refrigerate until ready to use.

To serve, warm the tortillas and fill with the shredded meat, and top with cucumbers, cilantro, and Siracha to taste.


Korean Beef adapted from My Life as a Mrs. and Confections of a Foodie Bride, originally from What's Cooking Chicago and Blisstree


Cucumber Slaw from My Life as a Mrs, originally from Steamy Kitchen


Sunday, October 16, 2011

Fall Harvest Pear Salad


An alternate title for this post could be "My Favorite Salad."  I've been making this salad for probably 4-5 years now, so I thought it was high time I shared it with you.  It is pretty much my go-to salad between the months of September to March, and I have taken it to countless dinners and parties as well.  One of my favorite lunches is this salad served with a baked sweet potato.  The general make-up of the salad is dark leafy greens, dried cranberries, sliced pears, a crumbly cheese, and toasted pecans, held together by a light raspberry vinaigrette.

There are also countless variations.  Sometimes I use pralined pecans for extra sweetness.  I mix up the cheeses depending upon my mood and what I have in the fridge - goat cheese is my favorite, but I also like blue cheese and feta.  You don't have to use pecans either - slivered almonds are great, as are walnuts.  Raisins can be used instead of dried cranberries.  And you could even use a sliced apple instead of a pear.  I've used a mixture of red wine vinegar and balsamic in a pinch, but I prefer to use raspberry or pomegranate - I like the extra sweetness, and it's a little milder in flavor.  I got really crazy last week and added some cubes of roasted butternut squash.  If I want to make meal out of it, I love serving rosemary grilled chicken breasts over the salad - add a crusty roll or some bread, and it's even a nice enough dinner to serve company.

Feel free to play around with the quantities of the components.  I rarely measure anything; I just toss in however much you want. These are just estimates. No matter how you build your salad, or how you serve it, this is a huge crowd-pleaser!


Fall Harvest Pear Salad
Pink Parsley Original


Raspberry Vinaigrette
  • 2 Tbs raspberry preserves
  • 2-3 tsp Dijon mustard
  • 1/4 cup raspberry or sherry vinegar
  • 1/4 tsp Herbes de Provence
  • 1/4 tsp kosher salt
  • 1/8 tsp ground black pepper
  • 1/4 tsp sugar
  • 1/8-1/4 cup olive oil
Salad
  • 4 oz mixed greens
  • 4 oz baby spinach or arugula
  • 1/4 cup crumbled goat cheese
  • 2-3 Tbs dried cranberries
  • 1/4 cup toasted pecans
  • 1-2 ripe but firm pears, sliced
To make the vinaigrette, whisk together the raspberry preserves, mustard, vinegar, herbs, salt, sugar, and pepper.  Pour in the olive oil in a slow and steady stream, whisking constantly.

In a large bowl, toss the greens lightly with the dressing, reserving some for later.  Top with dried cranberries, cheese, and pecans.  Sprinkle lightly with salt and pepper.  Fan the pears over the top of the salad, and drizzle with more dressing if desired (You definitely don't have to use all the dressing.  It will keep well in the refrigerator for later use).


Thursday, October 13, 2011

Pumpkin Pie Pop Tarts


Throughout high school, and part of college, my super-healthy breakfasts included two Pop tarts and a diet Coke.  My favorite flavor was s'mores, but really any with icing would do in a pinch.  I haven't had a Pop Tart in years, but after tasting these, I'm now tempted to make them myself every week from now on.

Let me preface this by saying that these are nothing like store-bought Pop Tarts.  And that is most definitely a good thing.  The pastry crust is basically like a pie crust - buttery and flaky, just the right amount of sweetness.  And the filling really does taste like pumpkin pie.  Topped with a sweet maple glaze, these are a wonderful fall breakfast treat.  Or any time of year breakfast treat.

These are a bit time-consuming, but it's broken up into several steps, which made it great for me - as the dough chilled, I could go nurse the baby or read Caroline a story.  Nothing was terribly difficult, but you should be as exact as possible when cutting the pastry dough into squares.  The closer they all are in size, the easier it will be to assemble them, and you'll have less of a chance of the filling leaking out.  I'd definitely recommend using a ruler - not that I'm anal retentive or anything :-).

Joey doesn't like pumpkin (I know, right?), and Caroline can't have these because of the egg, so "sadly" I am on my own with these.  And now that I have the method down, I can't wait to experiment with more flavors.  I'm thinking apple-cinnamon would be another great flavor for fall.


Pumpkin Pie Pop Tarts with Maple Glaze
adapted from Joy the Baker


For the Crust:

  • 2 cups all-purpose flour
  • 1 1/2 Tbs granulated sugar
  • 3/4 tsp salt
  • 1 cup (2 sticks) unsalted butter, cold, cut into cubes
  • 1 large egg
  • 2 Tbs milk
  • 1 large egg (for brushing the dough)
For the Filling:

  • 3/4 cup pureed pumpkin
  • 1 large egg
  • 1/8 tsp ground cloves
  • 1/4 tsp ground ginger
  • 1/2 tsp cinnamon
  • 1/4 tsp ground nutmeg
  • 1/4 tsp salt
  • 1/3 cup granulated sugar
For the Maple Glaze:

  • 1 cup powdered sugar
  • 3 tsp maple syrup
  • 2 Tbs milk

In the bowl of a food processor, pulse together flour, sugar and salt.  Add the cold butter and pulse in 1-second increments until the butter is the size of peas.  The mixture should also hold together when squeezed into a ball.

In a small bowl, beat the egg with the milk.  Add the mixture all at once to the dry ingredients and process to make sure that moisture is introduced to all of the flour mixture.  On a lightly floured surface, knead the dough  for a few turns until it really starts to come together.  Divide the dough in two, wrap in plastic wrap and refrigerate for about 30 minutes

While the dough is chilling, prepare the filling:

In a medium bowl, stir together the pumpkin puree and spices.  Whisk in egg, salt and sugar and place in the fridge to rest while you roll out the dough.

On a well floured work surface, press dough into a 3×5-inch rectangle, roll the dough out to about 1/8-inch thickness.  The dough should be slightly larger than 9×12-inches.  Trim dough with a pizza cutter, creating a perfect rectangle that is 9-inches tall and 12-inches long.  Using the pizza cutter, cut each side into thirds, creating 9 squares.  Place dough squares in the fridge while you roll out the second piece of dough in the same way.

Brush one set of 9 squares with beaten egg.  This will act as the glue for the top layer of dough.  Spoon about one tablespoon of pie filling into the center of each brushed dough square.  Top with a second piece of dough and use a floured fork to crimp the sides closed.  Use the tines of the fork to create vent holes in each tart.

Position a rack in the upper third of the oven and preheat to 350 degrees F.  Let tarts rest in the fridge for at least 30 minutes while the oven preheats.

Remove tarts from the fridge and place in the oven to bake for 25 to 30 minutes, or until golden brown on top.

While the tarts bake, whisk together ingredients for the glaze and set aside.

Let baked tarts rest on a cooling rack to cool completely before glazing.  Best served within 2 days.


Tuesday, October 11, 2011

Spicy Peanut Noodles


For over a month, I had a weird craving for peanut noodles.  I kept adding it to my weekly menu plan, but it just kept being pushed off week after week.  But then one week in September, I was desperate to go into labor, and I planned spicy foods for the entire week in an attempt to get things moving.  These noodles didn't make me go into labor, but they sure hit the spot and squelched my craving for peanut noodles.

This salad is full of veggies, and this particular version uses shredded chicken.  However, I think it would be just as good if you omitted the chicken for a vegetarian version - or you could even use tofu instead.  It is full of veggies, and the peanut sauce is that perfect blend of sweet, spicy, and salty.  I made mine extra spicy by sprinkling some crushed red pepper flakes over the top, but feel free to adjust the amount to your liking.  Get crazy and mix up the veggies if you feel so inclined.  Serve this hot, at room temperature, or cold. This dish is open to so many adaptations, and each one is just as delicious as the next. 

I made this for dinner on a Monday night, and then I enjoyed the leftovers for lunch all week long.  I know summer salads and veggies are being cast aside for comforting soups, chili, casseroles, and braises, but this is a nice and light dish that will taste good any time of the year. 


Spicy Peanut Noodles with Veggies and Chicken
adapted from Pinch of Yum, originally from Food Nouveau

Dressing:
  • 5 Tbs soy sauce
  • 2 Tbs water
  • 2 Tbs natural peanut butter
  • 2 Tbs sesame oil
  • 1 Tbs rice wine vinegar
  • 1 Tbs minced fresh ginger
  • 1/2 Tbs honey
  • 1 clove garlic, minced
  • 1 tsp sugar
  • 1 minced serrano chile, seeds and ribs removed
  • 1/3 cup peanuts
Salad
  • 1 cup julienne red and yellow pepper
  • 1 cup shredded carrots
  • 1 cup shredded zucchini, squeezed in a paper towel to remove excess moisture
  • 1/2 cup finely chopped broccoli
  • 1/2 cup chopped green onions
  • 1 cup chopped or shredded cooked chicken breast
  • 8 oz. cooked soba noodles or linguine
  • 2-3 Tbs minced fresh basil
  • 2-3 Tbs minced fresh cilantro
  • crushed red pepper flakes, to taste
For the dressing, combine all the ingredients (except peanuts) in a food processor and puree until smooth.  Add the peanuts, and pulse a few times until coarsely chopped.  Season with salt or crushed red pepper flakes to taste.

In a large bowl, combine all the ingredients for the salad.  Pour the dressing over the top, and toss to combine.

Before serving, top with cilantro and basil, and sprinkle with additional red pepper flakes to taste.


Sunday, October 9, 2011

PPQ: Curried Butternut Squash Soup


It's my turn to choose a recipe for Project Pastry Queen again!  And being that I have an newborn at home, I thought I'd go easy and simple.  And I figured if I chose a savory recipe, then there's a nobrainer dinner one night.  I have trouble putting down my cuddly baby long enough to make dinner, much less do any extra baking. 

This is actually the second time I made this soup.  I served it when I hosted book club around this time last year, and we all loved it.  Sometimes when I order butternut squash soup at a restaurant, it is bland and leaden with cream.  This one is the opposite - it's full of spices and with just a touch of cream. The curry powder just gives the soup a really nice warmth.  And when combined with cinnamon, a little nutmeg, paprika, just a pinch of cayenne, and ginger, it's a soup that really does taste like fall.  Cozy, warm, and comforting.  And as a bonus, it reheats really well, so it makes for an excellent lunch the next day.

To see how everyone else liked the soup, check out Project Pastry Queen.  And next week we're going big with a Bourbon Pumpkin Tart.


Curried Butternut Squash Soup
adapted from The Pastry Queen, by Rebecca Rather
serves 4 to 6
  • 2 Tbs unsalted butter or olive oil
  • 1/2 medium yellow onion, chopped
  • 1 large carrot, peeled and sliced
  • 1 1/2 lbs butternut squash, peeled, seeded, and cubed
  • 1 medium russet potato, peeled and cubed
  • 1 tsp ground ginger
  • 1 tsp ground cinnamon
  • 1 1/2 Tbs curry powder
  • 1/4 tsp nutmeg
  • pinch cayenne
  • 1/2 tsp salt
  • 2 cups chicken stock
  • 1/2 cup milk (low fat or fat-free is fine)
  • 1/2 cup heavy cream (optional)
  • 1 tsp honey
  • 1/2 tsp paprika
  • Freshly ground black pepper
  • Sour cream or Greek yogurt, for garnish
Melt the butter in a large saucepan or Dutch oven over medium-high heat.  Add the onion and carrot and saute over medium heat for about 3 minutes, or until the onions begin to soften.  Add the squash potato, ginger, cinnamon, curry powder, nutmeg, cayenne, and salt.  Saute for 2 minutes.  Add the stock, milk, cream, honey, and paprika and bring the soup to a boil.  Decrease the heat, cover the pot, and simmer the soup over low heat for about 45 minutes, or until the vegetables are soft.

Working in batches, puree the soup in a blender or food processor until smooth.  Add black pepper to taste.  If the soup seems too thick, add more milk or chicken stock.  Serve hot with a dollop of sour cream or Greek yogurt on top.


Thursday, October 6, 2011

Buttery Soft Pretzels


It's funny how our lives and priorities change over the course of just a few years.  Five years ago, it took a wedding or a funeral to cause us to miss a Georgia Tech home football game.  And it had to be a close friend or family member at that (kidding, kind of).  This year, we've only gone to one game.  We spend our Saturday mornings at Caroline's soccer games and now cuddling with our new baby.  And while I do miss seeing our friends and tailgating, I love our family time even more.

Now we watch the games at home in the comfort of our living room, during Caroline's naptime.  And I like to make some sort of fun snack to munch on while we watch.  While I made ham and cheese stuffed pretzel bites a few years ago, I had not yet tackled classic soft pretzels.  They were actually pretty easy and low maintenance.  The only "tricky" part was shaping and boiling, but even those steps were pretty easy once you got the hang of it. 

These are pretty big pretzels, but I think you could easily make them smaller.  Which I will probably do when I make these for a tailgate or party.  While huge mall food court pretzels are great, when you have other food in your spread it makes more sense to serve smaller portions.

I followed the recipe as written, but instead of brushing the pretzels with egg wash, I brushed them with butter - both before and after baking.  Partly because of Caroline's egg allergy, but mostly because I love the buttery pretzels at the mall.  Annie of Annie's Eats has great step-by-step pictures of the shaping process, and she also did some testing on making these ahead and freezing.  So if you are interested in that, check out her post.


Soft Pretzels
adapted from Alton Brown, via Annie's Eats
makes 8 large pretzels

For the dough:

  • 1½ cups warm water (110-115° F)
  • 1 Tbs sugar
  • 2 tsp kosher salt
  • 2¼ tsp instant yeast
  • 22 oz all-purpose flour (about 4½ cups)
  • 4 Tbs unsalted butter, melted
  • Vegetable oil
For finishing:
  • cooking spray
  • 10 cups water
  • 2/3 cup baking soda
  • 4 Tbs unsalted butter, melted
  • kosher (or pretzel) salt

To make the dough, combine the water, sugar, salt and yeast in the bowl of a stand mixer fitted with the paddle attachment.  Mix on low speed until the yeast is dissolved.  Add the flour and melted butter and mix until the dough just comes together.  Switch to the dough hook and knead on medium speed until the dough is smooth and clears the sides of the bowl, about 5 minutes.  Transfer the dough to a bowl lightly greased with vegetable oil, turning once to coat.  Cover with plastic wrap and let rise in a warm place, about 50-55 minutes or until doubled in bulk.

Preheat the oven to 450 degrees.  Line two baking sheets with parchment paper and spray lightly with cooking spray.  Bring the water and baking soda to a boil in a large saucepan or stockpot.

Meanwhile, divide the dough into 8 equal pieces (a kitchen scale makes this very easy).  Working one piece at a time, roll the dough into a 24-inch long rope.  Make a U-shape with the dough, and holding the ends of the rope, cross them over each other and onto the bottom of the U-shape to form a pretzel.  Transfer the pretzel to the baking sheet and repeat with the remaining dough.

Working 1-2 pretzels at a time, place into the boiling water and boil for 30 seconds, flipping once.  Use a slotted spoon or skimmer to remove the pretzels from the water and transfer back to the baking sheet.  Repeat with all the pretzels.

Using 2 tablespoons of the melted butter, brush the pretzels with the butter.  Sprinkle each pretzel with salt, and bake until they are a dark golden-brown, about 12-14 minutes. Brush with the remaining butter, transfer to a cooling rack for at least 5 minutes, and serve.


Tuesday, October 4, 2011

Vegetarian Green Chili


I can now say that it's now officially fall, because I've made my first batch of chili for the season!  I certainly have a few recipes that are favorites, but I'm always looking for new and fun variations.  I think I already have a list of 10 new chili recipes I want to try this fall and winter.  But first up for the year was this vegetarian green chili I came across in this month's Better Homes and Gardens.  

I was actually a bit skeptical about it, but it is loaded with veggies and I was intrigued by the combination of ingredients.  Plus, it uses salsa verde, which is pretty much my favorite thing ever.  I would have never thought to use edamame as the beans in chili, but surprisingly, it worked!  They had a bit more bite to them than other beans, so it made for a textural contrast with the other ingredients.  I served this over rice, but it would also be great over quinoa, tortilla chips, or crumbled cornbread.  I know some of the ingredients may seem nontraditional or weird, but it all really works together, and this chili will definitely be making another appearance this fall.


Vegetarian Green Chili
adapted from Better Homes and Gardens, October 2011
serves 8
  • 2 cups rice
  • 2 Tbs vegetable oil
  • 1 bunch green onions, chopped (1/2 cup)
  • 2 large green sweet peppers, seeded and chopped
  • 1 jalapeno pepper, seeds and ribs removed, minced
  • 3 stalks celery, chopped
  • 6 cloves garlic, minced
  • 1 tsp cumin
  • 1 tsp chile powder
  • kosher salt and freshly ground black pepper
  • 2 12-oz bags shelled frozen edamame
  • 2 4.5-oz cans chopped green chiles
  • 3 cups vegetable or chicken broth
  • 2 cups (16-oz) salsa verde
  • 6 cups fresh spinach
  • 1/2 cup chopped fresh cilantro
  • 3 avocados, peeled, pitted, and chopped
  • Sour Cream or nonfat Greek yogurt
  • lime wedges, for serving
Cook rice according to package directions.  Set aside.

In a Dutch oven, heat the oil over medium heat.  Add the green onions and cook, stirring constantly, for 2 minutes.  Add the peppers and celery, and cook 5 minutes, until crisp-tender.  Stir in the garlic, cumin, chile powder, and 1/2 tsp salt and cook until fragrant about one minute.  Add the edamame and and green chiles and cook 5 minutes.  Stir in the broth and salsa verde, and bring to a boil.  Reduce heat and simmer, covered, 15 minutes.

Stir in the spinach and cook until wilted, about 1 minute.  Remove from heat and stir in 1/4 cup of cilantro and 2 of the avocados.  Ladle into bowls with rice, and top with the yogurt and the remaining cilantro and avocado.  Serve with lime wedges.


Sunday, October 2, 2011

Fake Out Take Out: Orange Chicken


I think I'm one of the few people in the world who doesn't really care for take-out Chinese.  I probably crave it once every 2-3 years, if that.  It sounds good in theory, but it always leaves me feeling heavy, full, and icky.  My standard order is Cashew Chicken, so the fact that I wanted to make this recipe was a bit out of character for me.  But after seeing it on several food blogs over the past year or so, I finally caved in and decided to give it a shot.

And boy am I glad I did.  This was a really awesome dinner, and it made for an equally awesome lunch the next day.  Now I know that oftentimes a restaurant knockoff recipe boasts that it's so much more healthy than the original version....and while this doesn't contain all the additives and artificial ingredients found in take-out Chinese food, it's certainly not lightened up or healthy.  We're still coating chicken in a flour mixture, frying it, and then tossing it with a sweet and sugary glaze.  So it's decidedly NOT healthy.  But it is oh. so. good.  The chicken crisps up perfectly, and the glaze is sweet, but not cloyingly so.  And it's just spicy enough to keep it interesting.

This was definitely an indulgent dinner, and I know it won't be a regular fixture on our weekly menu.  But for those few times when I crave Chinese food, it will definitely be a better option than take-out.  And now that I've made this version, I can already think of ways to lighten it up for a more figure-friendly dinner.


Orange Chicken
adapted from Cooking at Home with America's Test Kitchen, via Annie's Eats


For the marinade and sauce:
  • ¾ cup low-sodium chicken broth
  • ¾ cup freshly squeezed orange juice 
  • 1½ tsp. finely grated orange zest
  • 6 Tbs. white vinegar
  • ¼ cup soy sauce
  • ½ cup brown sugar
  • 3 cloves garlic, minced
  • 1 Tbs. fresh ginger, grated
  • ¼-½  tsp. cayenne pepper
  • 1½ lbs. boneless chicken thighs or breasts, cut into bite-sized pieces
  • 1 Tbs. plus 2 tsp. cornstarch
  • 2 Tbs. cold water
  • 8 thin strips orange peel (optional)
For the Coating and Frying:
  • 3 large egg whites
  • 1 cup cornstarch
  • ½ tsp. baking soda
  • ¼ tsp. cayenne pepper
  • 3 cups peanut or canola oil

To make the marinade and sauce, combine the chicken broth, orange juice, orange zest, vinegar, soy sauce, brown sugar, garlic, ginger and cayenne pepper in a large saucepan and whisk to blend well.

 Measure out ¾ cup of the mixture and transfer it to a large zipper lock plastic bag.  Add the chicken pieces to the bag, pressing out the excess air and sealing well.  Refrigerate 30-60 minutes, but no longer (the acid from the orange juice and vinegar will make the chicken mushy if it's left too long).

Place the saucepan with the remaining mixture on the stove and heat over medium-high heat.  Bring to a simmer.  In a small bowl, whisk together the cornstarch and water until smooth.  Add the mixture to the saucepan with the sauce.  Continue simmering until the sauce is thick and translucent, about 1 minute.  Remove from the heat and stir in the strips of orange peel, if using.

To make the coating, place the egg whites in a pie plate or shallow bowl and whisk until frothy.  In a second pie plate combine the cornstarch, baking soda and cayenne pepper.  Whisk to blend.  Drain the chicken from  the marinade in a large strainer and pat dry with paper towels.  Place half of the chicken pieces in the egg whites and turn to coat.  Transfer the pieces to the cornstarch mixture and coat thoroughly, shaking off the excess.  Transfer to a plate and repeat with the remaining chicken pieces.

To fry the chicken, heat the oil in a 11- or 12-inch round Dutch oven or large sauce pan until the oil reaches 350˚ F.  Carefully place half of the chicken pieces in the oil and fry until golden brown, about 4-5 minutes, turning the pieces halfway through cooking.  Remove from the oil with a skimmer or slotted spoon and transfer to a paper towel-lined baking sheet.  Return the oil to 350˚ F and repeat with the remaining chicken pieces.

When all the chicken has been fried, reheat the sauce if necessary, and toss with the chicken in a large bowl.  Serve over rice.


BLOG DESIGN BY: SHERBET BLOSSOM DESIGNS