Thursday, December 31, 2009

2009 in Review: My Personal Favorites

When I make and blog food, I don't typically post a recipe unless it is truly a success.  So really, I do like most everything I blog.  However, inevitably some recipes will be more popular than others.  Usually I can predict which will be hits.  The chicken enchiladas, tortilla casserole, and s'mores cupcakes were easy to predict.  However, some of my most favorite dishes haven't seemed to be as popular as I might have anticipated.  Here are my personal favorites that didn't land in the Top 10.

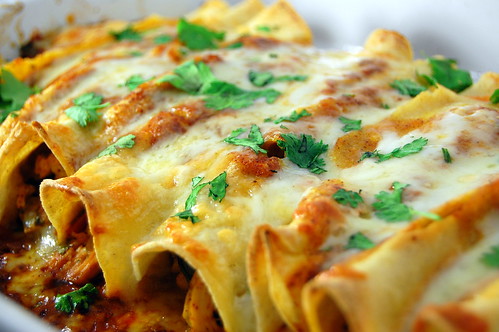
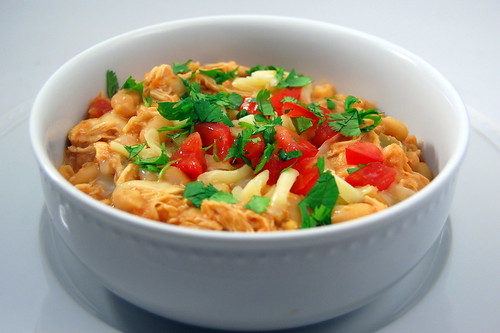
In no particular order...


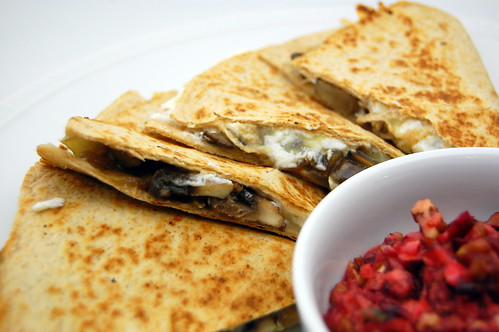
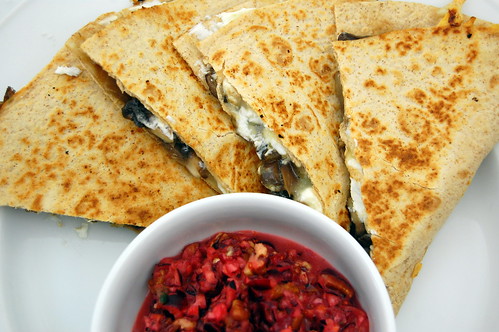
Wild Mushroom and Goat Cheese Quesadillas are such a fantastic dish.  These were seriously so tasty.  I love pretty much anything containing mushrooms or goat cheese, and the cranberry-pecan salsa is a nice sweet contrast to the salty-earthy quesadillas.  I bought The Pastry Queen Christmas just before the holidays, but I plan to use it throughout the year.


My most recent post, Ham and Cheddar Pretzel Bites. They are utterly addictive and quite frankly, the perfect snack food.  As I said in the original post, I'm making them for New Year's Eve, and I'm going to freeze some to eat while we watch the Orange Bowl.


Yet another hit from The Pastry Queen, Creamy Chicken Lasagna is easily one of the most decadent dishes on my blog.  I really can't say enough about it, so I'll just say you really should make this... when you have an extra 2000 calories to spare.


If I was forced to choose, I would have a hard time deciding between the seafood risotto and Risotto Marsala.  The sweet Marsala wine pairs beautifully with the earthy mushrooms and creamy risotto.  A quick, one pot meal that is a nice alternative to traditional Chicken Marsala.


When I asked Joey if he had any suggestions for this list, his first answer was "that chipotle pork with oranges."  When I made it, he said it was his favorite pork tenderloin that I've ever made.  Just so you know, the official name is Orange-Chipotle Glazed Pork Tenderloin.  The sweet-spicy combo is delicious, and the glaze is to die for.


When we had a version of this fun and whimsical dessert at a restaurant in Greenville, I immediately knew I would have to try and recreate the Arnold Palmers at home.  I used Dorie's rich, buttery, Lemon Tart, and I created a recipe for Firefly ice cream.  A raspberry coulis rounded it out, and this is one of Joey's favorite desserts.  I can't wait to make it again next summer.


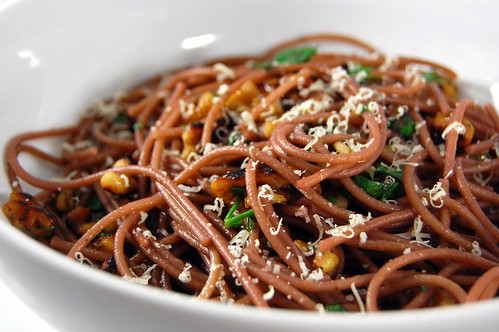
Easily one of the most unexpected dishes I have made, Red Wine Spaghetti is one of those recipes where the sum is truly greater than its parts.  Simple noodles boiled in red wine, then  tossed with a simple sauce of oil, wine, walnuts, and Parmesan.  But the result is something much more complex than you'd imagine. 


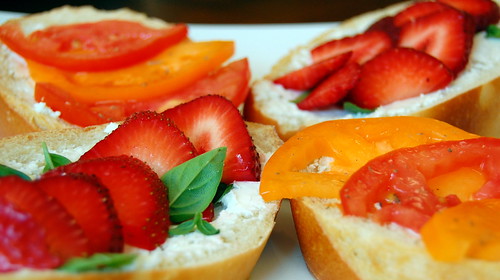
I first made these Goat Cheese Bruschetta on a whim one Friday afternoon.  While Joey preferred the more traditional tomato one, I was blown away by the combination of strawberries, goat cheese, and basil.  I made them often after that, toasting a few slices of bread, and enjoying my new favorite snack.  My mouth is seriously watering just thinking about them, and I  can't wait for strawberries to be back in season so I can continue the obsession.


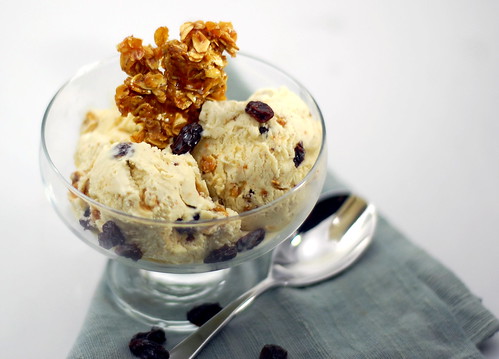
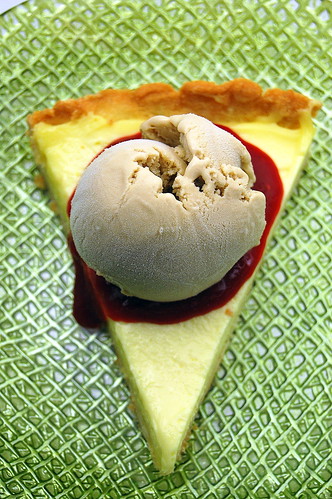
Oatmeal-Raisin Ice Cream is another unexpected hit.  This was the first recipe I tried from Dave Lebovitz's The Perfect Scoop, but it certainly hasn't been the last.  I love the combination of the cinnamon ice cream base, whiskey-soaked raisins, and the oatmeal praline.  I finished off most of this on my own, and really, I'm not at all ashamed.


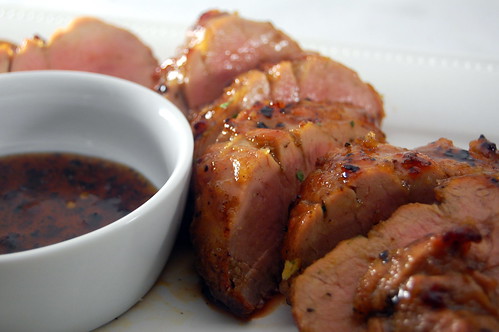
And last but not least, Chipotle and Cheddar Twice Baked Potatoes are such a fun twist on the classic.  I served these with the Orange-Chipotle Pork Tenderloin above, and Joey fell in love with me all over again, haha.  One of the reasons I'm including them in this list is that the possibilities are endless when it comes to fillings.  There are endless variations just waiting to be created. 

Well, that's it!  My personal favorites of the year.  I hope you've found something you enjoy on here, and I hope to continue sharing great recipes in 2010 and beyond!


Wednesday, December 30, 2009

2009 in Review: Most Popluar Posts

As the year comes to a close, I know there are a lot of year-end round-ups on blogs.  I only started my fledgling blog in June, so I only have to choose 6 months worth of posts.  Even so, I have had trouble narrowing down what I'd like to include.  Thus, I have decided to have 2 posts.  Today's posts are the 10 most popular posts according to my stat counter.  Tomorrow I will recount my 10 favorites that weren't in the most popular.

Although I have but a newborn blog, I hope I have begun to make a name for myself and an impact on the food blogging community.  I am still working to find my focus and blogging voice.  And of course, photography will always be a learning process.  Hopefully 2010 will bring even more deliciousness with your lives!

So without further adieu, here are the 10 most popular posts on Pink Parsley.


These chicken enchiladas are by FAR the most popular post on my blog, and for good reason.  They are absolutely the best enchiladas I've had.  Though a little time consuming, the work is well worth it.  Every week when I plan the menu, I ask Joey if he has any requests.  I think if I'd do it he would eat them every single week without complaint.


Continuing with the Mexican theme, Chicken Tortilla Casserole was also immensely popular.  It is a perennial favorite in our house; something I can throw together when I don't really feel like cooking or if I need comfort food. 


Cinnamon Roll Cupcakes were just destined to be a popular post.  I mean, seriously, who wouldn't want this?  Though I had a few issues with the dough, it was all my fault; even so, they were still a perfect tailgating treat.


Bakerella's cupake sliders were all over the internet this summer, and I made them no less than 3 times.  Anytime we went to a party or gathering, these were requested.  They are cute, whimsical, fun, and most of all, delicious!


speaking of delicious, the Tomato-Mozarella Tart with a Basil-Garlic Crust is utterly drool-worthy.  What a perfect summer meal to showcase tomatoes and basil.  Add garlic and mozzarella to anything, and I'm a happy girl.  Joey described this as "like pizza, only better."  I have to say I agree.


Speaking of summertime fare, these s'mores cupcakes were just so much fun, and so so delicious.  They start with a graham cracker crust, followed by a rich chocolate cake, topped with chocolate ganache, and finished with burnt marshmallow frosting.  Its okay, you can wipe the drool off your keyboard now ;-)


Still continuing with some summer-time treats, salmon pesto pasta just screams summer to me.  Though you could certainly make it in the winter as well, basil is so fresh and abundant in the summer, and while it is substantial and filling, it just feels light and refreshing.


Quite easily the most simple recipe in this blog, Crockpot White Bean Chicken Chili is also one of the most flavorful.  I probably make this at least once a month, and it is always a hit.  I can't say enough good things about it.  Just make it.


If I had to choose (but please don't make me), seafood risotto would have to be my favorite risotto recipe.  I just love seafood in general, and I love risotto in general, so it should come as no surprise that when the two collided, my world was forever altered.  In all seriousness, this is one of my all-time favorite meals.  Pair it with a glass of wine and some crusty bread, and you have my idea of perfection.


And rounding out the top 10, The Pastry Queen's Bacon and Cheddar Scones are definitely worthy of their spot.  Hearty and filling, yet still light and fluffy, they are my idea of a great breakfast.  They left such an impression of me; I still remember sitting on the deck, sipping coffee and munching on these with Joey on a warm summer morning.


I hope you've enjoyed reliving some of the popular posts of the year; check back tomorrow, I'll be posting my personal Top 10!


Tuesday, December 29, 2009

Ham and Cheddar Pretzel Bites


As soon as I saw these little snacks in the October issue of Gourmet (RIP), I knew I would be making them, and soon.  I have been dying to try my hand at homemade pretzels, and I loved the idea of having bite sized snacks - add cheese and ham, and I am a happy girl.  I just love any sort of bite-sized or single serve food.  I love grazing on appetizers and dips all night.  In fact, I will be making these again on Thursday for our mini New Year's Eve gathering.  My sister and niece are in town visiting, and I know that our girls will love munching on these.

I honestly don't know why I was so intimidated to try pretzels.  They were surprisingly easy and painless to put together.  You have to plan ahead, but nothing about the recipe is particularly challenging or tedious.  The original recipe called for country ham, but my local grocery store didn't carry it.  I just bought some smoked ham and diced it.  Also, while the jalapeno mustard was tasty, I think next time I will puree it so the jalapenos are better incorporated, and add more honey as well, to give it a sweet finish.  I made this change in my version of the recipe below.

I took these to a party to watch my beloved Georgia Tech Yellow Jackets clinch the ACC title, so they are now somewhat of a good luck charm.  I guess I will have to make them again when we play Iowa in the Orange Bowl next week.


Ham and Cheddar Pretzel Bites with Jalapeno Mustard
adapted from Gourmet, October 2009
makes about 4 dozen
  • 1 1/2 teaspoons active dry yeast
  • 2 Tablespoons plus 1 tsp packed brown sugar, divided
  • 1/4 cup warm water (110-115 degrees F)
  • 1 cup warm milk (110-115 degrees F)
  • 2 1/2-3 cups all-purpose flour
  • 1/2 cup finely chopped ham (3 ounces)
  • 1/2 cup finely chopped sharp Cheddar
  • 6 cups water
  • 4 tsp baking soda
  • 1/2 cup dijon mustard
  • 2 Tablespoons chopped jalapenos
  • 1/4 cup mild honey
  • 1/2 stick unsalted butter, melted
  • 1-2 Tablespoons coarse salt
Stir together the yeast, 1 teaspoon brown sugar, and warm water in a large bowl.  Set aside until foamy, 5-8 minutes.  In another bowl, stir together the remaining 2 Tablespoons brown sugar and warm milk until dissolved.

Add 2 1/2 cups of the flour and the milk mixture to the yeast.  Stir with a wooden spoon until a soft dough forms.  Add the remaining flour as needed.  Turn the dough out onto a lightly floured surface, and gently knead a few times, forming a smooth ball.

Brush the inside of a clean bowl with olive oil.  Transfer the dough to the bowl, and cover tightly with plastic wrap.  Allow to rise in a draft free, warm room for about 2 hours, until dough has doubled in size and bubbles appear on the surface.

Turn out dough onto a lightly floured surface.  Divide into 4 equal pieces.  Lightly dust your hands and rolling pin with flour.  Roll dough and stretch into a 12-inch long rope.  Flatten and arrange so the long side is facing you.  Use the rolling pin or your hands to form a 12x4 inch rectangle.  Gently press 1/4 of the ham and cheddar into the bottom third of the dough, and roll as tightly as possible to form a rope.  Cut into 12 1-inch pieces and transfer to a sheet pan lined with parchment paper.  Repeat with remaining 3 portions of dough.

Let rest, uncovered, at room temperature, for 30 minutes.  Meanwhile, preheat oven to 400.

Bring 6 cups of water to a boil.  Add the baking soda and reduce heat to a gentle simmer

Cook pretzels in batches, cooking about 20 seconds each, turning once.  They should be slightly puffed.  Use a slotted spoon to transfer them back to the baking sheets.

Bake until puffed and golden-brown, about 15 minutes.  The cheese might ooze out, but that's okay.

Brush warm pretzel bites with melted butter, and sprinkle with salt.

To make the jalapeno mustard, pulse the jalapenos in a food processor until finely ground.  Add the honey and mustard, and process until evenly mixed.

Serve pretzels warm or at room temperature.


Monday, December 28, 2009

Red Velvet Cupcakes with Cream Cheese Icing


I mentioned in another post that I recently bought The Pastry Queen Christmas.  I seriously cannot say enough good things about it.  It is chock full of delicious treats and indulgences.  I've made no less than 5 recipes out of it in the month that I've had it.

These red velvet cupcakes met my already exceedingly high expectations I have of her recipes.  They are moist and sweet, without being cloyingly so.  The vinegar and sour cream gave them a nice tang, and the chocolate richened the flavor.  I didn't use her suggested marscapone cream cheese icing; rather, I used a pretty standard one from Annie's Eats.  It was so smooth, and piped so beautifully.  I have already made these cupcakes several times, and its not looking to slow down anytime soon!


Red Velvet Cupcakes
Rebecca Rather, The Pastry Queen Christmas
makes 24 cupcakes
  • 1/4 cup (2 ounces) red food coloring
  • 3 1/2 Tablespoons unsweetened cocoa powder
  • 1 cup (2 sticks) unsalted butter, at room temperature
  • 1 3/4 cups sugar
  • 2 large eggs
  • 2 cups cake flour
  • 1 1/2 cups all-purpose flour
  • 1 teaspoon kosher salt
  • 1 teaspoon baking soda
  • 2 teaspoons vanilla extract
  • 1 cup buttermilk
  • 1 cup sour cream
  • 1 Tablespoon distilled white vinegar
Preheat the oven to 350.  Line 2 cupcake pans with liners and spray with cooking spray.

In a small bowl, combine the cocoa powder and food coloring with a fork, mashing and mixing until it forms a paste.  Set aside.

In the bowl of a stand mixer fitted with a paddle attachment, cream the butter and sugar at medium-high speed until it is light and fluffy, about 2 minutes.  One at a time, add the eggs, stopping to scrape down the bowl as needed, and allowing each one to be fully incorporated.  Reduce the speed to low, and add the cocoa paste.  Increase to medium speed and beat the batter for about 4 minutes.

Meanwhile, sift together the cake flour, all-purpose flour, salt, and baking soda.  Stir the vanilla into the buttermilk (this can be done in a measuring cup).

Add the flour and buttermilk in increments, alternating between each addition.  Start and end with the dry ingredients.  Beat on medium speed until just combined.

Add the vinegar and sour cream and beat at low speed until just combined.

Divide batter evenly among the muffin tins, filling each one about 3/4 full.  Bake 17-22 minutes, only until the cupcakes feel firm to the touch  and a toothpick inserted into the center comes out clean.  Be careful not to overbake, as the cupcakes will dry out easily.

Remove from oven and allow to cool in pans for 5 minutes.  Remove the cupcakes from pan and allow to cool completely before frosting.

Cream Cheese Frosting
from Annie's Eats, originally from Confections of a Foodie Bride
  • 12 ounces cream cheese (still cold - not softened)
  • 7 1/2 Tablespoons unsalted butter, softened
  • 1 Tablespoon vanilla extract
  • 3 3/4 cups confectioners sugar, sifted
Cream the butter and cream cheese in the bowl of a stand mixer fitted with the paddle attachment, until creamy and smooth, 2-3 minutes.  Add the vanilla extract.  Gradually add the confectioners sugar over low speed, and when well combined, increase to medium.  Beat until smooth. 


Tuesday, December 22, 2009

Creamy Chicken Lasagna


I figured I'd post this lasagna recipe before the new year and people start being concerned with calories and fat.  Because this lasagna is full of both.  I could barely believe my eyes when I saw the ingredients:  2 stick of butter, a cup of heavy cream, 5 cups of cheese..... my arteries are clogging just thinking about it.... my mouth is also watering.

I toned it down a little.  I only used 1 1/2 sticks of butter, and I subbed fat free half and half for the heavy cream.  I figured there was still plenty of fat elsewhere to make up for it.

The verdict?  Oh my, so good.  Creamy, cheesy, flavorful.  I loved the mushrooms and bell peppers in it, and I think you could really play around with the vegetables and cheese.  Pepperjack would provide a nice kick, and spinach would also be yummy added in.

This isn't a fast throw-together meal, but if you are having company over, it is perfect make-ahead.  And your guests will thank you for it.


Creamy Chicken Lasagna
adapted from Rebecca Rather, The Pastry Queen Christmas

Cream Sauce
  • 2 Tablespoons olive oil
  • 1 yellow onion, chopped
  • 2 stalks celery, diced
  • 10 ounces cremini mushrooms, sliced
  • 1 red bell pepper, seeded, deveined, and diced
  • 4 cloves garlic, minced
  • 2 Tablespoons chopped parsley
  • 1 1/2 teaspoons kosher salt
  • 1/2 teaspoon freshly ground pepper
  • 3/4 cup (1.5 sticks) unsalted butter
  • 1 1/2 cups all-purpose flour
  • 3 cups low-sodium chicken stock
  • 1 cup fat-free half and half
  • 1 cup freshly grated Parmesan cheese
  • 1/4 teaspoon Tabasco sauce
  • 1 teaspoon kosher salt
  • 1 teaspoon ground pepper
  • Pinch of ground nutmeg
  • 15 lasagna noodes (about 12 ounces)
  • 1 rotisserie chicken, skinned, deboned, and shredded into bite-sized pieces
  • 3 cups (12 ounces) shredded Monterey Jack cheese
  • 1 cup freshley grated Parmesan cheese
 Preheat the oven to 350, and grease a 9 x 13 inch baking dish.


To make the cream sauce:  Heat the olive oil over medium heat in a large saute pan.  Cook the onion, celery, mushrooms, red pepper, and garlic until the onion is translucent, about 5 minutes.  Stir in the parsley, salt, and pepper.  Set aside.

In a large saucepan or stockpot, melt the butter over medium-low heat.  Whisk in the flour 1/2 cup at a time, whisking after each addition.  Add the chicken stock 1 cup at a time, again, whisking until smooth after each addition.  Increase the heat to medium, and cook, stirring constantly, until  the sauce thickens to the consistency of cream soup.  Stir in the cream, Parmesan, salt, pepper, Tabasco, and nutmeg.  Heat until the cheese is melted and the sauce is smooth.  Stir in the sauteed vegetables and remove from heat.

Cook the lasagna noodles in a large pot of salted water according to the package directions.  Drain the noodles and seperate them so they don't stick together (hang them around the edges of the cooking pot).

Spread a thin layer of cream sauce over the bottom of the baking dish.  Layer 5 lasagna noodles on top, and follow with half the chicken, 1 cup of the jack cheese, and 1/3 of the remaining cream sauce.  Repeat the layers of noodles-chicken-cheese-sauce.  Top with the remaining 5 noodles, and cover with the remaining cream sauce.  Mix together the Parmesan cheese and the last cup of jack cheese, and sprinkle evenly over the lasagna. 

Bake 30-45 minutes, until the cheese is melted and the lasagna is bubbling.  Allow to sit at room temperature 15 minutes before cutting and serving.


    Monday, December 21, 2009

    Herb and Goat Cheese Biscotti


    It isn't often that I see a recipe and want to try it immediately.  Usually, I will save or star it in my google reader, then come back to it weeks (or even months) later when I'm lacking inspiration.  I saw Giada make this savory biscotti on her show, and in 2 hours I had made it myself.  Pretty much anything with goat cheese or herb de provence will always catch my eye, and in combination with my newfound love for biscotti, I just had to make it right.then.

    And it didn't disapoint.  It is crunchy, savory, and so flavorful.  The goat cheese definitely plays a supporting rather than a starrring role.  That belongs to the herbs de provence.  These made a wonderful addition to my holiday gift baskets this year; I figured it might be nice to have something savory to round out all the sweets. 


    Savory Biscotti
    from Giada de Laurentiis
    • 2 cups all-purpose flour
    • 3 tablespoons herbes de Provence
    • 1 1/2 teaspoons baking powder
    • 3/4 teaspoon kosher salt
    • 1/2 cup (1 stick) unsalted butter, at room temperature
    • 1/4 cup (2 ounces) goat cheese, at room temperature
    • 3 tablespoons sugar
    • 2 eggs, beaten, at room temperature
    Preheat the oven to 350, and position the rack in the middle position.  Line a baking sheet with parchment paper.

    Whisk together the flour, herbs de Provence, baking powder, and salt in a medium bowl.

    In a stand mixer fitted with a paddle attachment, beat the goat cheese and butter until smooth.  Beat in the eggs and sugar, stopping to scrape down the sides if necessary.  In 3 batches, add the flour and herb mixer, mixing until just combined.

    Turn out dough onto the baking sheet.  Using damp hands, shape the dough into a 13 x 4 inch log.  Bake until golden brown, about 30 minutes. 

    Cool on a baking sheet for 30 minutes.

    Using a serrated knife, cut the log on the diagonal into 1/2-1 inch slices.  Transfer slices to the baking sheet, cut side down. 

    Bake an additional 15 minutes, then transfer to a cooling rack to cool completely.  Store in an airtight container.


    Sunday, December 20, 2009

    Pecan-Crusted Chicken Tenders with Cranberry-Orange Sauce


    Here is yet another hit from Cook's Illustrated.  These chicken tenders originally called for a coating of almonds, but I thought pecans would be a great substitution - and they were!  This is an easy and fast meal, perfect for those busy nights I'm sure we're all having this time of year.  They cook up nice and crispy, and the cranberry-orange dipping sauce is simultaneously sweet, tart, and tangy from the combination of cranberries, orange marmalade, and Dijon mustard.


    Pecan Chicken Fingers with Cranberry-Orange Sauce
    adapted from Cook's Illustrated
    serves 4

    • 1 cup fresh or frozen cranberries
    • 1/2 cup orange marmalade
    • 1 1/2 Tablespoons dijon or coarse grain mustard
    • 1 cup all-purpose flour
    • 2 large eggs
    • 3/4 cup pecan halves
    • 3/4 cup panko breadcrumbs
    • 1 1/2 pound chicken, cut into tenderloins
    • salt and pepper
    • 1/3 cup vegetable oil
    Simmer cramberries and orange marmalade in a small saucepan over medium heat about 6 minutes, until mixture has thickened and cranberries have popped.   Off heat, stir in mustard.

    Meanwhile, in 2 shallow dishes, add flour and lightly beaten eggs.  Set aside.

    Pulse pecans in a food processor until finely ground, then combine with panko and add to a 3rd dish.

    Pat the chicken dry with paper towels, and season with salt and pepper

    Working one chicken tender at a time, dredge the chicken first in flour, then egg, and finally the panko/nut mixture.  you may need to press lightly to adhere the nut mixture to the chicken.

    Heat a few tablespoons of oil in a large nonstick skillet over medium heat until shimmering.

    Cook half the chicken until golden-brown, about 3 minutes per side.  Drain the chicken on a paper towel lined plate.  Wipe out the skillet, then repeat with the remaining oil and chicken.

    Serve with cranberry-orange dipping sauce.


    Friday, December 18, 2009

    Chocolate Peppermint Cupcakes


    A few weeks ago, I agreed to make some cupcakes for a friend's birthday party.  She wanted to do something fun and seasonal for the adults, so I suggested chocolate cake with peppermint buttercream.  I wasn't able to attend the party, but from what I've heard, they were pretty popular.  Since then, I've made them a few more times, and they are always a hit!  I used my favorite choclate cake recipe, then a standard buttercream recipe.  I just used mint extract in place of most of the vanilla, and used a little pink gel coloring to make them look minty and pretty.  Finally, I sprinkled some Andy's mints on top to complete the look.


    Peppermint Buttercream
    basic buttercream adapted from Cook's Illustrated
    • 2 1/2 sticks unsalted butter, at room temperature
    • 3-4 cups confectioner's sugar, sifted
    • 1/4 teaspoon salt
    • 1/2 teaspoon vanilla extract
    • 2 teaspoons mint extract
    • 2 Tablespoons heavy cream
    Cream the  butter over medium speed in the bowl of an electric stand mixer fitted with the whisk attachment.  When pale and fluffy, gradually add the confectioner's sugar in batches, mixing well after each addition.  Add the extracts, salt, and heavy cream, and beat until light and fluffy, about 5 minutes.  If using, add a small amount of pink or red gel paste food coloring and mix well to combine.


    Monday, December 7, 2009

    Salted Cocoa-Roasted Nuts


    If you are looking for a fun and festive addition to your holiday gift baskets, look no further!  If you are looking for something to munch on while you cook, bake, or decorate, look no further!  If you are looking for something to eat for no reason....look no further!  These are insanely addictive.  And seriously yummy.  Its no secret that I'm a big fan of the sweet/salty combo, and these nuts are exactly that.  The coating is egg whites, and it keeps the nuts feeling kind of light and fluffy.  I used a combination of hazelnuts, pecans, and walnuts, but I think next time I'll just use hazelnuts and pecans.  They were my favorite, anyway.  Next time I might add a bit of cinnamon to give them even more flavor!

    These babies are getting packaged up as part of my holiday gift baskets.  I'm also going to have several bags ready to go for all the parties we will be attending in the next few weeks.  They'd make great hostess gifts.  Or great to give to last minute visitors that stop by. 


    Salted Cocoa-Roasted Nuts
    from Joy the Baker, adapted from Essence of Chocolate
    • 3 cups mixed nuts (I suggest hazelnuts and pecans)
    • 8 Tablespoons (1 stick) unsalted butter, cut into chunks
    • 2 large egg whites
    • 1 cup sugar
    • 1 Tablespoon unsweetened cocoa powder
    • 1 teaspoon kosher salt
    Preheat oven to 325.  Spread nuts in a single layer on a baking sheet, and bake for 10 minutes, or until slightly browned and fragrant.  Transfer to a large bowl and allow to cool.

    Scatter the chunks of butter on the baking sheet, and return to oven to melt the butter.  This will only take a few minutes, so keep a close eye on it.  Remove from oven and tilt the pan to spread the butter all over.

    Meanwhile, beat the egg whites in the bowl of a stand mixer over medium-low/medium speed.  When the egg whites are just starting to hold their shape, add the sugar and increase the speed to medium-high for 2 minutes.  They will be shiny and sticky, and a little thinner than meringues. 

    Sift the cocoa over the egg whites, and fold in. Mix the egg white mixture into the nuts, and spread onto the baking sheet. 

    Bake for 10 minutes, then gently stir.  Return the nuts to the oven and bake another 10 minutes.  Stir again, and sprinkle the salt over the nuts.  Return for another 10 minutes, then remove.  Give the nuts one final stir, breaking up chunks as you go.  When done, the coating should be crisp, and the butter absorbed by the nuts. 

    Allow to cool completely.  They can be stored in an airtight container up to 1 week.


    Friday, December 4, 2009

    Wild Mushroom and Goat Cheese Quesadillas with Cranberry-Pecan Salsa


    Whew, that is a long title!!  But I really couldn't leave anything out and still convey the awesomeness of these quesadillas.  I know it might sound like a strange combination, but these are truly delicious.  Goat Cheese and mushrooms are just made to go together (ok who am I kidding, goat cheese is made to go with just about anything), and the earthy mushrooms really play nicely off of the sweet-spicy salsa. I recently bought The Pastry Queen Christmas, and this recipe just jumped right out at me.  I'm continuing my love of her, and I'm also continuing only to make savory recipes, haha!

    While this was one of my favorite dinners that we've had in awhile, Joey was only semi-pshyched by it.  And that's okay, I knew it might be a little girly and out there for him.  I will be making this again for myself... I think it will be a great lunch.  And I know its something Caroline will eat - mushrooms are her new favorite food!

    I also think these would be a nice addition to a holiday spread of appetizers.  The salsa is so pretty and festive, and everyone loves hand-held food!


    Wild Mushroom and Goat Cheese Quesadillas with Cranberry-Pecan Salsa
    adapted from The Pastry Queen Christmas, by Rebecca Rather
    4-6 main course servings, or 24 appetizers.

    Cranberry-Pecan Salsa
    • 1/2 cup whole pecans
    • 3 Tablespoons balsamic vinegar
    • 2 Tablespoons olive oil
    • 1/3 cup sugar
    • 1 Tablespoon Dijon mustard
    • Grated zest and juice of 1 orange
    • kosher salt and freshly ground black pepper
    • 2 cups fresh  cranberries
    • 1 shallot, sliced
    • 1 jalapeno pepper, seeded and minced (optional)
    Preheat the oven to 350.  Arrange the pecans on a baking sheet and toast 7-9 minutes, until deeper brown and aromatic.  Cool, and coarsely chop.

    Combine the vinegar, olive oil, sugar, mustard, orange zest and juice, and salt and pepper in a food processor.  Process until well combined, about 30 seconds.  Add the cranberries, shallot, and jalapeno, and pulse to coarsely chop.

    Transfer to a bowl, cover, and refrigerate.  When ready to serve, fold in pecans.


    Mushroom and Goat Cheese Quesadillas
    •  6 Tablespoons unsalted butter
    • 1 yellow onion, coarsely chopped
    • 1 1/2 pounds mixed wild and commercial mushrooms, sliced (stem the shiitakes)
    • 1 pound cremini mushrooms, sliced
    • 4 cloves garlic, minced
    • 1 teaspoon kosher salt
    • 2 Tablespoons Worcestershire sauce
    • 2/3 cup dry white wine
    • 1/2 teaspoon ground pepper
    • 8 8-inch flour tortillas
    • 2 cups (8 ounces) shredded monterey jack cheese 
    • 3 cups (15 ounces) crumbled fresh goat cheese
    Melt butter in a large saute pan over medium-high heat.  Add the onion and saute about 4 minutes, until softened.  Add the mushrooms, garlic, salt, and Worcestershire sauce, and saute an additional 5 minutes.  Add the white wine and pepper, and cook until most of the liquid has been absorbed, at least 5 minutes.

    While the mushrooms cook, coat a griddle or large skillet with cooking spray and heat to high heat.  Reduce heat to medium when it is preheated.

    Lay a tortilla flat on the cooking surface, and sprinkle 1/4 cup Monterey Jack cheese over the whole tortilla.  Top half with about 1/3 cup of the mushroom mixture, then sprinkle with a thin layer of goat cheese.  Use a stiff spatula and fold each tortilla in half.  Cook until light brown and crisp on the bottom, then carefully flip and cook until the other side has browned.

    Transfer to a plate and keep warm in the oven.  Repeat with remaining tortillas.  To serve, cut each into 3-4 wedges, and serve with salsa for dipping.


    Thursday, December 3, 2009

    BB: Company Pot Roast


    The first recipe for Barefoot Bloggers November was creme brulee.  In case you didn't notice, I didn't post it.  But I will.  So stay tuned.   However, the second recipe was chosen by Lisa of Lime in the Coconut.  She chose Company Pot Roast, which is perfect for the chilly weather we've been having recently.

    As far as pot roasts go, this was a good one.  Although admittedly, pot roast isn't my favorite food.  The sauce however, was phenomenal.  Of course, I shouldn't be surprised.  It is Ina Garten after all.  You puree half the sauce, and leave the other half with chunks of vegetables.  This gives the sauce a nice texture and consistency.  I took the leftover sauce and ate it over pasta the next night, and Joey and I really enjoyed that as well.

    I really didn't make any changes to her recipe, so I will just link to it over on Food Network.  If you are looking for a hearty, comforting recipe for pot roast, give this one a try.  Ina never disapoints!!


    Ina Garten's Company Pot Roast


    Friday, November 27, 2009

    Pesto, Spinach, and Mushroom Lasagna


    Sometimes I am all about fast and easy recipes. Sometimes I like making complicated and time consuming meals. And sometimes, I take a fast and easy recipe and make it complicated and time consuming. This is one of those times.

    Originally a crockpot lasagna, this Cooking Light recipe calls for commercial pesto and jarred tomato sauce. I like to make my own for both of those, so I did. Being Cooking Light, it also called for low fat cheese... and I just don't do that. I replaced the provolone-mozzarella blend with fresh mozzarella, but I did use part-skim ricotta. I also just baked it in the oven for 45 minutes instead of using the crockpot. I don't think that that part really matters.

    All in all, we really enjoyed this lasagna. Its a nice change of pace from the usual lasagna, and we didn't miss the meat at all. If you want to try it out in the crock pot, check out the original link.

    Pesto Lasagna with Spinach and Mushrooms
    adapted from Cooking Light
    serves 8
    • 4 cups torn spinach
    • 2 cups cremini mushrooms, diced into medium pieces
    • 1/2 cup pesto; commercial or homemade
    • 1 1/2 cups fresh mozzarella, shredded
    • 1 (15-ounce) carton part-skim ricotta cheese
    • 1 large egg, lightly beaten
    • 3/4 cup (3 ounces) grated fresh Parmesan cheese, divided
    • 4 cups tomato-basil sauce; homemade or jarred
    • 1 (8-ounce) can tomato sauce
    • Cooking spray
    • 1 (8-ounce) package precooked lasagna noodles (12 noodles)
    Preheat the oven to 425. Spray a casserole dish with nonstick cooking spray.

    Steam the spinach and drain the excess moisture.

    Combine the mushrooms, pesto, spinach in a small bowl and set aside. In another bowl, combine 3/4 cup mozzarella, egg, ricotta, and 1/2 cup of the Parmesan cheese. Combine the tomato sauce with the pasta sauce.

    Spread 1 cup of the pasta sauce in the bottom of the saucepan. Layer 3 lasagna noodles, followed by 1 cup of the spinach mixture and 1 cup of the cheese mixture. Repeat the layers, following the order of pasta sauce-pasta-spinach-cheese. Sprinkle remaining parmesan and mozzarella over the top.

    Bake, covered, for 30 minutes. Remove the foil and bake an additional 15 minutes, until top is bubbly and golden.


    Wednesday, November 25, 2009

    Applesauce Snack Cake


    Bridget told me that I must make this cake. So I listened, because she knows her stuff. Now I'm going to tell you: you must make this cake. It is crazy good. I had actually seen it in Cook's Illustrated, but kind of skimmed over it. It doesn't seem like much... just a simple apple cake. But it is really really delicious.

    You are hit with apples from 3 sides: applesauce, apple cider, and dried apples. Then you feel the warmth of fall spices from cinnamon, nutmeg, and cloves. The result is an incredibly moist, light, apple-y cake.

    Applesauce Snack Cake  
    adapted from Cook's Illustrated, as seen on The Crumbly Cookie
    makes one 8-inch square cake
    • 3/4 cup (2 ounces) dried apples, cut into 1/2-inch pieces
    • 1 cup apple cider
    • 1 1/2 cups all-purpose, unbleached flour
    • 1 teaspoon baking soda
    • 2/3 cup sugar
    • 1/2 teaspoon ground cinnamon
    • 1/4 teaspoon ground nutmeg
    • 1/8 teaspoon ground cloves
    • 1 cup unsweetened applesauce
    • 1 large egg, at room temperature, lightly beaten
    • 1/2 teaspoon salt
    • 8 Tablespoons (1 stick) unsalted butter, melted and cooled slightly
    • 1 teaspoon vanilla extract
    Preheat oven to 325. Line an 8-inch square baking dish with foil or parchment paper, and spray with cooking spray.

    Bring dried apples and cider to a simmer in a small saucepan over medium heat; cook until liquid evaporates and the mixture seems dry; 15-20 minutes (it might take a little longer depending on your stovetop and the pan you use)

    Whisk flour, and baking soda in a medium bowl and set aside. In a second medium bowl, mix together the sugar, cinnamon, nutmeg, and cloves. Measure out 2 Tablespoons and set aside in a small bowl for the topping.

    In a food processor, puree the dried apples with the applesauce until smooth, 30 seconds or so. Scrape down the sides of the bowl as needed.

    Whisk together the egg and salt in a large bowl. Whisking continuously, add the sugar mixture; whisk until it is well-combined and light yellow, about 20-30 seconds.

    Add the butter in 3 additions, whisking after each. Whisk in the applesauce mixture and vanilla to just combine. Add the flour to the wet ingredients. Use a rubber spatula to gently fold the batter. Only stir until it is just combined and evenly moistened.

    Pour the batter into prepared pan. Smooth the top with a spatula, and sprinkle with remaining sugar-spice mixture. Bake until a wooden skewer comes out clean and cake has set, 35-40 minutes.

    Cool on wire rack to room temperature, about 2 hours. Run a knife along the edge to release from parchment. Life parchment to remove cake; cut into squares and serve.


    Saturday, November 21, 2009

    Chicken Tortilla Soup


    As I'm sure you have noticed by now, we are huge fans of anything with Mexican flavors. And now that I have begun to be able to handle more spice, I have been enjoying experimenting with more jalapenos, chipotles, etc.

    What can I say about this soup, other than it is my new favorite tortilla soup? I previously was partial to Ina's, but this one takes the cake. It should come as no suprise, given my previous successes with the Pastry Queen.

    I love the idea of roasting the tomatoes before pureeing them with canned tomaotes. This forms the most flavorful broth. The original recipe calls for dried ancho chiles, but I didn't see any in my local Publix. I just substituted a chipotle chile in adobo sauce.

    Have fun with the garnishes. I kept it simple with tortilla chips, cilantro, and Monterrey Jack cheese, but then I ate leftovers with some avocado, extra diced tomatoes, and salsa. Delicious both ways!!

    Texas Tortilla Soup
    adapted from The Pastry Queen, by Rebecca Rather

    serves 8

    • 8 plum tomatoes
    • 4 Tablespoons olive oil
    • 1 medium yellow onion, diced
    • 6 cloves garlic, minced
    • 1 red bell pepper, diced
    • 2 teaspoons chili powder
    • 2 teaspoons ground cumin
    • 4 cups chicken stock, preferably homemade
    • 1 chipotle chile, diced
    • 1 15-oz can peeled tomatoes
    • salt and freshly ground pepper
    • 3 cooked, shredded chicken breasts
    • 3 ears of corn, or 1 (8-0z) package frozen corn (optional)
    Preheat the oven to 350. Spread 1 Tablespoon of oil on a baking sheet. Slice the tomatoes in half, and lay them skin-side up. Drizzle with another tablespoon of oil and season with salt and pepper. Roast 25-35 minutes, or until the skins wrinkle and the tomatoes are beginning to brown around the edges.

    Meanwhile, heat the remaining 2 tablespoons of oil in a dutch-oven or 4-quart soup pot over medium heat. Sautee the onion, garlic, and bell pepper for 5 minutes, or until the vegetables become soft. Stir in the chili powder and cumin, and cook for an additional minute. Add the chicken stock and chile. Bring to a boil, and simmer about 15 minutes.

    Transfer the canned tomatoes with their juices and the roasted tomatoes to a food processor. Pour an additional 1/2 cup of chicken stock on the baking sheet that you cooked the tomatoes on, and scrape up any browned bits. Scrape into the food processor. Puree about 1 minute, until smooth.

    Add the tomato mixture to the soup, and continue simmering, covered, about 1 hour. Add salt and pepper to taste, the shredded chicken, and corn. Simmer an additional 5 minutes.

    To serve, ladle the soup into bowls and top with desired ganishes.


    Wednesday, November 18, 2009

    Herb-Baked Eggs

    I have been looking for an excuse to make this dish ever since I saw it on Inn Cuisine. I love eggs for breakfast, but since Caroline is allergic, I always feel guilty to make them, especially if its just for me. Well, I finally had my chance this week. My sister and niece were visiting for a few days, so I made them for us on Monday.... and then again on Tuesday.

    One of the great things about this recipe is that it can be easily adapted to many tastes and ingredients. Have leftover turkey from Thanksgiving? Just use that. Prefer sausage? no problem. Any combination of herbs and cheese would be wonderful. I actually used milk the first day, and yogurt the second, and either would be just fine.

    These are just so cute, and would be perfect for a post-Thanksgiving breakfast. Or any-day-breakfast!


    Herb-Baked Eggs with Ham and Cheddar

    serves 4

    adapted from
    Inn Cuisine, originally from Strawberry Creek Inn
    • 4 slices ham (each about 1/4-inch thick)
    • 6 large eggs
    • 3 teaspoons Dijon mustard
    • 1/2 cup plain yogurt or 1/4 cup milk
    • 1/4 teaspoon ground nutmeg
    • 1 & 1/2 cups shredded cheese, divided (I used extra sharp cheddar)
    • 4 teaspoons fresh herbs (any combination), divided (I used thyme and parsley)
    • salt and pepper to taste


    Monday, November 16, 2009

    Fontina Shells and Cheese


    This is easily one of the easiest and tastiest recipes for macaroni and cheese ever. Amped up with Fontina and Parmesan Cheese, this is crazy good. I froze half, and I'm waiting for the perfect opportunity to break out the second pan....sometime soon, I'm thinking.

    With Thanksgiving just around the corner, this would be a great twist on the classic versions.

    After the Tomato-Mozarella Tart with Basil-Garlic Crust, I am dying to buy this cookbook. Thank you, Rebecca, for sharing such a rich and tasty recipe!

    Baked Shells with Fontina and Parmesan Bread Crumbs adapted from Ezra Pound Cake, originally from The Complete Italian Vegetarian Cookbook
    • 1 pound small shells
    • 8 tablespoons unsalted butter
    • 1/2 cup heavy cream
    • 1/2 cup buttermilk
    • 8 ounces (about 2 cups) Italian Fontina cheese
    • Salt
    • Pinch of freshly grated nutmeg
    • 1/3 cup plain bread crumbs
    • 1/4 cup freshly grated Parmigiano-Reggiano
    • 2 Tablespoons basil, chiffonade
    Cook the shells according to package directions, boiling until they are 1-2 minutes short of al dente. Drain and set aside.

    Preheat the oven to 350.

    Meanwhile, shred the fontina, and cut 5 tablespoons of the butter into Tablespoon portions. Cut the remaining butter into 1/2 inch cubes. Warm the cream and buttermilk in the microwave, then set aside and cover to keep warm.

    Stir the shells with the butter in a large bowl. Pour in the cream, and fold in the fontina until it starts to melt. Season to taste with salt, and add the nutmeg as well.

    Spread into a greased 9 x 13 inch baking dish. Top with breadcrumbs and Parmesan, then sprinkle the reserved butter over the top.

    Bake for 20 minutes, or until the top is slightly browned and the cheese is bubbling. Sprinkle basil over the top, and serve hot.


    Wednesday, November 11, 2009

    Red Chile Chicken with Black Beans and Rice


    Ever since I watched Rick Bayless win Top Chef Masters, I have wanted his cookbook, Mexican Everyday. As a matter of fact, I think my husband might even have a bit of a man-crush on him. So when I saw this recipe on Elly's blog, I knew I needed to try it, and soon.

    Pretty much anything with black beans is a winner in our house. So it should come as a shock to no one that this has become a new favorite. It is fast, easy, and leaves very little mess to be cleaned up. And what's even better, is that we pretty much always have all these ingredients on hand.

    Caroline has some major dietary restrictions (no eggs, dairy, or gluten), so the fact that she could actually eat this meal was another major bonus for us. Despite the fact that it has nearly 3 Tablespoons of chile powder, this is not spicy at all. It merely gives it a nice smoky flavor. I even added a jalapeno into the mix with the onion, and it still isn't spicy. So don't let that scare you; just make this soon because it is fantastic!

    Red Chile Chicken with Rice and Black Beans

    adapted from Elly Says Opa! originally from Rick Bayless, Mexican Everyday
    • 2 Tbsp. canola oil
    • 4 boneless, skinless chicken breast halves (1.25-1.5 lbs. total)
    • 2.5 Tbsp. ancho chili powder, divided
    • 1 medium onion, large dice
    • 1-2 jalapenos, diced
    • 1 cup rice
    • 4 cloves garlic, minced
    • 1.5 cups chicken broth
    • 1 (15 oz.) can black beans, drained and rinsed
    • 1/4 cup chopped green onions, (OR 1/3 cup cilantro) OR a mixture of both (which is what I did)
    • 1/2 to 1 cup salsa, for serving
    • lime wedges and sour cream, for serving (optional)
    Season chicken with salt, pepper, and 1 Tablespoon of chile powder. Preheat a large skillet with oil until shimmering. Brown chicken on both sides, 2-3 minutes per side. Remove from skillet and place on a plate, leaving behind as much oil as possible.

    Sautee onion, rice, and jalapeno until the rice is toasted and is no longer translucent and turns opaque. Add the remaining chili powder, the garlic, and 1/2 teaspoon of kosher salt. Cook 1 minute, then stir in the broth. Bring to a boil, reduce heat, and cover. Simmer 10 minutes.

    Meanwhile, cut the chicken into bite-sized pieces. Add the chicken and the black beans to the pot, stir, re-cover, and cook an additional 10-12 minutes.

    Taste a grain of rice. If it is slightly chalky in the center, remove the pot from heat, stir in the green onion and cilantro, and let sit, covered, 5 additional minutes. If it is not cooked through, re-cover the pot, and cook an additional 5 minutes, or until done.

    Fluff rice with a fork, and serve with salsa, sour cream, and lime wedges.


    Tuesday, November 10, 2009

    Jalapeno-Cheddar Cornbread


    So I am from the deep south. While I spent 6 years living in Atlanta (which I know people don't consider to be "the south" anymore) during my young adult years, I was born and raised in a semi-rural area south of Atlanta (which, incidentally is now a suburb. Gotta love that urban sprawl). Naturally, I have had my fair share of cornbread. Cooked with lard, in a cast-iron skillet cornbread. True, southern cornbread.

    Well, let me tell you that this isn't it. No cast iron skillet, no lard (but plenty of butter). With mix-ins such as extra-sharp cheddar, jalapenos, and scallions. And it is my favorite cornbread ever. It is lighter and fluffier, and more...cake-like than typical cornbread.

    In face, I have made it more than any other recipe from Barefoot Contessa at Home. But please don't make me turn in my sweet tea and monograms.

    Jalapeno-Cheddar Cornbread
    adapted from
    Barefoot Contessa at Home
    makes 12 large pieces, or 24 normal sized pieces

    • 3 cups all-purpose flour
    • 1 cup yellow cornmeal
    • 1/4 cup sugar
    • 2 Tablespoons baking powder
    • 2 teaspoons kosher salt
    • 2 cups buttermilk
    • 3 large eggs, slightly beaten
    • 1/2 pound (2 sticks) unsalted butter, melted, plus extra to grease the pan
    • 8 ounces extra-sharp cheddar, grated
    • 1/3 cup chopped scallions, plus extra for garnish (3-4 scallions)
    • 3 Tablespoons seeded and minced fresh jalapeno peppers (2-3 peppers)
    Sift together the flour, cornmeal, sugar, baking powder, and salt. Combine the buttermilk, eggs, and butter. Make a well in the center of the dry ingredients, and pour in the wet ingredients. Stir until just combined. Mix in 2 cups of the cheddar, the scallions, and jalapenos and stir until just combined. Do not overmix!

    Allow the mixture to sit at room tempeature for 20 minutes. Meanwhile, preheat the oven to 350, and grease a 9 x 13 x 2 inch baking dish. Spread the batter into the baking dish, and sprinkle the top with the remaining cheddar and scallions.

    Bake for 30-35 minutes, or until a toothpick inserted in the center comes out clean. Cool slightly and cut into squares to serve.


    Friday, November 6, 2009

    Cinnamon Cupcakes with Pumpkin Icing


    A few weeks ago, I got the itch to bake something fall-ish. I perused my ever-growing list of saved recipes, and I happened upon this one that I starred, oh about a year ago.

    These cinnamon cupcakes are warm, sweet, and well, cinnamon-y. Even my picky-about-dessert husband really liked these. I made just a few changes from Annie's version - adding a pinch of nutmeg, and I omitted the orange zest because I didn't have any. I also changed the frosting from cream cheese -cinnamon frosting to cream cheese-cinnamon-pumpkin frosting. Delicious!

    This a perfect fall dessert. Make them soon, you won't be sorry!


    Cinnamon Cupcakes
    adapted from Annie's Eats, originally from A Southern Grace
    makes 12

    • 1 cup all-purpose flour
    • ¾ tsp. baking powder
    • 1 tsp. ground cinnamon
    • 1/8 teaspoon ground nutmeg
    • 1/8 tsp. salt
    • ½ cup buttermilk
    • 4 tbsp. unsalted butter
    • 2 large eggs
    • ¾ cup plus 2 tbsp. sugar
    • 1 tsp. grated orange zest (optional)
    • ½ tsp. vanilla extract
    Preheat the oven to 350. Line a 12-cup cupcake pan with liners, and spray with cooking spray.

    Sift together the flour, baking powder, cinnamon, nutmeg, and salt. Melt the butter and combine with buttermilk. Set aside.

    In the bowl of a stand mixer fitted with the paddle attachment, cream the sugar and eggs until a thick batter forms, about 5 minutes. Beat in the vanilla and orange zest, and mix until combined. Mix in the flour mixture until just combined, and then do the same with the butter and milk mixture.

    Fill each cupcake liner 3/4 full, and bake 15-18 minutes, or until a toothpick inserted in the center comes out clean. Allow to cool in the pan for 5 minutes, then transfer to a wire rack. Cool completely before icing.

    For the icing
    • 6 ounces cream cheese, softened to room temperature
    • 1/2 cup unsalted butter, at room temperature (1 stick)
    • 2 Tablespoons canned pumpkin puree
    • 3-4 cups powdered sugar, sifted
    • 1 teaspoon vanilla extract
    • 1 1/2 teaspoons ground cinnamon
    Cream the butter, cream cheese, and pumpkin together in a stand mixer until well combined and very smooth. Add the vanilla and cinnamon and mix until well combined. Slowly add the powdered sugar, about 1 cup at a time, until desired consistency and sweetness is reached. Frost the cooled cupcakes.


    Thursday, November 5, 2009

    Moroccan-Spiced Lamb Patties with Peppers and Feta


    While I do enjoy complicated and intricate recipes, sometimes I just want a quick, one-pot dinner. This recipe is seriously one of the easiest and fastest that I've thrown together in quite some time. Don't let that fool you though; this packs some serious flavor.

    I was intrigued by the Moroccan spice blend used for the lamb - cumin, cinnamon, and cloves. I am also a huge fan of roasted red peppers and feta. The lamb patties were so flavorful - smoky with a little sweetness and warmth from the cinnamon and cloves. And we both really loved how the feta caramelized a bit in the oven. Joey commented that this would be great as a burger, and I agree.

    The original recipe suggests serving with warm pita, but I somehow missed that line when making my grocery list. I think it would be wonderful though, and will definitely remember to whip some up next time I make this dish.

    Moroccan-Spiced Lamb Patties with Peppers and Feta

    Food and Wine Magazine, October 2009
    • 12 ounces roasted red peppers, cut into 1/2 inch strips (2 cups)
    • 1 large, sweet onion, thinly sliced
    • 8 ounces feta or halloumi cheese, cut into 1/3-inch thick slices
    • 1/2 teaspoon red pepper flakes
    • 3 Tablespoons extra-virgin olive oil
    • kosher salt and freshly ground black pepper
    • 1 1/2 pounds ground lamb
    • 2 teaspoons ground cumin
    • 1/4 teaspoon ground cinnamon
    • 1/8 teaspoon ground cloves
    • 2 Tablespoons chopped flat-leaf parsley
    • Warm pita, for serving
    Preheat the oven to 450.

    In a large baking dish, toss the peppers, onions, cheese, and red pepper flakes with 2 1/2 Tablespoons of the olive oil. Season with salt and pepper.

    In a medium bowl, knead the lamb with the cumin, cinnamon, cloves, 1 1/2 teaspoons salt, and 1/2 teaspoon of pepper. Form into 4 4-inch patties, and arrange over the pepper mixture. Drizzle the remaining olive oil over the tops.

    Roast for 25 minutes, or until vegetables are very tender and the lamb is cooked through. Sprinkle the parsley over the top and serve with warm pita.


    Wednesday, November 4, 2009

    BB BRC: Chicken Chili


    My third recipe for this week is Ina's Chicken Chili. I am hugely torn on this, because of my love of my other chicken chili. I feel guilty.... because I could possibly like this one even better :-( Don't get me wrong; I love the ease of the crockpot and the 4 ingredients. But this one is just so different than the norm. In fact, I have made it twice in the last week. We just really enjoyed it.

    I did make a few additions and changes to Ina's original recipe. I don't consider it chili without beans, so I added a can of pinto and a can of white beans.... just because that's what I had on hand. Any bean would work - black, kidney, etc. I also omitted the basil because my plant died before I could bring it inside from the blistering cold. The first time I made this, I ended up adding extra spices while it simmered, so when I made it for the second time, I just went ahead and doubled them all, and I threw in a diced chipotle pepper for good measure. And finally, I used boneless skinless chicken breasts instead of bone-in skin-on. All of my changes are reflected below.

    Garnish this however you like; we like Fritos, cheese, green onion, and sour cream. And serving with cornbread is a must - we really like Ina's jalapeno cheddar cornbread (stay tuned for the recipe)!

    Chicken Chili
    adapted from The Barefoot Contessa Parties!
    serves 6-8

    • 4 cups chopped yellow onions (3 onions)
    • 1/8 cup good olive oil
    • 1/8 cup minced garlic (2 cloves)
    • 2 red bell peppers, cored, seeded, and large-diced
    • 2 yellow bell peppers, cored, seeded, and large-diced
    • 2 teaspoon chili powder
    • 2 teaspoon ground cumin
    • 1/4 teaspoon dried red pepper flakes, or to taste
    • 1/2 teaspoon cayenne pepper, or to taste
    • 1/2 teaspoon dried oregano
    • 1 chipotle chili in adobo sauce, finely diced
    • 2 teaspoons kosher salt, plus more for chicken
    • 2 (28-ounce) cans whole peeled San Marzanno tomatoes in puree, undrained
    • 3 boneless, skinless chicken breasts, trimmed of fat
    • 2 cans beans, rinsed and drained (any combination or type)
    • Freshly ground black pepper
    Preaheat oven to 375. Place a piece of foil on a baking sheet, and place chicken on top of foil. Season each with salt and pepper, and fold foil around chicken breasts to make a "packet." Roast 40-45 minutes, or until chicken has cooked through. Allow to cool enough to handle, and chop into bite-sized pieces.

    Meanwhile, heat olive oil in a large stockpot or dutch oven. Sautee onions 10-15 minutes, or until softened and translucent. Add chopped bell peppers and all the spices, and cook an additional 5 minutes.

    Roughly chop the tomatoes; either use your hands to break them apart as you add them to the pot, or pulse a few times in the food processor. Add tomatoes and their puree to the onions and peppers, and bring to a boil. Reduce heat, and allow to simmer, uncovered for 30 minutes. Stir occasionally.

    Stir in the chicken and beans, and allow chili to simmer for an additional 20 minutes. Serve with desired toppings.


    Monday, November 2, 2009

    BB BRC: Roasted Potato Leek Soup


    This week, expect to see several recipes from the great Ina Garten. My Barefoot Bloggers group is having a bonus recipe challenge, called "A Week with the Barefoot Contessa." We will blog a different recipe each day. I was very excited to take on this challenge. Partly because of how much I love her recipes, but also because I was able to try out some new ones that I might not have made otherwise.

    However, this is not one that I would have ignored. In fact, I already had it on my menu for last week before the challenge was even announced! I really love baked potato soup, and this was a wonderful, more 'grown-up" version.

    I have to admit that I was a little intimidated by leeks. Cleaning out the sand seemed scary to me for some reason. But I needn't have feared. It was no big deal, and I am now officially in love with leeks. Unless Mike Isabelle is preparing them to look like scallops (Top Chef, anyone?).

    Other than halving the recipe, I made a few minor changes: I used russet potatoes because I had some on hand, subbed fat-free half and half for heavy cream, and used light sour cream instead of creme fraiche. I would like to say that those changes did not significantly affect the outcome. This soup was sooo good. Creamy, salty, comforting. And don't skip the crispy shallots. mmmm they are sweet, crunchy, and delicious! I actually just sauteed mine in a little butter and olive oil until they were starting to brown.

    While I really loved this soup, I think it would be extra delicous to toss a few garlic cloves onto the sheet pan with the poatoes and leeks. I will probably try that next time.

    Roasted Potato Leek Soup
    adapted from Barefoot Contessa, Back to Basics

    serves 6 to 8

    • 2 pounds yukon gold or russet potatoes, peeled and cut into 3/4 inch chunks
    • 4 cups chopped leeks, white and light green parts, cleaned of all sand (4 leeks)
    • 1/4 cup olive oil
    • Kosher salt and fresh ground pepper
    • 3 cups baby arugula, lightly packed
    • 1/2 cup dry white wine, plus extra for serving
    • 6 to 7 cups low sodium chicken broth
    • 3/4 cup half and half or heavy cream
    • 8 ounces creme fraiche or sour cream
    • 1/4 cup freshly grated Parmigiana-Reggiano cheese, plus extra for garnish
    • Crispy shallots, optional
    Preheat oven to 400.

    Toss the potatoes and leeks with olive oil, 1 teasppon salt, and 1/2 teaspoon pepper. Lay in a single layer on a sheet pan. Roast 40 to 45 minutes, turning them with a spatula every 10-15 minutes. Cook until very tender. Add the arugula and roast an additional 4-5 minutes, until wilted.

    Remove the pan from the oven and place over two burners. Stir in the wine and 1 cup of chicken broth. Cook over low heat, scraping up browned bits from the pan.

    Working in batches, transfer the vegetables and pan juices to a food processor fitted with a steel blade. Add 5 cups of the chicken broth throughout the batches, and puree until the soup is mostly smooth, with a little texture, about 30 seconds.

    Pour the puree into a large stockpot or dutch oven, and add enough of the remaining stock to make a thick soup. Add the half and half, creme fraiche, 2 teaspoons of salt and 1 teaspoon of pepper. Stir to combine and check seasonings.

    When ready to serve, reheat the soup gently and whisk in 2 Tablespoons of white wine and the Parmesan cheese. Serve hot with an extra grating of cheese and the crispy shallots.


    Sunday, November 1, 2009

    Chicken and Dumplings


    I realize I have been awfully heavy on comfort food lately (not to mention that I have a backlog of posts that are almost all in that category), but something about the start of fall just makes me want to cook soups, chili, stews, and comforting meals. In an effort to keep the same delicious, comforting flavors without gaining 5 pounds overnight, I made these chicken and dumplings. Don't get me wrong. I wouldn't necessarily call it healthy, but it is definitely better than the cream-laden versions that I'm sure we're all used to. This particular recipe really lets the chicken flavor shine though, and they taste well, more chickeny.

    Now on to the recipe. I am absolutely in love with this. Hearty, comforting, delicous...a wonderful classic just amped up. Once again, Cook's Illustrated took out all the guesswork and created this wonderful dish.

    I used the recommended chicken thighs, but boneless, skinless chicken breasts can be substituted (with a little loss of flavor). You will just simmer them for 20-30 minutes, waiting for the internal temperature to reach 160.

    I was also a little torn on the idea of using chicken wings, but I think it really gave extra flavor to the broth, and the white meat was a nice addition to the thighs. It is definitely optional to add the meat from the wings, but it literally fell off the bone anyway; plus I don't like to waste food.

    The original recipe serves 6, but I halved it with no problems. This was a great Sunday night dinner, and the leftovers made for a hearty lunch the next day. Don't wait - make this soon!!

    Lighter Chicken and Dumplings
    adapted from Cook's Illustrated, September 2009
    serves 6

    • 6 bone-in, skin-on chicken thighs, trimmed of excess fat (about 2 1/2 lbs)
    • 2 teaspoons vegetable oil
    • 2 small onions, chopped fine (1 1/2 cups)
    • 2 medium carrots, peeled and cut into 3/4 inch pieces (2 cups)
    • 1 celery rib, chopped fine (1/2 cup)
    • 1/4 cup dried sherry or dry white wine
    • 6 cups low-sodium chicken broth
    • 1/2 teaspoon dried thyme (or 1 teaspoon fresh)
    • 1 pound chicken wings
    • 1/4 cup flat leaf parsley
    For the dumplings
    • 2 cups all-purpose flour
    • 1/2 teaspoon baking soda
    • 1 teaspoon sugar
    • 1 teaspoon salt
    • 3/4 cup cold buttermilk
    • 4 Tablespoons (1/2 stick) unsalted butter, melted and cooled for 5 minutes
    • 1 large egg white

    1. Pat chicken thighs dry with paper towels and season with 1 teaspoon salt and ¼ teaspoon pepper. Heat oil in large Dutch oven over medium-high heat until shimmering. Add chicken thighs, skin-side down, and cook until skin is crisp and well browned, 5 to 7 minutes. Using tongs, turn chicken and brown on second side, 5 to 7 minutes longer; transfer to large plate. Discard all but 1 teaspoon fat from pot.

    2. Add onions, carrots, and celery to pot; cook, stirring occasionally, until caramelized, 7 to 9 minutes. Stir in sherry or wine, scraping up any browned bits. Stir in broth and thyme. Return chicken thighs, with any accumulated juices, to pot and add chicken wings. Bring to simmer, cover, and cook until thigh meat offers no resistance when poked with tip of paring knife but still clings to bones, 45 to 55 minutes (as a side note, when I halved this recipe it only took 35-40 minutes to reach this point).

    3. Remove pot from heat and transfer chicken to cutting board. Allow broth to settle 5 minutes, then skim fat from surface using wide spoon. When chicken is cool enough to handle, remove and discard skin. Using fingers or fork, pull meat from chicken thighs (and wings, if using) and cut into 1-inch pieces. Return meat to pot

    4. Whisk flour, baking soda, sugar, and salt in large bowl. Combine buttermilk and melted butter in medium bowl, stirring until butter forms small clumps; whisk in egg white. Add buttermilk mixture to dry ingredients and stir with rubber spatula until just incorporated and batter pulls away from sides of bowl.

    5. Return stew to simmer; stir in parsley and season with salt and pepper to taste. Using greased tablespoon measure (or #60 portion scoop), scoop level amount of batter and drop over top of stew, spacing about ¼ inch apart (you should have about 24 dumplings). Wrap lid of Dutch oven with clean kitchen towel (keeping towel away from heat source) and cover pot. Simmer gently until dumplings have doubled in size and toothpick inserted into center comes out clean, 13 to 16 minutes. Serve immediately.


    Thursday, October 29, 2009

    Maple-Cider Glazed Chicken


    Yet another success from Cook's Illustrated, these glazed chicken breasts are fantastic. I love glazing pork tenderloin and chicken; I just feel like it gives it so much flavor, and I love the crust that forms from the glaze.

    I adapted this recipe a little by using boness-skinless chicken breasts... you know, to keep them a little healthy. i made a few other minor changes as well, which are reflected below. It was a perfect fall Sunday supper with sauteed kale and Trader Joe's harvest grains.

    One final note, I highly recommend using a meat thermometer for this recipe. The cook time will vary depending on several factors - the thickness of the chicken breast, how long you cook it on the stove-top, and the heat of your pan. There will be no question of the doneness if you simply use a thermometer. I use mine almost every time I cook chicken and pork!

    Apple-Maple Glazed Chicken Breasts
    adapted from Cook's Illustrated, September 2007
    • 1 1/2 cups apple cider, plus 2 Tablespoons
    • 1/3 cup light corn syrup
    • 2 Tablespoons maple syrup
    • 1 Tablespoon Dijon mustard
    • 1 Tablespoon apple cider vinegar
    • pinch red pepper flakes
    • 1/2 cup all-purpose flour
    • 4 boneless, skinless chicken breasts, trimmed of fat
    • 2 teaspoons vegetable oil
    • 1 medium shallot, minced
    • kosher salt and ground black pepper
    Adjust oven rack to the middle position and heat to 375. Whisk together 1 1/2 cups apple cider, corn syrup, maple syrup, mustard, vinegar, 1/8 teaspoon each of salt and pepper, and red pepper flakes together in a medium bowl.

    Spread flour in a shallow bowl or pie plate, and season chicken breasts with salt and pepper. Dredge each chicken breast in flour, patting off excess.

    Heat oil in an oven-proof 12-inch skillet until it is shimmering but not smoking. Lay chicken breasts in a single layer, and cook 12-14 minutes, turning once, until both sides are golden brown. Transfer chicken to a plate.

    Pour off all but 1 teaspoon of fat. Saute shallot until softened, about 1-2 minutes. Increase heat to high, and add cider mixture to skillet. Simmer, stirring occasionally, until mixture has reduced to about 1 cup, 6-10 minutes. A spatula should leave a slight trail when dragged through the mixture.

    Remove skillet from heat, and tilt so that all the glaze pools on one side. Use tongs to coat each chicken breast in the glaze, and lay in a single layer in the skillet.

    Transfer the skillet to the oven and bake until the thickest portion of the chicken reads 160 on an instant read thermometer, 20-25 minutes, turning chicken halfway through.

    Remove from oven and set the chicken aside. Return the skillet to high heat on the stove top (be careful, the handle will be very hot!!). Cook until glaze has thickened and is syrupy, about 1 minute (a spatula will leave a wide trail when dragged through). Remove from heat and whisk in remaining 2 Tablespoons of cider.

    Spoon 1 teaspoon over each chicken breast, and serve, passing remaining glaze at the table


    Tuesday, October 27, 2009

    Creepcakes

    A few weeks ago, I got together with my mother-in-law to make some Halloween themed cupcakes. We used Martha Stewart’s Cupcakes as inspiration to create our scary monsters, and we had so much fun making scary faces and funny little friends.

    We bought marshmallows, chocolate chips, a few different kinds of candy, and just mixed and matched to make the different faces. We also made a few spider webs using only some black gel and a toothpick!

    Mix and match, be creative. This would be a fun project to do with kids. And it makes me so excited for when Caroline will be old enough to help cook and play in the kitchen. In fact, her new favorite toys are mixing bowls and wooden spoons – she is definitely my daughter :-)

    Creepcakes

    inspired by Martha Stewart, Cupcakes

    • 1 batch cupcakes, any flavor
    • 1 batch buttercream icing, tinted green, brown, and some white (or really any color you want to use)
    • m&m candies
    • mini m&m candies
    • gumdrops
    • sour LifeSaver gummies
    • Twizzlers
    • Black Licorice
    • mini chocolate chips
    • jumbo sized marshmallows
    • mini marshmallows
    • Assorted colored Airheads

    Frost Cupcakes. Using candies, decorate each to be a different face.

    For the spiderwebs, ice each cupake with white icing. Using black decorating gel, carefully draw concentric circles on top. Starting from the center, drag a toothpick to the edge to create the "web." Repeat at intervals all the way around the cupcake


    BLOG DESIGN BY: SHERBET BLOSSOM DESIGNS