Thursday, January 30, 2014

Bacon and Cheddar Toasts


As you have no doubt seen all over the news by now, the past few days in Atlanta have been nothing short of insane.  I wanted to write about it all and share some thoughts, but to be honest, I'm still having trouble processing it and wrapping my head around it all.   I'll just say that our family was extremely fortunate on Tuesday that Joey only spent over two hours in the car before abandoning it and walking three miles home in the snow.  And that we are incredibly lucky that we only live a mile from the school.  After waiting over two hours for her to arrive home on the bus, I set out on foot to the school, when I happened upon the bus just outside our neighborhood.   She got off the bus thinking that she'd just had the greatest adventure of all-time, and I fought back tears of relief.  My mother in law was stuck in traffic near our house, just a few miles from home, but roads were closing and traffic was grid-locked, so she wisely gave up and came to stay with us for the night.

Those are small and petty inconveniences compared to the children who had to spend the night in the school gymnasium because bus service was discontinued and their parents were stranded somewhere in the snow... or worse, the children who had to spend the night on their buses that were stranded on deserted roads.  Or the woman who gave birth to a baby on the interstate.  Or the thousands of people who never made it home that night.  The silver lining was that good samaritans were out in full force, and reading the stories of all the acts of kindness and selflessness brought me to tears.  It's a good reminder of the wonderful human nature that comes out in times of crisis.

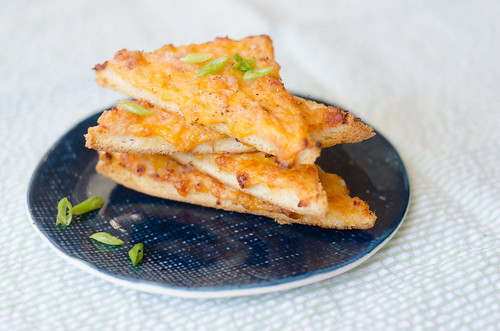
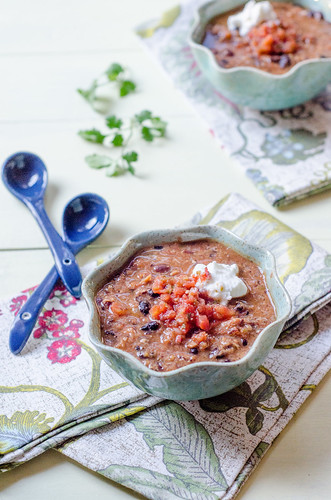
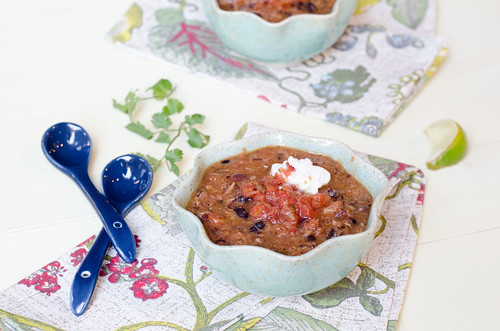
So what does all of this have to do with bacon and cheese toast?  Not much, other than as I waited for my family to come home, I engaged in some wicked emotional eating, and downed an embarrassing number of these little babies.  And then I made another batch that night; and Joey, his mother, and I all just stood around the baking pan, drinking wine and eating these toasts as we watched all the reports and news roll in.

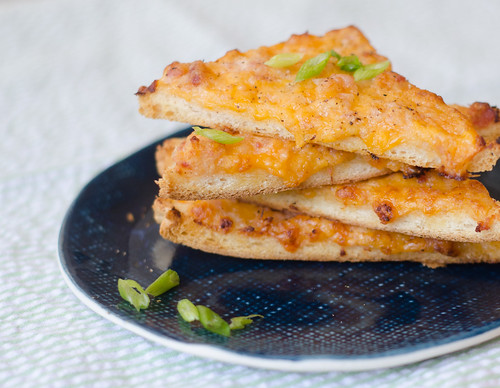
These are embarrassingly easy, but amazingly delicious and addictive.  It's a simple mixture of sharp cheddar, bacon, onion, and horseradish, then it's spread on pieces of bread, and baked until the cheese is melted and gooey, the bacon is cooked through, and the bread is nice and crispy.  It's a familiar concept with a kicked-up flavor profile, thanks to the bite from the horseradish and onion.

These are an ideal make-ahead dish and can be flash frozen before baking, or chilled for several hours in the refrigerator.  This makes them perfect for serving at parties.  Like, perhaps a Super Bowl party this weekend?  They also make a nice easy breakfast, snack, or accompaniment to a salad or soup.  With a recipe as easy as this in your arsenal, you'll always have something to make for parties, potlucks, or unexpected visitors during a snowstorm.


Bacon and Cheddar Toasts
adapted from Gourmet Today
makes 28 triangles

While I usually use thick-cut bacon, thin, lean bacon is best here.  Discard the extra fatty parts of the bacon.

Using a food processor is optional, but I think the mixture spreads easier and the flavors meld better with the food processor.

These are utterly irresistible straight out of the oven, but no one will turn them down at room temperature either.

  • 8 oz extra-sharp cheddar, grated (about 2 cups)
  • 8 oz cold lean bacon, finely chopped
  • 2/3 cup coarsely chopped white onion
  • 2 Tbs prepared horseradish
  • 1/2 tsp salt
  • 1/4 tsp freshly ground black pepper
  • 14 thin slices of white sandwich bread (recommended:  Pepperidge farm)
  • sliced scallions or chives for garnish
In the bowl of a food processor, combine the cheese, bacon, onion, horseradish, salt, and pepper.  Pulse a few times to combine well.

Spread a heaping tablespoon of the cheese mixture onto each of the bread slices, spreading it all the way to the edges.  Arrange in a single layer on a baking sheet, cover the bread with wax paper or parchment paper, and place in the freezer for 15 minutes.  Alternatively, store in the refrigerator for at least 2 hours, or overnight.

When ready to bake, preheat the oven to 375 degrees.  

Trim the crusts off the bread, then slice each piece in half diagonally.  Arrange on a greased baking sheet  15 minutes, or until the cheese is melted and the edges are beginning to brown.  Sprinkle with scallions or chives and serve.


Monday, January 27, 2014

Henry and Tucker are Uno: Let's Fiesta!


I've been putting off writing this post because I get so gosh darn emotional when I think about the past year.  What a wild year it has been!  When I found out that we were expecting twins, I was completely terrified, yet totally excited.  How in the world were they going to fit into our family, and how in the world was I going to manage four kids under five?!  I won't lie and say it was a totally seamless transition, they were the perfect babies, Caroline and Smith were the perfect toddlers, and my hair looked awesome every day.  The truth is, at times it was really hard.  There were definitely days where I took things hour by hour.  There were days that someone was crying at all times (one of those someones may have been me, ha).  But through it all, I tried really hard to savor every single minute with those sweet baby boys.  Because I knew from experience how fleeting those minutes are.

From the moment they were born, Henry and Tucker have been inseparable.  In the early days, they cuddled up together in their crib, arms intertwined and sleeping nose-to-nose; and now they crawl around the house together, laughing, babbling, and playing ball with each other.  They are just so much fun these days, and I know it will just keep getting better.


So as their first birthday rolled around, we knew we wanted to have a big party to celebrate the milestone.  I of course agonized over the theme - or whether to even have a theme.  In the end, our love for Mexican food won out, and we threw a big fiesta!  Since everyone jokes that first birthday parties are for the parents anyway, we just threw the party we wanted!  And let me tell you - this party was fun for all ages - babies, kids, and adults alike all had a blast.


I wanted a colorful, fun party, so I went with bright shades of yellow, green, blue, and orange.  And because chalkboards are so fun and trendy these days, I incorporated those into the decor as well.


Since the party was in the afternoon, I didn't need to serve a whole meal, but I wanted some substantial snacks.  The menu was as follows:


We also had some"kid" snacks out for the really littles ones - applesauce pouches, puffs, and cheddar bunnies are always a hit with Smith and the twins.

Everyone loved customizing their guacamole - my favorite combination was bacon, grilled pineapple, and fresh cilantro.  


I served the tortilla chips in brown lunch bags, and it made it so easy to just grab your chips and be on your way (plus no worries about little hands spreading germs to everyone by reaching into a community bowl!).


No fiesta is complete without margaritas, and the margarita station was a huge hit!  I made a HUGE batch of homemade margaritas, and served them in mason jars with brightly colored straws.  My drink dispenser has a weird hollow stand, so to dress it up, I just stuffed it with some bright tissue paper.  It might seem inappropriate to serve alcohol at a first birthday party, but Joey and I joked that we deserved some margaritas for making it through the year, ha!  No worries, we also served bottled water, lemonade, and Corona for those who don't drink tequila :)


I kept things pretty simple with the decorations.  I wanted to incorporate the chalkboard into a few areas, so for the foyer, I DIY-ed this faux chalkboard sign with black poster board, a white crayon, and a white piece of sidewalk chalk.  As you can see below the sign, we have out rubber duckies dressed as a mariachi band for the favors.  The kids LOVED these.


I wanted a fun background for the twins' highchairs, so I covered some letters in multi-colored yarn to spell "uno."  This was a really easy craft, and one I did while watching Top Chef one night.  I also made tissue paper banners for a few areas, and these were super easy as well.  Please don't mind my window - I promise it's not dirty - it rained the day of the party!


My favorite element however, was the background behind the food table.  I bought a roll of black paper, and Joey drew "Uno" in similar script to the invite, then I taped up some paper medallions for pops of color.  I attached another tissue paper banner to the tablecloth, then used a piñata for the centerpiece.  The cupcake stands were also DIY, using this tutorial, and orange crepe paper that I cut into fringe.

Finally, we blew up tons of brightly colored balloons, which Smith promptly got a hold of and released to the top of our 2-story foyer....


Since there were close to two dozen kids in attendance, we wanted to have plenty for the little ones to do to keep them happy and busy.  I ordered wooden maracas, then broke out our markers and extensive sticker collection.  The kids loved decorating the maracas, and it made for a fun favor to take home as well.  I also taped down brown paper to the table, so that my kitchen table didn't end up covered in marker and frosting ... bonus that it provided more places for the kids to color!


Remember the piñata from the food table?  Well it was stuffed with candy.  And while we didn't take any pictures, after the cake, we broke it open.  Obviously the kids loved that as well :)


Speaking of cake, I'm no cake decorator, so I just frosted their smash cakes and covered up the imperfections with sprinkles.  They donned their sombreros, we sang happy birthday, then it was time to eat!


Tucker and Henry love to eat, so they unsurprisingly dug right into their cakes as well.  I'm pretty sure they sat there eating cake for close to an hour.  And they even snuck bites of each other's cake, ha!

The Mexican-themed first birthday party was a blast, and we were so happy that so many of our friends and family could be there to celebrate with us.  Henry and Tucker had a great time, and it was such a fun party to plan.  Here's to another year of health and happiness!

Sources:
Invitations:  Endash Designs (etsy shop)
Paper Medallions and paper serving cups for guacamole and salsa:  TomKat Studios
Rubber Ducks and Maracas:  Oriental Trading Company
Food Tents and Guacomole Menu:  My fabulous friend Courtney!  (go bug her to start an Etsy shop!)
Inspiration for "Party Like There's No Mañana:"  Little Baby Garvin


Wednesday, January 22, 2014

Pork & Mango Stir-Fry


Oftentimes when I buy a new cookbook, I feel overwhelmed by all of the recipes, and I have a really hard time deciding what to make first.  With every page that I turn, I decide that "No, THIS is what I want to make first."  Whenever this happens, I give the cookbook to Joey and let him decide.  Such was the case with Ellie Krieger's So Easy.  I pretty much wanted to make every single recipe I came across, so in the interest of saving myself the agony of making such a monumental decision, I let Joey be the judge.

We all really love mango, so I wasn't too surprised when Joey chose the Pork and Mango Stir-Fry.  We also love meat with fruit, so this was kind of a no-brainer.  The sweet mango pairs so nicely with the tender pork and the other veggies in the stir fry, and it's all pulled together with a sweet-spicy-salty Asian sauce.  This is colorful, healthy, and it was a big hit with the whole family.  Caroline and Smith loved to tell us which colors they were eating, and which was their favorite (for the record, Smith just parrots everything Caroline says).

Even though chopping and prepping the veggies and pork takes a bit of time, the dinner comes together quite quickly once you get started - so definitely measure out the ingredients for the sauce and have everything else ready to go once you start.

Dinners like this make it easy to stick to your New Year's resolutions - quick and easy, healthy, and a pretty darn good substitute for Chinese take-out!

Psst - I'm including the nutritional info because it's provided in the book.  Since I've been counting calories, I've been calculating the nutritional info for most of my recipes - is that something you would be interested in seeing for future posts?

Pork & Mango Stir-Fry
adapted from Ellie Krieger's So Easy
serves 4

  • 3/4 cup low-sodium chicken broth
  • 2 tsp cornstarch
  • 4 tsp canola oil
  • 1 lb pork tenderloin, trimmed of any visible fat, cut into 5-6 pieces
  • 1 medium red onion, halved and thinly sliced
  • 1 red bell pepper, seeded and thinly sliced
  • 2 Tbs minced fresh ginger
  • 3 cloves garlic, minced
  • 3/4 lb snow peas
  • 1/4  cup dry sherry (or Chinese cooking wine)
  • 3 Tbs low-sodium soy sauce
  • 1 tsp Chinese five-spice powder
  • 1/4-1/2 tsp crushed red pepper flakes
  • 1 large firm but ripe mango, peeled, pitted, and cut into chunks
  • kosher salt and freshly ground black pepper
  • 3 cups cooked brown rice
Whisk together the chicken broth and cornstarch in a small bowl to dissolve the cornstarch.  Set aside.

Using a food processor with the slicing attachment,  pass the pieces of pork tenderloin through to thinly slice.  Alternatively, use a knife to slice the pork as thinly as possible.

Heat 2 teaspoons of the oil in a wok or large nonstick skillet over medium-high heat.  Add the pork, season lightly with salt and pepper, and cook, stirring occasionally, until just cooked through, about 4 minutes.  Transfer the meat to a plate and set aside.

Meanwhile, in a small bowl, whisk together the sherry, soy sauce, Chinese five-spice powder, and red pepper flakes.  Set aside.

Heat the remaining 2 teaspoons of oil in the now-empty skillet.  Add the onions, peppers, ginger, and garlic, and cook about 3 minutes, stirring constantly.  Add the snow peas, the cornstarch-broth mixture, and the sherry mixture, and toss to combine.

Cook until the peas are crisp-tender and the sauce is slightly thickened, about 3 minutes.  

Return the pork to the wok, and stir in the mango.  Cook an additional 2 minutes, or until the pork and mango are heated through.

Taste and season with additional salt, pepper, and red pepper flakes as needed.  Serve over brown rice.

Serving Size:  2 cups stir-fry plus 3/4 cup cooked brown rice
Per serving:
460 calories
9 g fat (1.5 g sat fat + 4.5 h mono fat + 2.5 g poly fat)
32 g protein
58 g carbohydrates
7 g fiber
75 mg cholesterol
470 mg sodium


Monday, January 20, 2014

Quick and Easy Black Bean & Salsa Soup


I have a handful of recipes that my mother passed down to me, and this is one of my favorites.  I affectionately call it "Two by Four" Soup, because it is simply two cups each of four ingredients.  So, so easy, and so so good.

All you do is dump it all in a pot and let it simmer for fifteen minutes or so, then serve with whatever garnishes and toppings your heart desires:  I typically top it with some extra salsa, a little sour cream, and shredded cheese.  In the past I've also done guacamole, diced avocado, cilantro, jalapeños... really anything you'd serve with chili works here.  I like to serve it with cheese quesadillas, or I'll keep it simple and just eat some chips and salsa with it.  Or I'll try and be healthy and have it with a salad. The world is your oyster... errr black bean soup.

So about those four ingredients.  Black beans, salsa, broth, and a protein of your choice.  I just go with whatever I have on hand:  be it shredded chicken, pulled pork, ground turkey, chicken, or beef... I've even used chopped ham after Easter before!  And oftentimes I just omit the meat altogether and make it a vegetarian meal.  My preference for the salsa is to use my rustic roasted salsa, but I've used store-bought in a pinch before.  The roasted tomatillo salsa is pretty fabulous as well, and it gives you a totally new flavor profile.

As you can see, this is infinitely adaptable.  And with it being so easy, it's a great meal to have in your back pocket for busy nights.  The leftovers reheat beautifully, making it a perfect soup to have around for lunches.  As we hunker down for yet another cold snap, I'm craving soup more than ever.  This soup is not only totally delicious and easy, but it reminds me of my sweet mom - foods that make you think of family are always the best ones, aren't they?


Quick and Easy Black Bean & Salsa Soup
serves 4 to 6

I like my soups on the thicker side, but if you prefer a thinner consistency, just add a little more broth, or skip the immersion blender step.

  • 2 cups salsa
  • 2 cans (or 3 1/2 cups) black beans, drained and rinsed
  • 2 cups broth (vegetable, chicken, or beef)
  • 2 cups cooked meat of your choice (shredded chicken, pork, ground beef, etc) - optional
  • To serve:  salsa, shredded cheese, sour cream, cilantro, avocado, etc
In a medium saucepan, combine the salsa, beans, broth, and meat.  Bring to a simmer over medium heat, cover, and cook 15 minutes.

Using an immersion blender, give the soup a few pulses to create a bit more of a creamy, chunky texture.

Divide among soup bowls and serve immediately with desired toppings.


Wednesday, January 15, 2014

Pasta all'Amatriciana (Pasta with Spicy Tomato Sauce & Pancetta)


Spaghetti is a regular in the rotation here, and while I love classic marinara and meat sauce, sometimes I'm in the mood to mix things up a little.  When that happens, this is a great option.  It's got all the components of a good, classic marinara sauce, but it's kicked up a few notches.  There's pancetta, garlic, a good pinch of red pepper flakes, and red wine.  Finished with a sprinkle of grated Parmesan or Pecorino cheese, this is a bold, brash pasta dish that is a perfect way to spice up the dreary winter days we've been having.  Yeah, it's good stuff.

Do you know what else is good?  This meal will be on your table in less than 30 minutes.  Your weeknights just got a little less hectic.  In just a few more minutes than it takes to pop open a bottle of marinara sauce, you can have a big plate of spicy, cheesy pasta that's homemade.  Throw together a simple Caesar or garden salad, warm up a loaf of bread, open a bottle of red wine, and call it done.


Pasta all'Amatriciana
adapted from America's Test Kitchen, Pasta Revolution
serves 4 to 6

kid-freindly adaptation:  Adjust the red pepper flakes to your spice tolerance, but if your kids (or spouse) find it too spicy, stir a little cream or half-and-half into their serving to tame it a bit.  And if you like things really spicy, feel free to top your serving with extra red pepper flakes.  That's the beauty of making your own sauce - you make it exactly how you like it!

  • 1 Tbs olive oil
  • 4 oz pancetta, diced into small pieces (or bacon)
  • 1 medium onion, chopped fine (about 1 cup)
  • 1/2 tsp red pepper flakes
  • 2 cloves garlic, minced
  • 1/2 tsp kosher salt
  • 1/4 cup red wine
  • 1 (28-oz) can diced tomatoes
  • 1 lb pasta
  • 1 1/2 oz Pecorino Romano or Parmesan cheese, grated (about 3/4 cup), plus more for serving
Heat the oil in a 12-inch skillet over  medium heat.  Add the pancetta, and cook until it's well-browned and crop, 6 to 8 minutes, stirring often.  Use a slotted spoon to transfer it to a paper towel-lined plate.  

Pour off all but about 2 tablespoons of fat from the skillet (if you don't have 2 tablespoons of fat in the skillet, add more olive oil to reach that volume).  Add the onion and cook over medium heat until softened, about 5 minutes.  Stir in the pepper flakes, garlic, and salt, and cook until fragrant, about 30 seconds. 

Pour the wine into the skillet, and scrape the bottom with a wooden spoon to scrape up any browned bits.  Cook until the wine has reduced to about half it's volume, 1-2 minutes.  Stir in the tomatoes, bring to a simmer, and cook until the sauce is slightly thickened, about 10 minutes.  Taste and season with additional salt if needed.

Meanwhile, bring a large pot of salted water to a boil.  Add the pasta and cook, stirring often, until al dente, according to the package directions.  Reserve 1/2 cup of cooking water, then drain the pasta and return it to the pot.

Add the sauce, pancetta, and grated cheese, and toss to combine.  Season to taste with salt, and add the reserved water as needed to adjust the consistency.  Divide among serving plates and garnish with additional cheese and/or red pepper flakes.


Sunday, January 12, 2014

Tequila-Braised Short Rib Enchiladas


So you guys.  These enchiladas.  Oh my.  They are something special.  These chicken enchiladas are by far the most popular recipe on my site.  And I'm not trying to be sensationalist or be "the girl who cried enchiladas," but dare I say the short rib version is even better?  We loooooved them, and the twins both absolutely devoured the short rib meat we gave them (spoiled little foodie babies).

As Joey and I were discussing our plans for New Year's Eve, I gave him a few ideas for dinner - various appetizers, braised short ribs, or enchiladas.  As we so often do, we decided on Mexican food, but I couldn't get short ribs out of my head.  So I did what any Mexican food-obsessed person would do, and combined the two ideas.


I turned to my usual chicken enchilada recipe, and adapted it to short ribs.  After a quick sear on the stove top, I braised them in a mixture of tequila and tomato sauce, all seasoned with my favorite enchilada sauce ingredients - plenty of chile powder, cumin, jalapeños, etc.  After a few hours in the oven, I not only had perfectly tender short ribs, but an intensely flavored and perfect enchilada sauce - once I spiked it with a little more tequila, that is.

Assembly was quick and painless, and the result was totally fantastic.  These enchiladas obviously require a lot of time, but much of it is hands off, and it's the perfect project for a cold and rainy day at home.  Cook for a while, go play or relax for a while.  And you'll be handsomely rewarded with these awesome enchiladas.  The meat is fall-apart tender, there's just enough tequila and spice to keep them interested, and the bits of meat that are right inside each enchilada get kind of crispy - almost like carnitas.  But better.  Because it's short ribs.  And there's tequila.

We ended up having a low-key evening at home, snacking on black bean and corn dip, drinking margaritas, eating enchiladas, and coloring Sesame Street characters with Smith and Caroline.  It was the perfect end to a pretty wild and wonderful year, and I wouldn't have had it any other way.


Tequila-Braised Short Rib Enchiladas
inspired by these Chicken Enchiladas

Take care to skim off as much fat from the sauce as you can, as it will cause the enchiladas to be pretty greasy otherwise.

  • 1 Tbs vegetable oil
  • 2 1/2 - 3 lbs beef short ribs (bone-in)
  • kosher salt and freshly ground black pepper
  • 1 large onions, finely diced
  • 2-3 jalapeños, seeds and ribs removed, chopped
  • 3 cloves garlic, minced
  • 1/4 cup chile powder
  • 1 Tbs ground cumin
  • 1 tsp sugar
  • 1 cup tequila, divided
  • 1 (15-oz) can tomato sauce
  • 1/3 cup minced fresh cilantro
  • 1 cup sharp cheddar cheese, divided
  • 1 cup Pepperjack cheese, divided
  • 12-15 corn tortillas
  • 1/2 cup water (optional)
  • chopped cilantro and/or scallions, for serving
Preheat the oven to 325 degrees.  

Heat the oil over medium-high heat in a large pot or Dutch oven.  Season both sides of the short ribs liberally with salt and pepper.  Working in batches (only sear as many as can fit in a single layer in the pot at a time), cook the short ribs 2-3 minutes on each side, or until they are browned.  Remove to a clean plate and repeat with the remaining short ribs.

Pour off all but about 2 tablespoons of the oil, reduce the heat to medium-low, and add the onions and jalapeños with 1/4 teaspoon of salt to the pot, stirring well.  Cover and cook until they are softened but not browned, 5-8 minutes.  Add the garlic, chile powder, cumin, and sugar, and cook about 1 minute, or until the mixture is fragrant.

Pour in 2/3 cup of the tequila, and scrape the bottom of the pot with a wooden spoon to scrape up any browned bits.  Stir in the tomato sauce, then nestle the short ribs (and any juices that are on the plate) into the sauce.  Remove from heat, cover, and transfer to the oven.

Cook the short ribs 2 1/2 - 3 hours, or until they are very tender and falling off the bone.  Remove the meat from the sauce, and transfer them to a plate too cool.  

As the meat cools, pour the sauce through a fine-mesh strainer into a medium bowl.  Press down on any solids to extract as much liquid as possible.  Allow to cool slightly, then use a large spoon to skim as much fat off the top as possible.  Stir in the remaining 1/3 cup of tequila, and if the sauce seems too thick (if it's the same consistence as spaghetti sauce, it's just a little too thick), thin it with up to 1/2 cup of water.

Shred the meat into bite-sized pieces using 2 forks (or clean hands), discarding the bones and visible fat.

Increase the oven temperature to 425 degrees, and lightly grease a 9x13 inch baking dish.  

In a large bowl, toss the meat with the cilantro, 1/2 cup of the cheddar, 1/2 cup of the pepperjack, and 1/2 cup of the sauce.  Toss well to combine and season with additional salt and pepper to taste.

Stack the tortillas on a microwave-safe plate and cover with a damp paper towel.  Microwave about 1 minute, or until the tortillas are soft and pliable.  

To assemble the enchiladas, add a scant 1/3 cup of the filling onto each tortilla, and roll tightly.  Arrange the enchiladas in a single layer in the prepared baking dish, seam side-down.  Repeat with the remaining tortillas and filling.  

Lightly brush the tops of the enchiladas with vegetable oil, and bake 7 minutes, or until the tortillas begin to brown.  Remove from the oven, reduce the heat to 400 degrees, and pour the remaining enchilada sauce over the top.  Sprinkle with the remaining cheese, cover the dish with foil, and return to the oven.

Bake 20 minutes, remove the foil, and bake a final 5 minutes.  Sprinkle with cilantro and/or chopped scallions before serving.


Tuesday, January 7, 2014

Bacon, Potato, and Caramelized Onion Pizza


Do I post too much pizza here?  Is there such a thing as too much pizza?  I don't think there is.

This pizza is a thing of beauty.  Allow me to break it down for you:  Chewy, perfect pizza dough.  Sweet caramelized onions.  Carb-o-licious roasted potatoes.  Salty bacon.  Mozzarella and gruyere.  Are you drooling yet?

I know that potatoes on pizza seem kind of odd and maybe a tad redundant (carbs + carbs?), but they provide a nice earthy flavor and wonderful added texture to the pizza.  They are briefly roasted, just to cook them through, and then once they are added to the pizza, they get beautifully browned and crispy. The old adage of "Bacon makes everything better" is certainly true here as well.

I typically let the seasons guide me in my pizza-making, using as much fresh and seasonal produce as I can.  That sadly doesn't work as well in the winter, but this is a great option if you are like-minded about that sort of thing.  It's definitely a hearty and indulgent pizza, but when served alongside a leafy green salad with beets and oranges, it is a lovely and seasonally appropriate meal.

We're hunkered down in the cold along with the rest of the country, and as if you needed another reason to make a pizza - having your oven on for this will really warm up your kitchen for you!

Bacon, Potato, and Caramelized Onion Pizza
barely adapted from Annie's Eats

  • 1 cup thinly sliced small potatoes, such as fingerling, red potatoes, or Yukon golds
  • 2 Tbs olive oil, divided, plus more for brushing
  • Salt and pepper
  • 1 large onion, halved pole-to-ple and thinly sliced
  • Pinch of sugar
  • 1 lb pizza dough
  • cornmeal, for sprinkling
  • 1 cup shredded mozzarella cheese
  • 1 cup shredded shredded gruyere cheese
  • 3 slices bacon, cooked until crisp, and crumbled

  • Preheat the oven to 400˚ F, and place your pizza stone in the oven.  Line a baking sheet with parchment paper or foil. In a bowl, combine the sliced potatoes with 1 tablespoon of the olive oil and season with coarsely ground salt and pepper. Arrange in a single layer on the prepared baking sheet.
    Bake, flipping the slices over once, until the potatoes are just beginning to brown, about 10-15 minutes. Remove from the oven and let cool.  
    Meanwhile, make the caramelized onions.  Heat the remaining tablespoon of olive oil in a 12-inch skillet over medium heat.  Add the sliced onions to the pan, and stir in the sugar, salt, and pepper.  Reduce the heat to medium-low.  Cook the onions, stirring occasionally, until golden brown and fully caramelized, about 15-20 minutes.  Remove from heat and set aside.
    To make the pizza,  increase the temperature to 500˚ F, and preheat it for at least 30 minutes.  Roll and stretch out the the pizza dough into a 12-14 inch round on a piece of parchment paper that's been sprinkled with cornmeal.  Brush the perimeter of the dough with olive oil, and then sprinkle about two thirds of the shredded cheeses over the dough. Top with the caramelized onions, potato slices, and crumbled bacon, arranging them as evenly as you can over the cheeses. Sprinkle with the remaining shredded cheese.
    Transfer the pizza to the preheated pizza stone, and bake until the cheese is melted and bubbling and the crust is lightly browned, about 10-12 minutes.  Remove from the oven and allow to cool slightly before slicing and serving.


Sunday, January 5, 2014

Chicken Fajita Mac & Cheese


Mexican food is what I call my "baseline craving."  Anytime, anywhere, I'm pretty much always down for Mexican.  On the other hand, Caroline's baseline craving is macaroni and cheese.  Whenever I ask her what she wants for dinner, that's her immediate request.  So one fateful day last month, I was craving Mexican food, and planned to make chicken fajitas for dinner.  That afternoon, she came home from school and requested mac and cheese.  It was cold and rainy that day, and comfort food definitely sounded good, but I wanted fajitas, darn it!  What's a mom to do?  Put your hands together, my friend.

Fajita mac and cheese.  Oh yes.  Creamy, cheesy, noodles swimming with spicy chicken and sautéed onions and peppers?  This stuff is good.  I loved the combination of the sweet peppers and onions, the rich and creamy sauce, and the slightly spicy chicken.  And of course who can resist gobs of melted cheddar and pepperjack?  Not I.  Joey couldn't sing its praises enough, and while I cleaned the kitchen, I couldn't stop myself from grabbing bite after bite from the casserole dish.

This was a wonderfully comforting take on Mexican food.  While I already have tons of recipes for macaroni and cheese in my arsenal, it never hurts to add another - because you never know when you'll have simultaneous cravings for Mexican food and mac and cheese.


Chicken Fajita Mac and Cheese
adapted from Annie's Eats

  • 12 oz pasta shapes
  • 1 tsp cumin
  • 1/2 tsp chili powder
  • 1/2 tsp kosher salt
  • 1/2 tsp paprika
  • 1/4 tsp ground black pepper
  • pinch of cayenne
  • 3 Tbs unsalted butter, divided
  • 2 chicken breast halves, trimmed of any visible fat
  • 1 medium red onion, halved pole-to pole and thinly sliced
  • 3 medium bell peppers (various colors), seeded and thinly sliced
  • 3 cloves garlic, minced
  • 1 (4 oz) can diced green chiles, drained
  • 3/4 cup sour cream (light is fine)
  • 8 oz pepper jack cheese, shredded
  • 6 oz sharp cheddar cheese, shredded
Preheat the oven to 400 degrees and butter a 2 qt baking dish.

Bring a large pot of salted water to a boil and cook the pasta according to the directions on the box, until just al dente.  Drain and set aside.

Meanwhile, combine the cumin, chile powder, salt, paprika, black pepper, and cayenne in a small bowl.  Pat the chicken dry with a paper towel, then sprinkle the mixture on both sides of the chicken.

Heat 1 tablespoon of the butter in a large skillet over medium-high heat.  Add the chicken, and cook about 7 minutes per side, or until it's cooked through.  Remove from the pan, allow to cool slightly, then shred or chop into bite-sized pieces.  Set aside.

Melt the remaining 2 tablespoons of butter over medium heat in the now-empty skillet, and add the onions and pepper, and sauté until tender, about 5 minutes.  Add the garlic and green chiles and cook an additional minute.

In a large bowl, mix together the pasta, chicken, sautéed vegetables, sour cream, and all but 1/2 cup of the cheeses.  Stir until well-combined, taste and season with additional salt and pepper if needed, then spread into the prepared baking dish.  Sprinkle the remaining 1/2 cup of cheese over the top, transfer to the oven, and bake 15 to 20 minutes, or until the cheese is melted and the sauce is bubbly.  Cool slightly before serving.


Thursday, January 2, 2014

Lentil & Cauliflower Soup with Broiled Gruyere


Raise your hand if you overindulged in December.  Raise your hand if you're recommitting to eating healthier.  Now raise your hand if you're still somehow craving cheesy, hot comfort foods instead of salads and grilled veggies.  Guilty, guilty, guilty.  Things got a little... out of hand... for me at the end of the year.  And while I'm normally not one to make big sweeping resolutions, the beginning of the year is as good a time as any to get back on track.  So here we are.

Yet, it's a cruel irony that just when we all want to start eating fresh veggies and salads, we're stuck in the depths of winter.  It's really freaking cold outside.  And it's raining.  Again.  I want comfort food -  a big bowl of something starchy and cheesy.

This soup is a great compromise.  It's full of nutritious and healthy ingredients, but you get juuuuuust a little indulgence from the melted Gruyere topping.  Kind of a healthy take on French onion soup going on here.  This soup is packed with veggies:  onions, celery, carrots, and cauliflower.  And the lentils give you that starchy carb-y feel, but they are full of protein, fiber, and iron.  The finishing touch of broiling the gruyere really makes this soup.  The creamy, salty cheese pairs really well with the earthy vegetables, and I couldn't get enough.  We enjoyed this for dinner, then I enjoyed the leftovers for lunch the next day.  It was a big hit all-around, and a soup I'll definitely make again when I want something healthy but am craving something sinful.

Lentil & Cauliflower Soup with Gruyere
adapted from Martha Stewart Living, November 2013
serves 4

  • 2 Tbs olive oil
  • 1 cup chopped white or yellow onion
  • 1/2 cup finely chopped celery
  • 1/2 cup finely chopped carrot
  • 2 cloves garlic, minced
  • 2 tsp tomato paste
  • 3 sprigs fresh thyme, minced, plus more for garnish
  • kosher salt and freshly ground black pepper
  • 1 cup brown or French green lentils, rinsed and drained
  • 3 1/2 - 4 cups chicken or vegetable broth
  • 1/2 head cauliflower, cored, trimmed, and cut into small florets (about 3-4 cups)
  • 1 cup shredded Gruyere or Swiss cheese
Heat oil in a medium saucepan set over medium-high heat.  Add the onion, celery, and carrots, and cook, stirring occasionally, until the vegetables are softened, about 8 minutes.  Stir in the garlic, tomato paste, thyme, 1/2 teaspoon of salt, and 1/4 teaspoon of pepper.  Cook, stirring constantly, until fragrant, about 1 minute.

Add the lentils and broth and bring to a boil.  Cover, reduce heat to medium, and simmer until the lentils are tender, 25 to 30 minutes.  

Stir in the cauliflower, increase heat to medium-high, and simmer just until the cauliflower is crisp-tender, 3-4 minutes.  Taste the soup and season accordingly with salt and pepper.

Meanwhile, preheat the broiler.  Divide the soup among 4 oven-proof ramekins or soup bowls, and sprinkle 1/4 cup cheese over each one.  Watching the soup VERY closely, broil until the cheese is melted, golden, and bubbly, 3 to 4 minutes. 

Garnish with additional thyme and serve immediately.


BLOG DESIGN BY: SHERBET BLOSSOM DESIGNS