It's November 30th! Which means it's the last day of NaBloPoMo. Thanks so much for sticking with me this month. I'm glad and proud that I managed to write (what I would consider) a quality blog post each day. Most of the time I didn't feel pressure and wasn't pressed for time to get a blog post in, because I pretty much wrote them all a few days in advance and scheduled them to publish. However, sometimes life got in the way and I didn't have the time or energy, which is why some of my posts weren't published until 10:30 pm. :-) However, I got to the chance to feature some seasonal menus and party ideas, which was fun. Maybe I'll keep this feature alive intermittently and post a menu or round-up when the mood strikes. And hopefully I also shared some recipes and stories that you enjoyed as well. To celebrate the end of the month, I'm sharing with you a family favorite.
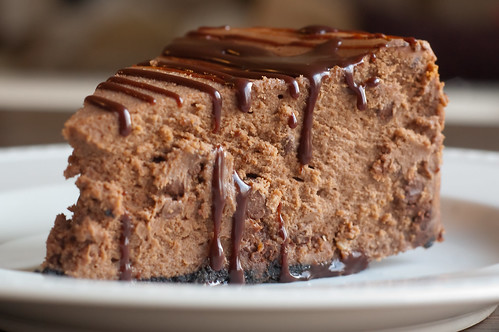
This cheesecake is kind of legen (wait for it) dary. It's been one of my mom's signature desserts for as long as I can remember, and now it's one of mine as well. It is also intense. You have a chocolate cookie crust, chocolate cheesecake base, mix in some chocolate chips, then drizzle the whole thing with chocolate kalhua sauce. Like I said, it's intense. She cut this recipe out of the Atlanta Journal Constitution years ago, and has been making it ever since.
I have made this a couple of times in the past - all for functions when my mom wouldn't be present of course, since it's "her" dessert. I went on a spree a few weeks back and purged my gmail inbox (I think I had over 60,000 email strings...) so unfortunately I lost the recipe, but luckily my mom has it filed away and resent it. She reminded me that it makes more than a full springform pan, and I should bake the extra alongside it in a small dish. Instead, I opted to just scale down the recipe. So if the quantities seem a little weird, that's why.
I took this cheesecake to Thanksgiving this year, and while I know it may seem like a nontraditional dessert, I say that a chocolate dessert is always welcome - no matter the holiday. And trust me, no one cared one bit. I think this would be a wonderful addition to a Christmas buffet, it would make a great dessert for a dinner party, or a great dessert for a Tuesday night. Chocolate cheesecake is always welcome.
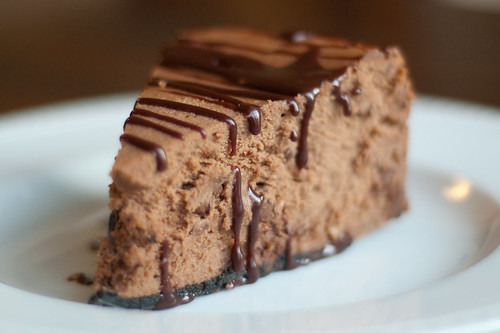
Triple Chocolate Cheesecake
a Phillips Family Favorite
Crust:
- 1 1/2 cups chocolate cookie crumbs
- 1/3 cup butter, melted
- 4 (8-ounce) packages of cream cheese, softened to room temperature
- 2 1/2 Tbs all-purpose flour
- scant 1/4 tsp kosher salt
- 4 eggs
- 1 1/2 cups sugar
- 7 oz semisweet chocolate, chopped and melted
- 1/4 cup milk
- 1 heaping cup semisweet chocoalte chips
Preheat oven to 475 degrees. For the crust: Combine crumbs and butter. Press on thebottom of 9-inch springform pan.
For the cheesecake: Beat cream cheese until smooth. Add flour and salt. Gradually beat in sugar. Add eggs one at a time, beating after each addition. Add melted chocolate. Stir in milk and chocolate chips.
Pour mixture into prepared crumb crust. Bake at 475 degrees for 10 to 12 minutes. Reduce heat to 300 degrees and bake 40-50 minutes longer, or until filling is barely set in middle. Remove from oven and let stand at room temperature 1 hour. Refrigerate several hours or overnight.
When ready to serve, sprinkle top with chocolate chips (if desired) and serve with Kahlua Chocolate Sauce.
Kahlua Chocolate Sauce
- 1/3 cup Kahlua
- 1/3 cup light corn syrup
- 1 cup semisweet chocolate chips