Thursday, March 29, 2012

Smith's Baptism Lunch


We had Smith baptized at our church on Sunday.  It was a beautiful service, and he entertained the entire congregation by laughing, kicking his feet, and playing with the pastor's face the whole time.  Caroline was well-behaved  too - she recognized her cousin sitting in the front row, she waved to her throughout the whole ceremony.  So a good time was had by all.  Since we have a lot of family that lives in the Atlanta area, we decided to host everyone at our house for a casual lunch following the service.  We debated hosting it ourselves vs going to brunch at a restaurant, but as usual, my love for entertaining won out (as if I really considered the other option anyway).  I wanted to host a special lunch that would show everyone how grateful and thankful we were to have them drive out of their way and be there for Smith's special day.  I also wanted to keep things low-key and casual, so everyone could just relax and enjoy the time together.


I loved my friend Annie's Butterfly Garden Baby Shower that she recently hosted, so I decided to take inspiration from her and do a sort of rustic, spring garden theme.  I wanted to stay away from the typical baby blue crosses, and instead do a springy party that would also work well for a casual Easter lunch, a baby or bridal shower, or really any spring party.  I used a moss runner that I bought at Michael's for the food table, then decorated with daisies, daffodils, and tulips.  Since I still wanted it to be somewhat "masculine" and boyish, I kept the color scheme to browns, greens, and yellows.  I wanted everything to be bright, springy, and rustic.

I decided to serve a variety of sandwiches, along with a few salads.  I wanted to be able to do the majority of the prep ahead of time, so that when everyone came over after church, I could just put on the finishing touches and then spend the rest of the time with my family.  The menu was as follows:

Appetizers:
Fruit Tray (not pictured)
Pimento Cheese + pretzel chips
Cheese Tray (Horseradish Cheddar, Blueberry-Vanilla Goat Cheese, Prosciutto, Syrah-Soaked Toscano, and a variety of crackers and dried fruit)


Main Course:
Chicken Salad on Croissants
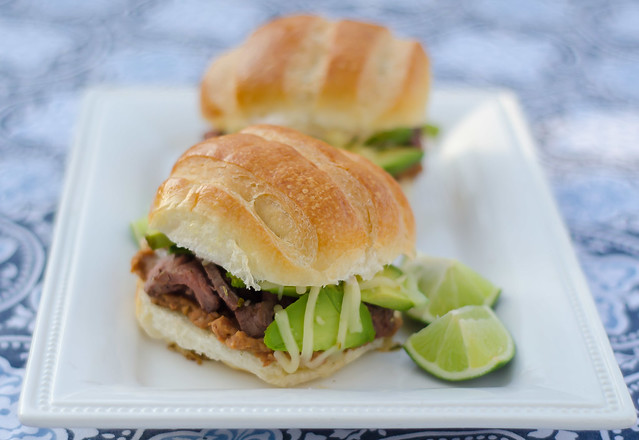
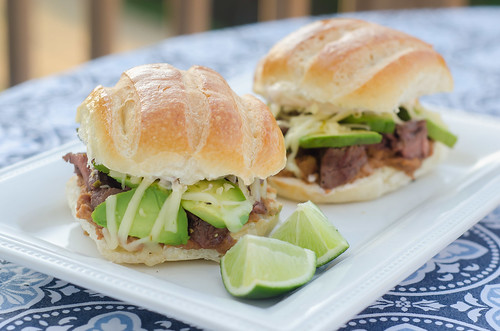
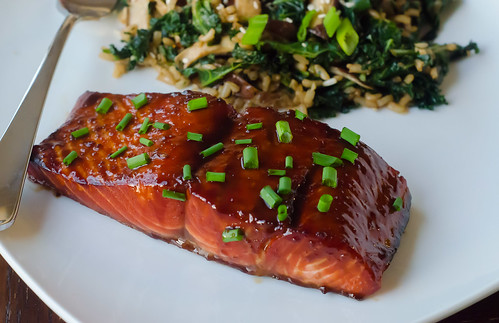
Roast Beef, Cheddar, and Horseradish Sauce (Joey's request)
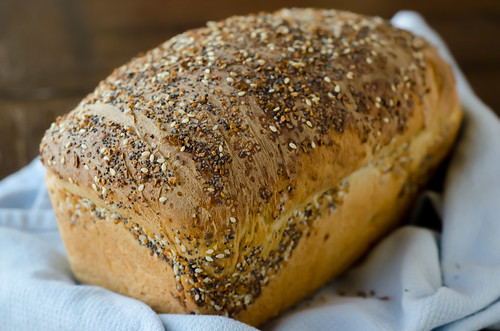
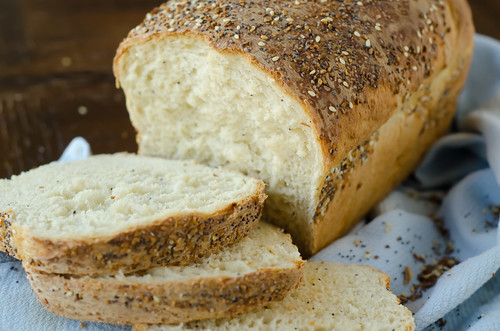
Roasted Tomato, Pesto, and Mozzarella on Homemade Foccacia
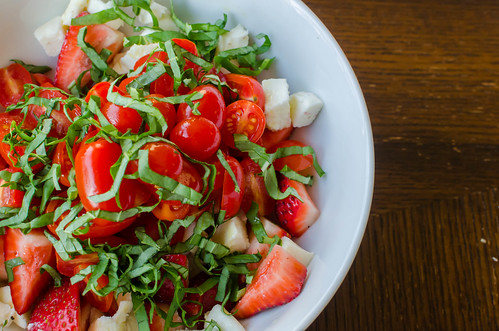
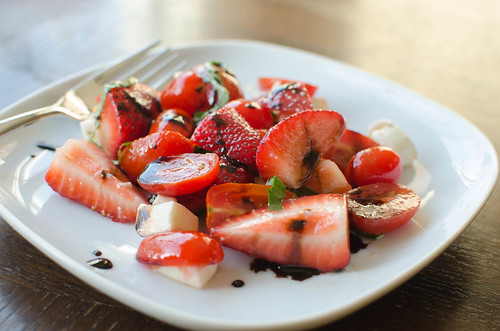
Strawberry Salad with Poppyseed Dressing
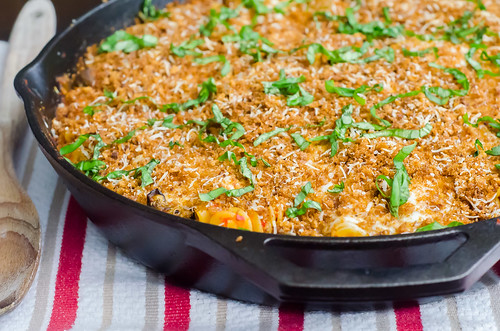
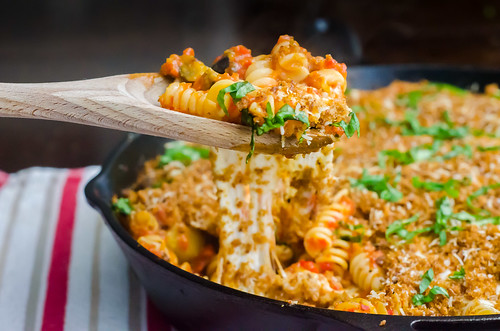
Spring Vegetable Tortellini Salad
Kettle Chips


Desserts:


Beverages:
Basil Lemonade
Sweet Tea


This was a great menu because everyone could graze and eat as they wanted to.  As soon as I had everything set up, I had to run upstairs to nurse Smith and put him down for a (unsuccessful) nap.  My sister has a 3 week old baby, so she was upstairs for much of the party as well.  Joey was keeping an eye on Caroline and my niece while they played outside, and some of the family was too busy talking and visiting to make their plates when the food was ready.  Everything was served chilled or at room temperature, so no worries about the food getting cold.  We all ate at our leisure, then went back for seconds with no fear of the food being cold or stale.

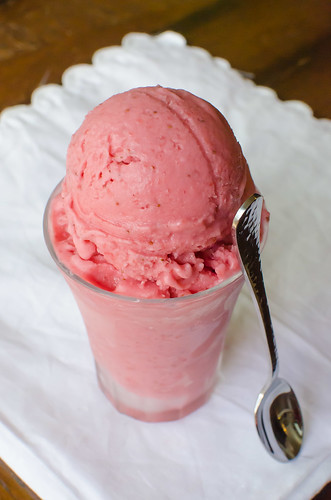
The tomato sandwiches were my favorite sandwich, and I really loved the strawberry spinach salad and the pasta salad as well.  And everyone loved the desserts - they were all small enough to where most everyone was able to try more than one and not feel too guilty.  The strawberry-ricotta trifles seemed to be the hit of the dessert table, and I'm pretty sure I demolished at least 50% of the macaroons all by myself.


And there was still plenty of time for lots and lots of baby cuddles.  The weather was perfect, the food was plentiful, and the family time was wonderful.  All in all, I couldn't have asked for anything more from our day.

If you are still looking for ideas for Easter, this menu was low-maintenance, yet still elegant and delicious.   If you need more food, add a few extra sides or appetizers:  deviled eggs, a veggie tray, potato salad, etc.


*Let me know if you'd be interested in any of the recipes, and I'll post them in the coming weeks.  


Wednesday, March 28, 2012

Strawberry Caprese Salad


I have been totally strawberry-obsessed lately.  I've been putting them into my morning smoothies, eating them as snacks, adding them to salads, cocktails making muffins (recipes coming soon!).... basically trying my best to incorporate them into every meal.  And we're going strawberry picking in the next few weeks as well - the obsession will most definitely continue.

With the weather being so absolutely gorgeous lately, I've been thinking of and craving so many summery foods.  Caprese salad is definitely one of my favorite lunches to eat during the summer, yet sadly tomatoes aren't really in season yet.  Cherry and grape tomatoes are reasonable during this time of year though, so I improvised and used those.  And given the strawberry obsession, I thought "why not?" and threw some of those in there too.

This salad was really delicious.  The sweetness of the strawberries was perfect with the creamy mozzarella, and the tomatoes and basil were a wonderfully fresh counterpart.  The flavors were familiar, but the strawberries made it special.  I drizzled the whole thing with a  balsamic reduction (another recent obsession), and it was really elevated to the next level.  And now I'm really dying to make a dessert with strawberries and balsamic vinegar.  It was my first time trying that combo, and I want more!

When food is this gorgeous and fresh, you don't have to do much to it.  Keep it simple and let the food speak for itself.  I served this alongside mushroom-pesto paninis, and it was a perfect spring meal.  Healthy, fresh, and flavorful.  I could eat like this all year-round.


Strawberry Caprese Salad
a Pink Parsley Original

  • 1 cup halved grape tomatoes
  • 1/4 tsp kosher salt
  • pinch of sugar
  • 1/2 cup balsamic vinegar
  • 1 Tbs olive oil
  • 1 Tbs honey
  • squeeze of fresh lemon juice
  • 1 cup hulled and quartered strawberries
  • 1/2 cup diced fresh mozzarella cheese
  • 4-5 basil leaves
Toss the tomatoes with the salt and sugar in a colander, and allow to drain for 10-15 minutes to remove excess water.

Meanwhile, bring the vinegar to a boil in a small saucepan.  Cook until it is thick and syrupy, and has reduced to just a few tablespoons, five to ten minutes.  Remove from heat and pour into a small bowl to cool.

In a medium bowl, whisk together the olive oil, honey, and lemon juice.  Season with a pinch of salt.  Toss with the tomatoes, strawberries, mozzarella, and basil.  Before serving, drizzle each serving with some of the balsamic vinegar (a little goes a long way, so you definitely won't use all of it)


Sunday, March 25, 2012

Greek Pita Pizzas


I am all about quick and easy meals these days.  Now that it's light until eight pm, I want to have time to eat, play outside, and take a short walk before it's time to start the bath-books-bedtime routine.  I'm also recommitting to the whole weight-loss thing in an effort to fit into a bathing suit this summer, so I'm trying to keep dinner on the light side as well.  

These pita pizzas meet both requirements.  And I loved them so much that I had them for lunch the next two days as well.  You start with a pita - whole wheat if you're feeling healthy - and crisp them up shortly in the oven.  Hummus acts as the sauce, then you can play with the toppings and add whatever you see fit.  I did a combination of cherry tomatoes, onion, and kalamata olives.  Spinkle with some mozzarella and feta, then the pizzas get another brief stint in the oven to heat everything up and melt the cheese.  And then the grand finale:  drizzle the whole thing with tzatziki.  Mmmmm tzatziki sauce.


Greek Pita Pizzas
inspired by America's Test Kitchen, The Best Simple Recipes
  • 2 Tbs olive oil
  • 4 (8-inch) pita breads
  • 1 Tbs red wine vinegar
  • salt and pepper
  • 1 tsp chopped fresh oregano
  • 1/2 small red onion, halved and sliced thin
  • 1/2 cup pitted kalamata olives, chopped
  • 3/4 cup halved grape tomatoes
  • 1/2 cup hummus
  • 1/2 shredded mozzarella cheese
  • 1/2 cup crumbled feta cheese
  • tzatziki sauce, for serving
Preheat the oven to 475 degrees.  Brush 1 tablespoon of the oil over both sides of pitas.  Arrange them in a single layer on a baking sheet and bake about 5 minutes, or until lightly golden.

Meanwhile, combine the remaining oil, vinegar, and oregano in a medium bowl.  Season with salt and pepper and whisk to combine.  Toss with the olives, onions, and tomatoes.

Spread 2 tablespoons of the hummus over each pita, leaving a small border.  Sprinkle 2 tablespoons of mozzarella on each pita, Divide the vegetable mixture evenly over the cheese, then sprinkle with the feta.  

Cook until the vegetables are softened and the cheese has melted, 6 to 8 minutes.  Drizzle with tzatziki sauce and serve.


Thursday, March 22, 2012

Balsamic Steak, Roasted Red Pepper, & Goat Cheese Pizza


Happy pizza Friday!  When we have leftover meat, my favorite way to use it up is on a pizza.  Chicken. pulled pork, and most recently, steak!  There was a good bit of steak leftover from the Mexican-Style Steak Sandwiches, so one night I chopped it up and made bbq sandwiches, and one night I made this pizza.  And this pizza - oh my goodness - it's one of the best things I've made in quite some time.

I started by making a roasted red pepper sauce - simply pureed some roasted peppers in the food processor with a little garlic and basil.  I topped that with a little mozzarella, the chopped steak, and then some crumbled goat cheese.  After it was cooked, I drizzled the whole thing with balsamic glaze, and it just put the whole pizza over the top.  Balsamic glaze on pizza is, quite simply, life-changing.  I first tried it on a whim last time I made white pizza, and I thought it would go really well with the steak and goat cheese this time.  It's just a little sweet, a little sour, and a lot delicious.  So so good.  To be honest, I'm going to have a hard time eating pizza without it moving forward.

If you don't just happen to have any leftover steak in your fridge, then just cook it to your liking and slice it thinly.  I also think chicken would work well here, or make it vegetarian and leave the meat off altogether.  


Balsamic Steak, Roasted Red Pepper, and Goat Cheese Pizza
Pink Parsley Original
  • pizza dough
  • olive oil
  • 1/2 cup roasted red peppers, patted dry and coarsely chopped
  • salt and pepper
  • 1 clove garlic, minced
  • 2-3 basil leaves torn
  • 3/4 cup shredded mozzarella cheese
  • 1/2 cup thinly sliced steak
  • 1/2 cup crumbled goat cheese
  • 1/2 cup Balsamic vinegar
Preheat the oven and the pizza stone to 500 degrees, for at least 30 minutes.  Lightly sprinkle a large square of parchment paper with cornmeal, and stretch the pizza dough over it into a 12 inch circle.  Brush the outer ring with olive oil.

In the food processor, puree the roasted red peppers, garlic, and basil.  Season to taste with salt and pepper.  

Spread the roasted red pepper puree over the pizza dough, and sprinkle with mozzarella.  Scatter the steak over the cheese, and then top with the goat cheese crumbles.  

Use the parchment to transfer the pizza to the pizza stone and cook for about 10 minutes, or until the crust is browned and the cheese is bubbly. 

Meanwhile, bring the balsamic vinegar to a boil in a small saucepan.  Boil until it's thick and syrupy and reduced to a few tablespoons.

Allow the pizza to cool about 10 minutes, then drizzle with the vinegar (a little goes a long way and you don't have to use all of it).  Slice and serve.


Tuesday, March 20, 2012

Strawberry Frozen Yogurt


Caroline's big right now into "favorites."  What's your favorite color?  What's your favorite animal?  What's your favorite ice cream?  And no two people can have the same favorite anything.  As we discussed our favorite flavors of ice cream last week, she informed me that her favorite flavor is "bamilla," and mine is strawberry.  I honestly don't think I could choose a favorite, but strawberry is definitely up there, so I'll take it.   In honor of my "favorite" flavor, I thought I would make a fun dessert for us to enjoy this week.  However, I've been trying to keep things a bit lighter around here lately, and I've been wanting to try homemade frozen yogurt anyway, so I figured I'd give this recipe a try. 

This frozen yogurt is embarrassingly easy.  Strawberries are diced and then tossed with sugar, and then they sit for a bit to bring out all those wonderful juices.  They are then pureed with the yogurt, chilled, and then the whole thing is frozen in your ice cream maker.  It really doesn't get any easier. The instructions warn against using reduced fat yogurt, but I used 2% Greek yogurt, and I didn't notice it being too icy or hard.  And I think it had a more intense yogurty flavor since Greek yogurt is a stronger flavor than plain (in my opinion anyway).

There are a few things that I really love about this frozen yogurt:  While I wouldn't classify it as "health food," it is much much lower in fat, sugar, and calories than ice cream.  It is nice and sweet from the strawberries, but the sweetness is counteracted nicely by the tang from the yogurt.  And finally, look how pretty it is! 

If you are like me and are obsessed with all things strawberry, then check out the Featured Recipes Page.  I've updated it with some great recipes that use my favorite spring fruit!


Strawberry Frozen Yogurt
adapted from The Perfect Scoop, by David Lebovitz
makes about 1 quart
  • 1 lb fresh strawberries, hulled and diced
  • 2/3 cup sugar
  • 2 tsp vodka (optional but recommended)
  • 1 cup plain Greek yogurt
  • pinch of salt
  • juice of half a lemon
Toss the strawberries with the sugar and vodka in a large bowl.  Stir until the sugar dissolves and the strawberries start to release their juices.  Allow to sit at room temperature for about an hour, stirring every 10 minutes or so.

Puree the strawberries and their liquids in a blender with the yogurt, salt, and lemon juice until smooth.  If you don't like the seeds, then strain the mixture through a fine-mesh sieve into a large bowl.  Otherwise, cover and refrigerate for at least 1 hour, or up to overnight.

Freeze according to the instructions for your ice cream maker, and serve.


Sunday, March 18, 2012

Skillet Macaroni & Cheese with Broccoli


My love for mac and cheese pretty much knows no bounds.  I'm always eager to try a new variation or recipe, nevermind that I have several favorites already in my repertoire.  I try to limit myself to only making mac and cheese once every other week instead of the three times per week that I would like.  Ah, sacrifices.

This version is great for several reasons:  it only dirties one pan, is very easy, and it already has a veggie in it - no need to prep another side.  And of course it goes without saying that it's delicious.  Obviously it's still not the healthiest dish, but if you're eating mac and cheese, you're clearly not going for light anyway.  This mac and cheese uses sharp cheddar for super cheesy flavor, and Monterey Jack for creaminess.  The hot sauce and cayenne give it just enough spice without being overpowering, and the garlic and dry mustard give the whole dish even more flavor.

When I was in college and would make velveeta shells and cheese, I tricked myself into thinking I was being health-concious by buying the broccoli and cheese flavor - somehow I felt pretty good about myself for eating the broccoli.  Who cared that it was just tiny dehydrated broccoli crumbs? This version actually has real broccoli in it.  Who knew you could feel so healthy eating mac and cheese? ;)


Skillet Macaroni and Cheese with Broccoli
adapted from America's Test Kitchen, Pasta Revolution
  • 4 cups water, plus more as needed
  • 10-12 oz broccoli florets, cut into bite-sized pieces
  • salt and pepper
  • 3 Tbs unsalted butter
  • 3 garlic cloves, minced
  • 1/4 tsp red pepper flakes
  • 1 (12-oz) can evaporated milk
  • 12 oz pasta
  • 3/4 tsp cornstarch
  • 1/2 tsp dry mustard
  • 1/4 tsp hot sauce
  • 6 oz extra sharp white cheddar, shredded (about 1 1/2 cups)
  • 6 oz Monterey Jack cheese, shredded (about 1 1/2 cups)
Bring 1/2 cup water to a boil in a 12-inch skillet over medium-high heat.  Add the broccoli and a pinch of salt, cover, and cook until the broccoli is just tender, about 5 minutes.  Drain broccoli and set aside.

Wipe out the skillet and melt 1 tablespoon of the butter.  Add the garlic and pepper flakes and cook, stirring constantly, until fragrant, about 1 minute.  Stir in the remaining 3 1/2 cups of water, 1 cup of the milk, 1/2 tsp salt, and the pasta.  Bring to a fast simmer and cook, stirring frequently, until the pasta is tender and the sauce has started to thicken, 9 to 12 minutes.

Whisk together the remaining 1/2 cup of evaporated milk, cornstarch, mustard, and hotsauce.  Stir into the skillet, and continue to simmer for 2-3 minutes until the sauce has thickened.

Off the heat, stir in the cheddar and Monterey Jack, one handful at a time, until melted.  If the sauce seems too thick, add a few tablespoons of extra water.  Stir in the remaining 2 tablespoons of butter, broccoli and season with salt and pepper to taste.  Allow to sit 5 to 10 minutes to thicken before serving.


Thursday, March 15, 2012

Mexican-Style Steak Sandwiches


We are typically year-round grillers, so when spring arrives, I do love to fire it up, but it's not quite as exciting to me as it is to say, my sister who lives in Minneapolis.  However, this week the weather has been absolutely gorgeous, so I couldn't resist cooking our dinner on the grill and eating on the deck.

I also can't resist Mexican food, so these sandwiches were a no-brainer for me.  You have thinly sliced steak on top of refried beans, topped with sliced avocado, Pepperjack cheese, and a creamy chipotle-lime sauce.  They are also very easy.  First, the steak is quickly cooked on the grill.  While it is grilling, you prep the other fillings - shred the cheese, slice the avocado and the buns, mix up the sauce, etc.  After assembling the sandwiches, they are popped back on the grill just long enough to melt the cheese and warm the whole thing through.  They are that perfect combination of spicy, salty, and creamy.  I knew that Joey would love these, but I'm pretty sure I loved them just as much. I served these with sweet potato fries, and they were also pretty delicious dipped into the leftover sauce.  In the summer, I also think a watermelon salad would be lovely as a side dish.

These sandwiches are quick, easy, and low-maintenance.  Which is perfect for this time of year - we finished dinner, loaded Smith in the Baby Bjorn, and went for a nice, leisurely walk after dinner.  I love spring so so much!


Mexican-Style Steak Sandwiches
adapted from America's Test Kitchen's 30 Minute Suppers, Summer 2011
  • 1 lb steak (preferably flank, flatiron, or skirt steak)
  • salt and pepper
  • 1/2 cup Greek yogurt or mayonnaise (lowfat is fine)
  • 1 Tbs minced chipotle chiles
  • 1-2 Tbs lime juice
  • 1/2 cup refried beans
  • 1 avocado, pitted and sliced
  • 1/2 cup shredded Pepper Jack cheese
  • 4 sandwich or burger buns, halved
Prepare grill to cook over medium-high heat.  Season both sides of the steak with salt and pepper.  Grease the grates well, then cook the steak until charred on both sides and cooked to your liking (about 4-7 minutes per side for medium).  Transfer the steak to a cutting board and tent with foil.  Allow to rest 5 minutes.

Meanwhile, in a small bowl whisk together the yogurt, chipotles, and lime juice.  Taste and season with salt as desired.

 Slice the steak as thinly as possible, then chop into bite-sized pieces.  On the bottom half of each roll, spread about 2 tablespoons of refried beans.  Top with the chopped steak, avocado, and then sprinkle about 2 tablespoons of cheese over the top.  On the top half of the bun, spread about 1 tablespoon of the chipotle sauce.  Place the top of the bun over the cheese, and lightly press down.

Arrange the sandwiches on a baking sheet and place the sheet directly on the grill.  Close the cover and cook until heated through and the cheese has melted, about 2 minutes.  Serve.


Wednesday, March 14, 2012

Teriyaki Salmon


I know that every parent thinks their own child is "the best," and I suppose I'm no different.  Every night after we put our kids to bed, Joey and I talk about how funny, cute, smart, and sweet they are.  The night we ate this salmon was especially noteworthy.  I made this teriyaki salmon for dinner, and as we were eating, Joey asked Caroline if she knew where salmon lived.  Her response?  "In my mouth."  She's a sharp one, that Caroline.  So that night after she was in bed, we laughed about her comment, and then talked about how thankful we are that she's such a good eater and loves salmon as much as us.

And then there's Smith.  That night was the first time we gave him any solid food.  He had his first taste of rice cereal, and I think it's safe to say he's going to be a foodie like his sister.  Any time the spoon was not in his mouth, he was reaching for the bowl and growling.  If he thinks cereal is good, I can't wait to start introducing him to things like peaches, pears, and blueberries.  He's in for a real treat!

And I'm pretty certain he will one day eat this salmon with just as much enthusiasm.  This really is an ideal family meal.  It requires minimal prep time and ingredients, is easy, healthy, and is pretty much universally enjoyed.  Who doesn't like teriyaki sauce? 


Pin It

Teriyaki Salmon
adapted from My Father's Daughter, by Gwenyth Paltrow (via Milk & Mode)
  • 1/4 cup soy sauce
  • 2 tablespoons dry white wine
  • 1 tsp sugar
  • 3 tablespoons honey
  • 1/3 cup water
  • 1 teaspoon peeled and finely grated ginger
  • 2 sprigs fresh cilantro
  • squeeze of fresh lemon juice
  • 4 6-ounce salmon fillets
  • 1 tablespoon finely minced fresh chives, for serving

Combine the soy sauce, white wine, sugar, honey, water, ginger, lemon juice, and cilantro in a small saucepan over high heat. Once it boils, turn the heat to low and simmer about 2 minutes. Remove the saucepan from the heat and allow the sauce to cool until it's just warm to the touch. Pour into a plastic freezer bag and add the salmon. Turn the bag a few times to coat the salmon, and marinate in the fridge for at least an hour (can also be marinated overnight)

To cook the salmon, preheat the broiler. Line a baking sheet with foil, spray lightly with cooking spray, and arrange the salmon in a single layer with whatever sauce adheres to it. Broil 6-8 minutes, or until it flakes easily with a fork and is just cooked through. While it's cooking, strain the extra sauce into a clean saucepan, bring to a boil, and let it reduce until it's thick and syrupy.

To serve, drizzle the cooked salmon with some of the extra sauce and a sprinkle of chives.


Sunday, March 11, 2012

Cheesy Baked Pasta with Roasted Red Pepper Sauce and Eggplant


Eggplant seems to get kind of a bad rap, but I for one really love it.  It can be used in several different cuisines, cooks quickly, and it stands up to pretty much any cooking method - roasted, broiled, baked, grilled, etc.  So how about if you mix it into a baked pasta dish with Parmesan, mozzarella, garlic, and roasted red pepper sauce?  And then top it all off with crunchy breadcrumbs?  The result is a filling and comforting pasta dish that is reminiscent of eggplant parmesan.

Joey is one of those people who isn't crazy about eggplant, so I try to be creative with it when I make it, and he loved this dish.  As did Caroline.  It made enough for plenty of leftovers, so we enjoyed it for dinner another night, and I ate it a few times for lunch as well.


Pin It

Cheesy Baked Pasta with Roasted Red Pepper Sauce and Eggplant
adapted from America's Test Kitchen, Pasta Revolution
  • 3/4 cup panko bread crumbs
  • 1/4 cup olive oil
  • kosher salt and freshly ground black pepper
  • 3 oz. Parmesan cheese, grated (1 1/2 cups)
  • 1 (14.5 oz) can fire-roasted diced tomaotes
  • 3 cups roasted red peppers, rinsed, patted dry, and coarsely chopped (24 oz jar)
  • 1 1/2 lbs eggplant, chopped into 1-inch cubes
  • 6 garlic cloves, minced
  • 1 tsp minced fresh oregano, or 1/4 tsp dried
  • 1/8-1/4 tsp crushed red pepper
  • 4 cups water
  • 12 oz short pasta shapes (I used rotini)
  • 6 oz. fresh mozzarella, sliced thin
  • 2-3 Tbs chopped fresh basil
Adjust the oven rack to the middle position and preheat to 375 degrees.  Toss the panko with 1 tablespoon of the olive oil and season with salt and pepper.  Spread on a rimmed baking sheet and bake, stirring often, until golden-brown, 5 to 10 minutes.  Let cool slightly and then toss with 1/2 cup of the Parmesan.

Meanwhile, pulse the tomatoes and red peppers in the food processor until coarsely ground and no large pieces remain, about 10 pulses.

Line a large plate with a double layer of paper towels.  Toss the eggplant in a medium bowl with 1 teaspoon of salt and then spread it out over the plate.  Microwave uncovered, about 10 minutes, tossing halfway through.  The eggplant should be dry and starting to shrivel.  Let the eggplant cool slightly, then toss with 1 tablespoon of the oil in the bowl.  Set aside.

Heat 1 Tablespoon of the oil in a 12-inch ovensafe skillet over medium-high heat.  Add the eggplant and cook until well browned and tender, about 10 minutes, stirring occasionally.  Return to the bowl.

 Reduce the heat to medium-low and add the remaining tablespoon of oil.  Saute the garlic, red pepper flakes, and oregano until fragrant but not browned, about 1 minute.  Stir in the tomato mixture and 1 teaspoon of salt, and increase the heat to medium-high.  Stir in 3 1/2 cups of water and the pasta.  Cover and cook at a vigorous simmer, stirring often, until the pasta is tender, 15 to 18 minutes.

If the sauce seems too thick, stir in the remaining 1/2 cup water.  Add the remaining 1 cup of Parmesan and eggplant, and season with salt and pepper.  Stir to combine, then top with the slices of mozzarella.  Sprinkle the panko mixture over the cheese and transfer the skillet to the oven.  Bake until the topping is well-browned and cheese is melted, 5 to 10 minutes.  Sprinkle the basil over the top and serve.


Thursday, March 8, 2012

Everything Sandwich Bread


I really really really love bagels.  And while I've made them once, it was kind of a cheater recipe, and I've been dying to try them for real.  A few weeks ago I got a major craving for everything bagels, and thought maybe I'd try them over the weekend.  Well, we ended up having a lot to do and I didn't really have time for it, but the craving never went away - and why I didn't just go to the bagel place for one, I don't know.  I like to make things complicated.  So anyway, I thought of a way that I could satisfy my craving and save on time - make sandwich bread flavored with the everything spices!

I took my favorite basic sandwich bread dough and mixed some of the spice blend right into the dough.  I then sprinkled more of the spice blend over the top.  The result?  Everything perfection!  This bread really does have the flavor of an everything bagel.  And it makes an incredible breakfast sandwich - melty cheese, a fried egg, and bacon.  Amazing.  Also great?  A sandwich at lunch - I loved it with cucumbers, tomato, avocado, and lettuce.  And it makes a pretty great BLT as well.  And a great turkey sandwich.  And great cheese toast.  Really it's great with just about.... everything (see what I did there?).


Everything Sandwich Bread
adapted from Baking Illustrated's American Sandwich Bread

*the onions and garlic on the top may get a little too brown during the cooking time.   Check on them about half-way through, and if they are getting too dark too quickly, tent the loaf with foil.
  • 3 3/4 cups (18 3/4 oz) all-purpose flour
  • 2 tsp kosher salt
  • 1 cup cold buttermilk
  • 1/3 cup boiling water
  • 2 Tbs unsalted butter, melted
  • 3 Tbs honey
  • 1 envelope (about 2 1/4 tsp) instant yeast
Everything Mix
adapted from Annie's Eats
  • 2 tsp poppy seeds
  • 2 tsp sesame seeds
  • 2 tsp dried minced garlic
  • 2 tsp dried minced onion
  • 3/4 tsp kosher salt
Adjust one oven rack to the lowest position, and another to the middle position.  Heat the oven to 200 degrees.  When it is preheated, maintain the temperature for 10 minutes, then turn off the oven.

Bring the water to a boil in a small saucepan.  Remove from heat and add the cold buttermilk and stir to combine.

Mix 3 1/2 cups of the flour and the salt in the bowl of a stand mixer fitted with a dough hook.  Add the buttermilk/water mixture, butter, honey, and yeast to a liquid measuring cup.  Turn the mixer on low, and add the liquid in a slow stream, increasing the speed of the mixer as you go to medium.  Continue mixing until the dough is smooth and satiny, stopping to scrape the dough from the hook as needed. Sprinkle in 1 tablespoon of the everything spice mix.  Knead about 10 minutes, adding flour 1 Tablespoon at a time, as necessary to keep the dough from sticking to the sides of the bowl.

Turn the dough out onto a lightly floured surface and knead to form a smooth ball, about 15 seconds.

Place the dough in a lightly oiled bowl, rubbing the dough around the bowl to coat with the oil.  Cover tightly with plastic wrap and place the bowl in the oven until the dough doubles in size, 50-60 minutes.

Turn out onto the floured surface and gently press the dough into a rectangle that is 1 inch thick and 9 inches long.  With the long side facing you, roll the dough firmly into a cylinder, pressing with your fingers as you roll to make sure the dough sticks to itself.  Turn the dough seam-side up and pinch it closed.

Place the dough seam-side down in a greased 9x5 inch loaf pan, and press it gently to make sure it touches all four sides of the pan.  Sprinkle with the everything spice mix (you don't have to use all of it - I think I used a few more teaspoons of it), lightly pressing with your hands to adhere the spices to the dough.  Cover with a clean kitchen towel and allow to rise in a warm spot until the dough almost doubles in size, 20-30 minutes.

Preheat the oven to 350 degrees.  Place an empty baking pan on the lowest rack of the oven.  Bring 2 cups of water to a boil and pour  into the empty pan.  Set the loaf onto the middle rack, and bake until an instant-read thermometer inserted into the center of the loaf reads 195 degrees, about 40-50 minutes.

Remove the bread from the pan and cool to room temperature on a wire rack.  Slice and serve.


Tuesday, March 6, 2012

Recipe Remix: Foil-Baked Fish with Chickpeas, Feta, and Roasted Tomatoes


One night last week, I wasn't so jazzed about what I had planned for dinner that night.  Short on time, I decided to defrost some cod from the freezer, and I stood in front of the pantry looking for inspiration.  I spotted chickpeas and sun-dried tomatoes, and had a stoke of brilliance as I decided to make a Mediterranean version of this Foil-Baked Fish with Black Beans and Corn

I started by roasting some grape tomatoes and garlic in the oven.  I then mixed them with chickpeas, lemon juice, red onion, parsley, oregano, and feta.  The fish was slathered in a compound butter with sun-dried tomatoes, lemon zest, and garlic.  As the fish cooks, the butter melts into the fish and leaves it moist and flavorful.  The combination of roasted chickpeas, tomatoes, and feta is truly wonderful - it was definitely the highlight of the meal.

This meal is easy, super delicious, healthy, and ready in well under an hour.  Those are all things that I look for in a weeknight meal, how about you?


Foil-Baked Fish with Chickpeas, Feta, and Roasted Tomatoes
inspired by Foil-Baked Fish with Black Beans and Corn, from The Best Simple Recipes
  • 2 cups halved grape tomatoes
  •  2 garlic cloves, peeled
  • olive oil
  • salt & pepper
  • 1/4 tsp sugar
  • 4 skinless white fish fillets (6 to 8 oz each), 1-inch thick
  • salt and pepper
  • 4 Tbs unsalted butter, softened
  • 2 sun-dried tomatoes, minced
  • 1 tsp grated lemon zest
  • 2 Tbs freshly squeezed lemon juice
  • 1 (15-oz) can chickpeas, rinsed and drained
  • 1/2 medium red onion, minced
  • 1/2 cup crumbled feta
  • 2 tsp minced fresh oregano (or 1/2 tsp dried)
  • 1/4 cup chopped fresh parsley
Preheat the oven to 400 degrees and line a baking sheet with foil.  Toss the tomatoes and garlic cloves with 2 teaspoon of olive oil, 1/4 teaspoon of salt, 1/8 teaspoon of pepper, and the sugar.  Roast, stirring halfway through, about 15 minutes.

Meanwhile, pat the fish dry and season with salt and pepper.

In a small bowl, use a fork to mash together the butter, sundried tomatoes, one of the garlic cloves, lemon zest, 1/2 teaspoon of salt, and 1/4 teaspoon of pepper.  Spread  the mixture over the top of  the fish filets.

In a medium bowl, toss together the chickpeas, tomatoes, onion, feta, oregano, lemon juice, 1/2 teaspoon of salt, 1/4 teaspoon of pepper, and most of the parsley.

Lay four 14-inch lengths of foil on the counter and divide the bean mixture evenly over the lower half of each piece of foil.  Top with fish, and fold the foil over the fish, folding the edges to seal.

Arrange the packets in a single layer on a rimmed baking sheet and bake until the fish is just cooked through, 15 to 20 minutes.  Carefully open the packets and sprinkle with remaining parsley.  Serve.


Sunday, March 4, 2012

Four-Cheese Cheese Burgers


We don't really eat a lot of red meat at home, but a few weeks ago I got an undeniable craving for a cheeseburger.  I called Joey at work and asked if burgers were okay for dinner that night (ummm yes they were, of course), and then asked if he had any preferences on toppings - I do like to get fancy after all.  I read him a few ideas that I'd saved from various cookbooks, blogs, and magazines, and when I got to Four-Cheese Burgers he stopped me.  Done and done.

This is a basic burger patty, and the real business is the cheese.  You could really use any combination of cheeses you'd like, but I loved the combo of Swiss, American, Goat, and Parmesan.  Though I love goat's cheese more than life itself, don't be tempted to add extra - it's a very strong flavor and will easily overpower the rest of the cheeses.

This was just really really good - I obviously knew we would like it - I mean, what's not to like here - but we all LOVED it.  So much in fact, that we had the exact same dinner the very next night.  Definitely not something that happens often around here!


Pin It

Four-Cheese Cheese Burgers
adapted from Bobby Flay's Burgers, Fries, and Shakes
makes 4 burgers
  • 1 1/2 lbs ground beef (preferably 85%)
  • kosher salt and freshly ground black pepper
  • 1 Tbs Worcestershire sauce
  • pinch cayenne
  • 2 tsp Dijon mustard
  • 1 Tbs canola oil
  • 4 slices Swiss cheese
  • 4 slices American cheese
  • 1/4 cup crumbled goat cheese
  • 1/4 cup freshly grated Parmesan cheese
  • 4 slices Beefsteak tomatoes, sliced 1-inch thick
  • 4 hamburger buns, split and toasted
  • handful of spinach or arugula leaves
In a large bowl, gently combine the beef with salt and pepper, Worcestershire sauce, mustard, and cayenne.  Form into 4 equal-sized patties, each about 3/4-1 inch thick.  Make a deep depression in the center of each patty with your thumb.  Season with additional salt and pepper.

Heat the oil over medium-high heat in a large skillet, preferably cast-iron.  Cook the burgers 3-4 minutes, then carefully flip using a spatula.  Cook an addtional 3-6 minutes, until the burger reaches your desired degree of doneness.  Top each burger with a slice of Swiss, followed by the tomato slice, goat cheese, and the American cheese.  Cover the skillet and cook an additonal mitue or so, until the cheese has melted.  Remove from heat and sprinkle with the Parmesan.  Serve on the toasted buns with the spinach.


Thursday, March 1, 2012

Milk Chocolate-Brownie Ice Cream


I have been pretty over-the-top-obsessed with brownies lately.  I've probably saved close to a dozen brownie recipes in the past month or so, and I just can't get enough.  And it's safe to say that ice cream is always an obsession.  Now if I had to choose?  Put your hands together (Friends, anyone?).  This is far and away the best ice cream I've ever made.  It's a milk chocolate base, which basically tastes like pure milk chocolate.  And then dense, chewy brownies are mixed into the ice cream just after it's churned.  It's serious stuff.  I've been rationing it over the past week or so, because I could easily just eat the entire quart in one sitting.

When I mentioned to my friend Annie that I wanted to make this ice cream sometime soon, she pretty much insisted that I make it ASAP.  And since I actually had a few egg yolks left after needing whites for dinner that night, I knew it was fate.  That night, I made the brownies and the ice cream base.  While the brownies were baking, I mixed up the ice cream base, and then the next morning I churned and froze it.  Easy peasy.

I know it's not summer yet, blah blah blah, but I eat ice cream year-round, so whether it is hot, cold, rainy, snowy, or if you're lucky enough to live in Atlanta and have perfect weather right now - make this ice cream.  You won't be sorry.


Pin It


Milk-Chocolate Brownie Ice Cream.
barely adapted from The Perfect Scoop, by David Lebovitz


For the brownies:
  • 8 tbsp. unsalted butter, cut into pieces
  • 4 oz. unsweetened chocolate, chopped
  • 1¼ cups sugar
  • 2 large eggs
  • 1 tsp. vanilla extract
  • ½ cup all-purpose flour
  • Pinch of salt
  • ½ cup semisweet or bittersweet chocolate chips 
For the ice cream:
  • 8 oz. milk chocolate (at least 30% cacao solids), chopped
  • 1½ cups heavy cream
  • 1½ cups whole milk
  • ¾ cup sugar
  • Pinch of salt
  • 4 egg yolks
  • 2 Tbs Kahlua (optional)

To make the brownies, preheat the oven to 350˚ F.  Line an 8 x 8-inch baking pan with aluminum foil, and lightly spray with cooking spray.

Add the butter to a small saucepan and melt.  Whisk in the chopped chocolate and stir just until melted.  Remove from the heat and whisk in the sugar, eggs and vanilla.  Stir in the flour and salt.  Fold in the chocolate chips with a spatula.  Smooth the batter into the prepared baking dish. 

 Bake for 30 minutes, until the center feels just set.  Remove from the oven and let cool completely.  Cut into small bits to be mixed into the ice cream.  (Only half of the brownies are needed for the ice cream.  The remainder can be eaten whole or frozen for later use).


To make the ice cream, combine the milk chocolate and heavy cream in a micowave-safe bowl..  Microwave at 30 second intervals, stirring in between.  When melted, set aside and set a mesh sieve over the top of the bowl.

In a medium saucepan, combine the milk, sugar and salt.  Heat until the sugar is dissolved.  In a medium bowl, whisk together the egg yolks.  When the milk mixture is warm, slowly add to the bowl with the beaten egg yolks, whisking constantly.  Return the mixture to the saucepan and continue to heat, stirring constantly, until the mixture thickens just slightly and coats the back of a spoon (170-175˚ F on an instant-read thermometer).  Remove from the heat and pour the custard through the strainer into the milk chocolate mixture.  Stir in the Kahlua.

Cover and chill the mixture thoroughly in the refrigerator (preferably overnight).  Freeze in an ice cream maker according to the manufacturer’s instructions.  Once frozen, fold in the brownie bits with a spatula.  Transfer to an airtight container and freeze until ready to serve.


BLOG DESIGN BY: SHERBET BLOSSOM DESIGNS