Showing posts with label mozzarella. Show all posts

Sunday, September 21, 2014

Summer Caprese Pasta

Summer Caprese Pasta 

I know, I know.  Today's the first day of fall.  But here in the south, it's still "summer-like," so I'm still cooking summer dishes.  Sorry not sorry.  I just can't get on the pumpkin-apple-butternut squash-fall foods bandwagon quite yet.  Give me until the end of September, and I promise I'll join all of you fall lovers in October.  Deal?

And I couldn't possibly let summer end without sharing this super easy and delicious pasta recipe with you.  Caprese pasta is nothing new or revolutionary, but oftentimes there are some drawbacks:  the tomatoes release too much water and create a bland and watery sauce... the mozzarella gets kind of gummy… the basil is too strong, or not strong enough… The problem with seemingly simple dishes is that even a small misstep makes a big negative impact on the final dish.  When there are so few ingredients and components, it doesn't take much to muck it up.

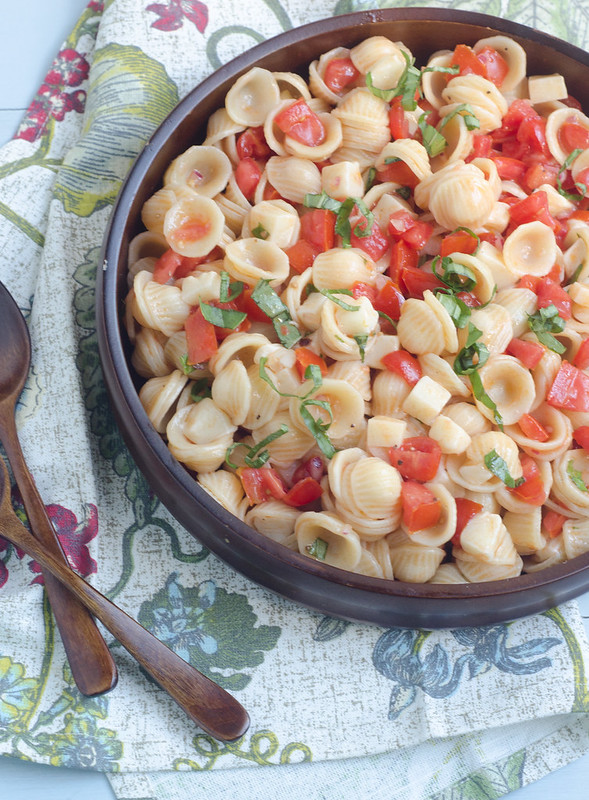
But have no fear!  This pasta recipe is pretty much foolproof.  Good tomatoes are still available in most areas, so snatch some up and make this caprese pasta, stat!  Bonus:  the leftovers are awesome served as a chilled pasta salad.  I packed this in Caroline's lunch with great success, and the boys enjoyed the leftovers for their lunches as well.

I'm not quite ready for fall, so indulge me and join me in my end-of-summer denial?

Summer Caprese Pasta 

Summer Pasta Caprese
barely adapted from Pasta Revolution
serves 4 to 6

  • 1/4 cup extra virgin olive oil
  • 2 tsp lemon juice, plus more as needed
  • 1 tsp lemon zest
  • 1 small shallot, minced
  • 1 clove garlic, minced
  • pinch of red pepper flakes
  • pinch of sugar
  • kosher salt and freshly ground black pepper
  • 1 1/2 lbs vine-ripened tomatoes; cored, seeded, and chopped into 1/2-inch pieces
  • 12 oz fresh mozzarella, cut into 1/2-inch pieces and patted dry with paper towels
  • 1 lb small or medium pasta shapes (I used orecchiete)
  • 1/4 cup chopped fresh basil
Whisk the oil, lemon juice, shallot, garlic, lemon zest, red pepper flakes, a pinch of sugar, 1/2 tsp salt, and 1/4 tsp pepper together in a large serving bowl.  Add the tomatoes and toss gently to combine.  Marinate the tomatoes in the dressing for at least 10 minutes, but no more than 45 minutes.  

Meanwhile, place the mozzarella in the freezer and freeze until slightly firm, about 10 minutes.

Meanwhile, bring a large saucepan of salted water to a boil.  Stir in the pasta and cook until al dente, about 10 minutes.  

Drain the pasta and add to the bowl with the marinated tomatoes.  Add the mozzarella and basil, and toss gently to combine.  Allow to sit for 5 minutes, then taste and season with salt, pepper, and/or additional lemon juice as needed.  Serve immediately.


Thursday, July 18, 2013

Cheesy Potato & Tomato Casserole


How do you define comfort food?  For me, cheese must be involved.  And a lot of it.  I also need some sort of carb - be it pasta, potatoes, whatever.  Anything else is just a bonus, but those are my main requirements.  So this potato bake is some major comfort food.  It has thinly sliced potatoes, seasoned with garlic, rosemary, and salt, and layered with chopped tomatoes, mozzarella, and parmesan cheese.  After baking, you are left with what I would consider a pretty awesome dish.   There is a blanket of perfectly crispy potatoes covering a bed of soft, creamy, cheesy potato goodness.  The rosemary and tomatoes give the dish a nice burst of freshness.  I couldn't decide if I liked the crispy top layer or the creamy interior.  Because if there is anything better than a crispy, salty potato, it would be a soft, creamy, cheesy potato.  

This is one of those dishes that I kept sneaking bite after bite as I cleaned the kitchen that night.  I had originally planned to save enough to serve with breakfast - how fabulous would this be topped with a poached egg?!  But alas, Joey and I couldn't keep our forks out of this, and um, we finished the whole thing.  Sorry not sorry.


Cheesy Potato & Tomato Casserole
serves 4-6 as a side.  Or 2-3 as a main dish, apparently.
  • 1/4 cup olive oil
  • 1 Tbs minced fresh rosemary leaves
  • 2 large cloves of garlic, minced
  • 1 tsp kosher salt
  • 1/2 tsp freshly ground black pepper
  • 2 lbs potatoes, scrubbed 
  • 6 oz mozzarella cheese, shredded
  • 1 oz parmesan cheese, shredded
  • 1 1/4 lbs plum tomatoes, cored, seeded, and chopped (about 5-6 medium)
Preheat the oven to 400 degrees Fahrenheit.  Brush 1 tablespoon of the oil over the bottom and sides of a 9x13 inch baking dish.  Set aside.

Combine the remaining 3 tablespoons of the oil with the rosemary, garlic, salt, and pepper.

Slice the potatoes as thinly as you can - preferably 1/8-inch.  Using a food processor with the slicing blade attachment works really well, as does a mandolin.  But a sharp knife works just fine.

Place the potatoes in a large bowl and toss with the oil mixture, coating them evenly.  

Line the bottom of the baking dish with one third of the potatoes, slightly overlapping the slices.  Sprinkle with half the mozzarella, half the parmesan, and half the tomatoes.  Repeat the layering of potatoes, cheese, and tomatoes one more time, then finish by topping with the remaining potatoes.  If there is any of the oil mixture pooled at the bottom of the bowl, drizzle it over the top.  Sprinkle very lightly with salt.  (At this point, the casserole can be covered and refrigerated overnight.  Bring to room temperature before baking).

Cover with foil and bake 40 minutes.  Remove the foil and bake an additional 20 minutes, or until the top layer of potatoes is golden-brown.  Allow to cool 5 to 10 minutes before serving.


Sunday, March 11, 2012

Cheesy Baked Pasta with Roasted Red Pepper Sauce and Eggplant


Eggplant seems to get kind of a bad rap, but I for one really love it.  It can be used in several different cuisines, cooks quickly, and it stands up to pretty much any cooking method - roasted, broiled, baked, grilled, etc.  So how about if you mix it into a baked pasta dish with Parmesan, mozzarella, garlic, and roasted red pepper sauce?  And then top it all off with crunchy breadcrumbs?  The result is a filling and comforting pasta dish that is reminiscent of eggplant parmesan.

Joey is one of those people who isn't crazy about eggplant, so I try to be creative with it when I make it, and he loved this dish.  As did Caroline.  It made enough for plenty of leftovers, so we enjoyed it for dinner another night, and I ate it a few times for lunch as well.


Pin It

Cheesy Baked Pasta with Roasted Red Pepper Sauce and Eggplant
adapted from America's Test Kitchen, Pasta Revolution
  • 3/4 cup panko bread crumbs
  • 1/4 cup olive oil
  • kosher salt and freshly ground black pepper
  • 3 oz. Parmesan cheese, grated (1 1/2 cups)
  • 1 (14.5 oz) can fire-roasted diced tomaotes
  • 3 cups roasted red peppers, rinsed, patted dry, and coarsely chopped (24 oz jar)
  • 1 1/2 lbs eggplant, chopped into 1-inch cubes
  • 6 garlic cloves, minced
  • 1 tsp minced fresh oregano, or 1/4 tsp dried
  • 1/8-1/4 tsp crushed red pepper
  • 4 cups water
  • 12 oz short pasta shapes (I used rotini)
  • 6 oz. fresh mozzarella, sliced thin
  • 2-3 Tbs chopped fresh basil
Adjust the oven rack to the middle position and preheat to 375 degrees.  Toss the panko with 1 tablespoon of the olive oil and season with salt and pepper.  Spread on a rimmed baking sheet and bake, stirring often, until golden-brown, 5 to 10 minutes.  Let cool slightly and then toss with 1/2 cup of the Parmesan.

Meanwhile, pulse the tomatoes and red peppers in the food processor until coarsely ground and no large pieces remain, about 10 pulses.

Line a large plate with a double layer of paper towels.  Toss the eggplant in a medium bowl with 1 teaspoon of salt and then spread it out over the plate.  Microwave uncovered, about 10 minutes, tossing halfway through.  The eggplant should be dry and starting to shrivel.  Let the eggplant cool slightly, then toss with 1 tablespoon of the oil in the bowl.  Set aside.

Heat 1 Tablespoon of the oil in a 12-inch ovensafe skillet over medium-high heat.  Add the eggplant and cook until well browned and tender, about 10 minutes, stirring occasionally.  Return to the bowl.

 Reduce the heat to medium-low and add the remaining tablespoon of oil.  Saute the garlic, red pepper flakes, and oregano until fragrant but not browned, about 1 minute.  Stir in the tomato mixture and 1 teaspoon of salt, and increase the heat to medium-high.  Stir in 3 1/2 cups of water and the pasta.  Cover and cook at a vigorous simmer, stirring often, until the pasta is tender, 15 to 18 minutes.

If the sauce seems too thick, stir in the remaining 1/2 cup water.  Add the remaining 1 cup of Parmesan and eggplant, and season with salt and pepper.  Stir to combine, then top with the slices of mozzarella.  Sprinkle the panko mixture over the cheese and transfer the skillet to the oven.  Bake until the topping is well-browned and cheese is melted, 5 to 10 minutes.  Sprinkle the basil over the top and serve.


Monday, May 23, 2011

Grilled Bruschetta with Prosciutto & Mozzarella


Once warm weather hits, it is hard to keep myself from grilling every meal and every course for each meal.  It's not just the end result of grilling that I enjoy, but the act itself.  From igniting the first flame, to seeing those beautiful grill marks, to enjoying the final, smoky result, I love it all. 

This grilled bread made a fantastic appetizer for a pasta dish we enjoyed a few weeks ago.  This is incredibly simple, and very versatile as well - serve as a light lunch with a side salad, as part of an appetizer spread for a party, as a side with grilled meat or a pasta dish, or just on it's own as a snack. 

These grilled breads are also incredibly easy - just slice the bread, grill, rub with garlic, top with cheese and prosciutto, and return to the grill just long enough to melt the cheese.  In my opinion, the most important step of this recipe is rubbing with garlic.  I loved loved loved the garlicky bite that these had, and it truly took this dish from good to great.


Grilled Bruschetta with Prosciutto and Mozzarella
adapted from The Barefoot Contessa, How Easy is That?
  • 6-8 slices of Tuscan bread or a French Baguette, sliced 3/4-inch thick
  • 1 large garlic clove, cut in half
  • olive oil
  • 2 oz. thinly sliced prosciutto, torn into pieces
  • 2 oz. fresh smoked mozzarella, grated
  • 3 Tbs minced fresh herbs - parsley, basil, oregano, etc
  • freshly ground black pepper
Prepare the grill to medium-high heat.  Clean the grates and brush with oil.

Brush each slice of bread with olive oil.  Grill for 2 minutes, until golden on one side.  Remove from grill and place grilled-side up on a platter. As soon as it's cool enough to handle, rub the grilled side with the cut garlic.  The harder you rub, the more garlicky the bread will be.

Place the torn prosciutto over the grilled side of the bread and top with the shredded mozzarella.  Return to the grill, cover, and cook just until the cheese is melted, 1-2 minutes.

Drizzle with additional olive oil and sprinkle with pepper and herbs.  Serve.


Tuesday, April 12, 2011

Shaved Asparagus Pizza


Ever since she was probably 6 months old, I always find myself saying "Caroline is just at the best age right now."  It is true that every month seems to be better than the last.  And I really do think she is at the best age right now - for real this time!  Even though she's learned the meaning of the word "no," and has realized that she can in fact do what she wants instead of always listening to us, it is so amazing to see her little personality shine through.  She is definitely strong-willed and opinionated, and then right when I feel like I've reached my limit with her, she says something like "Mommy, I love you sooo much."  She is so funny and sweet, and I want to always remember every little thing she does and says - like being totally in awe of the "princesses" out at dinner a few weeks ago (high school girls going to the prom).  Or when she told me that daddy is her very best friend.  Or when she "calls" my grandpa on her play phone just to tell him she loves him.  Or most recently, when she kisses my growing belly every day and tells the baby good morning.

Though selfishly, I have to say my favorite thing that she does these days is help me cook.  Almost every night she pulls a chair up to the counter to help.  Even though sometimes she hurts more than helps - like when she dropped the rolling pin on a pan of rising rolls.  But I'll take it all because sharing this passion with her is truly one of the most rewarding things I've ever done. 

This pizza was one of our joint endeavors.  She helped me pat out and stretch the pizza dough, then we scattered the cheese, and finally, dropped handfuls of shaved asparagus on top.  She thought it was great fun to "drop it on the pizza," and what's better, she loved eating this! 

As did we.  I shaved thick asparagus spears into thin slices with my vegetable peeler, then tossed them with olive oil, salt and pepper, a pinch of red pepper flakes, and minced garlic.  The pizza is topped with Parmesan and mozzarella, and then finished with the asparagus.  After a brief stint in the hot oven, the asparagus gets nicely charred in spots, and a squirt of lemon juice and smattering of scallions brighten the whole thing up. 

We all really enjoyed this pizza, and with 10 minutes of prep followed by 10 minutes or so of cooking, it is perfect for a busy weeknight.  I served this with strawberry spinach salad, and we all loved this light and springy meal.  And Caroline still walks around saying "Drop it on the pizza."


Shaved Asparagus Pizza
adapted from Smitten Kitchen
  • 1 pizza dough
  • 1/2 pound fresh asparagus
  • 2 tsp olive oil + more for brushing
  • 1/8-1/4 tsp red pepper flakes
  • 2 cloves garlic, minced
  • 1/2 tsp kosher salt
  • freshly ground black pepper
  • 1/4 cup freshly grated Parmesan
  • 8 oz fresh mozzarella, cut into 1/2-inch cubes
  • juice of 1/2 lemon
  • 1 scallion, sliced thinly
Preheat the oven to 500 degrees, with the pizza stone, for at least 30 minutes.

Meanwhile, prepare the asparagus.  Lay each spear flat on the cutting board and hold by the woodsy end.  Moving from the base of the stalk to the tip, shave thin slices.  It's okay if they are different thicknesses.  In a medium bowl, toss the shavings with the olive oil, red pepper flakes, garlic, salt, and pepper.

On a piece of parchment paper dusted with cornmeal, shape the pizza dough into a 12-inch circle, leaving the outer edges a little thicker than the inside. Brush the outer edge with olive oil, then scatter the Parmesan over the crust, followed by the mozzarella.  Drop the asparagus over the pizza in small piles.  If there is any oil left in the bowl, drizzle it over the top of the pizza.

Transfer the pizza + parchment to the pizza stone, and bake until the crust is golden-brown and the asparagus is charred in spots, 10-12 minutes.  Remove from the oven, sprinkle with scallions, and allow to sit for 5 minutes before slicing and serving.


Monday, February 28, 2011

Thin Crust White Pizza


We eat pizza fairly often for dinner, and while I change up the toppings pretty regularly, I always stick to the same crust.  I've just never really felt the need to deviate from my standard pizza crust, but when I saw Annie of Annie's Eats rave abut thin crust pizza, I was sold.  I had actually seen this recipe in the previous month's Cook's Illustrated, and while it did catch my eye, I forgot about it soon after reading about it.

The nice thing about this pizza crust is that the recipe makes enough for two pizzas.  It also calls for the dough to be chilled in the refrigerator anywhere from 24 hours to 3 days.  So you can either make one and freeze one, or make one and save the other to make in the next few days.  For the first pizza, I made the classic cheese pizza that Annie posted, but for the other, I made white pizza.  I absolutely love ordering white pizza when we go out for pizza, but I had never made it myself.  Now I'm afraid I'll never order it out again; this one was so good that any other version is going to have a hard time living up to it.  The sauce is a mixture of ricotta, egg, herbs and spices, and then it is smothered in mozzarella, parmesan, and more ricotta.  So incredibly rich and delicious.

As far as the dough goes, I was a bit apprehensive when I prepped it, since it was very very sticky and kind of hard to handle.  But after the overnight chill, it turns into a smooth and silky dough that is easily rolled and stretched into a perfectly circular pizza crust.  Since the dough is prepped so far in advance, this pizza comes together quite quickly. 

I know there are many other variations of thin-crust pizza I could make, but after this white pizza, it's going to be hard to try anything new.


Thin-Crust White Pizza
adapted from Cook's Illustrated, Jan 2011

Dough
  • 3 cups (16 1/2 oz) bread flour, plus more for work surface
  • 2 tsp sugar
  • 1/3 tsp instant yeast
  • 1 1/3 cups ice water
  • 1 Tbs olive oil
  • 1 1/2 tsp salt
White Sauce
  • 1/2 cup whole-milk ricotta
  • 2 Tbs olive oil
  • 2 Tbs heavy cream
  • 1/2 large egg yolk
  • 3 cloves garlic, minced
  • 1/2 tsp kosher salt
  • 1/4 tsp black pepper
  • pinch cayenne pepper
  • pinch nutmeg
  • 1 tsp minced fresh oregano
  • 1/2 tsp minced fresh thyme leaves
  • 1 scallion, minced, plus more for garnish
Topping
  • 1/4 cup whole-milk ricotta cheese
  • 1 cup shredded whole milk mozzarella
  • 1/4 cup finely shredded Pecorino-Romano cheese
For the dough:  In the bowl of a food processor fitted with the metal blade, combine the flour, sugar, and yeast.  Pulse to mix well.  With the processor running, pour the water through the feed tube.  Continue to process until no flour remains and the dough is just combined, about 10 seconds.  Allow the dough to rest 10 minutes.

Add the oil and salt to the dough and process until a smooth, satiny ball forms that clears the sides of the workbowl, about 30-60 seconds.  Turn the dough out onto a lightly oiled work surface, and knead briefly.  Pat the dough into a ball and transfer to a a lightly oiled bowl.  Cover with plastic wrap and refrigerate at least 24 hours, or up to 3 days.

For the sauce:  Whisk all the ingredients together in a medium bowl.  Set aside.


To bake the pizza:  Remove the dough from the refrigerator and divide in half.  Smooth it into a smooth, tight, bowl, and cover with lightly-oiled plastic wrap.  Allow to sit at room temperature for about 1 hour.  Return the other half to the refrigerator. 

Preheat the oven to 500 degrees, and adjust the oven rack to the second-highest position.  Place the pizza stone on the rack and heat for at least 30 minutes.

Coat the dough with flour and flatten into a 8-inch disk, leaving a 1-inch border around the edges that it slighly thicker than the center.  Transfer to a large square of parchment paper that is lightly sprinkled with cornmeal.  Lifting the edge, use your knuckles and the back of your hand to pull and stretch the dough into a 13-inch circle, turning the dough a quarter of a turn as you stretch.  Use a rolling pin if necessary.

Brush the outer edge of the dough with olive oil.  Use a spatula to spread the white sauce over the dough, leaving a 1/4-inch border around the outside.  Sprinkle the Pecorino cheese over the white sauce, followed by the mozzarella.  Using a 1/2-teaspoon measuring spoon, drop the ricotta over the mozzarella.

Transfer the pizza (on the parchment) to the heated pizza stone, and bake 10-12 minutes, or until the cheese is melted, browned, and bubbly, rotating the pizza halfway through.  Remove the pizza and sprinkle with the reserved scallions.  Allow to cool 5-10 minutes before serving.


Wednesday, January 26, 2011

Chicken Parmesan with Pepperoni


If chicken parmesan and pepperoni pizza had a love child, it would be this dish.  It is a pretty standard chicken parmesan, but then it's topped with pepperoni before baking.  I used to really really hate pepperoni, but now I enjoy it in limited capacities.  Like on pizza.  Or now on chicken parmesan.

This was fairly quick, and very easy.  Chicken breasts are coated in panko bread crumbs, then pan-fried.  They are then transferred to a baking dish, topping with tomato sauce, cheese, and pepperoni, and baked. Easy peasy. 

Healthy, this is not.  But it was a great meal for a cold and rainy day.   And if you already love chicken parm, then this is a really fun and delicious twist on an old classic. 


Chicken Parmesan with Pepperoni
adapted from Food and Wine, January 2011
serves 4
  • 2 large eggs
  • 1/4 cup milk
  • 1/2 cup flour
  • 2 cups panko
  • 4 (8-ounce) boneless, skinless chicken breast halves, pounded 3/4-inch thick
  • salt and freshly ground black pepper
  • 1/3 cup canola oil
  • 1 1/2 cups tomato sauce (recipe follows)
  • 1/3 cup freshly grated Parmigiano-Reggiano cheese
  • 1 cup shredded mozzarella
  • 2 ounces sliced pepperoni
Tomato Sauce
  • 1 (15-ounce) can tomato sauce
  • pinch red pepper flakes
  • 3/4 tsp garlic powder
  • 1/4 tsp sugar
  • 1/2 tsp dried oregano
  • kosher salt and freshly ground black pepper
Preheat the oven to 450 degrees.  In a small saucepan, combine the ingredients for the tomato sauce.  Simmer over medium-low heat as you prepare the chicken.

In a pie plate, beat the eggs with the milk.  In 2 more pie plates (or shallow dishes), spread the flour and panko.  Season the panko with salt and pepper.  Pat the chicken dry and season with salt and pepper.  Lightly dredge each chicken breast in the flour, followed by the egg, and finishing with the panko.  Press to help the crumbs adhere.

In a large skillet, heat the oil over medium-high heat until shimmering.  Add the chicken and cook, turning once, until cooked through, about 7 minutes.  Drain the chicken on a paper towel-lined plate, then transfer to a lightly greased baking dish.

Top the chicken with the tomato sauce, cheeses, and pepperoni.  Bake the chicken for about 15 minutes, until the cheese is melted and bubbling.  Transfer the chicken to plates and serve.


Friday, September 17, 2010

Sausage and Pesto Pizza


Its Friday - so pizza for everyone!  When I made this pizza, I had originally planned to making calzones, but I got kind of lazy - so pizza it was!  It was kind of a thrown-together recipe, but I swear sometimes those make the best dinners.

I obviously love grilling pizza, but feel free to make it in the oven if you prefer.  This was a hit with everyone in our house, and I was the lucky one who got to eat the leftovers. 

I made my own pesto because I think its fun, but feel free to use store-bought.  I also used turkey Italian sausage to cut the fat a bit.  However, I used full-fat smoked mozzarella from a local dairy, and I feel zero guilt for it - it was that good.

One Year Ago:  Cheesy Creamed Corn and Caramelized Chipotle Chicken


Turkey Sausage and Pesto Pizza
a Pink Parsley Original
  • pizza dough
  • 3/4 cup prepared pesto
  • 2 links turkey Italian sausage, casings removed
  • 1 large tomato, cored, seeded, and chopped
  • 6 oz fresh mozzarella, shredded
  • olive oil, for brushing crust
Prepare grill to high heat (450-500 degrees) or preheat oven.

Heat a medium skillet over medium heat, and cook the sausage, breaking up any large clumps, until no longer pink.  Remove from heat and set aside.

Press the pizza dough into a large circle, and brush with olive oil.  Transfer to the grill, oiled side down.  Brush the top with oil.  When the underside of the dough is browned, carefully flip the crust. Working quickly, spread the pesto over the crust, then sprinkle with the sausage, tomato, and mozzarella.  Close grill lid and allow cheese to melt and the crust to cook through.

Carefully transfer the pizza to a large platter, allow to cool slightly, then slice and serve.


Friday, August 27, 2010

Grilled Pizza Margherita


Pizza Margherita sounds so much fancier than "cheese pizza" doesn't it?  This could also be called "caprese pizza."  Its all the components of my favorite combination:  tomatoes, mozzarella, and basil.   An authenic pizza margherita is cooked in an 800 degree oven and needs 2 days of proofing to acheive a thin, crispy crust.  I guess this is an imposter pizza because I just used my standard pizza dough.  Still, its delicious.  Its hard to mess up pizza.  In a pinch, I've also used dough from Trader Joe's or the Publix deli with good results. 

As the grill is heating, prep the tomato sauce, cut the cheese (hee hee), and shape the pizza dough.  Then its 10-15 minutes max to cook the pizza. With a salad this is the perfect light summer dinner.  I know Friday night is pizza night for many families, so its not too late to plan this for dinner tonight!

One Year Ago:  Salmon Pesto Pasta & Grilled White Pizzas with Arugula


Grilled Pizza Margherita
adapted from Cook's Illustrated
makes one 12-inch pizza
  • 1 ball pizza dough
  • 1 14.5-ounce can diced tomatoes
  • 1/4 teaspoon sugar
  • 1 medium garlic clove, minced
  • 1/4 cup basil leaves
  • 6 ounces fresh mozzarella, cut into 1-inch chunks
  • extra virgin olive oil
  • kosher salt
Add the tomatoes (with their juices) to the bowl of a food processor, and pulse several times to crush the tomatoes.  Transfer the tomatoes to a fine-mesh strainer set over a medium bowl and allow to drain 20-30 minutes, stirring occasionally.  Combine the drained tomatoes with sugar, 2 Tablespoons of basil, garlic, and 1/8 teaspoon salt. 
Meanwhile, preheat the grill to high heat (450-500 degrees) for at least 15-20 minutes.

As the tomatoes drain, shape the pizza on a well-floured surface by flattening the dough into an 8-inch disk, pressing to eliminate air pockets.  Stretch the outer edges with flattened fingers while giving quarter turns until the dough is a 12-inch circle.  Allow to sit at room tempeature 10-15 minutes.  Using a pastry brush, oil the dough well. 

Using a cutting board or pizza peel, transfer pizza, oil-side down, onto the grates of the grill.  Cook 5-10 minutes, or until under-side of dough is golden-brown.  Brush the top with more oil.  Using 2 spatulas, carefully flip the dough.  Working quickly, spread the tomatoes on the now-cooked side, then scatter the cheese evenly on top.  Close the grill cover and continue too cook until the crust is cooked through and the cheese has melted.  Carefully slide pizza onto a platter, and sprinkle with remaining basil, 1 teaspoon of olive oil, and a pinch of kosher or sea salt.  Serve immediately. 


BLOG DESIGN BY: SHERBET BLOSSOM DESIGNS