Thursday, December 29, 2011

Sparkling Pear Sangria


Sangria is one of my favorite cocktails to serve at a party.  It can be made ahead of time, in large batches, and everyone loves it.  Plus, there are endless variations out there.  White wine sangria made with peaches is one of my favorites, and this Pomegranate Sangria is my go-to during the winter months.  Well, it was anyway.  Now this sparkling pear sangria holds that spot. 

If you are still looking for a fun and festive cocktail for New Year's Eve, look no further.  Vodka, Pear nectar, lemon juice, and sparkling wine.  What's not to love?  Joey has a theory when it comes to mimosas - that they are pretty nearly impossible to screw them up.  100% orange juice = good.  100% champagne = good.  Any combination of the two?  Good!  I'd venture to say that the same is true for sangria.  Though actually I guess you actually could add too much vodka to this one and it might be a bit strong. 

This is mixed up in literally 2 minutes.  Then just chill it in the fridge until you're ready to serve.  Pop open your champagne, and you're good to go!  The bubbles make it fun and festive, the pear flavor is nice and prominent, and there's just enough kick from the vodka to keep it interesting.  We enjoyed these for "cocktail hour," and I'm already looking forward to having another one on New Year's Eve. 

Happy New Year's, everyone!  Thanks for being so awesome - see you in 2012!


Sparkling Pear Sangria
adapted from The Bonne Femme Cookbook, by Wini Moranville
makes 4-5 drinks


Pear nectar can be found in the Mexican food section of your grocery store, or in the juice section.  One can costs about 50 cents.  Regular vodka is fine, but if you happen to come across it, pear vodka would be even better.
  •  6 oz vodka (pear vodka is optional)
  • 2 oz freshly squeezed lemon juice
  • 5 oz pear nectar
  • sparkling wine, preferably a sweeter variety, chilled
  • thinly sliced pear slices, for serving
In a small pitcher, combine the vodka, lemon juice, and pear nectar.  Refrigerate until chilled.  When ready to serve, fill champagne flutes 2/3 to 3/4 of the way full, and top with champagne.  Drop a pear slice into each glass and serve immediately.


Wednesday, December 28, 2011

2011 in Review: My Favorite Posts

I always have a hard time narrowing down my posts to my  favorites because I really don't post anything that I don't truly love.  I felt like I was choosing my favorite child as I pored through old blog posts, but these are my absolute favorites of 2011.  I ended up with more than 10, but I hope you don't mind.  See you next year!  Have a festive and safe New Year's Eve!

I actually made these Buttermilk Biscuits on New Year's Day 2011, and I've lost count of the number of times I've made them since.  They have perfectly flaky layers, crisp exteriors, and light and fluffy insides.  They come together quite quickly, and rise perfectly every time.  I have a feeling I'll be starting 2012 the same was as I did 2011....


The crust for this Thin Crust White Pizza was pretty wonderful, but what really made it special to me was the topping.  A creamy white sauce, topped with lots of cheese... what could be better?  This is another recipe that I've made several times this year - I've also made several variations - adding spinach, sliced tomatoes, mushrooms, shrimp, chicken, sausage... I've also used yogurt instead of the heavy cream to lighten it up a bit, omitted the egg, and replaced the mozzarella with fontina...it's pretty great however you decide to make it.


Strawberry, Mango, and Avocado Salad was a surprise hit for us.  I threw this together as a quick side one night expecting Joey to be less than thrilled... but he (we) absolutely loved it!  I made this quite often throughout the spring and summer, and I never got tired of this salad.  It's also great if you chop the fruit in smaller pieces and use it as a salsa.  Yum yum yum.


Out of the hundreds of recipes I made this year, I am the most proud of the Individual Cream Cheese Danish.  I felt pretty intimidated to make them, but once I got started it wasn't too bad - just time consuming.  And the reward showed that they are most definitely worth the work.


This Strawberry and Goat Cheese Grilled Cheese Sandwich was another smash hit.  Strawberries and goat cheese are a great combination, and to turn that into a sandwich - well it was pretty awesome.  I ate this for lunches all throughout the spring, and I can't wait to make it again once strawberries come into season.


If you are still looking for an appetizer to serve for New Year's Eve... or for any random day for that matter... you should definitely make this Baked Tex-Mex Pimento Cheese Dip.  It combines my two favorite cuisines, and well... it's baked cheese that's spicy.  What else could you ask for?


Though they aren't healthy - and they aren't a quick and easy dinner - and they make a big mess... these Beer-Battered Fish Tacos are so insanely good that you'll forget about all that the minute you take your first bite.  Served with mango salsa and avocado crema, these are one of my all-time favorite dinners.  That I only make once a year.


I was also really proud of this Arnold Palmer Layer Cake.  This is a fluffy white  buttermilk cake, filled with lemon curd, and frosted with Sweet Tea Buttercream.  I don't know where I got the idea for sweet tea buttercream, but it was a pretty great one if I do say so myself.


Chicken with Tomato-Herb Pan Sauce was definitely a surprise hit.  It's a simple dish, but the combination of flavors is truly wonderful - and is there anything better than roasted cherry tomatoes?  I'm kind of cheating here because I'm also including the Fresh Corn and Basil Polenta.  We loved it with this chicken, and I loved it on it's own or topped with grilled veggies as well. 


Tomato Cobbler is another recipe that really doesn't need much of a write-up.  Gruyere biscuits.  Caramelized onions.  Roasted tomatoes.  The end.


Vanilla Latte Cupcakes were another smash hit of the summer.  I didn't have very many pregnancy cravings this time around, but I couldn't get enough iced vanilla lattes (decaf, of course).  Turning that drink into a cupcake was pretty amazing, and I ate waaaay too many of these.  And for the record, I'm still addicted to iced vanilla lattes.  I feel kind of silly when I order one when it's 35 degrees outside.


These tacos require very little work, but the reward is oh so sweet.  Made in the crockpot, Korean Beef Tacos are one of Joey's favorite meals to date.  You start with short ribs (though from what I hear from others, any beef roast or ribs will do), and you throw them in the crockpot with an easy sauce.  Eight hours later you have fall-off-the-bone meat.  Top them with a quick and easy cucumber slaw, and garnish with extra cilatnro and Siracha.  These made their way around the blogosphere this year, and for good reason.  They are just awesome.


Here's another crockpot meal that knocked our socks off.  Tequila-Lime Turkey Chili is a pretty standard chili, but it gets a dose of brightness and freshness from the tequila and lime juice.  A slightly different take on your traditional chili, and a very successful one at that.


And I'm wrapping this up with Sweet Potato Casserole Cookie Bars with Toasted Marshmallows.  I knew I would like these (what's not to like?), I wasn't expecting them to blow me away.  I definitely ate more than my fair share of these - for dessert... for a snack... for breakfast... I wish I was joking.


And of course, how could I forget?  My absolute most favorite thing I baked this year - Baby Smith!!  He is such a sweet baby, and I love every single minute with him.  Caroline is a wonderful big sister (though a little overly enthusiastic at times), and I can't wait to see how much they grow and change in 2012!  Happy New Year!


Tuesday, December 27, 2011

2011 in Review: Most Popular Posts

As 2011 draws to an end, my first thought is "holy crap, this year went by fast!"  It has definitely been a great year - both for the blog, and for me personally.  Over the next two days, I'll be posting year end round-ups.  Today I'm sharing the most popular recipes posted this year, and tomorrow I'll share with you my personal favorites.  So let's jump right in...

While once again the chicken enchiladas I posted over two years ago still reign supreme as the most-viewed recipe on my blog, these baked chicken taquitos are quite popular as well.  They are easy, delicious, and relatively healthy.  And they can be made ahead and frozen, which makes them even more wonderful.  I prepped a double batch of these to freeze when I was pregnant, and I loved having a quick and easy lunch or dinner on busy days.  I have a few variations of these in the works as well, so I can't wait to share those with you in the coming months!


These blackberry pie bars are not only popular because they are just so darn good, but also because they are open to so many variations.  I've made them with raspberries, strawberries, peaches, and a combination of of these as well.  These are equally good chilled as they are fresh from the oven.  And since they use frozen berries, they can be enjoyed year-round.


Cookie dough fudge.  I feel like I shouldn't even have to say anything else about this.


Oven-fried onion rings are a bit labor-intensive, but they are well worth the effort.  They are coated with a combination of potato chips and saltine crackers, and it creates the most perfect onion ring.  I won't lie - they still aren't healthy.  But they don't make a big mess from deep-frying, and I guess you save a few calories.  You can just tell yourself that if it makes you feel better in any case...


This spiced chipotle-honey chicken with roasted sweet potatoes is healthy though.  It is also a one-pot meal, which makes my dishwasher/husband very happy.  The potatoes and chicken are tossed in a sweet-spicy sauce of chipotles, honey, cinnamon, cumin, and garlic.  It's a wonderful combination of flavors, and I can see why so many of you loved this dinner!


It definitely came as no surprise that these Pumpkin Pie Pop Tarts made the list.  Pop Tarts are a childhood favorite, so to recreate them as a pumpkin pie flavor - well it was sure to be a hit.  I am already antsy to make another flavor soon.  The possibilities are endless....


Peach pie is a perennial summer favorite, and this version is gussied up with the addition of brown sugar, cinnamon, and bourbon.  I'm already craving peaches, and I know I'll be making this again next summer.


I made these Chocolate-Strawberry Cupcakes as a Valentine's Day treat, but they can be enjoyed throughout the spring and summer as well.  A rich, chocolatey cake topped with one of the most delicious icings I've ever had - totally irresistible. 


This Foil-Baked Fish with Black Beans and Corn was not only one of the easiest meals I made this year, but it is also really tasty.  Halibut is coated in a compound butter made of chipoltes, orange juice, garlic, and herbs.  My mom made foil-packet meals a lot when I was growing up, and this is definitely an updated version of one of my childhood favorites.


And finally, we round out the top 10 with these Steakhouse Mushroom Burgers with Creamed Spinach Sauce.  Mushrooms.  Burger.  Creamy spinach.  Parmesan.  This is a fancy, fork-and-knife burger, and I loved every single indulgent bite.

See you tomorrow - I'll be posting my personal favorites of the year!


Wednesday, December 21, 2011

Bacon-Blue Cheese Dip


Two ingredients that immediately make me want to make a recipe.  Bacon.  Blue Cheese.  Combine the two?  It is sure to be a hit.  This dip was a wonderful snack (err ... dinner) for us the night we decorated our house for Christmas.  Warm, cheesey, bacon-y... and it was equally good once it had cooled to room temperature.  It also comes together quite quickly, and can be prepped in advance.  So when it's time to serve, just pop it in the oven for a few minutes, and you're good to go!

If you are still looking for a quick and easy appetizer for your Christmas dinner, or if you are a planner and you're already putting together a menu for New Year's Eve, this is a great choice. 


Bacon-Blue Cheese Dip
adapted from Southern Living, December 2004
  • 7 slices bacon, chopped (preferably thick-cut, applewood smoked bacon)
  • 2 cloves garlic, minced
  • 2 (8-oz) packages cream cheese, softened (reduced fat is fine)
  • 1/3 cup half-and-half, heavy cream, or Greek yogurt
  • 4 oz crumbled blue cheese
  • 2 Tbs chopped fresh chives
  • salt and pepper to taste
  • grapes, for serving
  • crackers, for serving
Preheat the oven to 350 degrees.

Cook the bacon in a skillet until browned and crispy.  Remove with a slotted spoon and drain on a paper towel-lined plate.  Pour off all but about 1 tsp fat, and add the garlic.  Saute until fragrant, about 1 minute.

Beat cream cheese in a large bowl with an electric mixer until smooth.  Add the bacon (reserve a small amount for garnish), garlic, half-and-half, blue cheese, and chives.  Stir to combine and season with salt and pepper to taste.  Spoon into a lightly greased serving dish, and bake 15 to 20 minutes, or until golden and bubbly.  Garnish with reserved bacon and allow to cool slightly before serving.  Serve with grapes and crackers.


Monday, December 19, 2011

Hot Chocolate Layer Cake with Homemade Marshmallows


This cake has been a long time coming.  I've had it bookmarked ever since I saw it on the cover of a 2009 issue of 
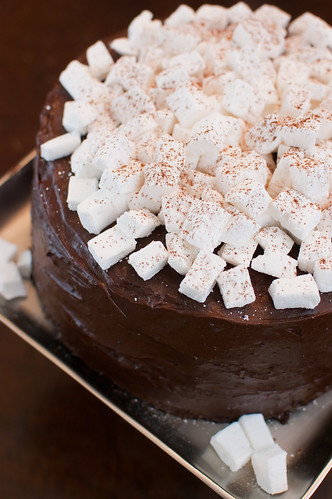
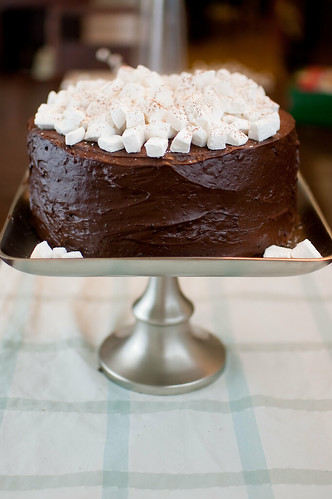
Fine Cooking (which is my current favorite cooking magazine, by the way).  Since then, I've kept it in the back of my mind, just waiting for a good opportunity.  Well, apparently a random Wednesday night is the perfect occasion.  We were having our best friends over for dinner, and when I was trying to decide on a dessert, I ran a few options by Joey.  I started with this one, and said he didn't even need to hear the other options because this was the one he wanted.  It turns out that he made an excellent choice.  It is a rich and dense chocolate cake, with a thick and rich fudgy chocolate frosting.  It is extremely rich, but somehow adding more sugar in the form of marshmallows manages to mellow it out and cut the richness.  Go figure, right?  The chocolate part isn't so much reminiscent of hot cocoa - the whole thing just looks like it due to the marshmallows on top

While the cake isn't terribly difficult, it is a bit of an undertaking from a labor standpoint.  The cake itself is very easy and simple - the batter is even mixed by hand!  But the frosting uses a technique that I've never encountered before.  It is first cooked on the stovetop, then poured into a dish and chilled overnight.  Before frosting the cake, it is whipped in a food processor until it's light and fluffy.  And then if you manage not to eat it all by the spoonful, you can frost the cake. ;-)

If you've never made homemade marshmallows before, this is your chance!  You only need about half a batch for the cake, so the rest are left for snacking.  Also, they can be made a few days in advance.  So you can make the marshmallows one day, mix up the frosting, and then the next day all you have to do is bake the cake and assemble. Easy peasy!  So since today's Tuesday, you can start this cake on Wednesday or Thursday, and have it ready for Christmas Eve or Christmas Day! 


Hot Chocolate Layer Cake with Homemade Marshmallows
adapted from Fine Cooking, October 2009
marshmallows from Gourmet, December 1998, via Ezra Pound Cake

For the Frosting
  • 2 1/2 cups heavy cream
  • 6 Tbs unsalted butter
  • 1 vanilla bean, split lengthwise and seeds scraped out
  • 6 oz bittersweet chocolate, finely chopped
  • 2 cups  sugar
  • 6 oz (2 cups) natural unsweetened cocoa powder, sifted; plus more for decorating
  • 1/2 cup Lyle’s Golden Syrup
  • 1/4 tsp. kosher salt

 Combine the cream, butter, and vanilla bean and seeds in a 4-quart saucepan over low heat and stir until the butter is melted. Remove the vanilla bean and whisk in the chopped chocolate until melted. Whisk in the sugar, cocoa powder, syrup, and salt until smooth—be sure the cocoa powder dissolves completely. Pour into a 9x13-inch pan and freeze until firm, about 2 hours, or refrigerate overnight. 


For the Cake
  • 3/4 cup (12 Tbs) unsalted butter; more for the pans  
  • 3 cups (13-1/2 oz.) unbleached all-purpose flour; more for the pans  
  • 3/4 cup canola oil  
  • 4 oz bittersweet chocolate, finely chopped  
  • 1 cup brewed coffee (or water)
  • 3 cups sugar  
  • 3/4 cup (2-1/4 oz.)  unsweetened cocoa powder  
  • 3 large eggs, at room temperature  
  • 3/4 cup buttermilk, at room temperature  
  • 2 Tbs. pure vanilla extract  
  • 2-1/2 tsp. baking soda   
  • 1/2 tsp. kosher salt  

Position racks in the bottom and top thirds of the oven and heat the oven to 350°F. Butter three 9-inch round cake pans and line each with a parchment round. Butter the parchment, then dust with flour and knock out the excess.

In a 3-quart saucepan, combine the butter, oil, chopped chocolate, and coffee. Heat over medium heat until melted.

In a large bowl, whisk the flour, sugar, and cocoa powder. Pour the hot chocolate mixture into the sugar mixture and whisk until combined.

Whisk in the eggs, one at a time, then whisk in the buttermilk, vanilla, baking soda, and salt. Divide the batter evenly among the prepared pans.

Set two pans on the top rack and the third on the lower rack. Stagger the pans on the oven racks so that no pan is directly over another. Bake, swapping and rotating the pans’ positions after 20 minutes, until a toothpick inserted in the center of each cake comes out clean, 35 to 40 minutes. It is possible for them all to be done at varying times.

Cool on racks for 10 minutes. Invert the cakes onto the racks, remove the parchment, and cool completely.

For the marshmallows

  • 1 cup confectioner’s sugar
  • 3 1/2 envelopes (2 tablespoons plus 2 1/2 teaspoons) unflavored gelatin
  • 1/2 cup cold water
  • 2 cups sugar
  • 1/2 cup light corn syrup
  • 1/2 cup hot water (approximately 115°F, which takes about 15 seconds in the microwave. )
  • 1/4 teaspoon salt
  • 2 large egg whites
  • 2 teaspoons 
Lightly spray a 13- by 9- by 2-inch rectangular metal baking pan with nonstick spray, and dust it (bottom and sides) with a little confectioner’s sugar.

Pour the cold water into bowl of your stand mixer, and sprinkle the gelatin over the water.  Set it aside to soften.

3. In a large saucepan, combine the granulated sugar, corn syrup, hot water and salt. Cook the mixture over low heat, stirring it with a wooden spoon, until the sugar is dissolved.

4. Turn up the heat to medium, and bring the mixture to a boil (without stirring it!) until your candy thermometer reads 240°F. This will take about 12 minutes, but you do need to use a thermometer to verify the temperature.

Remove the pan from heat, and pour the sugar mixture over the gelatin mixture that's in the stand mixer. Stir it until the gelatin is dissolved.


Beat the mixture on high speed until it’s bright white, thick and nearly tripled in volume. (This will take about 6 minutes if you’re using a standing mixer or 10 minutes with a hand-held.)

In  a separate bowl and a set of clean beaters or a whisk, and beat your egg whites until they just hold stiff peaks.   Add the egg whites and vanilla to the sugar mixture, and beat them until they’re just combined.

Pour the mixture into your prepared pan, and  sift 1/4 cup of confectioner’s sugar over the top of the marshmallow.

Transfer the pan into the refrigerator, and let the mixture chill, uncovered, until it’s firm. This will take at least at least 3 hours, but you can leave it in the fridge for up to 24.


Take a thin knife, and run it around all four edges of the pan.  Turn the pan upside-down onto a large cutting board. Then lift up a corner of the pan, and use your fingers or a knife to loosen up the marshmallow block so that it falls onto the board.  Cut into desired shapes and sizes.  Sift the rest of your original cup of confectioner’s sugar into a large bowl, and add the marshmallows in batches, tossing them to evenly coat them in sugar.  For this cake, I cut the marshmallows into 1/4-1/2 inch squares.  I only cut about 1/3-1/2 of the batch though.  The rest I cut into larger squares for snacking and gifting.


To assemble the cake, remove the frosting from the freezer or refrigerator. Transfer to the bowl of a stand mixer fitted with the paddle attachment and beat on medium speed for 2 minutes to soften. Change to a whisk attachment and beat at medium-high speed until light and fluffy, about 3 minutes.

Put a cake layer on a flat serving platter or a cake stand lined with strips of waxed paper to keep it clean while icing. Top the layer with 1-1/2 cups of the frosting, spreading it evenly with an offset spatula to the cake’s edge. Repeat with another cake layer and 1-1/2 cups frosting. Top with the last cake layer.

Put 1-1/2 cups of the frosting in a small bowl. With an offset spatula, spread this frosting in a thin layer over the top and sides of the cake. Refrigerate the cake until the frosting firms enough to seal in the crumbs, 20 to 30 minutes.

Spread the remaining frosting in a smooth layer over the top and sides of the cake. If necessary, you can rewhip the remaining frosting to loosen and lighten it. Remove the waxed paper strips.

Mound the marshmallows on top of the cake (you’ll need only a third to half of them). Sift some cocoa powder over the marshmallows.


You can bake, cool, wrap, and store the cake layers at room temperature for up to 1 day or freeze for up to 1 month. You can refrigerate the frosting for up to 3 days. The assembled cake can be refrigerated for up to 4 hours (return to room temperature before serving). Wrapped well, leftover marshmallows keep at room temperature for up to 1 month.


Sunday, December 18, 2011

Holiday Giveaways: My Favorite Southern Cookbooks - CLOSED

***This giveaway is now closed and a winner has been chosen.  Thank you for entering!***

For my final giveaway this year, one lucky winner will receive three of my favorite cookbooks.  Born and raised in the south, southern food is quite easily my favorite cuisine.  And I would argue vehemently that it has the richest food culture of any other region in the US.  It is definitely more than just Paula Deen, fried food, and lard.  It's the original farm-to-table cuisine.  It's about passing down treasured recipes from generation to generation.  It's about family and togetherness and love.  And this week I want to share that love with all of you.  I'll be giving away three cookbooks:  The Lee Bros. Southern Cookbook, Sara Foster's Southern Kitchen, and Basic to Brilliant, Y'all by Virginia Willis.  I have made multiple recipes out of each of these cookbooks, all with rave reviews.


The Lee Bros. Southern Cookbook is my Bible when it comes to southern food.  It has all the basics of southern cuisine - a killer pimiento cheese recipe, boiled peanuts, fried green tomatoes, collards, Brunswick stew, pound cake, biscuits... plus some fun and interesting spins on classics as well.  Wine and beer and beer pairings are also included with most of the recipes, and the recipes and commentary are witty and wonderfully written.  This is the first book I pull out when I want to reference any southern classic.


Sara Foster's Southern Kitchen is another winner.  She's all about seasonal and local cooking.  She takes traditional southern recipes and gives them a modern twist - some of the standouts:  flounder with garden vegetable ratatouille, corn cakes topped with an avocado-tomato salad, country ham and hominy hash, Autumnal chicken pot pie,  grits with roasted butternut squash and blue cheese, grilled peach salad with country ham and herbs, rhubarb-cornmeal tart...and her cornbread dressing is one of the best I've ever had.  It is now my Thanksgiving staple, bar none.


And finally, Basic to Brilliant, Y'all.  This is the newest cookbook that I've added to my collection, and I am so in love.  Virginia Willis is a classically French-trained chef who was born and raised in the south.  She combines the two cuisines effortlessly, giving fancy French recipes a down-home feel, and updating some classic southern-style dishes as French preparations.  Some standouts:  sweet potato grits, pecan-crusted trout with brown-butter sauce, kale omelet baked in a bread boule, roasted red pepper and goat cheese gratin, apple-Roquefort turnovers, summer squash slaw, poached eggs in red wine sauce, deviled chicken thighs, peach dijon-crusted pork tenderloin, Coca-Cola Cake... and each recipe is accompanied by a "brilliant" idea:  a shortcut, a short recipe that can accompany the dish, or an alternate presentation.  The book is also beautifully photographed by the talented Helene Dujardin.

The Rules:
  1. To enter, leave me a comment answering this question: What is your favorite cuisine?
  2. One entry per person.  The winner will be chosen by a random number generator.
  3. Must leave a valid email address with your entry (I need a way to get in touch with you if you win!!)
  4. Giveaway is open until Thursday 12/22 at 10 pm EST.


Thursday, December 15, 2011

Recipe Remix: Peppermint Oreo Cheesecake Cupcakes


My first thought when I made the Oreo Cheesecake Cupcakes last year was "these would be really good with mint cookies!"  And of course, they are.  Though if I'm being technical, I didn't use Oreos for these.  I used candy cane Joe-Joes.  Which in my humble opinion are so much better.  They aren't just regular cookies flavored with mint - they have pieces of crushed up candy canes in the filling!  If you have a Trader Joe's nearby, I highly recommend that you go buy a few boxes.  You can thank me/curse me later.

I followed the exact same recipe as with the classic cheesecakes, but just replaced them with mint-flavored ones.  If I had had any on hand, I probably would have used peppermint extract in place of the vanilla extract as well.  So that is also a good adaptation to keep in mind.  To serve, I topped each cupcake with a bit of whipped cream and a peppermint.

Peppermint Cookies and Cream Cheesecakes
Martha Stewart's Cupcakes
makes 30 cupcakes

  • 42 mint-flavored cookies and cream sandwich cookies - 30 left whole, and 12 chopped
  • 2 lbs cream cheese, room temperature (reduced fat is fine)
  • 1 cup sugar
  • 1 tsp vanilla extract or peppermint extract (or half and half!)
  • 4 large eggs, lightly beaten
  • 1 cup sour cream or Greek yogurt (low fat is fine)
  • pinch of salt
Preheat the oven to 275 degrees.  Line muffin tins with paper liners, and place 1 cookie in the bottom of each cup.

With an electric mixer on medium-high speed, beat the cream cheese until smooth, scraping down the sides of the bowl as needed.  Gradually add the sugar, and beat until smooth.  Beat in the vanilla or peppermint extract, then drizzle in the eggs.  When well combined, mix in the sour cream and salt.  Stir in the chopped cookies by hand.

Divide the batter evenly among the muffin tins, filling each one almost to the top.  Bake, rotating tins halfway through, until the filling is just set, about 22 minutes.

Transfer the tins to wire racks to cool completely, then refrigerate (in tins) at least 4 hours.  Remove from tins just before serving.


Monday, December 12, 2011

Chocolate Chip Cookie Dough Fudge


Yes, really.  If that doesn't stop you dead in your tracks, then I don't think you're human.  This is serious stuff.  I have a family recipe that I use for standard fudge, but I like making fun and unique variations as well - peanut butter, pumpkin pie, and white chocolate have all been well-received in the past.  But I'm pretty sure this one surpasses them all.

This comes together pretty easily, and honestly the hardest part is waiting for it to set up!  The fudge was smooth and creamy, with the perfect cookie dough flavor.  This was my test batch, and it passed with flying colors - I'll definitely be including this candy in my holiday baskets.  The only change I'll make is to use mini chocolate chips instead of the full-sized ones.  I just think it will look cuter, and be a little bit easier to eat.

So head into your kitchen and make these now.  You definitely won't regret it.


Chocolate Chip Cookie Dough Fudge
barely adapted from Sweet Confections, via Bake at 350
  • 1 3/4 c. sugar
  • 3/4 cup brown sugar
  • 1/2 cup heavy cream 
  • 1/4 c. milk
  • 1 Tbs corn syrup
  • 3/4 tsp  kosher salt
  • 2 Tbs unsalted butter
  • 1 tsp vanilla extract
  • 1/2 cup flour
  • 1/3 cup mini semi-sweet chocolate chips
Spray an 8x8 inch  baking dish with cooking spray and set aside.

In a 3-quart saucepan, combine the sugars, cream, milk, corn syrup and salt.  Cook over medium heat, stirring occasionally, until the mixture reaches 242 degrees (ie the soft-ball stage).  Remove from heat and stir in the butter, vanilla, and flour.

Pour the mixture into a 9x13 inch casserole dish, and allow to cool until it reaches 110 degrees, 10 to 20 minutes.

Use a large spoon to scrape the mixture in the bowl of a stand mixer fitted with the paddle attachment.  Beat at medium speed until the fudge thickens and holds its shape, 3 to 5 minutes.  Transfer the fudge to the prepared 8x8 inch dish and smooth the top with a spatula.  Sprinkle the chocolate chips over the top, pressing them lightly into the fudge.

Allow to set at least 2 hours.  If it's not setting up, cover and refrigerate for a few hours.  Cut into squares and store in an airtight container.


Sunday, December 11, 2011

Holiday Giveaways: Cuisinart Mini-Prep Food Processor - CLOSED


This giveaway is now closed.  Thank you to all that entered!

This week I'm giving away one of my favorite kitchen tools:  a mini-prep food processor.  While I do have a full-sized food processor that gets used quite often, I actually use this smaller one even more.  It is perfect for herbs, bread crumbs, chopping several cloves of garlic, nuts, cheese, salad dressings and marinades, small batches of dips and purees, etc.  It is truly one of the workhorses of my kitchen.

I have the brushed chrome one that is pictured above, but now they have all these fun colors available through Amazon.  I can't say that I'm not tempted to buy another one just so I can order the pink or green :-)  So if you win, you get to choose the color of your new toy!

The Rules:

  1. To enter, leave me a comment answering this question:  Are you done with your holiday shopping?  And if not, have you started?
  2. One entry per person.  The winner will be chosen by a random number generator.
  3. Must leave a valid email address with your entry (I need a way to get in touch with you if you win!!)
  4. Giveaway is open until Thursday 12/15 at 10 pm EST.


Thursday, December 8, 2011

Eggnog Waffles


I'm in full-on holiday mode now, which means I'm giving Christmas-y makeovers to some of my favorite recipes.  I have another peppermint and chocolate combination coming at you next week, but I thought I'd share these waffles first - weekends are made for indulgent breakfasts, after all. 

Though I've never blogged them before, my go-to recipe for waffles is the Waffles of Insane Greatness.  I've made them a million different ways too - plain, chocolate chip (Joey's favorite), blueberry (my favorite), strawberry, gingerbread, pumpkin, chocolate... but these eggnog waffles reign supreme right now.

To be honest, I used to hate eggnog.  As a child, I thought it tasted weird, thick, and yucky.  Now, while it may not be my number one drink of choice, I enjoy a small glass here and there throughout December.  And I love eggnog-flavored treats. 

To make these waffles, I just took the standard base recipe and replaced the milk with eggnog, added some nutmeg and cinnamon, and spiked the batter with some bourbon.  I served these with maple syrup, some freshly whipped cream, and a sprinkling of nutmeg.  The result was a wonderfully festive waffle.  I froze the ones we didn't eat, so we have another festive breakfast waiting for us this weekend.

And as an aside, does anyone have a waffle iron they love and would recommend?  Mine is not the best, and it's on it's last leg!


Eggnog Waffles
adapted from the Waffles of Insane Greatness, via Annie's Eats
  • 3/4 cup all-purpose flour
  • 1/4 cup cornstarch
  • 1/2 tsp baking powder
  • 1/4 tsp baking soda
  • 1/2 tsp salt
  • 2 tsp sugar
  • 1/2 tsp nutmeg (preferably freshly grated)
  • 1/2 tsp cinnamon
  • 1 cup eggnog (low-fat is fine)
  • 1/3 cup canola oil
  • 1 egg
  • 1 Tbs bourbon or dark rum
In a medium mixing bowl, whisk together all the dry ingredients.  In a large mixing bowl, whisk together the wet ingredients.  Add the dry to the wet, and stir until just combined - be sure not to overmix!

Allow the batter to sit for 30 minutes.  Preheat the waffle iron and cook the waffles according to the manufacturer's instructions.  Serve immediately with maple syrup, whipped cream, and nutmeg.


Tuesday, December 6, 2011

Peppermint White Russians


Though I've never seen it, I hear that White Russians are the drink of choice in the movie The Big Lebowski.  In fact, one night in college some friends decided to have a Big Lebowski party and watch the movie while drinking White Russians.  We ended up just drinking them and hanging out instead of actually watching the movie.  So the moral of the story is - I love White Russians.

My neighbor shared some Peppermint Mocha Kahlua with us a few weeks ago, and Joey and I immediately fell in love.  After we got a bottle of our own, we started dreaming up drink possibilities for it:  drink it on the rocks, mix into hot chocolate, mix into coffee (though not in the morning.  We're not that big of lushes), use it to make a martini.... but in the end we decided on Peppermint White Russians.  It proved to be an excellent choice.

We went out and bought our Christmas tree over the weekend, and these were the perfect drink to sip on while we decorated and made the house merry.  If you like White Russians and you like peppermint, then it's hard to go wrong here.  Feel free to adjust the volumes to your tastes - obviously you can make it as strong or as weak as you like - just add more milk or Kahlua until you think it tastes perfect! This would be a great drink to serve at a holiday party - make a big pitcher and then just add ice to individual glasses when you're ready to serve.  Happy Holidays!


Peppermint White Russians
Pink Parsley Original
makes 2 drinks
  • 2 oz Peppermint Mocha Kahlua
  • 1 oz vodka
  • 2 oz milk or cream
In a large glass or pitcher, combine all the ingredients and stir to combine.  Divide between small glasses and add ice to fill up the glass.  Serve.

optional:  crush peppermints or candy canes, wet the rim of the glass, and press into the candy.  This make for an especially festive presentation!


Sunday, December 4, 2011

Holiday Giveaways: The Pastry Queen Christmas - Closed


This giveaway is now closed, and a winner has been chosen.

For this week's giveaway, one lucky reader will win a copy of The Pastry Queen Christmas by Rebecca Rather.  The Pastry Queen is one of my very favorite cookbooks, and I love her Christmas cookbook just as much.  From breakfast treats, to salads, sandwiches, and appetizers, to main course offerings and side dishes, to over-the-top desserts and sweets, this cookbook has it all for perfect holiday entertaining.  And while many of the recipes are geared towards holiday gatherings, I've found myself cooking from it all year round.  You may  have already seen a few recipes from this book here on the blog:  Apple-Spice Layer Cake with Caramel-Swirl Icing, Bacon-Green Bean Bundles, Warm Pear-Ginger Upside Down Cake, Red Velvet Cupcakes, and Wild Mushroom Quesadillas with Cranberry-Pecan Salsa.  And I can think of a few more off the top of my head that I have made but not blogged.  I already have several recipes bookmarked to be part of my holiday baking and cooking for this year too!

The Rules:
  1. To enter, leave me a comment telling me your favorite holiday dessert.
  2. One entry per person.  The winner will be chosen by a random number generator.
  3. Must leave a valid email address with your entry (I need a way to get in touch with you if you win!!)
  4. Giveaway is open until Thursday 12/8 at 11 pm.


Thursday, December 1, 2011

Sweet Potato & Pomegranate Salad with Pepitas and Avocado


First off all, thank you to everyone who entered my giveaway this week!  Your responses gave me tons of inspiration  for my own holiday baking!  Joanne from Eats Well with Others is the lucky winner of a one-year subscription to Cook's Illustrated!  Congratulations, girl! I still have 3 more giveaways, and I think you will all really like them - the next one will be posted on Monday.  Now onto this fun salad...

I'm about to inundate you with holiday sweets and treats, so I felt like it was only fair to give you a salad first.  You know, moderation and balance and all that.  I first made this salad a few weeks ago to serve at book club, along with the infamous Turkey Cranchiladas.  I wanted a fall-ish salad, but for some reason I wasn't feeling my usual Harvest Pear Salad.  So as I perused the aisles of the grocery store, I came up with this one.  I love the combination of sweet potatoes and avocado, and pomegranate seeds and pepitas seemed like good add-ins as well. I was kind of stumped on the dressing, but then I saw Nicole mention that she was making a salad with a pomegranate vinaigrette, and that sounded perfect.

I really loved this salad.  There's a nice sweetness from the sweet potatoes and pomegranate seeds, creamy richness from the avocado, and a salty crunch from the pepitas.  The sweet/tart vinaigrette pulls it all together really nicely as well.  I roasted a huge sweet potato, and had plenty of the other ingredients on hand, so I was able to enjoy this salad for lunches all week long.  One day I added some feta, and it was a nice addition as well.  I think cotija or queso fresco would be equally tasty.  The recipe for the dressing makes much more than you'll need, so if you don't want to make this salad 50 times, maybe try this chopped salad out?  I think I'm going to make another jar of the dressing, just for that salad!

Not only is this salad healthy and full of super foods, but it is also so pretty and colorful!  And who doesn't like pretty food?


Sweet Potato & Pomegranate Salad with Pepitas and Avocado
Pink Parsley Original
Pomegranate Vinaigrette adapted from Bobby Flay
  • 1 medium sweet potato, scrubbed, peeled, and chopped into 1-inch pieces
  • 1 Tbs olive oil
  • kosher salt and black pepper
  • 1/4 tsp cumin
  • 1 avocado, halved, pitted, and sliced into thin pieces
  • 2-3 Tbs Pomegranate seeds
  • 1-2 Tbs roasted and salted pepitas (pumpkin seeds)
  • 8 oz mixed greens
Pomegranate Vinaigrette
  • 1 cup Pomegranate juice
  • 2 Tbs red wine vinegar
  • 1 heaping Tbs Dijon mustard
  • 1 Tbs honey
  • salt and pepper
  • pinch cayenne
  • 2/3 cup extra virgin olive oil
Preheat the oven to 400 degrees and toss the sweet potato cubes with olive oil, salt, pepper, and cumin.  Arrange in a single layer on a baking sheet and roast about 20 minutes, stirring once, until they are cooked through and browning around the edges.  Allow to cool.

Meanwhile, make the vinaigrette.  Add the pomegranate juice to a small saucepan and bring to a boil over medium heat.  Boil until the juice has reduced to about 1/4 cup and has thickened to a syrup.  Set aside to cool slightly, then combine with the vinegar, mustard, honey, salt, pepper, and cayenne.  Add the oil, whisking to combine well.  Alternatively, combine it all in a mason jar and just shake it to mix (this is my preferred method).

To assemble the salad, toss the greens with just enough dressing to coat, and top with the sweet potatoes, avocado slices, pomegranate seeds, and pepitas.  Season with additional salt and pepper to taste.  Serve.


Tuesday, November 29, 2011

Glazed Cranberry-Lemon Cake for Eat to the Beat


Years ago, before I started blogging, my friend Elly hosted a blogging event called Eat to the Beat.  I remember reading her blog back then and wanting to start my own food blog just so I could participate.  So when she resurrected it for her 5 year Blogiversary, I couldn't wait to participate.  The premise is pretty straightforward - make any recipe that can be related to music in any way.  I had several ideas floating around in my head, but then as the deadline approached, I couldn't make up my mind.  I was already planning to make this cake for Thanksgiving, so I decided it would be a great recipe to submit.

Does anyone else remember when Woodstock was held in 1994? That was back in my angst-ridden preteen years, and I sure did love some of those bands.  My older sister had the VHS (ha!) of the concert, so when she came home from college over Thanksgiving break, I watched it over and over and over again (in case you couldn't guess, I was really cool back then).  I still remember the performance by The Cranberries, which became my favorite band after that.  Though they are probably most known for "Linger," I really loved "Dreams" as well.

So onto the cake - it was a great contribution to Thanksgiving because not only is it something a little bit different from the usual pumpkin and pecan pies, but it is easy to make and is visually impressive.  The cranberries are so pretty, and I always love it when a cake has glaze dripping down the sides.

The lemon bundt cake is really delicious.  Oftentimes bundt cakes can seem dry and crumbly, but this one isn't.  It is perfectly moist and sweet with a nice hint of lemon.  And the cranberries on top were a nice tart contrast to the sweetness of the cake and glaze.  Just as a warning, if you don't like tart, then you should increase the sugar in the topping.  But I found that the tartness mellowed over the course of a few days anyway, so keep that in mind.

***Don't forget to enter my giveaway before Friday at midnight - I'm giving away a 1 year subscription to Cook's Illustrated magazine.*** 


Glazed Cranberry-Lemon Cake
barely adapted from Williams-Sonoma

  • Unsalted butter for greasing the pan, plus 12 Tbs. (1 1/2 sticks), at room temperature
  • 1/3 - 2/3 cup firmly packed light brown sugar 
  • 3 cups (12 oz) fresh cranberries
  • 2 1/2 cups all-purpose flour 
  • 2 1/2 tsp. baking powder 
  • 1/2 tsp. baking soda 
  • 1 tsp. salt 
  • 1 1/2 cups granulated sugar 
  • 2 lemons 
  • 3/4 cup buttermilk 
  • 1 1/2 tsp. vanilla extract 
  • 3 eggs 
  • 1 cup confectioners’ sugar, sifted, plus more as needed  
Preheat the oven to 350°F. Generously grease a 12-cup bundt pan with butter. Sprinkle the brown sugar in the bottom of the pan, then evenly scatter the cranberries over the sugar.

In a bowl, whisk together the flour, baking powder, baking soda and salt. Add the granulated sugar to the bowl of a stand mixer. Finely grate the zest from the lemons over the sugar and use your fingers to combine the two, sort of pinching the sugar through your hands.

Squeeze the juice from the lemons. In a liquid measuring cup, combine 2 Tbs. of the lemon juice, the buttermilk and vanilla.  Set aside the remaining lemon juice.

Add the butter to the lemon zest–sugar mixture and beat on medium-high speed until light and fluffy, 1 to 2 minutes. Beat in the eggs, 1 at a time, scraping the sides of the bowl after each addition. Reduce the mixer speed to low and add the dry ingredients in 3 batches, alternating with the buttermilk mixture.  Start and end with the dry ingredients.  Raise the mixer speed to medium-high and beat for 2 minutes.

Scrape the batter into the prepared pan and spread it evenly over the cranberries. Bake until the cake is browned and a cake tester inserted into the center comes out clean, 35 to 40 minutes. Let cool in the pan for 5 minutes, then invert the cake onto a cake plate, lift off the pan and let cool completely.

After the cake has cooled, whisk together the confectioners’ sugar and 1 1/2 - 2 Tbs. of the reserved lemon juice until thick and smooth. Test the consistency by drizzling a bit of glaze over the cake. If it runs off the cake, whisk in a little more confectioners’ sugar; if it sits on the cake without moving, whisk in a little more lemon juice. Drizzle the glaze over the cake and let set for at least 15 minutes. Slice into wedges and serve. 


Sunday, November 27, 2011

Holiday Giveaways: Cook's Illustrated Subscription - Closed

***This giveaway is now closed, and a winner has been chosen.  Thank you to everyone who entered!***

Now that Thanksgiving is over, we are officially in the holiday season! And since I love you guys so much, I thought I'd celebrate by giving away some of my favorite things over the course of the next few weeks.  I'll be giving something new away once a week between now and Christmas, so be sure to check it out every Monday.

I'm kicking things off by giving away a one-year subscription to one of my favorite cooking magazines.  Cook's Illustrated is always one of the first places I look when I'm researching a new recipe.  I love their scientific approach to cooking, and they have never let me down.  I own several of their cookbooks, but I really love receiving the magazine every month as well.  I'll be giving a way a one-year subscription to either the magazine or the website - winner's choice!

To enter, leave a comment telling me what you are most looking forward to cooking this holiday season.  One entry per person.  International residents will only be eligible for the online subscription.  This giveaway is open until Friday, December 2nd at midnight.


Tuesday, November 22, 2011

Twice-Baked Sweet Potatoes with Sage, Brown Butter, and Gruyere


As I mentioned in my post for Sweet Potato & Marshmallow Bars, I really love sweet potatoes, but I think that sweet potato dishes often fall into the sweet/dessert sector.  Not these.  These twice-baked sweet potatoes have just a hint of sweetness, but they are most definitely savory.  And that's definitely a good thing - sage, brown butter, and gruyere.  mmmmm.  I know you probably already have your Thanksgiving menu planned out, but if you are still looking for a side dish to replace sweet potato casserole, this would be a great choice.  Especially if you are planning dinner for just a few people - you don't have to make a huge casserole, and everyone gets their own individual portion.

These potatoes were kind of an experiment, but they were so delicious.  I made these for lunch one day thinking that I'd eat one half potato that day, and save the other one for the next day.  Well, I ended up eating both.  Oink oink! 

I loved the combination of the crunchy breadcrumb topping with the creamy potatoes, the savory sage and breadcrumbs mixed with the sweetness of the filling, and the richness from the Gruyere.  Everything is better with Gruyere, right?   

This is a great side dish to pretty much any meat, but it is great on it's own as well.  Served with a side salad, this would make a wonderful light fall or winter dinner.


Twice-Baked Sweet Potatoes with Sage, Brown Butter, and Gruyere
Pink Parsley Original, topping inspired by Martha Stewart
  • 2 sweet potatoes, scrubbed 
  • 4 Tbs unsalted butter
  • 1/2 cup fresh bread crumbs, still somewhat chunky
  • 4 tsp chopped fresh sage, divided
  • kosher salt and freshly ground black pepper
  • 1/4 cup + 2 Tbs grated Gruyere cheese
  • 2 tsp maple syrup
  • 2 Tbs sour cream or Greek yogurt
  • pinch cayenne pepper
Preheat the oven to 400 degrees.  Pierce the sweet potatoes a few times with a fork, and place on a baking sheet.  Cook 45 minutes to 1 hour, or until they are cooked through and tender to the touch.  Remove from the oven and allow to cool until they are cool enough to handle.

Cut each potato in half lengthwise, and carefully scoop out the filling and add to a medium bowl.  You don't want to scoop out all of it, since the skins are pretty thin, but aim to scoop out 90% or so. 

In a small skillet, melt the butter over medium heat, whisking constantly.  When it reaches a deep golden-brown color and has dark brown specks in it, remove from heat immediately.

In a small bowl, combine the breadcrumbs, 2 tablespoons of the butter, 2 teaspoons of the sage, 2 tablespoons of sage, and salt and pepper to taste. 

Using a fork, mash the sweet potato filling until it's smooth.  Add the remaining brown butter, sage, Gruyere, the maple syrup, cayenne, and Greek yogurt.  Mix well to combine.  Divide the filling among the potato skins.  Sprinkle the breadcrumb mixture over the potatoes.

Return to the oven and cook about 15 minutes, or until the filling is heated through and the breadcrumbs are turning light golden-brown.  Serve.


BLOG DESIGN BY: SHERBET BLOSSOM DESIGNS