Showing posts with label candy. Show all posts

Tuesday, December 2, 2014

Sparkly Cranberry-Apple Jellies

Sparkly Cranberry-Apple Jellies 

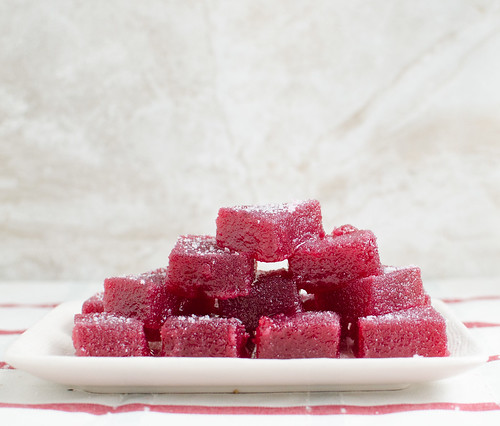
You know how you finish a big meal, and are super stuffed and full, but you just want something small and sweet?  Just me?  Well, these sparkly little jellies are the perfect small treat.  Just sweet enough to be satisfying, but tart enough to be a nice little palate cleanser.  The perfect ending to a big meal.  Or the perfect little snack to give your guests as they leave.

I really love making candy -- it makes me feel like I'm back in the chemistry lab (nerd alert!).  But I realize that a lot of you are intimidated by it.  Don't be.  Just buy a candy thermometer; they're really inexpensive, and invaluable when it comes to confections.

These jellies are really simple and straightforward, and look how pretty!  They taste like a fancy fruit snack, and I mean that in the best way possible!  If I were a fancy-party-throwing type of person, I'd totally make these to pass out to guests as they left.

Tis the season for sweets and treats, and here's to having a fun and sophisticated recipe in your back pocket!

Sparkly Cranberry-Apple Jellies
slightly adapted from Bon Appetit, November 2014

The jellies can be made and chilled a few days ahead of time, but roll in sugar just before serving.  They quickly absorb the sugar, and while they still taste great, they don't have the pretty sparkly appearance.  And we all know that's the most important part!

  • 1 large granny smith apple, peeled, cored, and roughly chopped
  • 1 lb fresh cranberries
  • 2 cups sugar, divided; plus more for coating
  • 2 tsp pectin
  • 1 Tbs fresh lemon juice
Line an 8x8 inch baking dish with 2 pieces of parchment paper, leaving overhangs on all sides.

Puree the apples, cranberries, 1 1/2 cups sugar, and 1 cup of water in a blender until very smooth.  Pour it into a large heavy pot.  Cook over medium heat, whisking occasionally, until the mixture is thick and bubbly.

Combine the pectin and remaining 1/2 cup of sugar in a small bowl.  Slowly whisk it into the cranberry mixture, then reduce heat to medium-low.  Continue to cook, stirring often, until the thermometer registers 200 degrees F, 8 to 15 minutes.  

Remove from heat and whisk in the lemon juice.  Scrape the mixture into the prepared pan and smooth the top with a spatula.  Cool at room temperature until it's firm and set, about 4 hours.

Just before serving, mold the jelly onto a cutting board and cut into 1-inch squares.  Gently toss jellies in a bowl of sugar to coat, and serve immediately.


Thursday, December 12, 2013

Peppermint Bark Cookies


I really began to love cooking around the time I graduated from college when I moved into a "fancy grown-up" apartment with a spacious kitchen - the apartment complex had a security gate and everything!  My previous apartment was pretty much exactly what you'd expect from a crappy college apartment, so I really felt like I was living the good life.  My roommate was a guy I'd been friends with since my freshman year of college, and through him and his friends, I eventually met Joey (another story for another day).  So all in all, it was a great time in my life.

That winter, I attended several holiday parties:  a cocktail party with friends, my work party, family parties, random Friday night gatherings, etc.  And through them all, I became quite the creature of habit.  I brought a cold veggie pizza appetizer, and peppermint bark.  While peppermint bark is a pretty standard holiday offering, I felt like mine was super special - my "secret" was using half peppermints and half spearmints - fancy! 

It has been quite a while since I've made peppermint bark, so these cookies brought back a lot of memories of the old days.  Like my secret ingredient peppermint bark, this is a little different than the usual as well.  You have the standard melted chocolate, crushed mints, and white chocolate drizzle, but underneath that candy blanket lies a buttery, crisp, shortbread cookie.  It takes the ubiquitous holiday dessert up a notch or two, and is definitely a little unexpected.  I like to think of these peppermint bark cookies as sort of the evolution of the standard dessert.  It only seems natural to take a perfectly good piece of peppermint-studded chocolate and add a tasty cookie underneath, right?  Next to some of the fancy and frilly holiday cookies, simple peppermint bark can seem a bit humble and boring, so the evolution of turning it into a cookie helps it keep up with the Joneses.  Plus, it's really fun to cut and break it into jagged, irregular pieces.  :)

As Caroline and Smith helped me pat out the dough, crush the mints, and drizzle the chocolate, I thought about how much things have changed in what's really a short amount of time.  Back then, if you'd told me that I'd have FOUR kids, I would have laughed my young and wrinkle-free little head off.  But life's full of surprises, and just like peppermint bark, you adapt and evolve.  And in this case, I couldn't be happier to do just that.

Peppermint Bark Cookies
barely adapted from Bon Appetit, December 2009
makes approximately 36 cookies, depending on how you cut/break them
  • Nonstick cooking spray
  • 2 cups all purpose flour
  • 1/4 tsp kosher salt
  • 1 cup (2 sticks) unsalted butter, softened to room temperature
  • 1 cup sugar
  • 1 teaspoon vanilla extract
  • 1 large egg yolk
  • 6 ounces bittersweet chocolate, chopped
  • 1/2 cup (about 3 oz) finely chopped red-and-whitestriped hard peppermint candies or candy canes - a few pulses in the food processor 
  • 2 ounces white chocolate 


Preheat oven to 350°F. Spray 13 x 9 x 2-inch metal baking pan with nonstick spray, and line the bottom of the pan with a long strip of parchment paper.  Leave an overhang on both short sides of the pan.  

Whisk flour and salt in medium bowl and set aside. 

Using an electric mixer fitted with the paddle attachment, beat the butter in large bowl until creamy, about 2 minutes.  Gradually beat in sugar, and continue beating until the mixture is light and fluffy, about 3 minutes.  Beat in vanilla, then egg yolk. Gradually add flour mixture, beating on low speed just until it's combined.

Drop the dough by tablespoonfuls into prepared baking pan, spacing evenly. Using moistened fingertips, press dough to form even layer over bottom of pan, then pierce dough all over with a fork.

Bake the cookie base until it's light golden brown, slightly puffed, and the edges begin to come away from sides of pan, about 30 minutes. Remove from the oven and place the pan on a cooling rack.  iImmediately sprinkle the chopped chocolate over the cookie base, and let stand until the chocolate softens, about 3 minutes.  Using a small offset spatula, spread the chocolate over the top of the cookie in a thin, even layer.  Immediately sprinkle the chopped peppermint candies on top.

Stir white chocolate in medium metal bowl set over saucepan of simmering water until it is melted and smooth.  Remove from the heat, and using a fork, drizzle and drop the white chocolate over the cookies.  Alternatively, you can spoon the melted white chocolate into a pastry bag, cut a small hole at the tip, and drizzle it over the mints.  Chill until white chocolate is set, at least 30 minutes.

Using the paper overhang as an aid, lift the cookie from pan and transfer to a cutting board.  Use a large knife to cut the cookie into irregular pieces.


Sunday, October 13, 2013

Apple Cider Caramels


Raise your hand if you are or ever have been intimidated to make caramel.  It seems like kind of a scary thing to make, doesn't it?  Boiling sugar and butter until juuuuuust before it burns... it can be scary, for sure.  But if you follow a few essential guidelines, you'll be totally fine.  First and foremost, always alway always use a candy thermometer!  Also, don't walk away for even a second.  It can literally go from perfectly golden, delicious caramel to burnt and scorched sugar in the blink of an eye.  But if you abide by these two rules, you will be rewarded.

And if you make caramels that start with apple cider, you will be very handsomely rewarded.  I've had my eye on these caramels since the moment I laid eyes on them in The Smitten Kitchen Cookbook.  Deb even claims that this is her favorite recipe in the whole book!  In her words, these caramels are "everything I love about New York City in October [...] in one tiny square."  I've been to New York City in the fall, and I have to admit, there is something magical and indescribable about it.  And just as she says, these caramels somehow manage to embody that.

You start by boiling down the best apple cider you can get your hands on - preferably from an apple orchard or farm.  Once it's reduced to just a fraction of it's original volume, it will be syrupy, rich, and your house will smell absolutely amazing.  Next, you add butter, sugar, and cream, and boil it into a rich, amber caramel sauce.  Mix in cinnamon and sea salt, let the whole thing cool and set, and you will be treated to some pretty awesome caramels.

They are sweet - but not to sweet.  Salty - but not to salty.  And there's just a whisper of apple-spiced flavor lingering in the background.  These caramels are really something special.

These make a pretty amazing snack on their own, but if you are interested in a killer dessert and can keep yourself from eating them all in one sitting, then I have a pretty great recipe on deck.  I'll be sharing it later this week, so check back soon!


Apple Cider Caramels
barely adapted from The Smitten Kitchen Cookbook
makes about 64 caramels

  • 4 cups apple cider
  • 1/2 tsp ground cinnamon
  • 1 1/2 - 2 tsp flaky sea salt (fleur de sel)*
  • 8 Tbs unsalted butter, cut into chunks
  • 1 cup (200 grams) granulated sugar
  • 1/2 cup (11 grams) lightly packed light brown sugar
  • 1/3 cup heavy cream
  • neutral oil, for oiling the knife
Boil the cider in a 3-4 quart saucepan over medim-high heat, until it's reduced to a dark, thick, syrup, between 1/3 and 1/2 cup in volume.  This should take about 30-40 minutes.  Stir or swirl occasionally to prevent scorching.

Meanwhile, mix together the cinnamon and salt in a small bowl, and set aside; assemble the remaining ingredients as well, since once the caramel starts cooking, you won't have much time.  Line the bottom and sides of an 8-inch square baking dish with 2 long sheets of criss-crossed parchment.  Set aside.

Once the apple cider is reduced, remove from heat and stir in the butter, sugars, and heavy cream.  Return the pot to medium-high heat, and attach a candy thermometer to the side of the pot.

Bring to a boil and cook until the thermometer reads 252 degrees Fahrenheit, and immediately remove from heat. This should only take about 5 minutes, so keep a close eye on it.

Remove the candy thermometer and stir in the cinnamon-salt mixture.  Pour the caramel into the prepared pan, and set aside to cool completely.  This will take about 2 hours at room temperature, and less time in the fridge.  

Once the caramel is firm, use the parchment paper to transfer it to cutting board.  Lightly oil a sharp knife, and cut the caramel into 1x1 inch squares, oiling the knife after each cut.  

Wrap the caramels in 4-inch square pieces of wax paper, and store at room temperature.  

*The original recipe calls for 2 teaspoons of salt, but I found them to be have a slightly salty aftertaste. However, Joey thought they were perfect as-is, so I gave a range.  If you use a finer-grain salt (such as table or sea salt), then definitely use less than 2 teaspoons.   


Monday, December 12, 2011

Chocolate Chip Cookie Dough Fudge


Yes, really.  If that doesn't stop you dead in your tracks, then I don't think you're human.  This is serious stuff.  I have a family recipe that I use for standard fudge, but I like making fun and unique variations as well - peanut butter, pumpkin pie, and white chocolate have all been well-received in the past.  But I'm pretty sure this one surpasses them all.

This comes together pretty easily, and honestly the hardest part is waiting for it to set up!  The fudge was smooth and creamy, with the perfect cookie dough flavor.  This was my test batch, and it passed with flying colors - I'll definitely be including this candy in my holiday baskets.  The only change I'll make is to use mini chocolate chips instead of the full-sized ones.  I just think it will look cuter, and be a little bit easier to eat.

So head into your kitchen and make these now.  You definitely won't regret it.


Chocolate Chip Cookie Dough Fudge
barely adapted from Sweet Confections, via Bake at 350
  • 1 3/4 c. sugar
  • 3/4 cup brown sugar
  • 1/2 cup heavy cream 
  • 1/4 c. milk
  • 1 Tbs corn syrup
  • 3/4 tsp  kosher salt
  • 2 Tbs unsalted butter
  • 1 tsp vanilla extract
  • 1/2 cup flour
  • 1/3 cup mini semi-sweet chocolate chips
Spray an 8x8 inch  baking dish with cooking spray and set aside.

In a 3-quart saucepan, combine the sugars, cream, milk, corn syrup and salt.  Cook over medium heat, stirring occasionally, until the mixture reaches 242 degrees (ie the soft-ball stage).  Remove from heat and stir in the butter, vanilla, and flour.

Pour the mixture into a 9x13 inch casserole dish, and allow to cool until it reaches 110 degrees, 10 to 20 minutes.

Use a large spoon to scrape the mixture in the bowl of a stand mixer fitted with the paddle attachment.  Beat at medium speed until the fudge thickens and holds its shape, 3 to 5 minutes.  Transfer the fudge to the prepared 8x8 inch dish and smooth the top with a spatula.  Sprinkle the chocolate chips over the top, pressing them lightly into the fudge.

Allow to set at least 2 hours.  If it's not setting up, cover and refrigerate for a few hours.  Cut into squares and store in an airtight container.


Sunday, October 23, 2011

Mini Triple-Treat Cupcakes


How can you make a Reese's Peanut Butter Cup even better?  Encapsulate it in a peanut butter cupcake!  These cute little cupcakes are a super fun fall treat, and make a festive Halloween dessert.  And if you should happen to have leftover Reese's from trick-or-treating, this dessert would be a good use for them.  These call for candy corn to be used as decoration, but if you don't care for it, I think Reese's Pieces would be really cute as well.  Or you could just use some festive sprinkles.

Every year I like to make at least one fun Halloween treat, and this year I went pretty low-maintenance.  These come together really quickly - the most time-consuming step is unwrapping all the candy!  These would also be a fun treat to make with your kids.  They would also be a great treat to send it for their Halloween party at school, or to give to neighbors, etc.  Quick, easy, festive, and yummy - what else do you want in a holiday dessert?

And since I'm writing a post about Halloween, I can't help but to share a photo of me with my little pumpkins from the weekend.  We took a day trip to the north Georgia mountains for a picnic and a visit to the pumpkin patch.  It made me so excited for Halloween, and I can't wait to take Caroline (and Smith) trick-or-treating next week!As much as I dread the end of summer every year, fall is so much fun too.  Now if only we could skip winter and go straight to spring....

More fun Halloween Treats:
Halloween Candy Bark
Creepcakes
Pumpkin Yumkins
Pumpkin Pie Poptarts

Mini Triple-Treat Cupcakes
adapted from Everyday Food, October 2011
makes 48 mini cupcakes
  • 1 cup all-purpose flour
  • 1/2 tsp baking powder
  • 1/4 tsp salt
  • 1/2 cup peanut butter
  • 6 Tbs unsalted butter, softened
  • 1/2 cup brown sugar, packed
  • 1 large egg
  • 1 large egg yolk
  • 1/4 cup buttermilk
  • 1/2 tsp vanilla extract
  • 48 miniature Reese's peanut butter cups
  • 48 pieces candy corn
Preheat the oven to 350 degrees and line two 24-cup mini muffin pans with paper liners.

In a medium bowl, whisk together the lour, baking powder, and salt. 

In the bowl of a stand mixer fitted with the paddle attachment, beat together the peanut butter, butter, and brown sugar until pale and fluffy.  Beat in the vanilla, egg, and egg yolk, scraping down the bowl as needed.  With the mixer on low, beat in the flour mixture and the buttermilk just until combined. 

Place 2 teaspoons of batter into each muffin cup, then press a peanut butter cup into the center until the batter aligns with the top edge of the candy.

Bake until puffed and set, about 10 minutes.  Immediately press the candy corn into the top of each cupcake.  Let cool completely in the pans on wire racks before serving.


Wednesday, April 20, 2011

Peanut Butter Fudge Oatmeal Bars


I really love both oatmeal and peanut butter.  In fact, one of my favorite breakfasts is oatmeal with peanut butter.  It's a nice and healthy breakfast, and it's filling enough to keep me satiated until lunch.  So let me be obvious here:  these are not healthy.  Nor will one bar keep you full until lunch.  But 3 bars might - not that I tested that or anything...

So here's what we have:  an oatmeal cookie base, topped with a thick layer of peanut butter fudge, and then topped with crumbled oatmeal cookie dough and Reese's pieces.  Pretty intense.  I  made several changes from the original recipe based on my own preferences and what I had on hand.  I added peanut butter to the chocolate fudge layer, because I wanted more peanut butter flavor.  I also didn't have either M&Ms or Reese's cups on hand, though I did have almost a full bag of Reese's Pieces to use up.  Perfect!

I made these to send to a friend who had just had a baby, and I sent the rest to work with Joey (after taste-testing a few myself, obviously).  He told me they were gone before lunch, so I'd say everyone else enjoyed them as much as I did!


Peanut Butter Fudge Oatmeal Bars
adapted significantly from Pinch of Yum
makes 16 large bars, or 32 smaller ones
  • 1/2 cup + 2 Tbs unsalted butter, softened
  • 1 cup packed brown sugar
  • 1 egg
  • 1 tsp vanilla extract
  • 1 1/2 cups all-purpose flour
  • 1/2 tsp baking soda
  • 1/2 tsp kosher salt
  • 1 1/2 cups old-fashioned rolled oats
  • 1 14-oz can sweetened condensed milk
  • 12 oz semisweet chocolate chips
  • 2/3 cup creamy peanut butter
  • 1 tsp vanilla extract
  • Reese's pieces, for the topping
Preheat the oven to 350 degrees.  Line a 9-inch square baking pan with foil, leaving an overhang on 2 sides.

In the bowl of a stand mixer fitted with the paddle attachment, cream 1/2 cup of the butter with the sugar until well-combined.  Add the egg and vanilla, and mix well.  Turn off the mixer, add the dry ingredient (flour through oats), and mix at low speed until just combined.

Press two-thirds of the oatmeal mixture into the bottom of the pan, and set aside the rest for the topping.

In a medium saucepan, combine the remaining 2 tablespoons of butter, condensed milk, chocolate chips, and peanut butter.  Cook over medium heat until the chocolate and butter are melted, stirring often.  Remove from heat and stir in the vanilla.  Spread most of the chocolate fudge mixture over the oatmeal layer, using a spatula to spread evenly.  Save the remainder for hot fudge sauce, or use it all for a thicker layer.

Crumble the remaining oatmeal mixture over the fudge, then sprinkle with the candy.

Bake 15-20 minutes, until the topping is starting to brown.  They won't seem cooked all the way through yet at this point.  Allow to cool to room temperature, then refrigerate for at least 12 hours to set completely.  Cut into squares and serve, or store at room temperature.


Friday, December 10, 2010

Beth's Famous Fudge


"Beth was sweeter than her fudge."  These were the first words delivered at my grandmother's funeral.  And they rang true.  My grandmother, or rather step-grandmother really, though I never considered  her to be "step," was famous for both her loving nature and her fudge.  I've mentioned before that I have the best grandfather in the world, and his devotion to Beth is just one of the many reasons.  She had a series of strokes the day after Easter in 2004.  They left her paralyzed pretty much from the neck down.  She was admitted into a rehabilitation center, and lived there until she died in September of 2006.  Twice a day, every single day, Pop visited her for a minimum of 2 hours.  Every.  Single.  Day.  My sweet Pop was the most devoted husband I've ever seen.  And this was the second wife he'd buried.  I just marvel at that commitment and love, and I can only hope that Joey and I still feel that way about each other when we're old and gray (or bald, as in Pop's case)!

Every year she literally made dozens of pounds of her fudge.  It's nothing out of the ordinary - just a classic chocolate fudge, but there was something special about hers.  It was always the perfect consistency.  And super sweet - which some may complain about, but it's fudge.  What do you expect?  She would "grudgingly" say at Thanksgiving every year that it was time to start the great fudge-making extravaganza, and we all looked forward to Christmas because she always brought it to our gatherings.  And we'd usually smuggle some home.  Luckily, she shared her recipe with my mom, who has now shared it with me.

A candy thermometer is absolutely vital for this fudge:  if the mixture isn't hot enough, it won't set.  If its too hot, it will be grainy and dry.  So 238 degrees Farenheit exactly is what you want.  Other than that, it is very straightforward and simple:  Melt the sugar, marshmallows, butter, and milk together to reach 238, then mix in the chocolate, vanilla, and cream of tartar.  Easy peasy. 

With 5 cups of sugar, this is not for the faint of heart.  However, it is one of the most nostalgic treats out there for me, and I can't help but to feel closer to her when I make it.  In fact, I made a batch recently, and gave a tin of it to Pop for his birthday.  He was quite excited to be able to enjoy this fudge again after all these years, and now that Joey has proclaimed it to be "the best fudge ever," I hope to carry on her tradition for years to come.


Beth's Fudge
makes 5 pounds
  • 1 (15-ounce) can evaporated milk
  • 5 cups sugar
  • 1 package mini marshmallows
  • 2 sticks butter
  • 1 (12-ounce) package, plus 1/2 cup semisweet chocolate chips
  • 1 tsp cream of tartar
  • 1 Tbs vanilla extract
  • 2 cups nuts (optional)
In a large stockpot, melt together the milk, sugar, marshmallows, and butter over medium heat, stirring often.  Bring to a boil and heat to 238 degrees.  Meanwhile, line a 9x13 inch bakign dish with foil and spray with cooking spray.

Remove from heat, and using an electric mixer, beat in the chocolate chips, cream of tartar, and vanilla extract.  Fold in the nuts, if using.  Carefully but quickly, pour the mixture into the prepared pan, and use a spatula to smooth the top.  Allow to set before cutting into squares.


BLOG DESIGN BY: SHERBET BLOSSOM DESIGNS