Sunday, January 25, 2015

Skillet Chicken Tamale Pie

Skillet Chicken Tamale Pie

When I was growing up, one of my favorite dinners was tamale pie.  My mom made a vegetarian version, which still remains in my top 5 meals (sorry, I've been holding out -- I'll share it soon!).  In case you're unfamiliar with the concept of tamale pie, it's a baked casserole, the filling consisting of various vegetables, perhaps meat, Mexican spices, and topped with cornbread.  Yeah.  It's good.

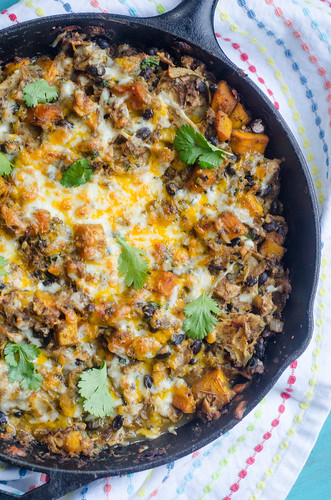
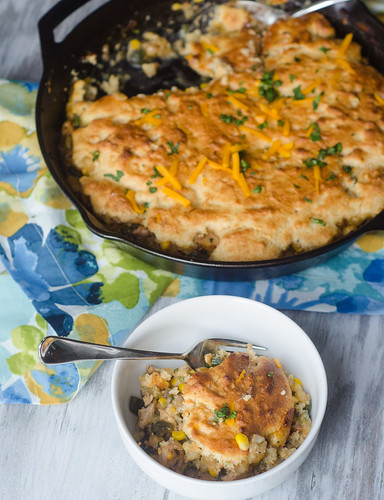
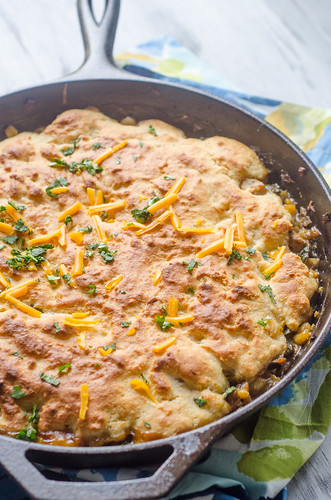
This version is pretty much a 180 from the tamale pie I had growing up, but I love it just as much.  The filling is chicken, poblano peppers, corn, hominy, and cheddar.  Topped with cornbread batter and baked, it is so comforting -- basically this is a Mexican-inspired chicken pot pie with cornbread instead of a pie crust on top.  As Ina would say, "How bad can that be?"

It's also a pretty light dinner, especially for something so filling and comforting.  It comes in at under 400 calories per serving, which makes this calorie-counting woman very happy.  Paired with a green salad, this made for a really wonderful dinner, and a few days worth of awesome lunches as well!

So I noticed that this is the third skillet dinner in a row that I've posted… hope you guys love them as much as we do!  Long live the skillet!


Skillet Chicken Tamale Pie 

Skillet Chicken Tamale Pie
adapted from America's Test Kitchen's Healthy Family Cookbook
serves 6

  • 1 lb boneless, skinless chicken thighs, trimmed of excess fat
  • kosher salt and freshly ground black pepper
  • 2 tsp canola oil
  • 1 onion, minced
  • 2 poblano peppers, stemmed, seeded, and chopped
  • 1 jalapeño, stemmed, seeded, and chopped (optional)
  • 3 cloves garlic, minced
  • 1 Tbs all purpose flour
  • 1 1/2 cups low-sodium chicken broth
  • 1 (15-oz) can hominy, drained and rinsed
  • 1 (7-oz) can mild chopped green chiles, drained
  • 1 cup frozen corn
  • 3/4 cup shredded extra sharp cheddar cheese
  • 1/4 cup minced fresh cilantro
Topping
  • 3/4 cup all-purpose flour
  • 3/4 cup cornmeal
  • 3 Tbs sugar
  • 3/4 tsp baking powder
  • 1/4 tsp baking soda
  • 1/2 tsp kosher salt
  • 3/4 cup buttermilk
  • 1 large egg
  • 1 Tbs unsalted butter, melted
  • 1/4 cup extra sharp cheddar cheese
Preheat the oven to 450 degrees.  

Pat the chicken dry and season liberally with salt and pepper.  Heat the oil in a 12-inch oven-safe skillet over medium-high heat.  Add the chicken and cook 6 to 8 minutes, flipping once, until it is golden-brown on both sides.  Transfer the chicken to a plate and leave the fat in the pan.

Add the onion, poblano, 1/2 teaspoon of salt, and 1/2 teaspoon of pepper to the pan and cook until it's softened and lightly browned, 5 to 7 minutes.  Stir in the garlic and flour and cook an additional minute.

Stir in the broth, hominy, chiles, and corn, and bring to as mimer.  Nestle the chicken in tot he mixture, cover, and reduce heat to medium-low.  Cook until the chicken is cooked through, about 10 minutes.

Remove the chicken from the skillet, and once it's cool enough to handle, shred it into bite-sized pieces.  Return the chicken to the skillet and stir to combine.  Stir in the cheddar and cilantro, taste, and season with additional salt and pepper if needed.  Remove from heat and cover to keep warm while you make the cornbread topping.

In a large bowl, whisk together the flour, cornmeal, sugar, baking powder, baking soda, and salt.  In a separate, smaller bowl, whisk together the buttermilk and egg.  Stir the buttermilk mixture into the flour mixture, just until no streaks of flour can be seen, then stir in the melted butter and cheddar cheese.  

Drop spoonfuls of the batter over the chicken filling, then smooth the top into an even layer, covering the filling completely.

Transfer the skillet to the oven and bake 15 to 20 minutes, or until the topping is golden and set.  Cool for 10 minutes before scooping into bowls and serving.


Thursday, January 22, 2015

Skillet Sausage and Kale Pesto Pizza

Sausage and Kale Pesto Pizza 

Pizza night is a regular occurrence around here.  I like to mix up the toppings and flavors, but the method is always the same.  Pizza stones for life, right?  However, this kale pesto and sausage pizza in the January Cooking Light caught my eye with the flavor combination, and then the method of cooking it in a skillet piqued my interest even more.  This method is super easy too - it starts on the stovetop to give you a nice crispy crust, then finishes under your broiler for maximum cheesiness.

I really loved this flavor combo as well.  Spicy sausage and earthy, nutty kale pesto.  At first I scoffed at the low amount of cheese, but truth be told, it was plenty.  It allowed the flavors of the pesto and sausage to shine through, while still providing the stretchy, cheesy goodness that we all expect and love from pizza.

Friday night is synonymous with pizza night, so if you're looking for a fun and different take on pizza, give this one a try!  Happy weekend!

Sausage and Kale Pesto Pizza 

Sausage and Kale Pesto Pizza
adapted from Cooking Light, January 2015

  • 10 oz prepared pizza dough
  • 1 link spicy Italian sausage, casing removed
  • 3-4 oz kale, chopped coarsely (about 3 tightly packed cups worth)
  • 1 tsp granulated sugar
  • 3 Tbs sunflower seeds
  • 1 garlic clove, crushed
  • pinch of crushed red pepper flakes
  • 3 Tbs extra virgin olive oil
  • 1 oz grated Parmesan cheese (about 1/4 cup)
  • 2 oz shredded mozzarella cheese (about 1/2 cup)
Bring the dough to room temperature.

Preheat the broiler to high.

Heat a 10-inch skillet (preferably cast iron) over medium high heat.  Cook the sausage, crumbing as you go, for 3-4 minutes, or until it's browned.  Remove from the pan.

Add the kale, 2 tablespoons of water, and the sugar.  Cover and cook for 2 minutes, or until the kale wilts.  Remove the kale from the pan and place on a lint-free kitchen towel or double layer of paper towels.  Squeeze to remove as much moisture as you can.  Remove the skillet from heat.

Pulse the nuts, red pepper flakes, and garlic in a food processor until finely chopped.  Add the kale; pulse until finely chopped again.  Add 2 tablespoons of the oil and process until it becomes a paste, adding 1-2 tablespoons of water if it's too thick.  Stir in the parmesan cheese.

Heat the remaining tablespoon of olive oil in the skillet over medium-high heat.  Roll the dough into a 10 1/2 inch circle and transfer to the skillet.  Press the dough light up the sides of the pan if you can.  

Top the dough evenly with the pesto, followed by the sausage and mozzarella.

Cook 2 minutes, then transfer the pan to the oven and broil 2 to 3 minutes, or until the cheese is melted.

Allow to cool 5 to 10 minutes, cut into 8 pieces, and serve.


Tuesday, January 20, 2015

Crock Pot Southern-Style Shrimp, Sausage, and Corn Stew

Crock Pot Southern-Style Sausage, Shrimp, and Corn Stew
Now that we are squarely into the new year, I've kind of established our routines for this semester.  New schedules, new after school activities, doctor appointments, fleeting daylight hours… there's a lot to contend with when planning our days and nights.  Caroline takes gymnastics on Monday evenings, so needless to say, getting a healthy dinner on the table at a decent hour has been a bit tricky.  Enter the crockpot.  Mondays have become our crockpot days.  And lucky for us, I have three pretty fabulous crockpot cookbooks, not to mention the dozens of recipes I've saved over the years.  So I don't think we'll be getting bored anytime soon!

This recipe was one of the first that caught my eye in the new Healthy Slow Cooker Revolution Cookbook.  Obviously I was drawn to the southern-style recipes, and this stew is loaded with corn, smoked sausage, and shrimp.  Not to mention plenty of other veggies to give it a nice nutritional boost. This stew is really healthy, coming in at 350 calories per bowl.  And it's obviously delicious.  What's not to love?  smoky sausage, sweet corn and shrimp, hearty brown rice, and just enough spice to give it a nice kick.

Do you have a designated crock pot night, or am I just a weirdo?

Crockpot Southern-Style Shrimp, Sausage, and Corn Stew
barely adapted from ATK's Healthy Slow Cooker Revolution
serves 6

  • 8 oz smoked sausage (or andouille for more heat), halved lengthwise and sliced 1/2 inch thick
  • 2 medium onions, chopped fine
  • 3 celery ribs, sliced 1/4-inch thick
  • 2 red bell peppers, stemmed, seeded, and chopped fine
  • 2 Tbs tomato paste
  • 4 cloves garlic, minced
  • 1 tsp Old Bay seasoning
  • 2 cups water
  • 2 cups chicken broth, plus more as needed
  • 1/2 cup brown rice
  • 2 Tbs instant tapioca
  • kosher salt and freshly ground black pepper
  • 12 oz shrimp, peeled, deveined, and chopped into 1-inch pieces
  • 4 cups frozen corn, thawed
  • 1-2 tsp hot sauce
In a microwave-safe bowl, combine the sausage, onions, celery, bell peppers, tomato paste, garlic, and old bay seasoning.  Stir well and cook in the microwave 8 to 10 minutes, stirring every 2 minutes.  

Transfer to the slow cooker and stir in the water, broth, rice, tapioca, and 1/2 teaspoon of salt.  Cover and cook on low for 3 to 5 hours (or 2 to 4 hours on high).

Stir the shrimp and corn into the stew, cover, and increase the heat to high.  Cook 15 to 20 minutes, or until the shrimp are cooked through.  If the stew is too thick, stir in some extra broth or water.  Stir in the hot sauce, and season to taste with salt and pepper.

Serve, passing the hot sauce around the table.


Sunday, January 18, 2015

Black Bean and Butternut Squash Enchilada Verde Skillet

DSC_0074

There are very few foods that Joey doesn't like.  He's always a good sport and eats anything I cook, but sometimes it is just with… less enthusiasm, if you will.  One such food is butternut squash.  I try to be a considerate wife, so I make an effort to limit meals that have butternut squash.  However, we received one in our produce delivery recently, so it was just begging to be used up and turned into something delicious.

If there's one way to make an unpalatable veggie palatable, then I'd say it's to Mexican-ize it! (yes, that's a word).  Mix it with black beans, chicken, salsa verde, plenty of cheese, and the standard smoky, spicy spices.  That'll do it, no question.

This quick and easy skillet dinner is a family-favorite for us, and it's not only a perfect one-pot weeknight meal, but it's healthy and filling.  The leftovers reheat beautifully (should you have any), so it's great for lunch too.

Joey's former most-hated vegetable was brussels sprouts, and now he actually requests them.  So there's hope for butternut squash yet!  In the meantime, there's this butternut squash enchilada skillet.

Black Bean and Butternut Squash Enchilada Skillet
adapted from Mel's Kitchen Cafe and Ambitious Kitchen
serves 4 to 6

The spiciness of your finished dish will depend upon the spiciness of your peppers and salsa.  However, stirring in a spoonful of greek yogurt or sour cream will help tame the spice, especially for little ones.

  • 1 tablespoon canola oil
  • 1/2 large yellow onion, chopped
  • 1 green bell pepper, seeds and ribs removed, chopped
  • 2 cloves of garlic, minced
  • 1 jalapeno, seeded and diced (optional)
  • 4 cups diced butternut squash (from a small to medium butternut squash that has been peeled and seeded)
  • 1 teaspoon kosher salt, plus more as needed
  • 1/2 teaspoon black pepper
  • 1 teaspoon ground cumin
  • 2 teaspoons chili powder
  • 1/2 cup water
  • 1 (15-ounce) can black beans, rinsed and drained
  • 8 yellow or white corn tortillas, each cut into 8 wedges or strips
  • 2 cups salsa verde
  • 2 cups cooked, chopped chicken
  • 1/4 cup chopped fresh cilantro
  • 3/4 cup freshly shredded Monterey Jack cheese
  • 3/4 cup freshly shredded extra sharp cheddar cheese
In a large, 12-inch nonstick skillet, heat the oil over medium heat and add the onion, bell pepper, and jalapeño (if using).   Cook 5 to 7 minutes, until it is translucent and softened, then stir in the garlic, salt, pepper, cumin, and chili powder.  Cook for about 1 minute.  Add the butternut squash and stir well to coat with the spices.  Cook for 3 to 4 minutes, then add the water.  Cover and cook until the squash is tender, an additional 5 to 6 minutes, stirring often.

Stir in the beans, tortillas and salsa. Bring the mixture to a simmer and cook for a 3 to 4 minutes. 

Preheat the broiler.

Add the chicken, cilantro and 1/2 cup each of the Monterey Jack and cheddar cheeses. Stir to combine. Taste and season with additional salt and pepper as needed, then sprinkle the remaining cheese over the top.

Transfer the skillet to the oven and broil until the cheese is melted and beginning to brown, 2 to 3 minutes.  Scoop into shallow bowls and serve, garnishing with more cilantro, greek yogurt, and/or avocado.


Tuesday, January 13, 2015

Roasted Winter Vegetable Chopped Chicken Salad

Roasted Winter Veggie Chopped Chicken Salad


Over the summer, I became totally obsessed with this grilled summer veggie chopped salad.  I made it once a week, on average.  My friend Annie made a riff on it and turned it into a fajita chopped salad, and that went into my rotation as well.  After the indulgences of the holidays, I've been reseting my diet, and I've majorly been craving that summer salad.  Zucchini and corn aren't exactly abundant these days, and it's too cold and rainy to grill, thus a seasonally appropriate winter roasted veggie salad was born.

Obviously you could use any combo of winter veggies here.  I happen to love roasted brussels sprouts and cauliflower together, so I went with that.  Carrots, butternut squash, sweet potatoes, onions, etc would also be lovely.  Or maybe even try roasting some apples or pears!  In lieu of the grilled romaine, I used a combination of chopped romaine and spinach.  However, if I'd had any kale on hand, I would have used that.  I think the hearty greens would work really well with the roasted veggies.

Roasted Winter Veggie Chopped Chicken Salad 

This was even easier than it's grilled counterpart, since you don't have to mess with preparing the grill.  I quickly seared the chicken on the stovetop, then finished it in the oven with the veggies.  I tossed it all together, along with some aged Gouda and lemon-garlic dressing.  This salad totally hit the spot.  The Gouda was an especially fantastic addition.

I've made it quite clear that I'm a summer-lover and a winter-hater, but this salad definitely makes the dreary weather more bearable.  I hope you enjoy it as much as I did!

Roasted Winter Veggie Chopped Chicken Salad 

Roasted Winter Vegetable Chopped Chicken Salad
serves 3-4

  • 12 oz brussels sprouts, stem-end cut off, halved, and quartered if large (about 3 cups of chopped sprouts)
  • 1/2 head cauliflower, cut into florets (about 2 1/2 cups)
  • 1/4 cup olive oil, plus 2 tsp
  • 3 cloves garlic, minced
  • kosher salt and freshly ground black pepper
  • 1/4 tsp red pepper flakes
  • 2 boneless, skinless chicken breasts, trimmed of excess fat
  • zest and juice of 1/2 lemon
  • 1 romaine heart, halved lengthwise and chopped into bite-sized pieces
  • 3-4 cups roughly chopped fresh spinach
  • 1/2 cup freshly grated aged Gouda
Preheat the oven to 400 degrees.  

In a small bowl, whisk together 1/4 cup of the oil, garlic, 1/2 teaspoon of salt and 1/2 teaspoon of pepper, and red pepper flakes.  Toss the brussels sprouts and cauliflower with 1 tablespoon of this mixture, then arrange in a single layer on a rimmed baking sheet.

Heat the remaining 2 teaspoons of oil in a skillet set over medium high heat.  Pat the chicken dry and season both sides with salt and pepper, then cook 2 to 3 minutes per side, until golden-brown.  

Place the chicken on the baking sheet with the vegetables, and cook for 10 minutes.  Turn the chicken over, stir the vegetables, and return the pan to the oven.  Cook an additional 5 to 10 minutes, or until the  vegetables are tender chicken is cooked through (check after 5 minutes, and take it out if it's reached 160 degrees in the center).  

Meanwhile, whisk the lemon zest and juice into the olive oil-garlic mixture.  Season to taste with additional salt and pepper.

Allow the chicken to rest for 5 minutes, then chop into large dice.  

Toss the romaine and spinach with the dressing, then gently mix in the vegetables, chicken, and gouda. Taste and season with additional salt and pepper if needed, and serve warm or at room temperature.


Sunday, January 11, 2015

Funfetti Sugar Cookie Bars

Funfetti Sugar Cookie Bars

While it only feels like two days ago, two years ago I posted about the birth of our twins, Henry and Tucker.  Those tiny, wrinkly, cuddly little babies that completed our family.  I'm going to try and keep it together and not turn this into a sob-fest of a post, but OMG HOW in the world are my babies two years old?!

I remember waxing poetic last year on their birthday.  I talked about how insuperable they were, how sweetly they played together, how they did everything at the same time, together.  Things are much different now.  They've grown into their own distinct little people. And while they don't seem to connect on the same level they did as infants, they are still each other's best friend.


Tucker has a big personality; he wears his heart on his sleeve already, and lives life with so much passion.  His highs are high and his lows are low. His cheeks are the most kissable cheeks I've ever kissed, and he will forever be my little cuddle-bug.  He loves being held and cuddled, and Joey and I like to call him "the lego."  Because when you pick him up and hold him on your hip, he just fits perfectly.  He snaps right into position like a little lego.


And Henry.  Sweet sweet Henry.  The baby of my babies.  He has such an innocence about him, and the most angelic little face.  He seems to experience the world on a different wavelength than most of us.  He has the softest, sweetest little voice, and I dare you to look into his big brown eyes without melting.  But don't let them fool you:  he's all boy, and climbs, jumps, runs, and roughhouses more than you'd believe.  He's always on the go, and he doesn't stay in one place for long.  But when he slows down, sits down, and lays his head on my shoulder…. it's the best feeling in the world.

My favorite time of day is getting the boys up from their nap.  They are hanging out in their cribs, and when I open their door, they stand up, grab the crib rail, and start jumping and laughing.  These boys turned our lives upside down, but somehow they also turned them right side up.  I can't imagine the world without Henry and Tucker, and I feel so lucky that I get to be their mom.

We celebrated Henry and Tucker's second birthday this weekend, and I'll be sharing all the details of their party very soon.  But for now, I want to share these funfetti sugar cookie bars.  They have become a bit of a tradition in our family.  I love making them to send to school for birthday treats for all the kids.  Cupcakes can be messy, but these are smaller and more portable, yet still just as cute.  And come on - find me a kid who doesn't love sprinkles?!

These have not only become birthday treats for our family, but I make them anytime I need a last-minute dessert to take somewhere.  They are equally adaptable as far as colors go, so they can be festive for any holiday or occasion!  I've made them for Valentine's Day, Christmas, soccer parties using team colors, and Halloween; and I foresee them being made using school colors for football games, spirit days, and the like as the kids get older.

These bars are so easy, so fun, and most importantly, absolutely delicious.  Sprinkles make everything fun!

Funfetti Sugar Cookie Bars

Funfetti Sugar Cookie Bars
adapted from  Smells Like Home

  • 2 1/2 cups all-purpose flour
  • 1/2 tsp salt
  • 1/4 tsp baking soda
  • 1/2 cup (1 stick) unsalted butter, at room temperature
  • 1 cups sugar
  • 2 large eggs
  • 1 tsp vanilla extract
  • 3 Tbs sprinkles
Preheat oven to 350° F. Lightly grease a 9x13 inch baking dish and set aside. 

Whisk the flour, salt, and baking soda together in a large bowl; set aside.

In the bowl of a stand mixer fitted with the paddle attachment, beat the butter and sugar together on medium-high speed until light and fluffy, about 2 minutes. Beat in the eggs one at a time, beating well after each addition and scraping down the bowl as needed. Mix in the vanilla.

Turn off the mixer and pour the dry ingredients into the bowl along with the sprinkles. On low speed, combine the dry ingredients into the wet ingredients, mixing until they are just incorporated.

Lightly press the dough into the prepared baking sheet. Bake for 10 to 15 minutes, until a toothpick inserted into the center of the pan comes out clean. The bars will still look pale with barely a hint of browning around the edges. 

Transfer the pan to a wire rack to allow the bars to cool completely in the pan.

Whipped Vanilla Frosting
  • 1 cup (2 sticks) unsalted butter, at room temperature
  • 2 cups confectioners' sugar, sifted
  • 2 tbsp heavy
  • 1 tsp vanilla extract 
  • Pinch of salt
  • Food coloring (gel, liquid, or paste), if you want colored frosting
In the bowl of a stand mixer fitted with the paddle attachment, beat the butter for 6 to 8 minutes on medium speed; it will be very pale and light. Add in the sugar, milk, vanilla, and salt and mix on low for 1 minute and then on medium speed for 6 minutes; the frosting will be very light and fluffy. If using food coloring, blend it in until it is fully incorporated.

Use an offset spatula to frost the fully-cooled bars in the pan.  Use a sharp knife to slice them into your desired size and shape, garnish with more sprinkles, and serve.


Tuesday, January 6, 2015

Bourbon-Braised Steaks with Chipotle Sweet Potatoes (Crock Pot Meal)

Bourbon-Braised Steaks with Chipotle Sweet Potatoes (crock pot) 

Let's go ahead and get it out of the way by saying that this dinner will never win a beauty pageant.  It's just not pretty food.  But it's definitely tasty food.  Say this with me.  "Bourbon-Braised Steaks with Chipotle Sweet Potatoes."  And then say this with me.  "Crockpot."  Meaning, you throw a bunch of stuff together in the morning, then come home to an amazing and delicious dinner waiting for you.  Oh and also:  this is under 500 calories per serving, so you can still keep your New Year's healthy eating resolutions.

You use a very inexpensive cut of meat, blade steak.  It is pretty tough, but when cooked low and slow, it becomes fork-tender.  Seriously, I wish I'd taken a picture of it "cut" to show you.  It basically turns into your own little individual pot roast.  But a pot roast that's served with a bourbon sauce.  And over sweet-spicy chipotle sweet potatoes.

You guys know I'm a major fan of the America's Test Kitchen Slow Cooker Revolution cookbooks, and they just released a new one, which focuses on healthy dinners.  One of the major issues I have with a lot of crock pot recipes is that you end up trading healthy for convenience.  This cookbook is full of lightened up crockpot recipes - from lightened up versions of some favorite comfort foods to lean proteins, to vegetables, healthy soups and stews… it's really awesome.  I can't wait to make more from it, and if this recipe is any indication, it may very well become my favorite cookbook!


Bourbon-Braised Steaks with Chipotle Sweet Potatoes (crock pot) 

Bourbon-Braised Steaks with Chipotle Sweet Potatoes
adapted from ATK's Healthy Slow Cooker Revolution
serves 4

  • 1 medium yellow onion, chopped
  • 1 Tbs tomato paste
  • 1 tsp canola oil
  • 1/2 tsp ground coriander
  • 1 clove garlic, minced
  • 1/2 cup reduced-sodium beef broth
  • 1/4 cup bourbon or whiskey
  • 1 Tbs worcestershire sauce
  • 2 tsp instant tapioca
  • 4 (6-8 oz) beef blade steaks, trimmed of all visible fat
  • kosher salt and freshly ground black pepper
  • 2 lbs sweet potatoes, peeled and cut into 1-inch pieces
  • 1 chipotle chile in adobo sauce, finely chopped
  • 1 tsp grated lime zest
  • 1 Tbs lime juice
  • 1/4 cup milk
  • minced fresh cilantro
In a microwave-safe bowl, stir together the onion, tomato paste, oil, coriander, and garlic.  Cook 5 minutes, stirring occasionally, until the onion is softened.  Transfer to the slow cooker.

Stir in the broth, bourbon, Worcestershire sauce, and tapioca.  Generously season both sides of the steaks with salt and pepper, and nestle them into the slow cooker as well.

Loosely tie the sweet potatoes in a cheesecloth bundle;  Gently lay the bundle on top of the steaks.

Cover and cook until the steaks are fork-tender and the potatoes are cooked through and tender as well, 8 to 9 hours on low or 5 to 6 hours on high.

Carefully transfer the potatoes to a large bowl.  Mash with a potato masher until they are mostly smooth, then stir in the chipotle, lime zest and juice, and milk.  Season with salt and pepper to taste.  

Transfer the steaks to a serving platter and cover loosely with foil.  Rest for 5 minutes.  Meanwhile, use a spoon to skim off any visible fat from the top of the sauce, then transfer the sauce to a small bowl.

Serve the steaks over the potatoes, and spoon the sauce over the top.  Garnish with cilantro.


Sunday, January 4, 2015

Baked Pasta with Cauliflower in a Spicy Pink Sauce

Baked Pasta with Cauliflower in a Spicy Pink Sauce 

I know it's January, and that means resolutions, healthy eating, and no carbs.  Thus, I bring you a cheesy, creamy, baked pasta dish.  Sorry not sorry.  There is cauliflower in here though, so… it balances out, right?  In all seriousness, this is a decadent, hearty, filling, and comforting dinner.  One that will definitely stick to your ribs on a cold winter night.

This is a pretty basic baked pasta dish, with just a few add-ons that catapult it into the "super delicious" category.  First, the spicy pink sauce.  A simple marinara sauce is amped up with the addition of a little cream and some red pepper flakes.  The rich cream pairs nicely with the spiciness from the pepper.  Secondly, it uses fontina instead of mozzarella, which gives it a slightly creamier, more complex flavor. Finally, the addition of cauliflower not only adds a textural counterpoint to the soft and tender pasta, but it balances out some of the richness as well.  I served this as a vegetarian main course, but I think some spicy sausage would be great it here as well, or even just served alongside the pasta.

Despite having several components, this does come together pretty easily.  However, I see no reason why you couldn't assemble it ahead of time and bake it when you're ready for dinner.  Just add a few extra minutes to the baking time.

And then have a salad on the side.  Because you know, resolutions and all.

Baked Pasta with Cauliflower in a Spicy Pink Sauce 

Baked Rigatoni with Cauliflower in a Spicy Pink Sauce
barely adapted from Fine Cooking
serves 6 to 8


  • 3 Tbs olive oil
  • 2 (28-oz) cans whole tomatoes
  • 1 large yellow onion, halved and thinly sliced
  • 1 1/4 tsp kosher salt
  • 4 cloves garlic, minced
  • 1/2 cup heavy cream
  • 1/4 cup chopped fresh flat-leaf parsley
  • 1/2 tsp crushed red pepper flakes
  • 1 lb dried pasta, such as rigatoni or corkscrews
  • about 4 cups small cauliflower florets (from 1 large head)
  • 2 1/2 cups shredded Fontina cheese (about 10 oz)
  • 2 oz freshly grated Parmigiano- Reggiano (about 3/4 cup)


  • Position a rack in the center of the oven and heat the oven to 450°F . Grease a 9x13-inch baking dish with 1 Tbs. olive oil.

    Pour off 1 cup of juice from one of the cans of tomatoes and discard it. In a blender or food processor, purée both cans of tomatoes with their remaining juice and set aside.

    Heat the remaining 2 Tbs olive oil in a large skillet over medium-high heat. When the oil is shimmering, add the onions and 1/4 teaspoon of the salt and cook, stirring occasionally, until nicely browned, 5 to 10 minutes. Add the garlic and pepper flakes and cook until fragrant, about 1 minute.

    Add the puréed tomatoes and cream (be careful; it will splatter), plus the remaining 1 teaspoon of salt. Bring to a boil over medium-high heat, reduce to a gentle simmer, and cook for 15 minutes, stirring occasionally, so that the sauce thickens slightly. Taste for salt and pepper and remove from the heat and stir in the parsley.

    Meanwhile, bring a large stockpot pot or Dutch oven of water to a boil and add 1 tablespoon of salt. Add the pasta and cook  until it’s al dente, 8 to 10 minutes. During the last 2-3 minutes of cook time, add the cauliflower and cook with the pasta.  Drain well and return to the pot.  Stir in the tomato sauce and 1 1/2 cups of the Fontina cheese.  Mix well to combine.
    Transfer to the prepared baking dish and spread evenly. Top the pasta with the remaining 1 cup Fontina and then the Parmigiano-Reggiano.

    Bake uncovered until the cheese is golden brown, about 15 minutes. Cool for 10 minutes before serving.


    BLOG DESIGN BY: SHERBET BLOSSOM DESIGNS