Tuesday, June 30, 2009

Triple Tomato Risotto with Zucchini


I have to admit that one of my favorite dishes to make is risotto. I just love all the combinations and flavors you can play with, and there is something relaxing about standing at the stove just stirring and stirring. Maybe its because I take that as an opportunity to drink a glass of wine while I cook?

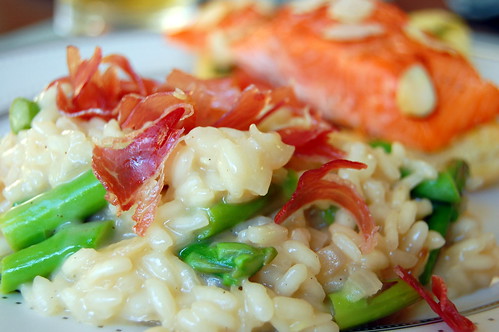
Anyway, my inspiration for this risotto was the abundance of beautiful summer vegetables we have access to right now. Vine-ripe tomatoes and herbs from my garden, and the zucchini and yellow tomatoes I picked up at a farmers' market today. Either way, this was such a wonderful side dish, but I think it would be a great main course if you add some salmon or grilled Italian sausage.

Triple Tomato Risotto with Zucchini
basic method for risotto from Giada de Laurentiis

  • 2 Tablespoons unsalted butter, divided
  • 1 Tablespoon extra virgin olive oil
  • 1/2 sweet yellow onion, diced
  • 3/4 cup Arborio rice
  • 3/4 cup dry white wine
  • 3 cups low-sodium chicken stock
  • 1 zucchini, quartered and sliced
  • 2 teaspoons each mixed herbs (I used basil and oregano)
  • 1/2 cup low sodium tomato juice
  • 1/2 yellow tomato, seeded and diced
  • 1/2 vine-ripe tomato, seeded and diced
  • 1/2 cup freshly grated Parmesan cheese
Heat chicken stock in a small saucepan until simmering.

Melt butter and heat olive oil in a large, heavy bottom skillet. Add the onion, and cook until transluscent, about 3-4 minutes. Add the rice and toast, stirring constantly, 2-3 minutes. Pour white wine into rice and allow to almost completely evaporate.

Add about 3/4 cup chicken stock to risotto, and stir constantly until the liquid has almost completely been absorbed. Continue to add the chicken stock and stir until the rice is cooked through, but still slightly al dente, about 20 minutes total.

Before the final addition of cooking liquid, add the zucchini and herbs. After all the chicken stock has been added, stir in the tomato juice, and allow to evaporate slightly. Mix in the diced tomatoes, remaining tablespoon of butter, and parmesan cheese. Serve immediately.


Barefoot Bloggers: Gazpacho


Better late than never, right? I actually made this recipe early, but with the craziness that was last week, never got around to posting.

I've made gazpacho once before, and I pretty much just winged it. It tasted good, but I thought it had the texture of salsa. Adding the tomato juice and olive oil really turned it into a soup. I put my own spin on Ina's version, adding some fresh herbs, and leaving some of the veggies coarsely chopped to add in at the end. I also didn't add as much tomato juice. The first time I served it, I used crackers to dip into the soup, and when we had it with dinner, I roasted some shrimp and topped it with some freshly shaved Parmesan. My changes are reflected below.

Thanks to Meryl of My Bit of Earth for choosing this recipe. It was refreshing, light, and delicious.

Gazpacho
Serves 4-5
  • 1 hothouse cucumber, halved and seeded, but not peeled
  • 2 red bell peppers, cored and seeded
  • 4 plum tomatoes
  • 1 red onion
  • 4 cloves garlic, minced
  • 2 cups tomato juice
  • 1/4 cup white wine vinegar
  • 1/4 cup extra virgin olive oil
  • 1 1/2 teaspoon kosher salt
  • 1/2 teaspoon freshly ground black pepper
  • 2 teaspoons each fresh basil, parsley, and oregano
  • juice of one lemon
Roughly chop the cucumber, bell peppers, tomatoes, and red onions into 1-inch cubes. Set aside 1/4 cup of each vegetable. Put each vegetable separately into a food processor, and process until it is coarsely chopped. Do not overprocess!

After each vegetable is processed, combine them in a large bowl and add the reserved vegetables, garlic, tomato juice, vinegar, olive oil, salt, pepper, herbs, and lemon juice. Mix weland chill before serving. The longer the gazpacho sits, the more the flavors develop. Top with


Tuesday, June 23, 2009

Baked Shrimp with Tomatoes and Feta


Confession time: I have a fear of cooking shrimp and scallops. I don't know why. I'm just afraid of undercooking them and making us violently ill. Also, deveining the shrimp grosses me out. Who would have thought you could buy it already peeled and deveined?! Okay it seems like everyone knows that but me.

Anyway, now my fears are gone! I made this super simple and light dinner on Monday night. The shrimp were juicy and perfectly cooked, the tomato sauce was rich and sweet, and the feta gave the whole dish a nice punch. I served this over brown rice. Crusty bread is also a necessity to sop up the delicious sauce.

Baked Shrimp with Tomatoes and Feta
Adapted from Ellie Krieger, The Food You Crave, page 234
Serves 2


  • 1/2 Tablespoon olive oil
  • 1/2 medium onion, diced (about 3/4 cup)
  • 2 cloves garlic, minced
  • 1/4 cup dry white wine
  • 1 14.5-ounce can no-salt-added diced tomatoes, undrained
  • 1/4 cup finely minced flat-leaf parsley
  • 1 Tablespoon finely minced fresh dill
  • 1 Tablespoon finely minced fresh oregano
  • 3/4 lb medium shrimp, peeled and deveined
  • 1/4 teaspoon salt, plus more to taste
  • 1/4 teaspoon freshly ground black pepper
  • 1/3 up crumbled feta cheese
Preheat the oven to 425.

Heat oil in an ovenproof skillet over medium-high heat. Add the onion and cook, stirring until softened, about 3 minutes. Then add garlic and cook for one minute. Remove pan from heat and add the wine, stirring until almost evaporated.

Add the tomatoes and bring to a boil. Reduce heat to medium-low and let simmer for about 5 minutes, until the juices begin to thicken.

Remove from heat. Stir in the parsley, dill, oregano, and shrimp, and season with salt and pepper. Sprinkle the feta over the top. Bake until the shrimp are cooked through, and the cheese begins to melt, about 10-12 minutes.


Monday, June 22, 2009

Father's Day Breakfast: Buttermilk Chocolate Chip Pancakes with Homemade Strawberry Syrup


Yesterday was Father's Day, and we enjoyed a lazy morning. I'm sure it wouldn't have been quite so lazy if Caroline had slept for more than 5 hours, but that's another story. We hemmed and hawwed almost all morning about what to eat for breakfast/brunch - should we go out to eat, eat in, or just wait and make something for lunch? Finally Joey decided that he wanted chocolate chip pancakes. I let him have this day to make the decisions. 364 days a year is plenty for me ;-)

I broke out my trusty Better Homes and Gardens Bridal Edition, and went to work. Seriously, I don't know why people even bother with mixes when homemade are sooo much better and really, not much more work anyway. I topped my stack with homemade strawberry syrup (recipe will follow), and sprinkled some extra chocolate chips on top. Joey said they are better than J. Christoper's, his previous favorite. :-)

They were light and fluffy, but tasted rich and buttery at the same time. There are so many variations you could make - blueberry, strawberry, apple-cinnamon, bacon and cheese, the list goes on and on.

Buttermilk Chocolate Chip Pancakes
adapted from Buttermilk Pancakes, BH&G Bridal Edition, page 128-129

  • 1 cup all-purpose flour
  • 1 Tablespoon sugar
  • 1 teaspoon baking powder
  • 1/4 teaspoon baking soda
  • 1/4 teaspoon salt
  • 1 egg, beaten
  • 1 cup reduced fat buttermilk
  • 2 Tablespoons canola oil
  • 1/2 cup semi-sweet chocolate chips, plus more for garnish
Combine the flour, sugar, baking powder, baking soda, and salt. Make a well in the center of the flour mixture; set aside. Combine the egg, buttermilk, and oil. Add egg mixture all at once to flour mixture. Stir until just moistened (batter will still be lumpy). Gently stir in chocolate chips. Add additional buttermilk to thin batter, if necessary (I didn't add any extra)

Pour 1/4 cup batter into a 3-inch circle onto a hot, lightly greased griddle or heavy skillet. For silver-dollar sized pancakes, use a tablespoon of batter. Cook over medium heat about 2 minutes on each side or until golden brown, turning to second side when pancakes have bubble surfaces and edges are slightly dry.

Garnish with desired toppings, and serve warm.


Home Grown Tomatoes!


This is the first year (of many, I hope) that I've done any gardening. I started out about as simply as can be - 2 tomato plants, basil, oregano, and rosemary. So far my oregano is flourishing, and my basil is doing surprisingly well. Rosemary is so sturdy, its pretty hard to mess that one up!

So the fruits of my labor are paying off, and I picked my first 2 ripe tomatoes yesterday - YAY! Joey was excited to play around with the camera, and I will be using these 2 babies (and more if they ripen in time) in a kick-butt gazpacho later this week.


Saturday, June 20, 2009

Cupcake Sliders and Sugar Fries!


These little treats are popping up all over the place this summer, and with good reason. Seriously, how cute is this? I saw it over at Bakerella, and I couldn't wait to try it out. It really wasn't incredibly difficult or time consuming, so long as you plan ahead. I made the cupcakes Friday morning, and Joey's mom made the brownies. We mixed up the icing colors as the fries baked, and then we were ready to assemble! So much fun, and a great dessert to take to a summer cookout.

We pretty much followed her instructions step by step, and she gives a great picture tutorial, so I'm just going to link over to her site. I'm going to attempt her cupcake pops for Caroline's party next weekend... we'll see how they turn out!

Bakerella's Fast Food Fun


Thursday, June 18, 2009

BB BRC: Cranberry Orange Scones


I joined a great blogging group called Barefoot Bloggers. Twice a month we cook up an Ina Garten recipe. This week's was a Bonus Recipe, which was chosen by Em of The Repressed Pastry Chef. I have been cooking and baking out of my Barefoot Contessa cookbooks for years, so I was very excited that my first recipe was one I hadn't tried yet. I am starting to gain more confidence in baking, as for so long I was mostly into cooking. The exactness and the techniques really made me nervous. Especially pastry for some reason.

These scones were flaky and buttery and delicious. I don't know if you've ever had a bad scone, but my first scone experience was awful - dry and hard. I was actually turned off scones for years. I couldn't understand why anyone would actually want to eat that!

Overall I'm really happy with how these turned out. My only complaint was that they seemed to spread as they baked, but i'm sure that's something I did wrong. I also think I glazed them too early, becaus the glaze pretty much melted into the scone. Also, given some of the comments on the Barefoot Bloggers site, I decided to add extra orange zest to give a stronger orange flavor, and less cranberries to compete with the orange. I've reflected those changes below. I'd love to try these as orange and dark chocolate or blueberry or raspberry with lemon.


Cranberry Orange Scones


  • 4 cups plus 1/4 cup all-purpose flour
  • 1/4 cup granulated sugar, plus more for sprinkling
  • 2 Tbsp baking powder
  • 2 teaspoons kosher salt
  • 2 Tbsp orange zest
  • 3/4 pound (3 sticks) cold, unsalted butter, diced
  • 4 large eggs, lightly beaten
  • 1 cup cold heavy cream
  • 1/2 cup dried cranberries
  • 1 egg beaten with 2 Tablespoons water, for egg wash
  • 1/2 cup plus 2 Tbsp confectioners sugar
  • 4 tsp freshly squeezed orange juice
Preheat oven to 400 degrees line baking sheets with parchement paper.

In the bowl of an electrice stand mixer fitted with the paddle attachment, mix 4 cups of flour, 1/3 cup sugar, the baking powder, salt, and orange zest. Add the cold butter and mix at the lowest speed until the butter is the size of peas. Combine the eggs and heavy cream and, with the mixer on low speed, slowly add to the four and butter mixture. Mix until just blended. The dough will look lumpy!

Combine the dried cranberries and 1/4 cup of flour, add to the dough, and mix on low speed until blended.

Dump the dough onto a well-floured board and knead it into a ball. Flour your hands and a rolling pin and roll the dough just under 1-inch thick. You should see small bits of butter in the dough. Keep moving the dough onthe floured board so it doesn't stick. Flour a 3-inch round cutter and cut circles of dough. Place the scones on the prepared baking sheet. Collect the scraps neatly, roll them out, and cut more circles.

Brush the tops with the egg wash, sprinkle with granulated sugar, and bake for 20-25 minutes, until the tops are browned and the insides are fully baked. The scones will be firm to the touch.

Allow the scones to cool for 15 minutes and then whisk together the confectioners' sugar and orange juice and drizzle over the scones.


Wednesday, June 17, 2009

Honey Cumin Glazed Pork Tenderloin


Mmmmmmm grilled pork tenderloin might just be my new favorite dinner. Throw together the marinade in the morning, slap it on the grill with a sweet glaze, and just wait for your meat thermometer to read 160-165. How much easier is it than that?

The honey-cumin glaze for this pork really seals in the flavor, and allows for beautiful caramelization. Joey said he was never a fan of pork tenderloin until he had mine - I love getting compliments like that! I served this with the watermelon and feta salad below and my "famous" baked sweet potato fries. Which led us to the discovery that Caroline now prefers sweet potatoes to her previous favorite food, blueberries. She passed right over her blueberries and polished off her sweet poatoes in no time flat!

Honey-Cumin Glazed Pork Tenderloin

  • 1 pork tenderloin, trimmed of fat and membrane
  • 1/4 cup low sodium soy sauce
  • 3 Tbsp honey
  • 1 tsp lime zest
  • 1 tsp ground cumin
  • 1/2 tsp chile powder
  • 1/2 tsp garlic powder
  • 1/4 tsp kosher salt
  • 3 Tbsp canola oil
For the glaze:
  • 2 Tbsp honey, warmed
  • 1 tsp ground cumin
  • 1/2 tsp chile powder
Combine the ingredients for the marinade in a large ziploc bag. Season pork with salt and pepper, and add to bag. Massage marinade into pork through the bag, and refrigerate several hours.

Heat grill to medim heat. Remove pork from marinade, and brush both sides with honey glaze. Grill until a thermometer inserted in the thickest part of the meat reads 160-165 degrees F, turning once (I flipped it after about 10 minutes). Remove from heat, cover with foil, and allow to rest 15 minutes before slicing.


Watermelon and Cherry Tomato Salad with Feta and Basil Oil


I have seen watermelon and tomato salads popping up all over the place lately, from Top Chef to my new Giada cookbook, Giada's Kitchen. I didn't really follow a recipe for this; just kind of flew from the hip.

I actually made a tomato and onion salad a few weeks ago from a recipe in the latest Cook's Illustrated, and it recommeded that you halve the cherry tomatoes, season with salt, and allow them to strain for about half an hour. This will keep them from getting soggy in the salad by draining out excess moisture. I also drained the entire dish before mixing in feta and serving, since the watermelons give off a LOT of water (obviously); so the salad wasn't too wet.

I really enjoyed it and thought it was a great, refreshing summer salad. The sweetness and freshness of the watermelon make a great foil to the salty feta. Adding cherry tomatoes and basil make it so refreshing and light. I will definitely be making this again.

Watermelon and Cherry Tomato Salad with Feta and Basil Oil


  • 1 1/2 cups cherry tomatoes, halved
  • 3/4 tsp kosher salt, divided
  • 1 1/2 cups watermelon chunks, seeded and cut to approximate size of tomatoes
  • 3 Tbsp fresh basil
  • 3 Tbsp extra virgin olive oil
  • 1 tsp white wine vinegar
  • 1/2 tsp lime zest
  • 1 tsp freshly squeezed lime juice
  • 1/2 cup crumbled feta
salt tomatoes with about 1/2 tsp salt, and allow to strain about 30 minutes. Meanwhile, cut watermelon and allow to come to room temperature. Combine basil, olive oil, 1/4 tsp salt, vinegar, lime zest, and lime juice in a blender or small food processor. Process until well blended. Add tomatoes to the watermelon, and stir in the basil oil. When ready to serve, salad to remove extra water, and gently fold in feta.


Tuesday, June 16, 2009

Eggs Bruschetta


I am a huge fan of breakfast food. I absolutely love brunch - sweet, savory, whatever - I want it all! I made this egg dish out of leftover ingredients. Sometimes, those dishes turn out the best!

Eggs Bruschetta

  • 1/4 loaf Italial bread - sliced cross-wise and then lengthwise
  • 2 eggs + 2 egg whites.
  • 1/4 cup fresh mozarella, cut into cubes
  • 3 Tbsp basil, chiffonade
  • 3 Tbsp tomatoes, diced and seeded
  • 3 Tbsp proscuitto, diced
  • salt and pepper to taste
  • splash of milk
Hollow out the loaf of bread to leave about an inch border on all sides. Reserve the bread pieces for a later use (I pulsed mine down to use next time I need bread crumbs). Broil 1-2 minutes, until just crispy

Cook proscuitto in a nonstick skillet, until it begins to crisp. Set aside

Combine eggs and egg whites. Season with salt and pepper and a splash of milk. Scramble until no longer runny, and fold in the mozarella.

Fill the bread boat with egg mixture, and broil 1-2 more minutes, until cheese begins to melt. Top with tomatoes, basil, and proscuitto.


Wednesday, June 10, 2009

Turkey Sausage and Herb Stuffed Shells

Growing up, my family had a rule that on your birthday, you got to choose your favorite dinner for my mom to make. Without fail, every year, I chose stuffed shells. No question, this was my absolutely favorite meal. Back in those days, however, I was a vegetarian (another story, another post) so mine were always made sans meat. Actually, I never even asked my mom for her recipe, but stuffed shells are stuffed shells, right? I've just taken a basic recipe and vamped it up by adding lots of fresh herbs, spinach, and turkey sausage. I served this alongside a spinach salad with cherry tomatoes, shaved parmesan, and crispy proscuitto and roasted garlic garlic bread.


Turkey Sausage and Herb Stuffed Shells

For the filling
  • 1 lb turkey sausage, casing removed
  • 1 15-oz container part skim ricotta cheese
  • 1 egg
  • 2 tsp garlic powder
  • 1/2 cup freshly grated parmesan cheese
  • 1/2 cup shredded mozarella cheese
  • 1/2 cup chopped spinach
  • 2 Tbsp each fresh rosemary, oregano, basil, and parsley (you could really use any herbs, this is just waht I grow in my garden)
  • 1/2 tsp salt
  • 1/4 tsp pepper
Brown the sausage in a large skillet, breaking into small pieces. Meanwhile, combine the remaining ingredients. Add cooked sausage to the cheese mixture, and set aside.

For the sauce

Of course you can always use a jar of marinara, but I just like making my own. Plus, I have leftover to freeze for another use.

  • 2 cloves garlic, finely chopped
  • 1/4 cup red wine (optional)
  • 1 28-oz can crushed tomatoes
  • 1 14.5-oz can diced tomatoes, drained
  • 1-2 Tbsp tomato paste
  • 2-3 Tbsp chopped mixed herbs (fresh or 1-2 tsp dried)
  • 1/2 tsp salt
  • 1/4 tsp pepper
  • 2 Tbsp balsamic vinegar
Using the same skillet as the sausage, add garlic and saute 1-2 minutes until fragrant. Remove pan from heat and add wine, using a wooden spoon to scrape the browned bits from the bottom of the pan. Add the remaining ingrendients and stir to combine. Allow to simmer 15-20 minutes.
  • For the shells
  • 1/2 box jumbo shells
  • 1 cup shredded mozarella
  • 1/2 cup grated parmesan
Cook shells in boiling water, 7-9 minutes. Do not let them cook all the way, as they will complete cooking in the oven. Spread a thin layer of sauce on the bottom of a 9x13 dish or 2 8x8 square baking dishes. Stuff each shell with a few tablespoons of the sausage, herb, and cheese filling, and place them in baking dish. Spoon spaghetti sauce over the shells, and top with cheese. Cover with foil and bake at 375 for 30 minutes, removing the foil for the last 10 minutes.


Tuesday, June 9, 2009

Anniversary Dinner - Salmon on Puff Pastry and Champagne Risotto


Our second annivesary fell on a Tuesday. Instead of arranging a sitter, fighting traffic, and being out late on a weeknight, we opted to stay in and enjoy a nice dinner. I greeted Joey at the door with a scotch on the rocks and a platter of proscuitto wrapped melon for him to munch on while I finished dinner. I turned to Giada De Laurentiis for inspiration for a romantic modern Italian meal. I finally decided on Salmon with Puff Pastry and Pesto and Champagne Risotto.

The salmon was absolutely delicious. The combination of the smooth salmon with the fresh pesto and the flaky puff pastry was to die for. Add some toasted almonds for a nice crunch and a sliced tomato to tie it all together, and you have a great meal. This would be a great meal for entertaining. It presents elegantly, but is very simple to throw together. You could make it even easier by buying prepared pesto. The recipe serves 4, but I halved it for just the 2 of us.

The risotto was by far my favorite part of the meal. The creamy texture of the rice, the salty parmesan cheese, crunchy asparagus, and crispy and salty proscuitto all came together for a really fantastic dish!

This meal really put a new spin on the traditional salmon and asparagus!

Salmon with Puff Pastry and Pesto

  • 1 sheet frozen puff pastry, thawed
  • 2 (10-12 oz) center-cut salmon filets
  • salt and pepper to taste
  • 1/4 cup sliced almonds
  • 1/4 cup pesto
  • 2 tomatoes, sliced
  1. Preheat the oven to 400 degrees F. Line a baking sheet with foil or parchment.
  2. Unfold the puff pastry sheet on a cutting board and use a sharp paring knife to cut 4 4 1/2 inch squares. Prick each square all over with the tines of a fork. Arrang ethe squares on one end of a baking sheet about 1 inch apart.
  3. Cut the salmon filets crosswise to make 4 pieces about 3 inches square. Season with salt and pepper and arrange on the other end of the baking sheet.
  4. Sprinkle each filet with 1 Tablespoon of the sliced almonds.
  5. Bake 10-12 minutes, or until the pastry is puffed and golden brown and the salmon is firm.
  6. Place a piece of pastry on each plate. Top with 1 Tbsp of the pesto. Arrange 2 slices of tomato over the pesto and top with the salmon. Serve immediately.

Champagne Risotto

  • 4 thin slices proscuitto
  • 3 cups low sodium chicken broth
  • 12 asparagus spears, cut diagonally into 1-inch pieces
  • 2 Tbsp unsalted butter
  • 1 shallot, finely chopped
  • 3/4 cup Arborio rice
  • 3/4 cup champagne
  • 1/4 cup freshly grated Parmesan cheese
  • 1/4 tsp salt
  • 1/2 tsp freshly ground pepper
  1. Preheat the oven to 450. Place the proscuitto slices on a lightly greased baking sheet. Bake until they are almost completely crisp, 6-8 minutes. The slices will crisp up even more as they cool. Set aside.
  2. In a medium saucepan, bring the chicken broth to a boil. Reduce heat and simmer the broth.
  3. Blanch the asparagus spears in the broth for 2 minutes. Remove with a slotted spoon. Set the asparagus aside and keep the broth at a low simmer.
  4. In a large, heavy bottom skillet, melt 1 Tbsp butter. Add the shallot and cook until tender, about 3 minutes. Add the Arborio rice and stir to coat inthe butter. Continue toasting the rice, stirring constantly, about 3 minutes.
  5. Add the champagne and simmer until the liquid is almost evaporated, about 3 minutes.
  6. Add 1/2 cup of the broth and stir until almost completely absorbed by the rice, about 2 minutes.
  7. Continue cooking the rice, adding broth 1/2 cup at a time, stirring constantly and allowing each additon of broth to absorb before adding the next, until the rice is tender but still firm to the bite and the mixture is creamy, about 20 minutes total. Remove from heat.
  8. Gently stir in the asparagus, the remaining tablespoon of butter, the Parmesan, salt, and pepper. Spoon the risotto into serving dishes and garnish by breaking the crisp proscuitto into smaller pieces over the risotto.


Welcome to my blog!

Welcome to Pink Parsley! I hope you will find something that interests you. I am a 27 year old stay at home mom to a sweet baby girl. Cooking and baking has been a hobby of mine for quite some time, and now I want to share some of my creations and ideas with you. I aim to make meals as fresh and "whole" as possible by using fresh, seasonal, and local ingredients whenever I can. But of course I don't always succeed. You'll also find some decadent desserts and special treats throughout the blog as well. I love experimenting with new recipes and creating my own spin on old standbys. Bon Apetit!


BLOG DESIGN BY: SHERBET BLOSSOM DESIGNS