Thursday, February 28, 2013

Honey-Cinnamon Scones


I know I'm not the only one who does this - but one of my worst habits is failing to read recipes all the way through before I start cooking.  Especially if it's something basic or familiar.  Like these scones, for example.  I figured, "Hey, they're scones!  I'll whip them up before bed, then freeze them overnight, pop them in the oven first thing, and we'll have fresh scones for breakfast tomorrow.  Easy peasy!"  What I failed to realize, however, is that these scones are no ordinary scones.  I should have known better based purely on the fact that they come from Thomas Keller's Bouchon Bakery cookbook.  There are multiple steps and chills, and while none of it is difficult, it is time-consuming.  Lucky for me, I was able to work these in in-between middle of the night feedings, and it wasn't so bad.   And when we woke up Sunday morning, they were ready to be baked and enjoyed!

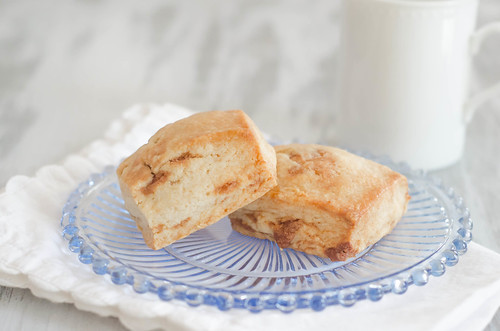
Worth it?  Absolutely!  The scones themselves were soft and tender, and rose sky-high during baking. The little pockets of honey-cinnamon butter were little bursts of flavor.  And as they came out of the oven, the scones were brushed with honey butter for some extra sweetness.


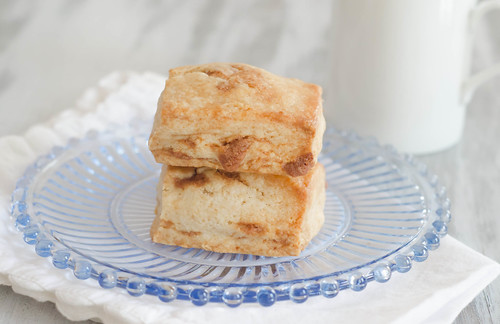
There are a few interesting aspects to the recipe as well.  The scones use part all-purpose flour, and part cake flour.  This helps them achieve a lightness that would be present in a cake or cupcake, but the sturdiness that you expect from a scone.  Typically when I make scones, the butter is cut into the flour, but not fully incorporated, so as to create a light and tender product.  In this recipe, the butter is fully incorporated into the dry ingredients.  Though because of the multiple chills and the cubes of honey-cinnamon butter, the scones are still light and tender.  As for the multiple chills, first the honey-cinnamon butter is frozen, then cut into small cubes.  After being incorporated into the scone dough, the dough is shaped into a large rectangle and chilled again.  And finally, the scones are cut and frozen solid before baking.  All of this results in a uniquely delicious scone.  The spice of the cinnamon plays nicely off the sweetness of the cinnamon.

These were a nice treat for a Sunday morning.  And since I only baked half and froze the other half, they can be a lovely treat any day of the week!


Honey Cinnamon Scones
barely adapted from Bouchon Bakery
makes 12 large scones

The ingredients are given in weight and volume below, but I highly suggest using the weight measurements, as they will produce a superior end result.

Honey-Cinnamon Butter Cubes

  • 30 g (3 Tbs) all-purpose flour
  • 30 g (2 1/2 Tbs) sugar
  • 1 1/2 tsp ground cinnamon
  • 30 g (about 2 Tbs) cold, unsalted butter, cut into 1/4-inch cubes
  • 20 g (1 Tbs) clover honey
Scone Dough
  • 152 g (1 cup + 1 1/2 Tbs) all-purpose flour
  • 304 g (2 1/4 cup + 2 Tbs) cake flour
  • 12.5 g (2 1/2 tsp) baking powder
  • 2.5 g (1/2 tsp) baking soda
  • 91 g (1/4 cup + 3 1/2 Tbs) granulated sugar
  • 227 g (8 oz) cold, unsalted butter, cut into 1/4-inch pieces
  • 135 g (1/2 cup + 2 Tbs) heavy cream
  • 135 g (1/2 cup + 2 Tbs) creme fraiche, sour cream, yogurt, or buttermilk
Honey Butter Glaze
  • 4 Tbs melted butter
  • 1 Tbs honey
For the Cinnamon-Honey Cubes:  Place the flour in a medium bowl.  Sift in the sugar and cinnamon and whisk to comine.  Add the butter cubes, and toss to coat.  Using your (clean) fingers, break up the butter until no large pieces remain.  Mix in the honey using a spatula, mixing until a smooth paste forms.

Press the paste into a 4-inch square on a sheet of plastic wrap.  Wrap tightly and freeze until solid, at least 2 hours.  this can also be prepared and frozen for up to 1 week.

When ready to make the scones, cut the butter paste into 1/4-inch cubes and chill until ready to use.

For the Scones:  Sift the flours, baking powder, baking soda, and sugar into the bowl of a stand mixer fitted with the paddle attachment.  Mix on the lowest setting for about 15-20 seconds to combine.  

Add the butter and, on the lowest setting, pulse to begin incorporating it into the dry ingredients.  Increase the speed to the low and mix for about 3 minutes, or until no large pieces remain.

With the mixer running, slowly pour in the cream.  Add the creme fraiche (or substitute) and mix for about 30 seconds, or just until all the dry ingredients are moistened and the dough comes together around the paddle.  Scrape down the sides of the bowl and the paddle, and pulse a few times to combine.

Using a wooden spoon, stir in the honey-cinnamon butter cubes.  They may begin to break up a bit, but that's okay.  It will give the finished product a marbled look.

Dump the dough onto a lightly-floured surface, and mound the dough to form a cohesive dough.  Place the dough between 2 pieces of plastic wrap, and using your hands, form it into a 7x10 inch block, smoothing the top and straightening the edges.  Transfer to a cookie sheet and refrigerate for 2 hours or freeze for about 30 minutes, or until the dough is firm.

Line a baking sheet with a silpat or parchment paper.  Using a sharp knife, cut the block of dough lengthwise into thirds and crosswise into quarters, creating 12 square scones.

Arrange the scones on the prepared baking sheet, leaving a small space between them.  Cover with plastic wrap, and freeze until frozen solid, at least 2 hours, but preferably overnight (the scones can be frozen for up to 1 month).

When ready to bake, preheat the oven to 350 degrees for a standard oven, or 325 degrees for a convection oven.  Line a sheet pan with parchment paper, and arrange the scones 1-inch apart.  Bake 28 to 30 minutes (standard) or 20 to 23 minutes (convection), or until the scones are cooked through and lightly golden-brown on top.

As the scones bake, whisk together the honey and melted butter.  Brush the tops and sides of the scones with the honey butter as soon as you take them out of the oven.  Serve.  

The scones are best eaten the day they are made, but can be stored in a covered container for 1-2 days.  


Sunday, February 24, 2013

Tomato Florentine Soup


Ever since Caroline was just a few months old, I've had a standing tradition with my mother-in-law to meet for lunch on Tuesdays.  We almost always go to the exact same place.  It's now Caroline's favorite restaurant, and she always asks to go to "The old restaurant with paintings on the wall."  It's not anything groundbreaking, but they do really excel at lunch:  their french fries are the best.  They have great chicken salad sandwiches and burgers.  And really awesome tomato-basil soup.  We order it quite often, and one day, a few years ago, Caroline reached over and dunked her grilled cheese sandwich in it like it was nothing.  See, even at two years old, Caroline knew what to do.  Ever since then, I pretty much always order the tomato soup and give half of it to her for dunking (and subsequent slurping).  

When I made this soup for lunch one weekend, I told Caroline we were having tomato soup.  Upon serving her a bowl, her first response was that it wasn't the "right" tomato soup.  Meaning, it's not the same one she's used to.  But let me tell you - there's nothing wrong with this soup.

It's a cruel irony that when you crave tomato soup - when it's cold, rainy, and dreary - it's nowhere near tomato season.  This soup combats that by using canned diced tomatoes.  I chose to use fire-roasted because I think they are just awesome.  In order to extract more flavor from them, they are sautéed with butter and onions, then the soup is built upon that base - garlic, a little sugar, tomato paste, and red pepper flakes.  It's then bulked up by the addition of small pasta and finished off with lots of spinach.  It's hearty, healthy, and totally comforting.  And as if I even need to tell you - but a grilled cheese is required with this (and any) tomato soup.

Tomato Florentine Soup
adapted from The America's Test Kitchen Quick Family Cookbook

the soup will thicken upon cooling, so you may need to add a little extra broth when reheating.

  • 2 Tbs unsalted butter
  • 3 (14.5 oz) cans fire-roasted diced tomatoes, drained and juice reserved
  • 1 medium onion, chopped fine
  • 1 Tbs tomato paste
  • 1 Tbs packed brown sugar
  • pinch of red pepper flakes
  • 2 Tbs all-purpose flour
  • 3 garlic cloves, minced
  • 4-5 cups low-sodium chicken broth or vegetable broth
  • 4 oz (1 cup) small macaroni, ditalini, or tubettini
  • 10 oz (10 cups) fresh baby spinach
  • kosher salt and freshly ground black pepper
Melt the butter in a Dutch oven set over medium-high heat.  Add the tomatoes and onion, and cook until the tomatoes are dry and begin to brown, 10-12 minutes.  

Add the tomato paste, brown sugar, red pepper flakes, flour, 1 teaspoon of salt, 1/2 teaspoon of pepper, and garlic, and cook until fragrant, about one minute.  Slowly whisk in the broth and reserved tomato juice, scraping up any browned bits and smoothing out lumps as you go.

Stir in the pasta and bring to a boil.  Reduce heat to a simmer and cook until pasta is tender, 10 to 12 minutes, stirring occasionally.

Stir in the spinach and cook until wilted, 1to 2 minutes.  Taste and season with salt and pepper as needed.  Serve.


Thursday, February 21, 2013

Chai-Milk Chocolate Ice Cream


Remember like 10 years ago when Chai tea lattes first became popular?  They were all the rage in college, and for good reason.  I don't particularly like hot tea - for whatever reason I feel like it's too bitter - but the latte I could get behind - syrup, milk, and whipped cream?  I'm totally on board with that.    And it just so happens that I love tea in desserts.  While the bitterness is what makes me dislike drinking tea, it's actually what makes me like it in desserts.  I know it sounds counterintuitive, but it somehow balances the sweetness and gives a nice complexity of flavor.

Anyway, I also love chocolate with cinnamon, so I knew that I would love this spiced chocolate ice cream.  The spices of chai tea - cardamom, cloves, peppercorn, cinnamon, and star anise - just subtly infuse this impossibly smooth, ultra chocolatey ice cream.  Because it uses milk chocolate instead of dark, the spices are able to be detected.  I think if you used a darker chocolate, the tea would get lost in it.  As it is, the spice is pretty subtle - just enough there to keep things interesting and make you wonder what exactly it is that makes this ice cream taste so good.

I have made a lot of ice creams, and this is easily one of the richest and creamiest I've eaten.  It is so luxurious and decadent, and the infusion of the chai tea makes it feel quite exotic.  I just love it, and Caroline did too.  So much so that she felt the need to photo bomb it :)


Chai-Milk Chocolate Ice Cream
adapted from Sweet Cream and Sugar Cones
makes about 1 quart
  • 4 bags chai tea (individual tea bags)
  • 1 1/4 cups heavy cream
  • 1 cup 1% or 2% milk
  • 1/4 cup sugar
  • 1/4 tsp kosher salt
  • 5 large egg yolks
  • 6 oz milk chocolate, chopped
In a medium saucepan, bring the cream, milk, sugar, and salt to a bare simmer - when the mixture just begins to bubble around the edges, remove from heat and add the tea bags, cover, and allow to steep for about an hour.

To make the base, whisk the yolks in a medium heat-proof bowl and set aside.  Place the chopped chocolate in another heat-proof bowl, and set that aside as well.

Remove the tea bags from the saucepan, squeezing them to remove as much liquid as possible, and set the pan over medium-high heat.  When the mixture just comes to a simmer, reduce the heat to medium.  

Carefully scoop out about 1/2 cup of the hot cream mixture and, whisking the eggs constantly, add the cream to the bowl.  Repeat, adding another 1/2 cup of the cream to the yolks.  Doing this allows the eggs to begin cooking slowly and making a custard, rather than scrambling them.

Slowly whisk the egg-cream mixture into the saucepan.

Cook the mixture over medium heat, stirring constantly with a rubber spatula, until it has thickened and coats the back of the spatula, about 1 to 2 minutes.

Pour the mixture into the bowl of chopped chocolate, wash your whisk, and whisk until the mixture is smooth.

Strain the mixture through a fine-mesh strainer into a clean bowl.  Set the bowl into an ice-water batch, and stir the base occasionally until it is cool.  Remove from the water bath, cover with plastic wrap, and refrigerate at least 2 hours, or overnight.

Freeze in your ice cream machine according to the manufacturer's instructions.  As the ice cream churns, put the container that you plan to use to store the ice cream into the freezer.  Transfer the ice cream to the container and freeze for at least 4 hours before serving.


Monday, February 18, 2013

On the Side - February


I've had several people ask for baby pictures, etc, so in lieu of peppering my food posts with babies, I thought I'd do a monthly post with some pics, some stories, and a few things I'm loving these days.


It's hard to believe that the twins are almost 6 weeks old - it really is SUCH a blur.  They are growing and changing every day, and as they become more interactive and alert, we fall more and more in love with them.  Here's a belly shot at 36 weeks, and here we are on my actual due date.  Pretty amazing.


Aside from a few things to hang on the wall, the nursery is finally finished!  The glider is in our room right now since they are still sleeping with us, but we'll be moving it to the nursery soon, and it will go on the wall under the gallery.


 Henry took a nap in his crib recently, and he was so sweet and small!


Smith has been obsessed with the babies lately.  He loves to lay on the floor with them during tummy time.  And  a few weeks ago, they were all coincidentally wearing the same pajamas.  That's what happens when multiple people get the babies ready for bed!  And as a side note, is there anything cuter than a baby in footed PJ's?

And I can't forget about this pretty girl!  Caroline's the best big sister, and she watches out for all of her baby brothers.

And now for a few things I've been loving lately...

When I was in the hospital, the nurses brought me cran-grape juice.  I quickly became obsessed with the grape and raspberry flavors, and proceeded to buy my weight in it when we got home.  I know it's not the healthiest option, but at least it's 100% juice, and it tastes great during the middle-of-the-night feedings.

Aden + Anais baby products.  They are made out of muslin, and super soft.  We use the burp cloths, swaddling blankets, and the crib sheets.  As an added bonus, the more you wash them, the softer they become.  And I love the subtle patterns that aren't so cutesy and babyish.


I have a history of break-outs and sensitive skin, and am always trying new treatments and face washes.  I always buy the acne-prone or oily skin formulas, but my skin was getting dry over the summer.  I tried Korres milk protein cleanser, and it is awesome - I think I was using too strong of products before, which was making my skin worse.  This stuff leave my face feeling clean and soft, and I haven't had any major break outs since I started using it.

Since I spend the majority of my days and nights nursing, I watch a lot of daytime tv.  I've been watching episodes of What Not to Wear, and I love it.  I used to watch it a lot in college, but my love has been rekindled.  I just love Clinton and Stacey!

If you are a fan of Pinot Noir like I am, you must try Van Duzer Estate.  Oregon Pinot Noirs are my favorite, and this has been a favorite of ours for a few years.   We are talking about making a trip to the Willamette Valley in a few years, so if anyone is familiar with that area, we'd love recs!

I hope you guys have enjoyed this little installment - we'll return to regularly scheduled posting later this week!


Monday, February 11, 2013

The Baked Brownie


You hear of pregnancy cravings, but is a postpartum craving a legitimate thing?  Because if so, I've had one for brownies ever since the twins were born.  A month ago (sidenote - they are already a month old??).   Understandably, my baking time is limited, so I just recently got around to fulfilling my craving.  And I have three words for you:  worth the wait.

These brownies are pretty famous.  Oprah has included them in her list of "Favorite Things."  America's Test Kitchen declared them to be the best brownies ever.  As did the Today show.  Dozens of bloggers have agreed.  This is the ultimate brownie.

Here's what makes these brownies stand out (in my humble opinion):  Five eggs.  Five.  This helps give them that chewy, fudgy perfection that I love so much in a brownie.  Eleven ounces of dark chocolate - making them intensely chocolately.  Espresso powder - brings out the chocolate flavor.  Dark cocoa powder - again, more chocolate.  And ever so slightly underbaking them - by just a minute or two.  This helps them retain that wonderful chewiness.  Otherwise, you're getting into dry, cakey territory.  And nobody wants that.

A few things to note:  in order to achieve brownie greatness, use the highest quality chocolate you can. Please, no Baker's Chocolate!!  Also, be sure your eggs are at room temp, and don't over mix them when you whisk them into the batter.  I stopped whisking just before they were fully incorporated, since I would be mixing in the flour next, and I figured the eggs would be completely incorporated through that.  And finally, be very careful not to over bake them.  I took mine out when they were still slightly under baked, and it produced the best brownie I've ever eaten.  Err, the best 12 brownies that I've ever eaten...

... and just as a PSA, these brownies make an excellent snack at 3am if you should happen to be awake and hungry.... not that I'm speaking from experience or anything.


The Baked Brownie
barely adapted from Baked, by Matt Lewis and Renato Poliafito
yield:  24 brownies

  • 1 1/4 cups all-purpose flour
  • 1 tsp salt
  • 2 Tbs Dutch process cocoa powder
  • 11 oz dark chocolate (60 to 72% cacao), coarsely chopped
  • 1 cup (2 sticks) unsalted butter, cut into tablespoon pieces
  • 2 tsp instant coffee (or 1 tsp instant espresso powder)
  • 1 1/2 cups granulated sugar
  • 1/2 cup firmly packed brown sugar
  • 5 large eggs
  • 2 tsp vanilla extract
Preheat the oven to 350 degrees and butter the sides of a 9x13 inch baking dish (the empty butter wrappers work really well for this).

In a medium bowl, whisk together the flour, salt, and cocoa powder.

Combine the chopped chocolate, butter, and instant coffee in a large microwave-safe bowl.  Microwave the ingredients at 20-30 second intervals, stirring well after each time.  When the chocolate is melted, whisk in the granulated and brown sugars.  The mixture should be room temperature.

Add 3 eggs to the chocolate mixture and whisk until combined.  Add the remaining 2 eggs and the vanilla, and whisk until just incorporated.  

Sprinkle the flour mixture over the chocolate and use a spatula to fold it into the chocolate mixture, stopping when just a little flour is still visible.

Pour the batter into the prepared pan and smooth the top.  Bake for 25-30 minutes, rotating the pan halfway through baking time.  When a toothpick inserted in the center comes out with a few crumbs sticking to it, remove the brownies from the oven.  I started checking them around 23 minutes, and took them out around 26 I think (my oven tends to cook things a little faster).  Cool completely, then cut into squares.


Wednesday, February 6, 2013

Red Velvet-Strawberry Cupcakes


Valentine's Day means all-things red velvet.  You can be traditional and go with cake or cupcakes, or you can step outside the box and red velvet-ize other desserts:  brownies, cobblers, cheesecake, oreos...  These cupcakes fall somewhere in between.  It's a no-frills (yet still fantastic) red velvet cupcake base.  But instead of the typical cream cheese frosting, I topped these with strawberry cream cheese frosting.  They still have all the familiar flavors, but with extra sweetness from the strawberries.  The tangy, slightly chocolatey flavor of the cupcake really pairs well with the tangy-sweet frosting.  And aren't they festive?  The only thing more festive than a red velvet cupcake is a red velvet cupcake with pink frosting.

When I initially tasted one of the cupcakes, I didn't think the strawberry flavor was very prominent.  But the next day, it was much stronger.  So I'd recommend making the frosting at least one day before you plan to serve them.

I hope everyone has a wonderful Valentine's Day, filled with lots of kisses and chocolate!!


Red Velvet Strawberry Cupcakes

Red Velvet Cupcakes
adapted from Saveur magazine, via Annie's Eats and Apple a Day
makes about 24 cupcakes

I've tried several recipes for red velvet cake, and this one is my favorite - both for flavor and ease of preparation.  It has the perfect balance of sweetness, richness, and tang.  And the color is so pretty!

  • 2½ cups cake flour
  • 1½ cups sugar
  • 1 tsp baking soda
  • 1 Tbs cocoa powder
  • 1 tsp salt
  • 2 large eggs
  • 1½ cups vegetable oil
  • 1 cup buttermilk
  • 2 Tbs (1 oz.) liquid red food coloring
  • 1 tsp vanilla extract
  • 1 tsp distilled white vinegar
Preheat the oven to 350 degrees and line two cupcake pans with paper liners.

In a large mixing bowl, whisk together the cake flour, sugar, baking soda, cocoa powder, and salt.  Set aside.

In the bowl of a stand mixer fitted with the paddle attachment, mix the eggs vegetable oil, buttermilk, food coloring, vanilla, and vinegar until well combined, about 1-2 minutes.  With the mixer on low speed, slowly add the dry ingredients, and mix until just combined and smooth.

Divide the batter evenly among the liners.  Bake 18-20 minutes, or until a toothpick inserted in the center of a cupcake comes out clean.  Cool for about 5 minutes in the pan, then transfer to a cooling rack to cool completely.

Strawberry-Cream Cheese Frosting
  • 2 cups chopped fresh strawberries
  • 1-2 tsp granulated sugar
  • 12 ounces cream cheese (still cold - not softened)
  • 8 Tbs unsalted butter, softened
  • 2 tsp vanilla extract
  • 3 3/4 cups confectioners sugar, sifted

Puree the strawberries and sugar in a food processor, then strain the puree through a mesh strainer to remove the seeds.

Cream the butter and cream cheese in the bowl of a stand mixer fitted with the paddle attachment, until creamy and smooth, 2-3 minutes.  Add the vanilla extract.  Gradually add the confectioners sugar over low speed, and when well combined, increase to medium.  Add the strawberry puree 1-2 tablespoons at a time, until you've reached desired flavor, consistency, and color.  Beat until smooth.  

Chill the frosting for about 30 minutes before piping or spreading onto cupcakes.


Sunday, February 3, 2013

(Crock Pot) Quinoa Chicken Chili


We've been extremely spoiled since the twins were born.  We've had tons of people graciously bring us dinner, and I've barely had to even think about what to eat for lunches for dinners for weeks.  While the food blogger and home cook in me misses cooking dinner every night, the new mom in me greatly appreciates it.  The boys' "schedule" is so unpredictable, that I never know when they'll be eating.  And with two other little ones to feed, having meals ready to go has been a huge blessing.

However, I did manage to fit this chili in a few weeks ago.  And it was the perfect meal for us.  I threw everything in the crockpot in the morning while the twins were napping, then it was ready to eat when Caroline and Smith declared that they were ready for dinner.

I have a few slow cooker recipes that are a bit high maintenance - requiring cooking ingredients first on the stovetop, chopping tons of veggies, etc.  But this one is so so easy.  It's also super healthy, and full of protein - something I definitely need a lot of these days.

I chose to keep it somewhat mild this time around, both for kids' palates, and the babies' tummies.  But feel free to amp up the spice-factor.  This was a big hit with our whole family, and it made for excellent leftovers throughout the week for lunch.  I know I have several recipes for chili on here, but I'm a firm believer that you can never have too many options - and now this one is definitely a contender for my favorite!


Slow Cooker Quinoa Chicken Chili
adapted from Sweet Treats and More
serves 4-6

  •   1 cup quinoa, rinsed
  •   1 (28 oz) can crushed tomatoes
  •   1 (14 oz) can diced tomatoes with green chilies (Rotel)
  •   2 (16 oz) can black beans
  •   2.5 - 3 cup chicken stock
  •   1 large bell pepper, seeded and chopped
  •   1/2 large onion, diced 
  •   1-2 jalapeño peppers, seeds and ribs removed, diced
  •   1 Tbs canola oil
  •   1 tsp garlic powder
  •   1 1/2 tsp cumin
  •   1/2 tsp crushed red pepper
  •   2 tsp tsp chili powder 
  •   1 tsp salt
  •   2 large chicken breasts
  •   1 cup frozen corn, thawed
  •   hot sauce, to taste
  •   1/4 cup chopped fresh cilantro
Combine the quinoa, crushed tomatoes, diced tomatoes, black beans, and chicken stock in the slow cooker.

Meanwhile, in a medium microwave safe bowl, combine the onion, bell pepper, and jalapeño with the oil, cumin, garlic powder, cayenne, chili powder, and salt.  Cook 5 minutes, stirring 2-3 times, until the vegetables have softened.  Stir into the crockpot as well.

Nestle the chicken into the mixture and cook on low 5-8 hours, until the chicken and quinoa are cooked through.  Remove the chicken and shred with 2 forks, then return to the crockpot.  Stir in the corn and cilantro, and cover and cook an additional minutes.  Serve with shredded cheese, extra hot sauce, etc.


BLOG DESIGN BY: SHERBET BLOSSOM DESIGNS