Tuesday, February 25, 2014

Feeding My Family: An Introduction


I've been planning this series for a few months, and I'm so excited to finally share it with you guys!


Feeding a family of six has definitely been a learning experience for me, and as the kids get older, it will continue to be a challenge.  Transistioning Henry and Tucker to table foods was a huge game-changer for our family, and um, three teenage boys?  I need to find a part-time job, like now.  All of this is just to say that as our family grows and changes, our meals and my approach to the meals will be evolving as well.


I plan on covering a pretty wide array of topics, and here is what I have so far on the docket:

Feeding Babies and Toddlers
Breakfasts
Lunches
Snacks
Weeknight Meals - planning, prep, and execution
Meal Planning
Feeding Picky Eaters
Grocery Shopping and Budgeting
Getting Your Kids Involved in the Kitchen
CSA's and Farmer's Markets

If you have any other suggestions or ideas of topics that you'd like to see, please leave them in the comments!  And of course any specific questions are welcome too, and I'll try and address them in the appropriate post.


Whether you are feeding a large family, just yourself, or anywhere in between, I hope this series will be helpful to you.  I am certainly no expert, and I definitely don't hold myself up as the standard of perfection.  I make mistakes.  I'm still learning, and this is just what works for my family.  Like I said, it's an ever-changing landscape and will be that way as long as these kids live under our roof.

My hope is that this will be a good resource for those of you in a similar season of your life, and that we can all learn as we go.  My personal goal is to have mealtime be a relaxing and happy time for everyone involved.  No battles, no stress.  Just happiness and togetherness.

Happy eating!


Sunday, February 23, 2014

Garlicky Pasta with Tuscan Chicken


Growing up, we lived across the street from my great-aunt.  I have many many memories and stories from their house, but in particular I remember going to her house after church for Sunday dinner.  I always loved going over there, seeing my cousins, and just enjoying time with our big family.  Now that I have a big family of my own, I romanticize about having big family dinners at our house after church.

However, those notions are pretty quickly squelched... by the time we get home from church on Sundays, I'm starving, Smith has passed out, the twins are hungry and tired, and Caroline... well actually, she's usually just singing a Disney song in the backseat and is fine.  We're definitely on borrowed time, and hangry meltdowns are imminent for all of us.  My visions of big Sunday dinners in reality end up being grilled cheese sandwiches, leftovers, or eggs and toast.  Nailed it.


A few weeks ago, however, I stayed home from church, and had the house all to myself for the morning.  After folding a bunch of laundry, leisurely drinking my coffee, and doing some cleaning, I decided to make a nice lunch for when everyone else got home.  While it's not the fried chicken, okra, tomato salad, biscuits, and butter beans that I grew up eating as Sunday dinner, it is still quite hearty, comforting, and delicious.

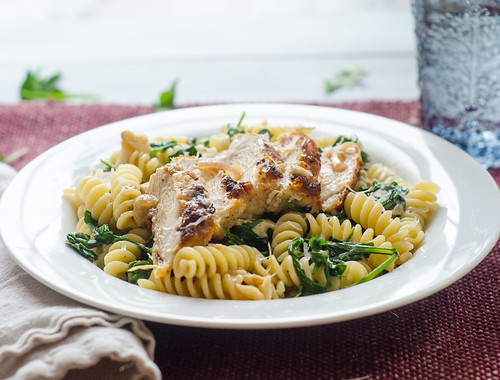
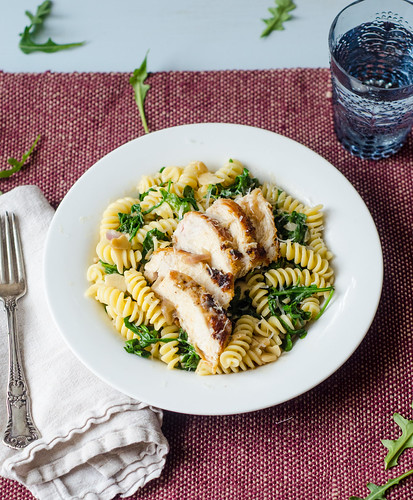
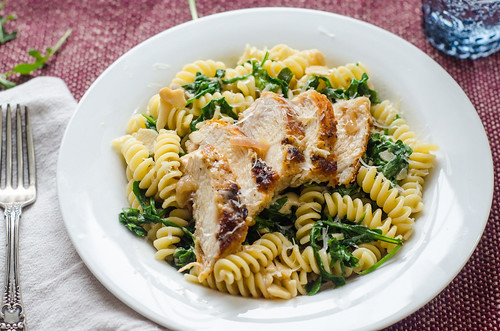
Chicken is pan-fried, then served atop a bed of garlicky pasta that's coated in a white wine sauce,and lots of bright and peppery arugula.  It's a great combination of creamy, garlicky, fresh, and comforting.

Now when I say this is garlicky, I mean there are 12 cloves of garlic here!  That's 3 cloves per person!  However, they are slowly sautéed, then cooked further in the sauce, so the flavor is more roasted and buttery vs strong and abrasive.  It's very well-balanced, so don't be scared!

Not a fan of arugua?  Try spinach, kale, or swiss chard or even toss the pasta with some steamed broccoli, asparagus, or roasted brussels sprouts.  I think pretty much any green veggie would work here.

While my daydreams of big family-style lunches after church are on the back burner for now, having a homey and comforting pasta dish like this isn't too shabby.


Garlicky Pasta with Tuscan Chicken
barely adapted from Pasta Revolution

  • 3 (6 to 8 oz) boneless, skinless, chicken breasts
  • kosher salt and freshly ground black pepper
  • 1/2 tsp garlic powder
  • 1 tsp lemon zest
  • 1/2 cup plus 1 Tbs flour
  • 3 Tbs olive oil
  • 12 cloves garlic, thinly sliced
  • 3 shallots, thinly sliced
  • pinch of red pepper flakes
  • 3/4 cup dry white wine
  • 3 cups low-sodium chicken broth
  • 12 oz dried pasta
  • 6 oz (6 cups) baby arugula
  • 1 1/2 oz  (3/4 cup) Parmesan cheese, grated, plus more for serving
  • 1 Tbs lemon juice
Pat the chicken dry with paper towels and season both sides generously with salt and pepper.  In a shallow dish, combine 1/2 cup of the flour with the garlic powder and lemon zest.  Working one piece of chicken at a time, dip in the flour mixture, coating all sides, and shaking off the excess.

Heat 2 tablespoons of the oil over medium-high heat in a 12-inch skillet.  Carefully arrange the chicken in a single layer, then allow to cook 6 to 8 minutes.  Use tongs to flip the chicken, reduce the heat to medium-low, and cook an additional 6 to 8 minutes, or until it registers 160 degrees.  Transfer the chicken to a plate and cover with aluminum foil to keep warm.

Meanwhile, bring a large pot of water to a boil and season with 1 tablespoon of salt.  Add the pasta and cook, stirring often, until al dente, using the time recommendation from the box.  Reserve 1/2 cup of the cooking water, then drain the pasta.  Return the pasta to the pot, add the arugula, stir, then cover to keep warm and wilt the greens.

As the pasta is cooking, add the remaining tablespoon of oil to the skillet, along with the garlic and shallots.  Cook over medium-low heat, stirring often, until softened and beginning to brown, about 3 minutes.  Stir in the pepper flakes and remaining tablespoon of flour, and cook 30 seconds.

Whisk in the wine, then broth.  Increase the heat to medium-high, bring to a simmer, and cook until the sauce is thickened and measures 2 1/2 cups, about 15 minutes.  Reserve 1/2 cup of the sauce, then pour the rest into the pot with the pasta and arugula.  Stir in the Parmesan cheese, and lemon juice, then toss until the mixture is well-combined.  Add the reserved cooking water as needed to adjust the consistency, then season with salt and pepper.

Slice the chicken thinly on the bias.  Divide the pasta among 4 serving bowls, then top with the sliced chicken.  Drizzle each serving with 2 tablespoons of the reserved sauce, then sprinkle with extra parmesan cheese.  Serve immediately.


Tuesday, February 18, 2014

Eggplant Parmesan Burgers


Eggplant can be such a divisive vegetable.  People either love it or hate it.  I love it, Joey... strongly dislikes it.  In the past, it's kind of a point of contention in our marriage (see also:  brussels sprouts).  Luckily, we've come to an unspoken agreement.  I don't make it very often, and he's a good sport and will always try it.

So here's a little secret to converting eggplant haters to lovers:  turn it into a burger, smother it with cheese and marinara sauce, then sandwich it in a garlic bread bun.  I dare you not to love this.

For the record, Joey really liked these burgers, and the twins couldn't get enough.  And as expected, Caroline loved them and Smith wouldn't try a single bite.

I just love eggplant in pretty much all incarnations, but I especially love giving foods the eggplant parm treatment.  What a great way to combine my love of burgers with my love of eggplant!  So what's next... eggplant parm mac and cheese, anyone?

Eggplant Parmesan Burgers
adapted from Eats Well with Others
makes 4 burgers

  • 1 1/2 - 2 lbs eggplant (1 large or 2 smaller eggplants)
  • 3 Tbs olive oil, divided
  • kosher salt and freshly ground black pepper
  • 1 cup panko bread crumbs
  • 1/4  cup Parmesan cheese
  • 2 Tbs minced fresh parsley
  • 2 Tbs minced fresh basil, plus more for serving
  • 2 cloves of garlic, minced
  • pinch of red pepper flakes
  • 1 egg, lightly beaten
  • about 1/4 cup marinara sauce
  • mozzarella cheese, sliced
  • 4 hamburger buns, sliced in half
  • 1 Tbs butter, softened
  • garlic powder
Preheat the broiler and line a rimmed baking sheet with foil.  Spray lightly with cooking spray.

Peel the eggplant, then slice into 1/2-inch rounds.  Arrange in a single layer on the prepared baking sheet, then brush with 1 tablespoon of the oil, being sure to flip the eggplant rounds and oil both sides.  Season generously with salt and pepper.

Place in the oven and watching closely, broil the eggplant, turning once, until golden-brown, about 7 to 10 minutes.  Watch it very closely though, as broilers do vary quite a bit, and your eggplant can go from golden-brown to charred very quickly.

Remove from the oven.

Allow the eggplant to cool slightly, roughly chop, then transfer to a food processor.  Add the panko, Parmesan cheese, parsley, basil, garlic, red pepper flakes, and the egg.  Pulse several times, until the mixture is evenly mixed.

Form the mixture into four patties.  Transfer to the refrigerator and allow to chill for at least 30 minutes, or up to several hours.

When ready to cook, preheat the oven to 350 degrees and heat an (oven safe) nonstick skillet with 3 tablespoons of oil over medium  heat.  Carefully transfer the eggplant patties to the pan, and cook 2 minutes, per side, flipping them very gently.  Top each burger with about 1 tablespoon of marinara sauce and a slice of mozzarella, then transfer the skillet to the oven.

Bake until the cheese is melted and the marinara is heated through, 3-4 minutes.  Sprinkle with freshly chopped basil.

Meanwhile, spread the butter on the cut-side of the buns, and sprinkle with garlic powder.  Arrange them in a single layer, cut side-up, on a baking sheet.  When the burgers are finished cooking, transfer the buns to the oven and toast until the butter is melted and the bread is lightly toasted.

Serve the eggplant burgers on toasted burger buns.


Sunday, February 16, 2014

Salted Brown Butter Rice Krispies Treats


As all older siblings tend to do, my brother picked on me quite a bit growing up.  I remember one such prank quite vividly, and I'm sure he does too.  One morning, I poured myself a bowl of Rice Krispies, then got up from the table to do something.  When I returned and took a big bite, my cereal was so salty that I almost threw up.  I, being a (slightly manipulative) little sister, immediately burst into tears, and of course my brother was punished.  His punishment?  He had to eat the entire bowl of salty rice krispies.  Parenting win, right there.

It feels kind of awkward to write about such an unpalatable experience, especially when I'm sharing with you the best rice krispies treats ever, but as I added salt to these babies, I couldn't help but remember that prank. So about these rice krispies treats.  I don't want to sound overly effusive or lame to be waxing poetic about such a simple treat, but hear me out.

I've seen tons of crazy add-ins and variations on the ubiquitous treat, some sounding great and some causing me to scratch my head a little.  But what makes this version so great is its simplicity.  There's more butter, and it's browned.  And a sprinkle of sea salt helps to balance out the sweetness of the treats.  Like fleur de sel, brown butter automatically gives every dessert a flair of sophistication and an extra depth of flavor.  It's not that you'll taste these and immediately proclaim that you can taste the browned butter.  More likely, you'll taste them and wonder what's in there that makes them taste so darn good.  You still have that nostalgic and homey childhood treat, but it's matured a bit - much like us, I dare say.  I don't think my brother would still pour salt into my cereal, but I daresay he would love these salted treats!


Salted Brown Butter Rice Krispies Treats
The Smitten Kitchen Cookbook

  • 8 Tbs unsalted butter, plus more for greasing the pan
  • heaping 1/4 tsp fleur de sel, or other flaky sea salt
  • 10 oz miniature marshmallows
  • 6 cups rice krispies cereal
Butter a 9-inch square baking dish and set aside.

In a large pot, melt the butter over medium-low heat, whisking and swirling it often.  After it melts, it will foam, then turn golden, then finally start to brown and smell nutty.  

As soon as this happens, remove the pan from heat and stir in the marshmallows and sea salt.  the residual heat in the pan should be enough to melt the marshmallows, but if they aren't melting, return the pan to the stovetop over low heat, stirring constantly, just until they melt.

Remove the pan from heat and quickly stir in the cereal.  Immediately transfer the mixture to the prepared pan, then use a buttered spatula to spread the mixture evenly to the corners and edges. and smooth the top.

Allow to cool, then cut into squares.  If you are are terribly impatient, you can just eat it with a spoon.  I won't tell anyone.


Wednesday, February 12, 2014

Warm Chocolate-Raspberry Pudding Cake


Which do you like better?  A super rich chocolate cake, or a molten lava cake?  Just kidding, you don't have to choose if you make this warm chocolate-raspberry pudding cake.  This thing is pretty amazing.  Oh and I forgot to mention - it's self-frosting, so after you are tortured by the smell of it baking, you just invert it onto your cake plate and it's ready to go.  This really and truly couldn't be easier.

So allow me to break this cake down for you - first, you make the ganache-frosting - simply melt bittersweet chocolate, raspberry jam, and heavy cream in a saucepan, then pour it into a cake pan.  Then you mix up the super simple cake batter.  Spread it over the ganache, pop that baby in the oven, and then go sit down and have a glass of wine with your honey.  After a tortorous thirty minutes of smelling it bake, and another excruciating 10 minutes of allowing it to cool (burnt mouths are no bueno), you can dig in.

And dig in, you will.  The top of the cake is the chocolate frosting, then from there you get a pudding/lava cake texture, which eventually gives way to a regular cake.  Kind of an ombre of textures and consistencies going on here.

I don't know if you've finalized your dessert plans for Valentine's Day, but I definitely recommend this. I especially recommend it if you are snowed in with nothing but pantry staples.  And I DEFINITELY recommend just standing at the cake plate and eating it by the forkful.  Plates are overrated, after all.


Warm Chocolate-Raspberry Pudding Cake
barely adapted from The Gourmet Cookbook
serves 6 to 8

Frosting

  • 1/2 cup seedless raspberry jam
  • 1/2 cup heavy cream
  • 3 oz bittersweet chocolate, chopped
Cake
  • 1/2 cup boiling water
  • 1/2 cup plus 2 tsp unsweetened cocoa powder
  • 1 tsp instant coffee powder
  • 1/4 cup buttermilk
  • 1 tsp vanilla extract
  • 1/3 cup seedless raspberry jam
  • 1 cup all-purpose flour
  • 3/4 tsp baking soda
  • 1/4 tsp salt
  • 8 Tbs butter, softened to room temperature
  • 1/3 cup packed light brown sugar
  • 1/3 cup granulated sugar
  • 2 large eggs, at room temperature
Preheat the oven to 350 degrees.  Generously butter a 9-inch round cake pan and set aside.

Make the frosting:  In a medium saucepan, melt the raspberry jam, cream, and chocolate over medium heat, stirring often.  Once it has melted, pour into the prepared cake pan and spread evenly with a spatula.  Set aside.

Make the cake:  In a large heat-proof measuring cup, whisk together the boiling water, cocoa powder, and coffee until smooth.  Whisk in the buttermilk, vanilla extract, and raspberry jam, then set the measuring cup aside.

In a medium bowl, sift together the flour, baking soda, and salt.

In the bowl of a stand mixer fitted with a paddle attachment, mix the butter with the sugars at medium-high speed until light and fluffy, about 3 to 5 minutes.  Add the eggs one at a time, beating well after each addition, and scraping down the sides of the bowl if needed.

Add the flour and cocoa mixtures alternately, starting and ending with the flour, and mixing at low speed just until incorporated.  

Spoon the batter over the frosting in the prepared cake pan, spreading it to completely cover the frosting.

Bake 30 to 40 minutes, or until a wooden skewer comes out clean when inserted into the center of the cake.

Remove the cake from the oven and cool on a wire rack 10 to 20 minutes.  

When ready to serve, run a thin knife around the edge of the pan and twist it gently back and forth to loosen the cake.  Place a cake plate on top of the pan, then invert the cake and plate.  Gently lift the pan.

Serve warm, garnished with whipped cream and/or raspberries if desired (and I think they would be great with the cake, but we are snowed in, plus the raspberries at the grocery store are kind of sketchy this time of year).


Monday, February 10, 2014

Shrimp and Sausage Cioppino


I realize that this version of cioppino may be considered blasphemous, but if adding sausage to a seafood soup is wrong, I don't want to be right.  Traditionally, cioppino can be any combination of mussels, shrimp, clams, squid, crab... really any mixture of seafood.  Here, it is simply shrimp and sausage - consider this to be surf and turf soup, if you want.

It's hearty and filling, a relatively quick meal, and is oh so comforting and delicious.  As we settled in for dinner, I couldn't stop talking about how much I loved the broth.  Typically the broth is an afterthought to me - I'm all about the meat and veggies in a soup.  But this broth was simultaneously light and fragrant and comforting and hearty.  It's a white wine-tomato broth, infused with the flavor of onions, garlic, fennel, and lots of fresh herbs.  With sweet and tender shrimp, spicy sausage, and creamy white beans, this soup was definitely a thing of beauty.  Served with a glass of white wine and a big piece of warm crusty bread, it was a comforting yet elegant weeknight dinner.  


Shrimp and Sausage Cioppino
adapted from Weeknights with Giada
  • 1 lb spicy Italian sausage, casings removed (substitute part of all for mild sausage if you prefer less spice)
  • 1 large fennel bulb, cored, trimmed and chopped into 1/2-inch pieces
  • olive oil
  • 4 garlic cloves, minced
  • 2 large shallots, chopped
  • kosher salt and freshly ground black pepper
  • 1/4 cup tomato paste
  • 1 Tbs chopped fresh thyme
  • 2 cups dry white wine, such as Pinot Grigio 
  • 3 cups low-sodium chicken broth
  • 1 dried bay leaf
  • 1 lb peeled and deveined large shrimp, chopped into bite-sized pieces
  • 1 (15-oz) can cannelloni beans, rinsed and drained
  • 1 cup fresh basil leaves, chopped
  • 2 Tbs chopped fresh parsley
Preheat a Dutch oven or large saucepan to medium-high heat.  Crumble the sausage into the pan, breaking it up into bite-sized pieces with a wooden spoon.  Cook, stirring often, until it's browned and cooked through, about 5 minutes.  Use a slotted spoon to remove the sausage to a bowl and set aside, leaving as much of the rendered fat as you can in the pot.

Add enough olive oil to the pan to have 2 tablespoons of fat.  Reduce the heat to medium and add the fennel, shallots, and garlic, and cook, stirring often, until the vegetables are softened and translucent, about 4-5 minutes.  

Stir in the tomato paste, thyme, 1/2 teaspoon of salt, and 1/4 teaspoon of pepper, and cook until fragrant, about 1 minute.  Stir in the wine, and use the wooden spoon to scrape up the browned bits from the bottom of the pot.  Add the chicken broth and bay leaf and bring to a boil.  Reduce the heat, cover,  and simmer 10 minutes.

Uncover the pan and add the shrimp, beans, basil, and parsley.  Simmer, uncovered, until the shrimp is pink and cooked through, 3-4 minutes.

Remove the bay leaf and discard.  Taste and season with additional salt and pepper if necessary.  Ladle the soup into bowls and serve with crusty bread.


Thursday, February 6, 2014

Antipasto Pizza


Friday nights in our house mean one of two things:

  1. The kids eat random leftovers or quesadillas and we get take-out once they go to bed, or
  2. Family pizza night!
  Making dinner with my two big kids is a great way for us to all unwind from the week, eat some cheese off the cutting board, and turn what is typically the most stressful and harried part of the day into a fun and relaxing activity for the kids to enjoy.  I feel like every time I post a new pizza recipe, I end up talking this, but I just can't help myself - it's probably the reason we eat pizza as much as we do, after all.  

This particular pizza night was especially memorable, because I got to introduce Caroline and Smith to some new ingredients and food.  They had never had salami before, and it's pretty much Caroline's favorite food now.  She was also introduced to roasted red peppers, and they were a hit too - I think I blew her mind when I wrapped a pice of salami around a roasted red pepper strip and gave it to her, ha!  Kalamata olives, however, were not a hit with Smith.  You win some, you lose some.

What's nice about this pizza is that since "antipasto" is such a broad term, it's pretty much an anything-goes situation.  I basically just took the things I like to see on an antipasto tray and threw them on a pizza.  I included salami, roasted red peppers, and olives, and used a combo of provolone and mozzarella cheeses.  I also threw on some green bell peppers and plenty of fresh basil for some brightness and freshness to balance the rich, salty flavors of the other toppings.  Definitely play around with the toppings though - prosciutto or soprasetta would be really great, fresh slices of tomato would be lovely in the summer, some hot cherry peppers... go nuts.

It's Friday.  Relax, unwind, and eat a pizza!


Antipasto Pizza
  • 1 lb pizza dough
  • cornmeal, for sprinkling
  • 1 Tbs olive oil, plus more for brushing
  • pinch of red pepper flakes
  • 2 cloves garlic, minced
  • 1/2 green bell pepper, seeded and thinly sliced
  • 1 red bell pepper, roasted and cut into thin strips
  • 2 oz salami, sliced into strips
  • 1/4 cup roughly chopped kalamata olives
  • 1 cup shredded provolone cheese
  • 1 cup shredded mozzarella cheese
  • 1/4 cup fresh basil, torn or thinly sliced
Place a pizza stone in the oven and preheat to 500 degrees for at least 30 minutes.  

Meanwhile, in a small skillet, sauté the garlic and red pepper flakes in 1 tablespoon of olive oil over medium-low heat.  Stirring often, cook until the garlic is beginning to turn golden-brown, about 5-6 minutes, then remove from heat.  Set aside.

Sprinkle a large sheet of parchment paper with cornmeal, then pull and stretch the dough into a 12-14 inch circle.  Brush the outer perimeter with olive oil, then brush the center with the garlic-infused oil.  

Sprinkle the dough with 2/3 cup of the provolone cheese and 2/3 cup of the mozzarella cheese, then scatter the salami, green and red bell peppers, and olives over the cheeses.  Top with remaining cheese, then carefully transfer the pizza to the preheated oven.

Bake 10-12 minutes, or until the crust is golden-brown and the cheese is melted and bubbly.

Remove from the oven and allow to cool 10 minutes.  Sprinkle with the fresh basil, slice, and serve.


Tuesday, February 4, 2014

Blood Orange Cosmopolitans


When I was freshly out of college, single, and responsibility free, my friends and I used to frequent the same restaurants and bars on the weekends.  One such bar was called East Andrews, and it was where we went if we wanted to feel cool and sophisticated.  And in the spirit of feeling cool and sophisticated, one must drink a cosmo.  I mean, I knew this for a fact - I did watch Sex and the City, after all.

With those days long gone, I don't have much need to come off as urban and cool - let's not kid ourselves, I drive a minivan - but I still like cosmos just the same.

Instead of the usual combo of cranberry juice, orange juice, lime juice, and vodka, I used the juice from a few gorgeous and sweet blood oranges.  I think that blood oranges are just a little more tart than naval oranges, which leads to this cocktail being less on the sweet side, more on the sweet-tart side - just how I like it!  And of course, given the gorgeous ruby-red color of blood oranges, the color of this cocktail is unmatched - how pretty is that??


As always, when making a cocktail, feel free to adjust the amounts and ratios as you prefer.  This particular cosmo isn't super strong, so if you're a vodka lover, by all means, bottoms up!

Blood Orange Cosmopolitans
makes about 4-5 martinis

  • 3/4 cup freshly squeezed blood orange juice (2-3 blood oranges)
  • 3/4 cup cranberry juice 
  • 1/3 cup Grand Marnier (or other orange liqueur)
  • 1 1/4 cups vodka
Combine all of the ingredients in a large cocktail shaker.  Add a handful of ice, shake vigorously, and pour into chilled martini glasses.  If your cocktail shaker isn't big enough to hold all of the liquid, mix it first in a large measuring cup, then shake in the cocktail shaker in batches.

Serve, garnished with a slice or wedge of a blood orange if you'd like.


Sunday, February 2, 2014

Mushroom-Miso Soup with Shrimp and Udon Noodles


I didn't really make New Year's resolutions for 2014, but I did sit down and make a little list of a few goals I'd like to focus on throughout the year.

....Ok, so when I put it that way, I guess I did make resolutions.

One of my non-resolution resolutions is to cook more foods outside my typical cuisines of Southern, Mexican, and Italian food.  I actually really love Asian food, and every time I make something that's Chinese or Japanese-inspired, I kick myself for not venturing to the far east more often.

Speaking of the far east, did you know that I almost moved to Japan when I graduated college?  It's a long story, but one that definitely worked out for the best in the end.  ANYWAY, I visited there over Christmas break of my senior year, after taking Japanese lessons for almost a year.  I was so excited to immerse myself in the culture, see some famous sites, and of course, eat the food.

Almost every meal began with miso soup, and I came to look forward to that small bowl of fragrant broth.  This soup is a heartier and more filling take on that soup.  In addition to the miso broth, there are tender udon noodles - which just so happened to be my favorite noodle in Japan!  There are also earthy mushrooms, tender and sweet shrimp, and bites of leafy green spinach.  It's a wonderful combination, and the first few bites transported me back all those years to Japan.  Caroline absolutely loved this soup - she slurped up all the noodles, ate the shrimp, spinach, and mushrooms out with a fork, and then drank the remaining broth.

With meals as delicious as this one, it will definitely be easy to keep my non-resolution this year, and I can't wait to share more of my adventures with you along the way.


Mushroom-Miso Soup with Shrimp and Udon
barely adapted from The Six-Ingredient Solution
serves 4 generously

  • 12 oz udon noodles
  • 4 oz (4 cups) baby spinach, roughly chopped
  • 10 oz shiitake mushrooms
  • 3 cups vegetable broth
  • 12 oz extra-large shrimp, peeled and deveined
  • 1/2 cup white miso
  • kosher salt and freshly ground black pepper
Bring 4 quarts of water to a boil in a large pot.  Add the noodles and cook until al dente, about 4 to 5 minutes.  Drain and rinse with warm water to remove any excess starch.  Drain well, then portion the noodles into four individual serving bowls.  In each bowl, top the noodles with one cup of the baby spinach.  Set the bowls aside while you finish the soup.

Stem and thinly slice the mushrooms.  Bring the broth, 2 cups of water, and the mushrooms to a boil in a large saucepan over medium-high heat.

Reduce the heat to medium-low and simmer gently until the flavors meld and the mushrooms are tender, about 10 minutes.

Meanwhile, remove the tails from the shrimp and cut each shrimp into 3 equal pieces, and season lightly with salt and pepper.

In a small bowl, whisk together the miso and 1/2 cup of water until it's a smooth mixture.

Remove the soup from heat and stir in the shrimp and miso mixture.  Cover and let sit until the shrimp are just pink, about 1 to 2 minutes.  Taste and season with salt and pepper as needed.  Ladle the soup into the prepared bowls and serve.


BLOG DESIGN BY: SHERBET BLOSSOM DESIGNS