Wednesday, October 14, 2009

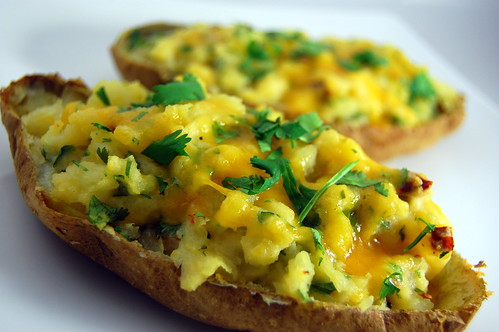
Tex-Mex Twice Baked Potatoes


Ok so in my effort to pay more attention to sides, I made these twice baked potatoes to go with the orange-chipotle glazed pork tenderloin below. Normally I reserve twice baked potatoes for our rare steak dinners. I just feel like they go together, ya know? Well Joey has since requested that I make these potatoes more often after these! So easy, and so flavorful. We both really really liked these.

I had originally planned on using pepperjack cheese, but the hunk that I swore I had in the fridge was nowhere to be found. So I just used some sharp cheddar and threw in half a chipotle chile. Again, using the chipotles. I can't get enough!

Twice baked potatoes do take a little time, only because... well they're twice baked. It takes about an hour to bake the whole potato, then you have to wait for it to be cool enough to handle, then bake it again for 20 minutes or so. But it is well worth the extra time. In fact, you could do the first bake the night before, then just refrigerate until the next day, mix up your filling, and throw them in the oven while the rest of your dinner cooks. Easy as pie! And open to so many variations... different cheeses, veggies, bacon, herbs... the possibilities are endless!

One final note: the amount of buttermilk will vary depending on the size of your potatoes, personal preference, etc. I just stream it in while stirring until I'm happy with the consistency.

Tex-Mex Twice Baked Potoatoes
serves 2, but can easily be adapted for more
  • 1 medium russet potato, scrubbed clean
  • 1/2 cup buttermilk
  • 1/2-1 chipotle chile in adobo sauce, finely minced
  • 1/2 cup sharp cheddar cheese
  • 3 Tablespoons fresh cilantro, minced
  • 2 Tablespoons sour cream
  • 1-2 Tablespoons unsalted butter
  • 1/4 teaspoon kosher salt
  • 1/8 teaspoon ground black pepper
Preheat oven to 450. Pierce each potato several times with a fork. Place potato on a baking sheet, and bake 45 minutes to an hour, or until cooked through.

Allow to cool so that the potato is cool enough to handle. Cut in half lengthwise, and carefully scoop out filling, trying to leave the skin intact.

Mash filling with a fork, then mix in buttermilk, cheese (reserve a little for the tops), sour cream, chipotles, cilantro, butter, and salt and pepper. Taste, then adust seasonings. You might need to add more buttermilk to reach your desired consistency. It should be a little more solid than mashed potatoes.

Top with additional cheese, and bake for 15 to 20 minutes, or until filling is heated through and cheese has melted. Sprinkle with additional cilantro, and serve.


Tuesday, October 13, 2009

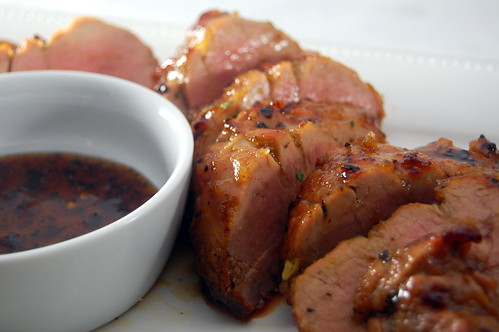
Orange-Chipotle Glazed Pork Tenderloin


As I've said before, I love pork tenderloin. It is flavorful, lean, and easily adaptable to so many recipes. I Have also said how much I love the sweet-spicy-savory combination. We have recently discovered chipotles, so it should come as no surprise that this pork tenderloin was such a hit in our house. It was very simple to throw together last week; the only thing that was even slightly complicated was coating the pork in cornstarch... which isn't hard at all... just something a little different. I would not recommend skipping this step though; the cornstarch creates a "sandpapery" surface that will help the glaze stick to the pork instead of sliding off as you brush it on.

This is now my favorite way to cook pork tenderloin. It is juicy and so flavorful, with just enough spice to make it interesting.

Orange-Chipotle Glazed Pork Tenderloin
adapted from Cook's Illustrated
serves 6
  • 3/4 cup maple syrup
  • 2 Tablespoons frozen orange juice concentrate
  • 2 Tablespoons bourbon
  • 2 chipotle chiles in adobo sauce, finely minced
  • 2 teaspoons adobo sauce
  • 1/4 cup cornstarch
  • 2 Tablespoons sugar
  • 1 Tablespoon salt
  • 2 teaspoons ground pepper
  • 2 pork tenderloins (1-1 1/2 lbs each), trimmed of fat
  • 2 Tablespoons vegetable oil
Preheat oven to 375 and adjust oven rack to middle position.

Stir 1/2 cup maple syrup, bourbon, orange juice concentrate, chipotles, and adobo sauce together in a small bowl. Set aside.

Whisk cornstarch, sugar, salt, and pepper together in a small bowl. Transfer to a rimmed baking sheet. Pat tenderloins dry with a paper towel. Roll in cornstarch mixture to coat evenly on all sides. Pat off excess.

Heat oil in a 12-inch skillet over medium-high heat until it just begins to smoke. Reduce heat to medium and place both tenderloins in skillet, at least 1 inch apart. Curve them around if necessary to fit them in the skillet. Cook until well-browned on all sides, 8 to 12 minutes. Transfer them to a wire rack set over a rimmed baking sheet.

Pour off excess fat from skillet and return to medium heat. Add syrup mixture to skillet, and scrape up the browned bits with a wooden spoon. Cook until reduced to about 1/2 cup, about 2 minutes. Transfer 2 Tablespoons of the glaze to a small bowl and set aside.

Using the remaining glaze, brush each tenderloin with about 1 Tablespoon of glaze. Roast until a meat thermometer inserted in the thickest part registers 130 degrees, 12-20 minutes. Brush each tenderloin with another tablespoon of glaze and continue to roast until the thermometer registers 135-140, 2 to 4 minutes longer.

Remove the pork from the oven and brush each one with remaining glaze. Allow to rest, uncovered, about 10 minutes.

While the tenderloins rest, add the remaining 1/4 cup maple syrup to the reserved 2 Tablespoons of glaze and whisk to combine.

Transfer the tenderloins to cutting boards and slice. Serve with remaining glaze.


Monday, October 12, 2009

Green Beans Parmesan


I feel like side dishes often get relegated to the back burner. Many people don't really care about them. Well, I have to admit that oftentimes I will just throw some veggies in the steamer or on the grill and call it a day, but sometimes I like to make something that is a little more substantial and interesting.

These green beans are now one of my favorites. I love Parmesan cheese, and I had actually just picked up a nice block of Parmigano-Reggiano last week, so this was a perfect chance to use it. Joey isn't usually a big fan of green beans, but he enjoyed these. The breadcrumbs really give them a great crunch, and I pretty much love tomatoes on everything.

While this wasn't the fastest recipe, it certainly wasn't too terribly difficult or time consuming. It can easily be done while your main dish cooks.

Green Beans Parmesan
adapted from Cook's Illustrated
serves 6 to 8
  • 1 slice high-quality white sandwich bread (without crusts), torn into quarters
  • 2 Tablespoons unsalted butter
  • 3/4 cup grated Parmesan cheese
  • 1 Tablespoon chopped fresh basil
  • 2 Tablespoons olive oil
  • 1 medium shallot, chopped fine
  • 3 medium garlic cloves, minced
  • 1 14.5-ounce can diced tomatoes, drained
  • 1 pound green beans, washed, and ends trimmed
  • 1/3 cup low sodium chicken broth
  • salt and pepper
Process the bread in a food processor (you should have about 1 cup crumbs).

Melt butter in a large skillet over medium heat. Stir in the breadcrumbs and cook, tossing often, until golden brown, 3-5 minutes. Transfer to a small bowl and toss with 1/4 cup Parmesan and the chopped basil.

Wipe out the skillet with a paper towel, and add 1 Tablespoon of oil. Heat over medium heat until shimmering. Add the shallot and 1/4 teaspoon of salt. Cook until soft, 1-3 minutes. Add the garlic and cook until fragrant, 30 seconds to 1 minute. Stir in the tomatoes and cook until the liquid evaporates, about 3 minutes. Transfer to a small bowl.

Wipe out the skillet again, and heat the last tablespoon of oil over medium-high heat. Add the green beans and 1/2 teaspoon of salt. Cook, tossing the beans often, until they are browned in spots, about 8 minutes. Reduce heat to medium and stir in tomato mixture and chicken broth. Cover and cook until the beans are crisp-tender, about 5 minutes. Remove the lid and cook until the liquid evaporates, 2 minutes.

Remove from heat and stir in remaining 1/2 cup Parmesan. Adjust seasonings if necessary with salt and pepper. Transfer to a serving dish and top with bread crumbs.


Saturday, October 10, 2009

Pumpkin Magic Cookie Bars


Magic cookie bars, 7-layer bars, Hello Dolly Bars... whatever you call them, they are a delicious treat. Add some pumpkin and fun fall flavors, and you have a fun and seasonal dessert.

I got the idea for these from Picky Palate, but I made quite a few adjustments. I thought hazelnuts would be more fallish than cashews, and I added some white chocolate. In the future I think I will add a little more pumpkin, and use pumpkin pie spice instead of just cinnamon. While they were certainly tasty, I didn't think the pumpkin was very prominent. I have made these adjustments below. Jenny tops these with caramel, which I think is awesome, but I left well enough alone. I also think using butterscotch chips would be great too. The fun thing about this type of dessert is that it is open to so many adaptations...the possibilities are endless!
Pumpkin Pie Magic Cookie Bars adapted from Picky Palate
  • 3/4 cup graham cracker crumbs
  • 1/4 cup melted butter
  • 1 cup pumpkin puree
  • 3/4 teaspoon pumpkin pie spice
  • 3 oz cream cheese, softened
  • 3 Tablespoons granulated sugar
  • 1/3 cup semisweet chocolate chips
  • 1 oz white chocolate, finely chopped
  • 1/2 cup coarsely chopped hazelnuts, toasted
  • 3/4 cup sweetened shredded coconut
  • 1/2 cup sweetened condensed milk
Preheat oven to 350. Grease the bottom and sides of an 8x8 inch square baking dish. Mix together graham cracker crumbs and butter, and press into bottom of the dish. Bake for 10-12 minutes, or until lightly browned and crispy. Remove from oven and set aside.

Meanwhile, toast the hazelnuts. I use a small skillet, and just cook them over medium heat, tossing occasionally until they are lightly browned. Set aside and allow to cool enough to handle, then coarsely chop.

Toast the coconut by spreading it out onto a dinner plate, and microwave at 30 second intervals, stirring well between each time. Repeat until lightly browned.

Using a hand mixer, beat the pumpkin, cream cheese, sugar, and pumpkin pie spice until well combined.

Spread the pumpkin mixture over the crust. Sprinkle chocolate chips, white chocolate, and hazelnuts over the pumpkin. Top with the coconut, and pour the condensed milk evenly over the top.

Bake for 25-30 minutes, or until the top is golden brown and the mixture has started to set. Remove from oven and allow to cool for 1-2 hours before cutting.

optional: drizzle with caramel to serve.


Thursday, October 8, 2009

BB: Cheddar Corn Chowder


First off, I would like to apologize for my lack of BB participation in September. I will say that I actually did make the birthday sheet cake, but never took pics, and wasn't really wow-ed by it. I do plan to make Beatty's Chocolate Cake in the near future as well.

On to October! I was super excited when I saw that Jill of My Next Life chose cheddar corn chowder. This has been a staple in our house for years, so I was grateful for the opportunity to make it and blog it.

Being that I've made it several times (most recently last month at my sister's house!), I have made several changes along the way. I always leave out potatoes.... well because the first time I made it I forgot to buy them, and I didn't feel like they were missing.. and I feel like corn is starchy enough on its own. Maybe this means its no longer a chowder? Who knows. Anyway, I decrease the chicken broth as a result, since I like my soups a little thicker. I also use my immersion blender to break up the corn and thicken it up a bit. And finally, I add a hefty dose of Tabasco sauce at the end. Really, we all know I'm not a huge spicy food fan, but this adds some nice heat at the end and a lot more flavor.

Oh and I also mix in a tablespoon or 2 of cornmeal to thicken it up just a smidge. The chowder will thicken a lot in the fridge, but just whisk it out before you reheat it. And I highly suggest you make enough for leftovers. This is goooood stuff (possibly even better) the next day.

Since this is an Ina recipe, it makes enough to feed a small army. I always halve the recipe, then freeze some of the leftovers. I am blogging the halved recipe that will feed 5 to 6 people.

And as Joey and I were eating, I commented that this would be soo good if you grilled the corn before cutting it off the cob. I think it would give it a really nice smoky flavor. So I will definitely be trying that next time.

Cheddar Corn Chowder
adapted from Ina Garten, The Barefoot Contessa
cookbook
  • 4 ounces bacon, chopped
  • 3 Tablespoons olive oil
  • 2 large onions, chopped (3 cups)
  • 2 Tablespoons unsalted butter
  • 1/4 cup all-purpose flour
  • 1 teaspoon kosher salt
  • 1/2 teaspoon freshly ground black pepper
  • 1/4 teaspoon tumeric
  • 4 cups reduced sodium chicken stock
  • 5 cups corn kernels, or frozen (about 2 lbs)
  • 1 cup half-and-half
  • 1/4 lb sharp white cheddar, grated
  • 1/2 teaspoon Tabasco sauce
  • 2 Tablespoons corn meal
  • green onion, for garnish
Cook the bacon in a large stockpot over medium-high heat until crispy, about 5 minutes. Use a slotted spoon and transfer it to a paper-towel lined plate. Reduce the heat to medium and add the onions and butter to the fat. Cook until the onions are translucent, about 10 minutes.

Stir in the flour, salt, pepper, and turmeric and cook for 3 minutes. Add the corn and cook, stirring frequently, 3-5 minutes.

Add the chicken stock and bring to a simmer. Add the half-and-half and using an immersion blender, blend the chowder in several spots to break up the corn. If you don't have an immersion blender, use a regular blender or food processor, but work in small batches and only puree about half to 2/3 of the soup.

Allow to simmer 15-20 minutes, stirring occasionally. Stir in the cheese, Tabasco sauce, and cornmeal. Taste and adjust seasonings if necessary. If it is too spicy, add more half and half or chicken stock. Allow to cook an additional 5 minutes.

Serve hot with garnishes of bacon, extra cheddar, and green onion. Pass extra hot sauce with soup.


Monday, October 5, 2009

Butternut Squash Risotto


Its no secret that I love risotto. I just love the creamy texture, smooth flavor, and the endless possibilities for mix-ins. I also think its so relaxing and therapeutic to just stand at the stove and stir, stir, stir.

I'm also a big fan of butternut squash, so its no surprise that this risotto is a winner in our house. You even get another hit of squashy flavor by simmering the fibers and seeds with the chicken broth. While this adds an additional few steps, the result is well worth it. This recipe uses a slightly different technique, adding 3 cups of the chicken broth at the onset instead of over time in more increments. Whether or not this made a difference in the flavor, I couldn't tell, but it did save a little time and effort in cooking. The only changes I made to the original recipe was to use shallots instead of onions, and to add a pinch of saffron threads. I just really like shallots in risotto, and I thought saffron would add a nice depth of flavor.

The only complaint I have is that we are apparently not fans of sage, and will be omitting it next time. Joey said he felt like he was eating a Christmas tree. He did manage to eat around it, but I wasn't a huge fan either. Cook's Illustrated also gives a variation of adding spinach and toasted pine nuts, and I think I'll try that next time we have this.

Butternut Squash Risotto
adapted from Cook's Illustrated
serves 4 as a main course, 6-8 as a side
  • 2 Tablespoons olive oil
  • 1 medium butternut squash (about 2 lbs), peeled, seeded, and cut into 1/2 inch dice. (about 3 1/2 cups). reserve fibers and seeds
  • 3/4 teaspoon salt
  • 3/4 teaspoon pepper
  • 4 cups low-sodium chicken broth
  • 1 cup water
  • 4 Tablespoons unsalted butter
  • 3 large shallots, diced ver fine (about 1 cup)
  • 2 cups Arborio rice
  • pinch of saffron threads
  • 1 1/2 cups dry white wine
  • 3/4 cup finely grated Parmesan cheese
  • 1/4 teaspoon nutmeg
  • 2 Tablespoons minced fresh sage leaves
Heat oil in a 12-inch skillet over medium-high heat until shimmering but not smoking. Add about 3 1/2 cups squash in an even layer. Cook for 4-5 minutes without stirring. Stir in 1/4 teaspoon of the salt and 1/4 teaspoon of the pepper. Cook an addtional 5 minutes, or until squash is tender and browned, stirring often. Transfer to a small bowl and set aside.

Lower heat to medium and add squash fibers and seeds to the skillet, and any leftover diced squash you might have. Cook, stirring frequently to break up the fibers, until lightly browned, about 4 minutes. Transfer to a medium saucepan and add chicken broth and water. Cover and bring to a simmer. Allow to simmer at a bare simmer over low medium-low heat.

Melt 3 Tablespoons of butter in the skillet over medium-high heat. When foam subsides, add shallots, garlic, and remaining salt and pepper. Cook until shallots have softened, 3-4 minutes. Add rice and saffron to the skillet and toast, stirring often, until the grains are translucent around the edges (about 3 minutes). Add wine and cook, stirring frequently, until fully absorbed, 4 to 5 minutes.

While wine is evaporating, strain the hot broth through a fine-mesh strainer set over a medium bowl.. Press on solids to extract as much liquid as possible. Return broth to saucepan, and set over low heat to keep broth hot.

When wine has been completely absorbed, add 3 cups of hot broth and half the cooked squash to the skillet. Simmer, stirring every few minutes, until liquid has been absorbed and the bottom of the pan is almost dry, about 12 minutes.

Add 1/2 cup of broth at a time and cook, stirring constantly, until absorbed between each addition. Repeat 2 or 3 more times, or until rice is cooked to al dente. Remove from heat and stir in remaining Tablespoon of butter, Parmesan, sage, and nutmeg. Gently fold in the remaining squash. If needed, add an additional 1/4 cup of broth to loosen the texture of the risotto. Serve immediately.


Thursday, October 1, 2009

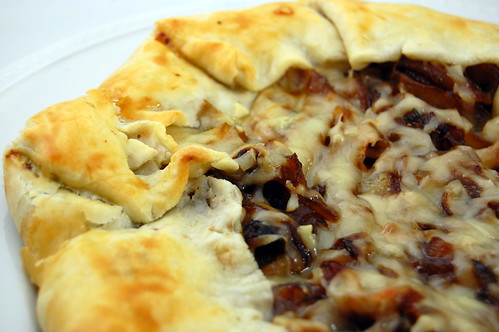
Vidalia Onion and Gruyere Tart


I have had this recipe saved from May's Southern Living all summer, and I am just now getting around to making it. A few week's ago we had Joey's parents over for dinner to thank them for watching Caroline. We started with the zucchini bruschetta, and I served this tart and a pork tenderloin with peach and tomato chutney. Sadly I will not be blogging this, as we didn't take a picture :-( I guess that means I will have to make it again. For dessert I served Arnold Palmers. Overall, it was a great meal.

This tart was a great side dish. Being from Georgia, I of course love Vidalias, and being a human, I of course love pie crust and Gruyere. So you can't go wrong. This was a little messy to serve, but no one seemed to mind. I think it would also be great as the main course for a light lunch, served with a salad.

If you don't have access to Vidalia onions, just use sweet onion and add a little sugar while caramelizing. Also, this seems like a lot of onions, but they will cook down significantly.

Rustic Vidalia Onion Tart
adapted from Southern Living, May 2009
  • 2 Tablespoons butter
  • 4 medium-sized Vidalia onions, halved and thinly sliced (about 6 1/2 cups)
  • 1 1/2 teaspoons chopped fresh rosemary (other herbs can be subbed)
  • 3/4 teaspoon salt
  • 1/2 teaspoon pepper
  • 1/2 recipe pie dough, or 1 refrigerated pie crust
  • 1 egg white, lightly beaten
  • 3/4 cup (3 oz) shredded Gruyere cheese (can sub Swiss cheese)
Preheat oven to 425. Melt butter in a large nonstick skillet over medium-high heat. Add onion, salt, and pepper (and sugar if necessary). Stirring occasionally, cook 8-12 minutes, or until tender. Reduce heat to low and cover; cook an additional 5-10 minutes, or until onions are browned and caramelized. Stir occasionally while cooking.

Shape pie crust on a lightly floured surface by rolling out into a 12-inch circle. Do this on parchment paper to make the transfer to a baking sheet easier.

Brush with egg white, and sprinkle 1/2 cup cheese over dough. Top with onions, leaving a 2 1/2 inch border. Sprinkle remaining cheese, and fold the pie crust over the edge of the onions, pleating as you go. Leave a 4-inch wide opening in the center. Brush crust with egg white.

Bake at 425 on the bottom rack 17-19 minutes, or until crust is golden-brown and cheese has melted. Let stand 5 minutes before serving.


BLOG DESIGN BY: SHERBET BLOSSOM DESIGNS