Sunday, August 19, 2012

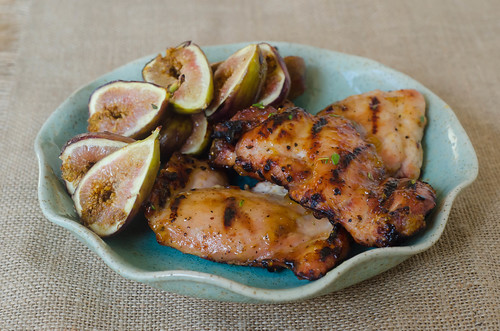
Fig-Glazed Grilled Chicken

First, I'd just like to thank everyone for the kind words and well-wishes for my big announcement on Friday.  I was so touched and humbled by the words of support and love.  Blogging is the best!

Growing up, my grandpa's house was probably my favorite place on earth.  He has nine grandkids, but somehow you always felt like YOU were his favorite.   Pop was so much fun - he had a pool, a long magnolia tree-lined driveway that was perfect for learning to ride a bike, and acres of land to just run around and play.  He also grew grapes (I think muscadine or scuppernongs?) and had a fig tree.  I used to love just grabbing a fig or two off the tree and chowing down.  My fondest childhood memories take place in his house, and I hope my kids will be able to remember fun times with Pop as well.  Caroline loves going to his house to play already.  And so far Smith really loves him too (this picture is from Christmas and is one of my favorite pictures ever).


Pop still has the fig tree, but the grapes and pool are no more.  Pop does have a golf cart now though, and that provides hours of entertainment for our cousins and kids  Without tons of grandkids to use the pool all the time, it wasn't worth the effort to keep up, so he filled it in..  He's gotten too old to tend to his yard the same way he used to, but the fig tree still remains.  When I visit him throughout the summer, I'm always quick to ask if there are any figs ready, but sadly I've been there at the wrong time every time.  I'm either too early or late, or someone else has already come and cleaned him out - don't they know his granddaughter should get first dibs? ;-)

So while it pains me to pay for figs at the grocery store, I'll do it when it means I can end up with a dish like this.  Chicken thighs are grilled and then brushed with a sweet-savory glaze of fig preserves, fresh thyme, and dijon mustard.  I brushed halved figs with the same glaze, then grilled them just long enough to get some caramelization and heat them through.  I served this with goat cheese grits, and it was pretty much perfect.  Just like all those days spent with my sweet Pop.

Fig-Glazed Grilled Chicken Thighs
a Pink Parsley Original

I used chicken thighs because I just really like them, but chicken breasts would work fine as well.  Just adjust the cooking time accordingly.

  • 1 1/2 lbs boneless-skinless chicken thighs, trimmed of excess fat
  • kosher salt and freshly ground black pepper
  • 1/2 cup fig preserves
  • 1 Tbs Dijon mustard
  • 1 tsp minced fresh thyme
  • pinch red pepper flakes
  • 10-12 fresh figs, halved pole to pole
Prepare grill and preheat to medium-high heat.  

Meanwhile, season the chicken thighs on both sides liberally with salt and pepper.  In a small bowl, whisk together the fig preserves, mustard, thyme, and red pepper flakes.  Taste and season with salt and pepper to taste.

Thread the fig halves onto skewers and brush lightly with the glaze.

Oil the grates of the grill and arrange the chicken on the grill.  Grill 5-6 minutes per side, or until an internal temperature of 165 degrees has been reached.  During the last few minutes, brush the chicken with the glaze, turning every minute or so to allow maximum caramelization.  Remove the chicken from the grill, brush one more time with the glaze, and cover loosely with foil for 5-10 minutes before serving.

Add the figs to the grill and grill 3-4 minutes, turning often, until heated through and beginning to caramelize.  Serve alongside the chicken.


Thursday, August 16, 2012

Full Hands, Full Heart


What do Twinkies, Double Stuff Oreos, and Doublemint gum all have in common?

You may or may not have noticed that things have been a little quieter than normal around here this summer.  

I mentioned earlier in the week that we're moving.  

I'm also buying a minivan/trading in my cool card.

And I've been eating weird things like chicken salad with blueberries, feta, and corn.  And okra tacos.  And savory French toast.

So why all the craziness?

.......

I'm pregnant!!  With TWINS!!  TWIN BOYS!!  


I know that's a lot of capital letters and exclamation points, but I'd say this occasion is pretty deserving.

My due date is early February, which puts me right around 16 weeks.  But since there are two in there, they will induce by mid January if I don't go on my own before then.

And to answer some FAQ's:  
  1.  No, twins do not run in my family.  
  2. They are most likely fraternal, but we'll know for sure once they're born.  I think we have a roughly 10% chance of them being identical.
  3. Yes, I was very surprised to see 2 babies in there!  Definitely the biggest shock of my life thus far!
  4. I had a lot of morning sickness at the beginning, but it's gotten much better.  I'm still very tired though, and I don't see that changing... for about 19 years.
  5. Caroline is very excited.  I'm sure Smith is too.
  6. You are right.  My hands will be full.

So bear with me over the next few years  months.  Hopefully I can maintain my sanity - what with raising Caroline and Smith, moving, and baking up two more sweet boys.  And in the future, expect to see a lot more family-style recipes, menu planning, and general cooking tips.  I'll be learning quite a bit myself as I prepare to feed a family of six!


Tuesday, August 14, 2012

Greek Chicken Salad


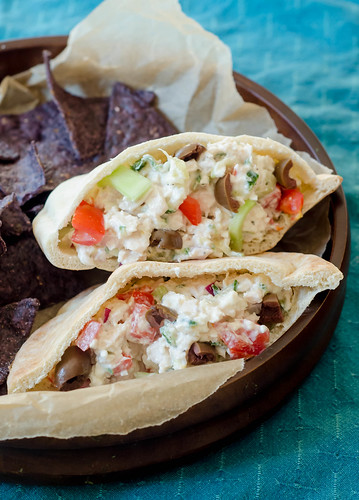
I'm a big fan of chicken salad.  And I'm usually pretty particular about it.  I like it light on the mayo, with some sort of fruit and nuts mixed in,  preferably served on a croissant.  So you'd think this Greek chicken salad would hold no appeal to me, but you'd be totally wrong.  One way to get me to branch out is to incorporate feta and tzatziki sauce.  Works every time.  Though I'm just now getting around to sharing it with you, I've made this chicken salad countless times.  We'll eat it for dinner one night, then I can eat the leftovers for lunches all week.  It's full of so many of my favorite things - the aforementioned feta cheese and tzatziki sauce, kalamata olives.. and it's served with pita bread.  It doesn't get much better.  Sometimes I eat it stuffed into a pita pocket, as shown, and sometimes I like to toast pita bread and dip it into the chicken salad.  Both are pretty awesome.

What's more, since this uses yogurt tzatziki sauce as the base instead of mayonnaise, Caroline can eat it without worrying about her egg allergy.  It's healthy, it's fast and easy to whip up, and the leftovers make great lunches.  And again:  it has feta and tzatziki sauce.  I'm not sure what else you could ask for?

Greek Chicken Salad
barely adapted from Annie's Eats

Because so many of the components have a lot of water, if you are eating this as leftovers, just pour off whatever liquid has accumulated at the top of the salad.

  • 1 1/2 - 2 cups chopped cooked chicken
  • 1/2 cup chopped cucumber (that has been peeled and seeded)
  • 3/4 cup chopped tomatoes, seeded and diced
  • 1/3 cup finely chopped red onion
  • 1/4 cup pitted and chopped Kalamata olives (optional)
  • 1/2 cup crumbled feta cheese
  • 1 - 1 1/2 cups tzatziki sauce
  • 2 Tbs chopped fresh parsley
  • kosher salt and black pepper
  • pita, for serving
Combine all the ingredients through parsley in a medium bowl and stir to combine.  Taste and season with salt and pepper as needed.  Serve with pita bread.


Sunday, August 12, 2012

Skillet Lasagna


So I've been holding out on you guys... I have a lot going on right now (all good things!), one of which is that we're moving!  If all goes according to plan, we'll be closing on our new house at the end of this month.  Woot!  As excited as I am to have a big backyard and a bigger kitchen, that comes with a price - cleaning and packing up our current house - and our lives for the last 9 years.  As you might could imagine, this will be no small feat with two small children underfoot.  Caroline loves to "help" me pack, which roughly translates to "ooooh look I found my favorite toy! " (some random ball that she hasn't touched for 2 years) and "Can I play with this book of 2000 stickers that you're trying to pack?  I promise not to make a mess!"

So needless to say, the less I have to pack and take with us, the better.  Which brings us to this lasagna.  I'm trying to pare down my pantry, fridge, and freezer.  The less we have, the less we have to pack or throw away.  I always seem to have several boxes of half-empty pasta, so this made the perfect dinner to use those up.  I actually did have some partially full boxes of lasagna noodles, but really any small or medium pasta would work well here.

The beauty of this dish is that it really does taste like lasagna, but it comes together in right around half an hour and is completely cooked one skillet.  Joey even ventured to say that he likes it better than traditional lasagna.

Peeled tomatoes are pulsed in a food processor to form the tomato sauce - but I think you could use crushed tomatoes and still have great results.  Onion and ground beef are then sautéed, flavored with some garlic, herbs, and spices, and the noodles and tomato sauce are added.  They are simmered on the stovetop, absorbing all the tomato-goodness, leaving you with a super flavorful dish.  And THEN, ricotta, parmesan, and mozzarella are stirred in, MORE cheese is sprinkled over the top, and a quick trip under the broiler leaves you with the melty, gooey top that is a necessity to any lasagna.

I'll most definitely be making this dish in our new house time and time again.  It has quite easily become a family staple.


Skillet Lasagna
adapted from America's Test Kitchen, Pasta Revolution
serves 4 to 6

  • 3 (14.5 oz) cans whole peeled tomatoes (or 1.5 28 oz cans)
  • 1 Tbs olive oil
  • 1 medium onion, diced
  • kosher salt and freshly ground black pepper
  • 3-4 garlic cloves, minced
  • pinch red pepper flakes
  • 3/4 tsp dried Italian seasoning
  • 1 lb ground sirloin
  • 10 (curly-edged) lasagna noodles, broken into 2-inch pieces
  • 3/4 cup shredded mozzarella cheese
  • 1/2 cup grated Parmesan cheese
  • 3/4 cup ricotta cheese (part-skim is fine)
  • 3 Tbs chopped fresh basil
Pulse the tomatoes in a food processor until coarsely ground and no large pieces remain, about 12 pulses.

Heat the oil in a 12-inch nonstick skillet over medium heat.  Add th onion and 1/2 teaspoon of salt and cook, stirring often, until softened, 5 to 7 minutes.  Stir in the garlic, pepper flakes, and Italian seasoning and cook until fragrant, about 30 seconds.

Add the ground beef to the skillet.  Cook, stirring often and using a wooden spoon to break up the meat, about 3 to 5 minutes, or until it's no longer pink.

Scatter the pasta in the skillet, then pour the tomatoes over the top.  Stir, increase the heat to medium-high, and cover.  Cook at a vigorous simmer, stirring often, until the pasta is tender, 20 minutes (if you don't stir it, the pasta will clump together and stick to the bottom and sides of the skillet).

Meanwhile, preheat the broiler.

Remove the skillet from heat, and stir in half the mozzarella and parmesan, and 1/4 cup of the ricotta.  Dot the remaining ricotta over the noodles in tablespoons, then sprinkle with the remaining mozzarella and parmesan.  Transfer to the oven and broil until the cheese melts and is starting to brown.  Remove from oven, sprinkle with basil, and serve.


Thursday, August 9, 2012

Funfetti Sandwich Cookies (from scratch)


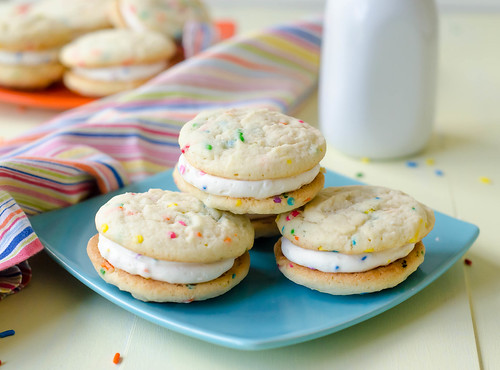
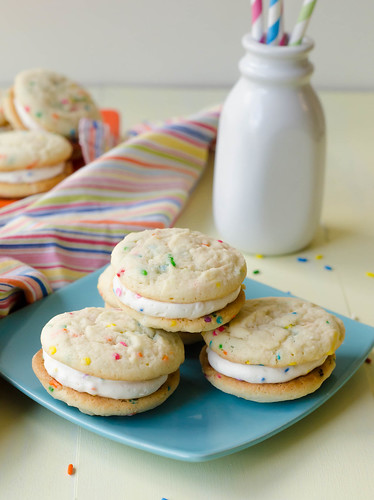
Is there anything more festive and FUN than FUNfetti?  I think not.  I've had a serious craving for funfetti lately, and while I did consider making cupcakes, cookies with icing just sounded too good to pass up.  When I set out to find a recipe, most seemed to call for boxed cake mix.  I finally found this recipe, which is made from scratch, yet the cookies still take on some flavors of the cake mix (minus the preservatives, of course!).  Using cake flour in lieu of all-purpose gives them a light texture.  The recipe called for butter extract to mimic boxed cake mix, but I didn't have any on hand, so I added some melted butter instead.  I also added an extra egg yolk to make them chewier.  These ended up as something of a whoopie pie - cookie hybrid, and they were really awesome.  The cookies actually reminded me a bit of the soft sugar cookies you can buy from the grocery store bakery, and anyone who's had those cookies knows what a good thing that is!

As if they couldn't be any better, they are full of colorful, fun sprinkles.  The sprinkles most definitely put the fun in funfetti :)


Funfetti Sandwich Cookies
adapted from Yammie's Noshery

  • 2 sticks (1 cup) softened butter + 2 Tbs melted butter
  • 1 1/4 cup sugar
  • 2 teaspoons vanilla extract
  • 1 egg + 1 egg yolk
  • 2 cups cake flour
  • 2/3 all-purpose flour
  • 3/4 teaspoon baking soda
  • 1/2 teaspoon salt
  • 1/2 cup colored sprinkles
In the bowl of a stand mixer fitted with the paddle attachment, cream the softened butter and the sugar at medium speed until light and fluffy, 3-5 minutes.  Add the vanilla extract, melted butter, egg, and and yolk, and mix until combined.

Add the cake flour, all-purpose flour, baking soda, and salt, and mix at low speed until just combined.  Use a spatula to fold in the sprinkles.  

Transfer to the fridge and allow to chill at least 30 minutes.

Meanwhile, preheat the oven to 375 degrees.  Using a cookie scoop (mine measures about 1.5 tablespoons), drop the dough onto parchment-lined cookie sheets, spacing them about 2 inches apart.  Bake 10-12 minutes, rotating the pans halfway through, until they are just beginning to brown on the bottom and barely firm on top.  Allow to cool 5-10 minutes on the baking sheet, then transfer to a wire rack to cool completely.

Funfetti Icing
adapted from Cook's Illustrated
  • 1 1/4 sticks (10 Tbs) unsalted butter, softened to room temperature
  • 1 1/4 cups confectioner's sugar, sifted
  • 1 tsp vanilla extract
  • 1 Tbs heavy cream
  • 1/3 cup colored sprinkles
In the bowl of a stand mixer fitted with the paddle attachment, beat the butter until creamy, about 2 minutes.  Add the sugar and beat at low speed until just combined, then increase the speed to medium for about 2 minutes.  Add the vanilla and heavy cream and beat at medium-high speed until light and fluffy, 3-5 minutes.  Stir in the sprinkles.

To assemble the cookies, match pairs based on size and shape.  Pipe or spread icing onto one half, then gently but firmly close the cookie and press lightly to spread the icing to the edges.

Store in an airtight container until ready to serve.  These are great slightly chilled from the refrigerator!


Tuesday, August 7, 2012

Savory Parmesan French Toast with Tomato-Basil Topping


Sometimes I make a recipe not because I know that without a shadow of a doubt that it'll be awesome, but more so that I'm intrigued.  Sometimes it blows up in my face and we have cereal or grilled cheese for dinner, but sometimes it results in a great dinner - like this grilled chicken salad with blueberries and corn, okra tacos, chorizo and sweet potato lettuce wraps, or this blueberry-BBQ salmon.  You win some, you lose some.

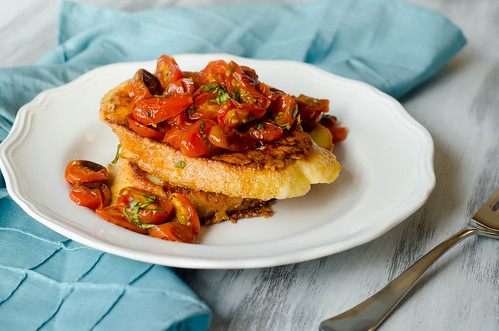
We're all familiar with french toast for breakfast - topped with a pat of butter and fresh fruit, drizzled (umm drenched) with syrup... always a favorite.  But how about making a savory version?  For dinner, even?  This recipe definitely intrigued me, but coat pretty much anything with parmesan cheese and top it with roasted tomatoes, and I'm sure I'll love it.

And of course, I did.  The toast gets a double dose of the cheese - some is shredded into the egg mixture that you use to soak the sliced bread, then the rest is used to encrust the bread and form a cheesy crust.  The tomatoes are briefly roasted in the oven and come out just garlicky enough, slightly sweetened, and caramelized.  Mixed with a dash of balsamic vinegar and some fresh basil, and you have a super awesome topping for the cheesy toast.  I pretty much always have all the ingredients for this savory french toast on hand, so I foresee it becoming a staple in our house - for a quick and easy weeknight dinner, or a lazy weekend brunch.  Don't be scared - take a leap of faith and try savory French toast!

Savory Parmesan French Toast with Tomato-Basil Topping
adapted from America's Test Kitchen, Simple Weeknight Favorites
serves 4

  • 1 1/2 lbs grape tomatoes, halved
  • 6 garlic cloves, sliced thin
  • 6 Tbs olive oil, divided
  • kosher salt and freshly ground black pepper
  • pinch sugar
  • 2 tsp balsamic vinegar
  • 3 Tbs chopped fresh basil
  • 3 large eggs
  • 2 cups milk
  • 1/4 cup all-purpose flour
  • 1/4 cup finely grated Parmesan cheese + 2 cups shredded on the large wholes of a box grater
  • 8-10 (1-inch) slices Italian or French bread
Heat oven to 450 degrees and adjust the rack to the middle position.  Toss the tomatoes with garlic, sugar,  and 2 tablespoons of the oil.  Season with salt and pepper and arrange them cut side up on a rimmed baking sheet.  Roast until the skins begin to brown on bottom, about 20 minutes.  Allow to cool slightly, then transfer to a bowl and toss with the basil and balsamic vinegar.  Set aside.

Meanwhile, whisk the eggs in a shallow dish with milk, flour, finely grated parmesan, 1/4 tsp salt, and 1/4 tsp pepper.  Spread the shredded parmesan in another shallow dish or large plate.

Working 4 pieces of bread at a time, soak the slices in the milk mixture for 5 minutes, flipping halfway through.  One at a time, remove each slice from the mixture, then transfer to the shredded parmesan, pressing gently on both sides to adhere the cheese to the bread.  Repeat with the remaining bread

Heat 2 tablespoons of the oil in a 12-inch nonstick skillet over medium heat until shimmering.  Cook 4 slices of bread turning once, until browned and crispy, about 2-3 minutes per side.  Transfer to a large plate and cover loosely with foil.  Repeat with the remaining 2 tablespoons of oil and the remaining 4 slices of bread.

Serve topped with the roasted tomato mixture.


Sunday, August 5, 2012

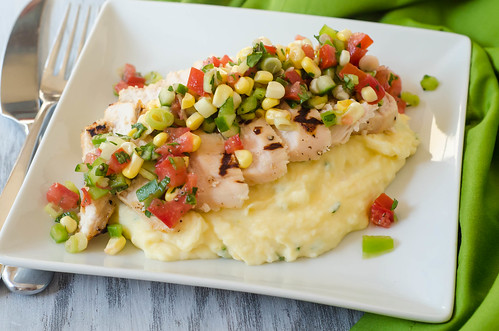
Buttermilk Grilled Chicken with Garden Vegetable Salsa


It sometimes seems like there are only a finite number of ways to do grilled chicken for dinner, so it's always fun to find a new option.  This chicken is heathy, quick and easy, and takes advantage of the bounty of beautiful summer produce.  Boneless, skinless chicken breasts are marinated in a mixture of buttermilk and a few spices, then thrown on the grill.  The buttermilk marinade pulls a double duty - it tenderizes the chicken, then keeps it from drying out while on the grill.  One of the biggest complaints about grilled chicken is that it can be tough, dry, and overcooked.  The buttermilk definitely helps avoid those issues.

While the chicken cooks, a quick salsa is mixed up of cucumber, bell pepper, tomatoes, corn, and a mixture of herbs.  Feel free to play around with the veggies here - just use what sounds good and what's in season.  I served this over cheddar-chive mashed potatoes, and it was both comforting and light.  Winner winner chicken dinner!


Buttermilk-Grilled Chicken with Garden Vegetable Salsa
a Pink Parsley Original

  • 4 boneless skinless chicken breast halves, trimmed
  • 2 cups low-fat buttermilk
  • 3 cloves garlic, peeled and crushed
  • 1/2 tsp paprika
  • 1/8 tsp crushed red pepper flakes
  • 1 tsp kosher salt 
  • 1/2 tsp freshly ground black pepper
In a gallon-sized ziploc bag or shallow baking dish, combine the chicken with the buttermilk, garlic, paprika, red pepper flakes, salt, and pepper.  Cover and refrigerate at least 1 hour, or up to overnight.

When ready to cook, preheat the grill to medium-high heat.  Oil the grates and cook the chicken about 7 minutes per side, turning once, or until the internal temperature reaches 165 degrees Fahrenheit.   Remove from heat, cover loosely with foil, and allow to rest at room temperature about 10 minutes before serving.

Garden Vegetable Salsa
  • 1/2 cup finely diced cucumber
  • 1/2 cup finely diced bell pepper
  • 1/2 cup minced scallions
  • 3/4 cup corn, cut from the cob (about 1-2 ears)
  • 2 medium tomatoes, cored, seeded, and diced
  • 1/4 cup minced fresh herbs (I used a mixture of basil, chives, oregano, and parsley)
  • 2 Tbs olive oil
  • 2 Tbs red wine vinegar
  • juice of 1/2 lemon
  • salt and pepper to taste
As the chicken cooks, combine all the ingredients for the salsa in a medium bowl.  Taste and season with additional salt and pepper before serving.


BLOG DESIGN BY: SHERBET BLOSSOM DESIGNS