Monday, April 30, 2012

Chorizo and Sweet Potato Lettuce Wraps


Lately I have been all about lettuce wraps.  They just seem so fresh, and I love the crisp, crunchy leaves in lieu of soft taco shells.  Plus, they are healthier - you can cut so many calories by swapping out the taco shell for a lettuce wrap.  If you're not on the lettuce wrap bandwagon, then have no fear:  this filling would be just wonderful on a regular tortilla as well.

Now onto the filling:  holy cow this was good.  Chorizo is one of my favorite things ever, as are sweet potatoes.  And while I love this recipe for chorizo and potato tacos, I never would have thought to use sweet potatoes.  But the combination is really great.  The spiciness of the chorizo is nicely countered by the sweetness of the potato.  The corn provides another texture, and while I used frozen corn this time, I think fresh sweet corn would be absolutely great here.

You serve the wraps with some cilantro-lime yogurt sauce and feta cheese.  The cilantro-lime gives the whole dish another hit of bright freshness, while the yogurt cools down the spice a bit.  And the salty, briny flavor of the feta ties the whole thing together and gives the dish another dimension besides sweet + spicy.

I just absolutely loved this dinner.  I ate 3 wraps (oink oink) and had to stop myself from having a fourth.  And thankfully we had leftovers, because I turned them into a hash or sorts topped with a poached egg.  And THAT was out of this world.

I actually used soy chorizo in these because I went shopping at Trader Joe's and that's what they had, but if I hadn't known it wasn't real chorizo, I probably couldn't have told the difference.  Halfway through dinner, Joey proclaimed his love for chorizo, and I burst his bubble ;-)

If you're still finalizing your Cinco de Mayo menu, consider these wraps if you're looking for something a little healthier and different.

And if these aren't your cup of tea, here are a few other main dishes to consider:
Mexican-Style Steak Sandwiches
Portabello & Black Bean Enchiladas with Roasted Poblano Sauce
Spicy Citrus Grilled Shrimp Tacos
Vegetable Enchiladas
The Famous Chicken Enchiladas
Chipotle Bean Burritos


Chorizo and Sweet Potato Lettuce Wraps
adapted from Perry's Plate


Chorizo-Sweet Potato Filling:
  • 2 medium sweet potatoes, peeled and cut into 1/2-inch cubes
  • 1 cup frozen or fresh corn
  • 3 Tablespoons canola, divided
  • 2 teaspoons ground cumin
  • pinch of cayenne
  • pinch of sugar
  • kosher salt
  • 1 cup chopped white onion
  • 10-12 ounces chorizo, casings removed (soy or pork both work!)
  • juice from 1 lime
  • 1/2 cup chopped fresh cilantro

Cilantro cream:
  • 1 cup  Greek yogurt 
  • 2 T freshly squeezed lime juice
  • 2 T chopped fresh cilantro
  • pinch of salt
To assemble:
  • 1 head of leaf lettuce (green, red, butter, or Bibb), leaves separated, washed, and dried
  • 1 cup crumbled feta
  • Additional lime wedges, for garnish

Preheat oven to 450 degrees. Place sweet potato cubes and corn on a large rimmed baking sheet. Drizzle with 2 T of the oil and sprinkle with cumin, cayenne, sugar, and a good pinch of salt. Use your hands to toss the vegetables and coat them well with the oil and spices.  Spread them into a single layer and roast for 15-20 minutes, stirring a couple of times during roasting, until the potatoes are tender browned in spots.
Meanwhile, heat the remaining tablespoon of oil in a large skillet over medium heat. Saute the onion, stirring occasionally, until golden brown, about 8-10 minutes. Add the chorizo, breaking up the clumps with the woolens spoon.   Stir and cook until the chorizo is browned and cooked through, about 5-8 minutes. Add the sweet potato mixture to the skillet, then stir in the lime juice and cilantro.  Taste and season with additional salt if necessary.
As the chorizo mixture is cooking, combine the sour cream, lime juice, and chopped cilantro in a small bowl. Stir to combine, adding a pinch of salt to taste.
Assemble the wraps by putting a couple spoonfuls of filling into the middle of a lettuce leaf. Drizzle with the cilantro cream sauce and sprinkle with feta.  Serve with extra lime wedges.


Sunday, April 29, 2012

Bacon-Chipotle Guacamole


Without a doubt, guacamole is one of my favorite snacks (um, meals).  Just a good, classic, guacamole:  avocados, garlic, cilantro, jalapeño, and lots and lots of lime juice.  So it's hard to stray from that classic version, but if anything will make me jump ship it's this.  I have two words for you  bacon.  chipotle.  Yes, indeed.

This guacamole is one that people who "don't even like guacamole" will inhale.  We brought this to a neighborhood block party, and that is what I heard over and over again.  "I don't even like guacamole or avocados, but that stuff is GOOD!"

The bacon gives the guacamole a fun crunch, while also of course adding some of the best flavor on earth.  The chipotle's smokiness plays really well off of that of the bacon, while also providing some heat.  It truly is the perfect combination.

Guacamole is a must at any respectable Cinco de Mayo party, so I highly recommend you gussy up your usual version and make this.  I promise you it will be well-received.

Bacon-Chipotle Guacamole
barely adapted from Fiesta at Rick's, by Rick Bayless
makes about 3 cups

  • 4 strips of bacon, preferably thick-cut, applewood-smoked bacon
  • 3 ripe avocados (about 1 1/4 lbs)
  • 1/3 cup finely chopped white onion
  • 3 canned chipotles en adobo - seeds removed optional - finely minced
  • 1 tomato, cored, seeded, and finely chopped
  • 1/4 cup chopped cilantro
  • 1 clove garlic, minced
  • juice of 1 lime
  • kosher salt to taste
Chop the bacon into 1/2-inch pieces and cook in a large skillet until browned and crispy.  Remove to a paper towel-lined plate to drain.

Meanwhile, cut each avocado in half, remove the seed, and scrape out the flesh from the peel.  Add it to a medium mixing bowl and mash with a fork into a coarse puree.  

Add the onion to a small strainer and briefly rinse under cold water (this helps tame the "bite" of raw onion).  Shake off the excess water and transfer to the bowl with the avocados.  Add the bacon, chipotle chiles, tomato, cilantro, garlic, and lime juice.  Mix well, then season to taste with salt. 

Serve immediately.


Thursday, April 26, 2012

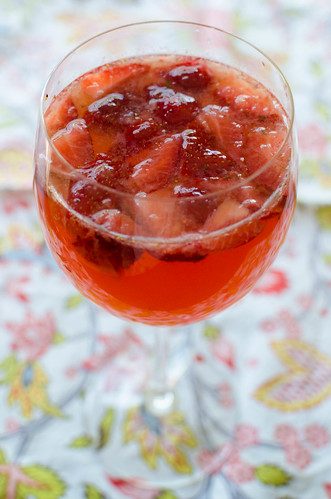
Strawberry Rose' Sangria


When I was pregnant with Caroline, all I wanted was a glass of sangria.  I wanted red wine sangria - with the booze-soaked fruit at the bottom of the glass.  And wouldn't you know - when I finally gave birth and was ready to have a drink again, it was completely lackluster.  We went to a Mexican restaurant, and as usual I hemmed and hawed deciding whether to order a margarita, beer, or sangria.  But I ended up going with sangria since I'd been craving it for all those months.  And it was not good.  I'm pretty sure it was just a bottle of "sangria" from the grocery store.  No fruit on the bottom.  Being in my hormonal post partum state, I think I started crying.  And Joey quickly flagged the waitress down and ordered me a margarita.

I can't think of a single person who would be disappointed in this sangria.  It's pretty awesome.  You start by soaking strawberries and peaches in sugar, vodka, and triple sec - it makes them unbelievably sweet and perfect.  Then you add rose' wine and sparkling water.  I know that rose' wine seems to get a bad rap because of the association with white zinfandel, but trust me on this.  It's not white zin.  It is not cloyingly sweet.  It's dry, fresh, very crisp, and incredibly drinkable.  It's actually my favorite wine to drink throughout the summer.  So if you're a fellow rose' lover, I'm sure that you can imagine that combination of rose' wine with strawberries is pretty great.  

Sangria is my absolute favorite cocktail to make when we entertain.  It's ideally made ahead of time so you have no prep work to do when it's time to (drink) eat.  Just pour and enjoy.  Cinco de Mayo is just over a week away, so if you can't/don't do tequila (don't worry, I've been there), then this sangria is a great alternative to margaritas. 


Strawberry Rose' Sangria
adapted from The Cilatnropist
  • about 1 1/2 cupa sliced frozen peaches (or 2 peaches, peeled, pitted and sliced)
  • 3 cups hulled and quartered strawberries
  • 1/4-1/3 cup sugar (depending on how sweet you like your sangria and how sweet your strawberries already are)
  • juice of 2 lemons
  • 3/4 cup triple sec
  • 1/4 cup vodka
  • 1 bottle dry Rose' wine, chilled
  • 2 cups sparkling water, chilled
In a large pitcher, stir the fruit and sugar until the fruit starts to release it's natural juices.  Mix in the lemon juice, triple sec, and vodka.  Allow to sit (at room temperature) 2-3 hours, stirring occasionally.

When ready to serve, stir in the Rose' wine and sparkling water.  Serve each glass with some of the strawberries and peaches.


Wednesday, April 25, 2012

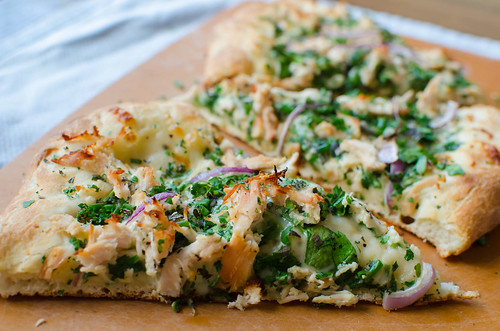
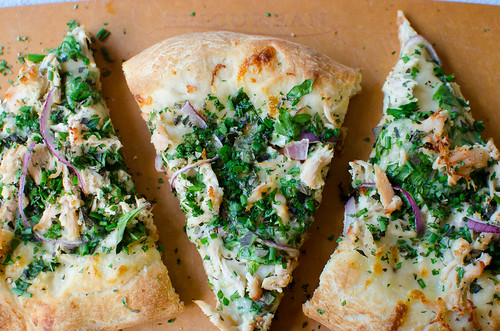
White Pizza with Chicken & Fresh Herbs


There are as many combinations for pizza toppings as there are stars in the sky.  You can be traditional, go really crazy... whatever floats your boat.  The sky's the limit, and the beauty of building your own pizza is that you can completely customize it to your liking.

Joey is pretty traditional and given the choice will almost always choose pepperoni and mushroom.  I on the other hand, like to get creative and top my pizza with "weird" toppings.  Like steak, goat cheese, and balsamic vinegar.  Or strawberries and goat cheese.  Or eggplant and ricotta cheese.

We both liked this combination though.  You start with a simple white sauce, then top it with shredded chicken, sliced onions, and a little mozzarella.  After cooking, a big handful of fresh herbs is scattered over the top.  And might I suggest dipping the pizza in the extra white sauce?

This pizza falls somewhere in the middle when it comes to crazy vs traditional.  White pizza is pretty standard in my opinion, as is the addition of chicken to pizza.  However, adding a boat load of fresh herbs just before serving is a little nontraditional.  Yet surprisingly delicious.

I'm sure we all get stuck in a dinner rut from time to time, but when you have so many options for pizza, you should definitely never get stuck in a pizza rut.  This one is a little different, yet still familiar.  Feel free to mix up the protein and use sausage, shrimp, or just leave it off and make it vegetarian.  Trade out th herbs for whatever combination sounds good to you and you have easy access to.  Add some sautéed mushrooms.  Drop dollops of ricotta over the top instead of mozzarella.  Make it your own and enjoy!


White Pizza with Chicken and Fresh Herbs
adapted from Cooking Light, October 2011

  • 1 lb pizza dough
  • about 1-2 tsp cornmeal, for sprinkling over the parchment
  • olive oil, for brushing the crust
  • 1 Tbs unsalted butter
  • 3 garlic cloves, minced
  • 2 Tbs all-purpose flour
  • 1/2 tsp freshly ground black pepper
  • 3/4 cup milk (low-fat or skim is fine)
  • 1/2 cup grated Parmesan cheese
  • kosher salt
  • 1 cup shredded, cooked chicken breast
  • 2/3 cup freshly grated mozzarella cheese
  • 1/3 cup thinly sliced red onion
  • 1 Tbs minced fresh oregano or basil
  • 1 Tbs minced fresh chives
  • 1 Tbs minced fresh parsley

Preheat the oven and pizza stone to 500 degrees, allowing it to maintain that temperature for at least 30 minutes.

Meanwhile, sprinkle a large piece of parchment paper with the cornmeal.  Stretch and roll the dough into a 12-14 inch circle.  Brush the outer edge with olive oil.

In a small saucepan, melt the butter over medium heat.  Stir in the garlic and cook until fragrant, about 1 minute.  Stir in the flour and pepper and cook, whisking constantly, until the flour has turned very light golden-brown, about 1 minute.  Slowly whisk in the milk and bring to a simmer, stirring often.  When it thickens slightly, remove from heat and stir in the Parmesan cheese.  Season to taste with salt and pepper.

Spread a thin layer of the white sauce over the pizza dough (using about 1/2 cup of the sauce).  Scatter the chicken and onions evenly over sauce, and top with the shredded mozzarella.

Transfer to the oven using the parchment paper, and cook about 10-12 minutes, or until the crust is golden-brown and the cheese is melted and bubbly.  Remove from the oven and allow to cool 5-10 minutes.  Sprinkle with the fresh herbs, slice, and serve with remaining white sauce.


Tuesday, April 24, 2012

Brown Butter Banana Strawberry Muffins


I've spoken a little bit about Caroline's egg allergy on here.  Short, basic story is that she is allergic to eggs.  We are hoping that she'll outgrow it, but every time we take her for her allergy testing, I leave disappointed.  And I always go into her appointment thinking that if she's no longer allergic, then I'll take her out to breakfast and order her scrambled eggs and a waffle.  But, that has yet to happen.  Most recently, I planned for us to spend the afternoon baking up egg-full treats that she could enjoy.  Maybe next year.

Most of the time she is a pretty happy go lucky kid, so she was a good sport through the poking of the test, and then when we left, she very matter-of-factly asked me if eggs still made her sick or if she would be able to eat cupcakes with her friends now.  It broke my heart, but she just said "okay" when I told her that they still make her sick.  And then she just went about her business like it was nothing.  Most of the time I really think it's harder on me than it is on her.  She doesn't know anything different, so she's fine with it.  And I should really take a cue from her and gain some perspective.

The good news is that even though she is still allergic, the diameter of her reaction spot has decreased from last year.  So we are still hopeful.  Maybe next year will be our lucky year!  Instead of wallowing in self/Caroline-pity this year, I thought that we might as well still enjoy baking together the afternoon following her appointment.  So instead of making cupcakes with Swiss meringue buttercream and egg yolk-based ice cream, we made these strawberry-banana muffins.  And I don't think she minded a bit.  To make them allergen-free, I just used egg replacement powder in lieu of the 2 eggs called for in the recipe.

As far as muffins go, I feel like they generally fall into 2 categories:  healthy and nutritious vs basically an excuse to eat a cupcake for breakfast.  I like to think that these are closer to the healthy side with a little indulgence from the butter.  You can replace up to half of the flour with whole-wheat flour, there is less than a cup of sugar in entire recipe, plus come on - there are bananas and strawberries there.  Fruit = healthy.

Caroline still loves to help me in the kitchen, so she lined the muffin tins with cupcake liners, whisked the dry ingredients, mashed the banana,  stirred it all together, and then topped each one with a slice of strawberry.  This was such a fun recipe for us to make together, and the muffins were enjoyed for several days following.

And since I just spent the entire post talking about Caroline, I suppose it's only fair to share a recent picture of my sweet girl.


Brown Butter Banana Strawberry Muffins
adapted from Joy the Baker

  • 6 oz (1 1/2 sticks) unsalted butter
  • 2 cups all-purpose flour (can substitute up to 1 cup of whole-wheat flour)
  • 3/4 cup brown sugar
  • 1 tsp baking soda
  • 1/2 tsp kosher salt
  • 1/2 tsp ground cinnamon
  • 2 eggs
  • 1 tsp vanilla extract
  • 1/4 cup plain yogurt or buttermilk
  • 1 1/4 cups mashed banana (2-3 medium bananas)
  • 1/2 cup small diced strawberries, plus 2-3 more for topping
Place a rack in the center of the oven and preheat to 350 degrees F.  Line a muffin pan with liners or grease each well with butter.
Melt butter in a saucepan over medium heat.  Butter will begin to foam and crackle as it melts.  When the crackling subsides, the butter will begin to brown.  Swirl the pan as the butter cooks.  When the butter browns and begins to smell nutty, remove the pan from the flame and transfer the butter to a small bowl.  Taking the butter out of the hot saucepan will stop the butter from overcooking and burning.  Set aside to cool.
In a large bowl, whisk together flour, sugar, baking soda, salt, and cinnamon.
In a medium bowl, whisk together eggs, vanilla extract, and yogurt or buttermilk.  Whisk in the mashed bananas.  When butter has cooled, whisk in the browned butter.
Add the wet ingredients to the dry ingredients.  Stir,  scraping the bottom of the bowl to incorporate any hidden pockets of flour.  Fold in the diced strawberries, being careful not to over stir.
Spoon batter into prepared pan and top with thinly sliced strawberries.   Bake for 20-25 minutes, or until a skewer inserted into the center of the loaf comes out clean.  Remove from the oven and allow to rest in the pan for 5 minutes, then transfer to a wire rack to cool completely.


Sunday, April 22, 2012

Ranch Dressing - Lightened Up


Up until a few years ago, I was never a big fan of ranch dressing.  I absolutely hated mayonnaise, so a dressing with mayo as the base never appealed to me in the slightest.  While I can now appreciate it in limited capacities, it has to be masked somewhat by other things.  In the case of ranch dressing, herbs, buttermilk, and garlic.  That I can handle with aplomb.

The problem with ranch dressing, however, is that it's a pretty big calorie bomb.  Mayonnaise.  Sour cream.  milk (or cream).  The things that make it so delicious are the things that make it so bad for you.  So I took a homemade version that has made the rounds on the web, and lightened it up.  I replaced the mayo with light mayo, the sour cream with nonfat greek yogurt, and used low fat buttermilk.  As far as I'm concerned, the taste didn't suffer at all.  It's still wonderfully creamy, and the subtle taste of the light mayo and Greek yogurt allow the herbs and garlic to really shine through.  And with the bright and fresh flavors, a little goes a long way, so you don't have to drench everything with it.  After tasting homemade ranch dressing, the bottled kind tastes really bland and heavy to me.

It's great to use for dipping veggies, as a salad dressing, to dip ... well pretty much anything if you're Joey... the possibilities are endless.  It's a versatile condiment, one that you can now feel pretty good about eating.


Light Ranch Dressing
adapted from The Gourmet Cookbook, via Confections of a Foodie Bride

  • 1/2 cup low-fat mayonnaise
  • 1 cup fat-free Greek yogurt
  • 2 tsp olive oil
  • 1/2 cup low-fat buttermilk
  • 3 Tbs snipped fresh chives
  • 1/4 cup chopped fresh parsley
  • 1 large clove garlic
  • juice of 1/2 lemon
  • 1/2 tsp salt
  • 1/2 tsp freshly ground black pepper
In a blender or food processor, combine all the ingredients and puree until smooth.  Taste and season with additional salt, pepper, and/or lemon juice.  Add more buttermilk if you want it thinner, and more Greek yogurt if you want it thicker.

Store, chilled, in an airtight container.


Thursday, April 19, 2012

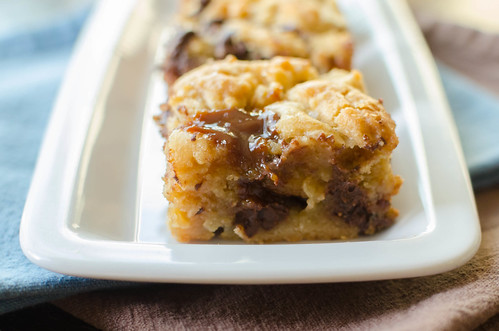
Salted Caramel Chocolate Chip Cookie Bars


When it comes to dessert, I think you'd be pretty hard-pressed to find anyone who doesn't like chocolate chip cookies.  You may find some dissenting opinions about soft and chewy vs thin and crispy (for the record, I'm soft and chewy all the way), but to not like chocolate chip cookies?  That's just unAmerican.  So then the issue becomes:  do you try and improve upon perfection, or just leave well-enough alone?  I personally think it's hard to beat a really good chocolate chip cookie.  But if anything could, it's a chocolate chip cookie bar that's laced with salted caramel.

You start with a basic - but outstanding - recipe for cookie dough.  Press half of it into a pan, then drizzle salted caramel over it.  Top with the rest of the cookie dough, bake, and give the finished product a generous sprinkle of sea salt and coarse sugar.

According to my husband, these cookie bars are the best thing to ever come out of my kitchen.  A good chocolate chip cookie already has a slight toffee flavor thanks to the butter and brown sugar, and the salted caramel not only enhances that, but adds another level of richness.  The salt keeps them from being too sweet and rich, and for those who love sweet and salty, it creates what I think is the perfect balance.  The innermost center piece is my absolute favorite - it's still just a little gooey, but has the crispy crust.

I used leftover salted caramel sauce from these salted caramel brownies, but if you don't happen to keep salted caramel sauce on hand (who are you?), then any caramel sauce with a generous pinch of fleur de sel will do.  These bars are great to take to new moms, a sick friend, potlucks, the gym... really I can't think of an occasion where they wouldn't be appropriate :)


Salted Caramel Chocolate Chip Cookie Bars


  • 2 cups plus 2 tbsp all-purpose flour
  • 1/2 tsp baking soda
  • 3/4 tsp kosher salt
  • 12 tbsp unsalted butter, melted and cooled until warm
  • 1 cup light brown sugar, packed
  • 1/2 cup granulated sugar
  • 1 large egg plus 1 egg yolk
  • 2 tsp pure vanilla extract
  • 1 1/2 cups milk or semi-sweet chocolate chips
  • 1/4 cup salted caramel sauce
  • coarse sugar, for sprinkling
  • fleur de sel, for sprinkling

  •   Preheat oven to 325 degrees F.  Line an 8×8-inch baking pan with aluminum foil so that the edges of the foil overhang two sides of the pan; grease the foil with butter or cooking spray.

    Whisk the flour, baking soda, and salt in a medium bowl and set aside.  In the bowl of a stand mixer fitted with the paddle attachment or in a large bowl using a hand mixer, beat the butter and sugars together until thoroughly combined.  Beat in the egg, yolk, and vanilla until just combined.  Add in the dry ingredients and beat at low speed until the mixture is just combined – do not overbeat.  Stir in the chocolate chips.

    Spread half of the dough out in the bottom of the baking pan with slightly damp fingers to prevent sticking.  Drizzle the caramel over the dough, then gently use a small offset spatula to form an even layer.   Drop the remaining dough in clumps over the caramel – the dough will bake together, so don't worry if the dough doesn't cover the entire pan.

    Bake for 30-35 minutes until a toothpick comes out clean from the bars when tested for doneness.  As soon as the bars come out of the oven, sprinkle the top with coarse sugar and fleur de sel.  Allow the pan to cool on a wire rack for 15 minutes before carefully removing the bars in the foil from the pan.  Allow the bars to cool completely before slicing.


    Source:  inspired by Smells Like Home, cookie dough from America's Test Kitchen.  Salted Caramel from Baked: Explorations


    BLOG DESIGN BY: SHERBET BLOSSOM DESIGNS