Thursday, April 10, 2014

Artichoke Pesto Chicken Pizza


It's Pizza Friday!  It's a thing, right?

I've come to the conclusion that it's time to start making two pizzas for my family on pizza night.  One just barely feeds everyone, and that's only if I serve a substantial side dish.  Or maybe I should just stop making pizzas that are so good that we all inhale an entire pizza in less than 10 minutes?  Then maybe Caroline won't cry when she doesn't get seconds because her brothers (and parents) ate the rest of the pizza?

.... We'll go with a second pizza.

This pizza is a riff on a pesto pizza, utilizing one of my favorite spring veggies:  artichokes!  I mixed up an easy artichoke pesto, slathered it on the crust, then topped it with plenty of cheese, shredded chicken, and roasted tomatoes.  Such a simple combo, but such a great pizza.

It was a gorgeous evening, so we carried our dinner outside and ate on the deck.  After the pizza was demolished in mere minutes, the kids all toddled around in the yard, and I sat and relaxed with a nice glass of rose'.  Life is good in the springtime.  Especially with pizza and wine.
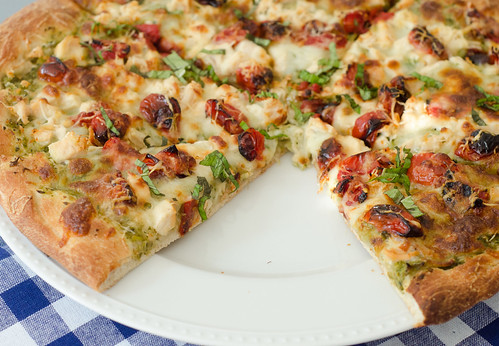


Artichoke Pesto-Chicken Pizza

Artichoke Pesto
adapted from Confections of a Foodie Bride

This will make more pesto than you need, but it is wonderful as a sandwich spread, stuffing for chicken or pork, bruschetta topping, pasta mix-in, etc.  Or you could probably freeze it pretty easily and save it for another pizza!

  • 9 oz artichoke hearts (frozen or canned, drained and patted dry)
  • 2 cloves garlic, smashed
  • 1/4 cup basil leaves
  • 2 Tbs fresh parsley leaves
  • 1 cup fresh spinach
  • 1 tsp lemon zest
  • juice of 1/2 lemon
  • 1/2 cup Parmesan cheese
  • pinch of red pepper flakes
  • 4-5 Tbs olive oil
  • salt and pepper to taste
Combine all the ingredients except the olive oil in a food processor, and puree until smooth, stopping to scrape down the bowl as needed.  With the food processor running, slowly pour 4 tablespoons of the olive oil through the feed tube.  Add an extra tablespoon of oil if the pesto still seems thick - you want it to be easy to spread.  Taste and season with salt and pepper as needed.

Pizza
  • 1 1/2 cups halved grape tomatoes
  • olive oil
  • kosher salt and freshly ground black pepper
  • 1 lb pizza dough
  • cornmeal
  • 1/2 cup artichoke pesto
  • 1 1/4 cups shredded mozzarella cheese
  • 1/2 cup shredded Parmesan cheese
  • 1 cup cooked and shredded chicken
  • 2 Tbs chopped fresh basil
On a rimmed baking sheet lined with parchment paper, toss the tomatoes with 1 tablespoon of olive oil, a big pinch of salt, and a pinch of sugar.  Turn on the oven to 500 degrees, place a baking stone on the bottom rack, and roast the tomatoes while the oven preheats.  Stir them every 5-6 minutes, roasting for 10-15 minutes total, or until they are browned, caramelized, and have released a lot of their liquid.  Keep a close eye on them though, because they will burn easily.  Remove the tomatoes from the oven and transfer the baking stone to the top rack.  Keep the oven on as you prepare the rest of the pizza.
Sprinkle a large square of parchment paper with cornmeal, then roll and stretch the pizza dough into a 12-14 inch circle.  Brush the outer edge with olive oil, and spread the artichoke pesto in a thin layer in the center.
Top the pesto with 1 cup of mozzarella, then scatter the chicken and tomatoes over the cheese.  Sprinkle the remaining mozzarella and the parmesan over the top.

Carefully transfer the pizza + parchment to the oven and bake 10-12 minutes, or until the dough is browned and the cheese is melted and bubbly.  Allow to cool 10 minutes, sprinkle the top with basil, slice, and serve. 


Tuesday, April 8, 2014

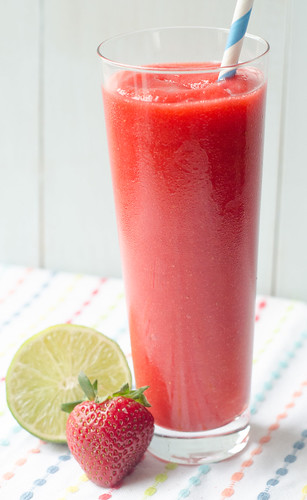
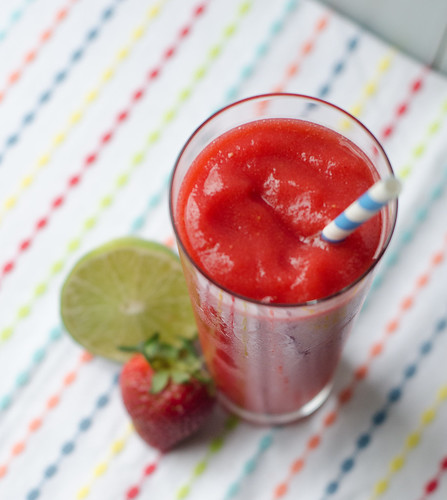
Fresh Strawberry Daiquiris


My big kids are on spring break this week.  While I wish we could be off enjoying a beach vacation (or any vacation, really), it just isn't in the cards this year.  It's no matter though.  The kids and I have been enjoying the downtime:  Caroline is attending a dance camp at the community center, and it's a Frozen theme.  It's basically the best thing she's ever done.  Smith's been helping me do some yard work and organizing.  And the twins are just being adorable, as usual.  We've all been taking advantage of the gorgeous weather by spending as much time as possible outside, and I have a few fun activities planned for the rest of the week as well.

One thing that helps a grown-up enjoy a spring break stay-cation?  A fun and fruity drink.  I've been wanting to make fresh strawberry daiquiris for over a year now, but haven't been able to keep any strawberries in the house long enough! This week I bought a package specifically earmarked for these pretty drinks, and I'm so glad I finally made them!

When I was a kid, the pinnacle of cool was to order a virgin frozen drink. I mean, it's basically a dessert that you get to enjoy though out the entire meal - what's not to love?  As a seasoned adult, I now know that the frozen daiquiris of my childhood are nothing more than sugar, sugar, sugar, fake strawberry flavor, and red food coloring.

But these.  Oh my, they are good.  Fresh strawberries, freshly squeezed lime juice, and rum.  Theres' a little water, sugar, and ice to round things out, and the drink is just the essence of summer.  I mean, just look at that color - could these drinks be any more vibrant??  These went down waaay to easily, and I foresee them being a dangerous and delicious addition to our summer cocktail list.

When we have friends over for dinner, I always like to serve a "signature cocktail," or something a little fun and unique besides beer and wine.  These are officially in the rotation, and I can't wait to enjoy them all summer long.

Who needs a beach vacation when you can enjoy awesome frozen drinks from the comfort of your own home?


Fresh Strawberry Daiquiris
adapted from Gourmet Today
makes 4 drinks

  • 1 lb strawberries, hulled and quartered*
  • 3/4 cup crushed ice
  • 3/4 cup rum
  • 1/3 cup water
  • 1/3 cup fresh lime juice
  • 1/4 cup superfine sugar**
Line a baking sheet with parchment paper.  Arrange the strawberries in a single layer, and freeze until hard, at least 2 hours (however, the frozen strawberries can be transferred to an airtight container and kept frozen for up to 1 week).

Combine the strawberries with the rest of the ingredients in a blender, and blend until smooth, about 1 minute.  Divide evenly among 4 glasses, and garnish with strawberries and lime slices.

*Frozen strawberries can also be used.  Be sure to buy them with no added sugar though.
**If you don't keep superfine sugar on hand, add granulated sugar to a food processor and pulse several times.  


Sunday, April 6, 2014

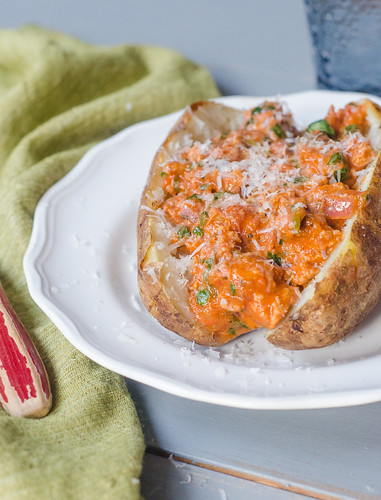
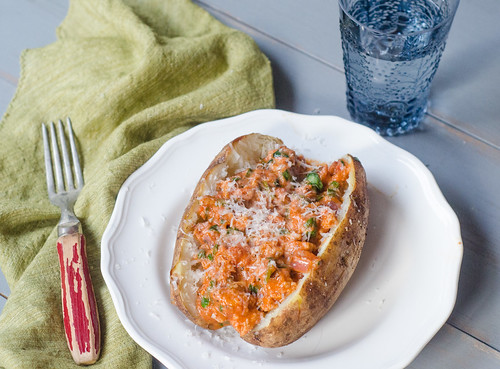
Creamy Sausage & Spinach-Stuffed Baked Potatoes


According to my kindergartener, the months of March and April are spent in a tug-of-war between winter and spring.  Winter is holding on tight, trying to force a few more cold days, while spring is trying its hardest to warm things up and get plants and flowers to bloom.  I thought that was a pretty apt description, and I for one am rooting for spring.  Caroline, however, is having a mental tug-of-war, herself.  On the one hand, she loves playing outside and planting flowers.  But on the other hand, "the cold never bothered [her] anyway."  Yes, she really says that; and yes, she is obsessed with Frozen and Queen Elsa.

Today was certainly a tug-of-war between the two seasons.  It wasn't terribly cold, but there was a definite chill in the air, it was overcast all day, and there were intermittent rain showers throughout the day as well.

Days like this mean comfort food for dinner, and these potatoes fit the bill nicely.  Baked potatoes are one of my favorite foods, but what if you stuff them with a creamy and cheesy mixture of sausage, tomatoes, and spinach?  Pretty wonderful.  This is total comfort food, but a little outside the normal comfort food triangle of pasta-casserole-pot roast.  I get burnt out a bit on some of the typical comfort foods, and this was a nice change of pace.

I took advantage of nap time to make dinner - baking the potatoes and mixing up the filling.  But it was pretty quick, and could definitely be done at dinnertime as well.  Or, you could bake the potatoes and cook the filling the night before, then just reheat when it's time to eat, making this a pretty great make-ahead meal.  I served these potatoes with some roasted asparagus, and it was a hit all-around.  It's practically a complete meal on its own, so just serve it with your veggie or salad of choice and call it a day.

Who will win the tug-of-war this week?  I'm still pulling for spring!


Creamy Sausage & Spinach-Stuffed Baked Potatoes
adapted from Weeknights with Giada
serves 4

  • 4 (8 to 10-oz) russet potatoes, scrubbed clean
  • 2 Tbs olive oil, divided
  • 1 cup diced yellow onion (1 small)
  • kosher salt and freshly ground black pepper
  • 3 cloves garlic, minced
  • pinch of red pepper flakes
  • 8 oz sweet or spicy turkey sausage, casings removed (or a combo of the two)
  • 1 1/2 cups marinara sauce
  • 4 cups baby spinach
  • 1/2 cup (4 oz) mascarpone cheese
  • 1/2 cup grated Parmesan cheese, plus more for serving
  • 3 Tbs chopped fresh basil leaves

Preheat the oven to 375 degrees.

Brush the potatoes with 1 tablespoon total of the olive oil, and sprinkle generously with salt and pepper.    Poke several holes in the tops with a fork, then bake in s single layer on a baking sheet for 45 minutes to 1 hour, or until they are tender when pierced with knife.

Meanwhile, heat the remaining oil in a large skillet over medium-high heat.  Add the onion, 1 teaspoon of salt, and 1/2 teaspoon of pepper.  Cook, stirring often, about 3 minutes.  Stir in the garlic and red pepper flakes and cook until fragrant, about 1 minute.  Add the sausage, and use a wooden spoon to break it into bite-sized chunks.  Cook until browned and cooked through, 5 to 7 minutes.

Stir in the marinara sauce and spinach.  Bring the mixture to a low boil and cook until the spinach is wilted.  Remove from heat and stir in the mascarpone, parmesan cheese, and 2 tablespoons of the basil.  Taste and season with additional salt and pepper if needed.

Once they are cool enough to handle, cut a slit in the top of each potato and gently squeeze the ends to form an opening.  Use a fork to break up the insides  bit, then season lightly with salt and pepper.

Spoon the sausage mixture into each potato, garnish with the remaining basil, and serve, passing the extra parmesan at the table.


Wednesday, April 2, 2014

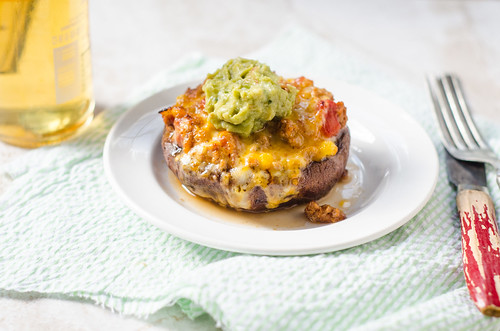
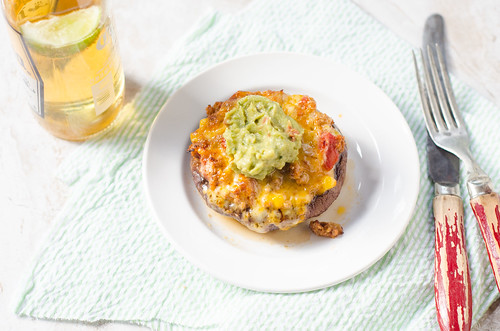
Chipotle Turkey-Stuffed Portobello Mushrooms


Like many food bloggers and enthusiastic home cooks, I have a bit of a cookbook addiction.  Sometimes I buy a cookbook because I just love looking at the pretty pictures and reading the recipes (I know I'm not the only one who reads them like novels).  But some cookbooks I buy because I know I will cook from them until they are tattered, stained, and falling apart at the seams.  Such is the case with Ellie Krieger's Weeknight Wonders.  I've sung the praises of her book So Easy in the past, yet dare I say that I like this one even better?  I pretty much flagged every single recipe as I flipped through this cookbook the first time, and I've loved everything that we've had so far.

Do you also remember when I told you that I can never decide what to make first when I get a new cookbook?  And how I always shove the book in Joey's face and make him decide?  Well, I didn't do that this time.  Because as soon as I saw these stuffed mushrooms, I knew.

I mean, really.  A portobello mushroom stuffed with a spicy, cheesy filling?  Done and done.  I've made many many variations of stuffed mushrooms in the past, but surprisingly, never a Mexican version.  It was only a matter of time though, and these definitely filled the void.

The filling is a mixture of ground turkey chipotle chiles, tomatoes, corn, a taco-like seasoning blend, and a modest amount of cheese.  It's a killer combination, and definitely a nice and healthy alternative to taco night.  Before serving, I topped each mushroom with a big scoop of guacamole, and it was a great addition... though when is guac not a great addition?  I thought so.

While this is not a vegetarian meal, I think you could easily convert it that way by using a can of black beans or pinto beans.  Maybe even add some sautéed veggies and some extra corn?  Or some sautéed mushrooms perhaps?

Since stuffed mushrooms aren't very easy to eat for a toddler, I dumped the filling out and chopped up the mushrooms for the boys.  Then I mixed the chopped mushrooms into the filling and fed it to them by the spoonful.  It was a great way to "sneak" an extra veggie into their dinner.

We actually had quite a bit of filling leftover, and it was great as a dip with some chips, rolled up into a tortilla as a taco, or just eaten by the spoonful.  It's very versatile, and well... just really good.  Healthy Mexican food, for the win!


Chipotle Turkey-Stuffed Portobello Mushrooms
adapted from Ellie Krieger's Weeknight Wonders
serves 6

  • 6 portobello mushroom caps
  • 2 Tbs canola oil
  • 3/4 tsp salt, divided
  • 1/2 tsp freshly ground black pepper
  • 1 cup diced onion
  • 3 cloves garlic, minced
  • 1-2 canned chipotle chiles in adobo sauce, plus 1 tsp sauce
  • 1 lb ground turkey
  • 1 tsp ground cumin
  • 1 tsp dried oregano
  • 1 tsp chile powder
  • 1 (14.5 oz) can fire-roasted diced tomatoes
  • 1 (8-oz) can tomato sauce
  • 2/3 cup corn kernels (fresh or frozen)
  • 1/4 cup fresh cilantro, minced
  • 1/3 cup shredded extra sharp cheddar cheese
  • 1/3 cup shredded Pepperjack cheese
  • guacamole, for serving
Preheat the oven to 450 degrees.

Pop out the stump from the mushroom caps, then use a butter knife to scrape out the gills.  Brush the caps on both sides with 1 tablespoon of the oil (total), then sprinkle them with 1/4 teaspoon each of the salt and pepper.  Lay them cap side-down on a baking sheet, and cook until they are tender and juicy, 8 to 10 minutes.  Remove from the oven.  If they have given off a lot of water, use a paper towel to lightly dab up the excess.  

Meanwhile, heat a large skillet over medium-high heat with the remaining tablespoon of oil.  Add the onions and cook until they begin to soften, about 3 minutes.  Add the ground turkey, and stirring to break up clumps, cook until it's no longer pink, 4 to 5 minutes.  Stir in the garlic, chipotle chile and sauce, cumin, oregano, chile powder, and remaining salt and pepper, and cook an additional minute.  Add the diced tomatoes, tomato sauce, and corn, and bring to a simmer.

Cook until the mixture thickens, stirring occasionally, 5 to 10 minutes.  Remove from heat and stir in the cilantro.  Taste and season with additional salt and pepper if needed.

Preheat the broiler.

Scoop about 1/2 cup of the filling into each mushroom cap, then sprinkle the top with 1 tablespoon each of the cheddar and pepperjack cheeses.  Broil until the cheese is melted and bubbly, 2 to 3 minutes (watch carefully!).

Divide the mushrooms among plates and top each mushroom with a healthy scoop of guacamole.


Monday, March 31, 2014

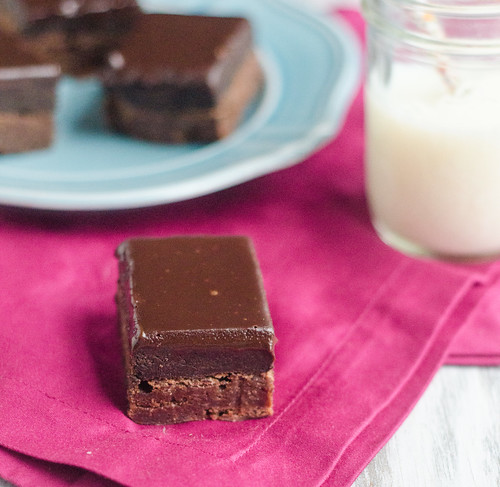
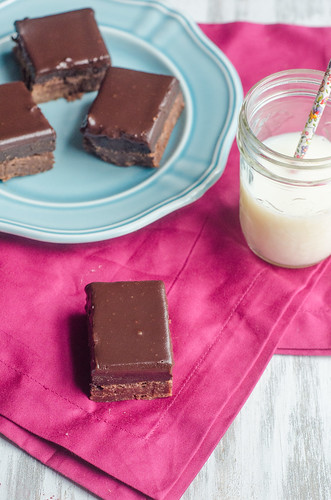
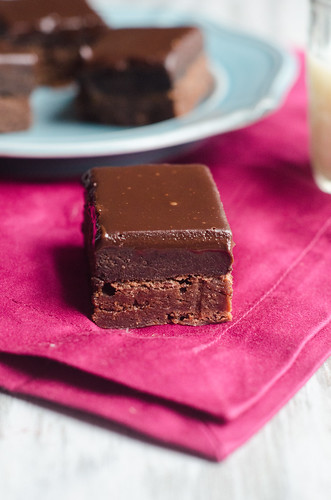
Oreo Truffle Brownies


Do you remember seven or eight years ago, when oreo truffles were all the rage?  I was all but sent home if I showed up at a party without them, and my friends nicknamed them "balls of fury," haha!  They were a super simple mixture of crushed oreos and cream cheese, then rolled into balls and dipped in melted chocolate.  So easy, but always alway always a huge crowd pleaser.


These brownies are a majorly updated and decadent version of those little truffles, and my gosh are they good!  You start with a pretty simple and basic pan of brownies,  top them with that oreo-cream cheese mixture, and finish them off with a layer of chocolate ganache.  Um, yeah.  They're amazing.

Oreo-anything will always be a huge hit with my family, but these brownies were definitely a grand slam-home run-major win.  How could they not be?  These are definitely one of the best treats to come out of my kitchen, and I foresee many more pans of these delicious brownies being made in the near future.


Oreo Truffle Brownies
adapted from Chef in Training, via Good Thymes & Good Food

  • 1 cup unsalted butter, softened to room temperature
  • 2 cups granulated sugar 
  • 4 large eggs 
  • 1 tsp vanilla extract 
  • ½ cup cocoa powder 
  • 1 ⅓ cups all-purpose flour 
  • ½ tsp salt 
  • 30 Oreo cookies
  • 6 oz cream cheese, softened to room temperature 
  • 1 cup heavy cream or half-and-half
  • 10 oz semi-sweet chocolate chips

Preheat oven to 350° F and line a 9x13-inch baking pan with aluminum foil, leaving an overhang on the two long sides. Spray with cooking spray and set aside. 

In the bowl of an electric mixer, cream butter and sugar together until light and fluffy, about 2 minutes. Add eggs one at a time, and mix well, scraping down the bowl as necessary.  Add vanilla, salt, cocoa, and flour.  Mix until just combined, being careful not to over mix.


Pour batter into the prepared pan and bake for 20-25 minutes, until a toothpick comes out with just a few crumbs attached.  Transfer to a wire cooling rack and cool completely. 


While the brownies are cooling, make the Oreo truffle layer. In the bowl of a food processor, pulse cookies into fine crumbs. Add the cream cheese and pulse until combined. 


Once brownies are completely cool, carefully spread the Oreo truffle layer over brownies with an offset spatula and/or clean hands -  this doesn't have to be perfect, since it will be covered with ganache.

To make the ganache, heat the cream in small saucepan over medium heat until it is simmering.  Meanwhile, place the chocolate chips in a medium heat-proof bowl.  Pour the hot cream over the chocolate, and allow to sit for 2-3 minutes.  Whisk the cream and chocolate together until the chocolate is melted and smooth.  Pour the ganache over Oreo layer and spread with an offset spatula. Chill in the refrigerator until fully set.  To slice and serve, lift the brownies out of the pan using the foil overhang, then use a sharp knife to cut into small squares.


Thursday, March 27, 2014

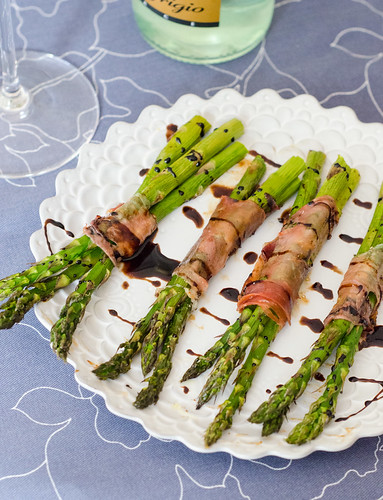
Prosciutto-Wrapped Asparagus Bundles


This is one of those embarrassingly easy recipes that I make dozens of times a year.  As soon as spring rolls around and asparagus comes into season, this becomes my go-to appetizer and pot luck contribution.  It's great straight out of the oven, at room temperature, and even chilled; so you really can't go wrong.

I love to drizzle these with a balsamic glaze, but it's certainly not necessary.  Just an extra little touch that makes them even more special.

Same deal with the Dijon mustard.  I brush each piece of prosciutto lightly with the mustard, and I think it imparts a nice little bit of spiciness, and it helps cut the rich saltiness of the prosciutto.  So while you could just simply wrap some asparagus with prosciutto and call it a day, the mustard and prosciutto are what elevate this dish to truly wonderful.

I hope everyone has a wonderful weekend - perhaps one that involves these little babies and a few glasses of wine?


Prosciutto-Wrapped Asparagus Bundles

  • 1 lb asparagus, woody ends trimmed
  • 4 oz thinly sliced prosciutto, halved horizontally
  • 1-2 Tbs Dijon mustard
  • extra virgin olive oil
  • kosher salt and freshly ground black pepper
  • balsamic glaze, for serving*
Preheat the oven to 400 degrees and lightly grease a rimmed baking sheet.

Brush each slice of prosciutto lightly with the Dijon mustard, and wrap tightly around 3-4 spears of asparagus.  Lay each bundle seam side-down on the baking sheet.

Drizzle lightly with oil, then sprinkle the asparagus VERY lightly with salt.  Season with freshly ground black pepper.

Bake 10-15 minutes, or until the asparagus is tender and cooked-through, and the asparagus is slightly browned and crispy.

Before serving, drizzle with balsamic glaze.

*To make a balsamic glaze, heat 1 cup of balsamic vinegar in a small saucepan over medium-high heat.  Bring to a boil and cook until it is thickened and reduced by half, 15-20 minutes.  Remove from heat and cool.


Tuesday, March 25, 2014

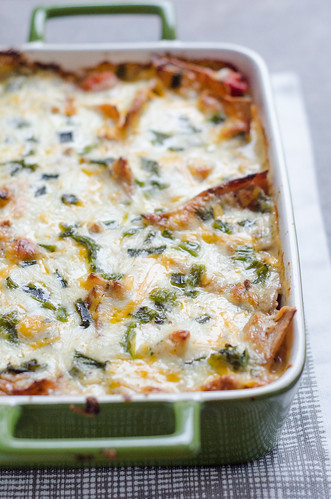
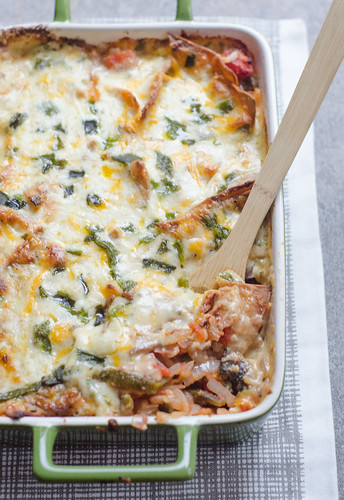
Creamy Poblano-Tortilla Casserole


Creamy Poblano-Tortilla Casserole.  Pretty much any of those words on their own send me running to the kitchen, but combined?  Oh man, it's dangerous.  This casserole is made up of layers of crispy baked tortilla chips, a creamy, cheesy sauce, a tangy and spicy filling, and lots and lots of poblano peppers.  It's creamy, cheesy, crunchy, spicy, and well... just really freaking good.

I couldn't decide if this reminded me more of mac & cheese or an enchilada casserole... then I realized that I didn't care.  It was so awesome that there's no need to label it or compare it to anything else (though of course then I really wanted to make this green chile mac & cheese as a result, ha!).

Like I tend to do most days, I prepped this baby during nap time, then just popped it in the oven when Joey was on his way home.  I also put together a quick citrus and avocado salad to balance out the spice and richness of the casserole.  This was the perfect meal for the end of winter - comforting and homey, but with plenty of brightness and spice from the poblanos.  A winner all-around.


Creamy Poblano-Tortilla Casserole
adapted from Gourmet Today
serves 4

While this is a vegetarian dish, I see no reason why you couldn't stir some shredded chicken, pork, or ground beef or turkey into the filling.  


Filling
  • 9 (6- to 7-inch) corn tortillas
  • 3/4  pound poblano chiles, roasted and peeled (about 3 large poblano peppers)
  • 2  Tbs vegetable oil
  • 2  cups chopped white onions
  • 1 jalapeño pepper, seeds and ribs removed, minced
  • 2 cloves garlic, minced
  • 1  teaspoon salt
  • 1  (14- to 15-ounce) can diced tomatoes
  • 1/4 cup fresh cilantro, chopped
Sauce and topping
  • 2  Tbs unsalted butter
  • 2  Tbs all-purpose flour
  • 1 1/2  cups milk
  • 1 1/2 cups freshly grated cheddar cheese
  • 1 1/2 cups freshly grated  Monterey Jack cheese 
  • 1/2  tsp salt
  • 1/4  tsp pepper
Toast the tortilla wedges: Put racks in upper and lower thirds of oven and preheat to 400 degrees F. Stack tortillas and cut into 8 wedges. Spread tortilla triangles in one layer on two large baking sheets and bake, stirring occasionally and switching position of pans halfway through baking, until crisp and pale golden, 10 to 15 minutes. Cool tortillas, and leave the oven on.

Prepare the chiles: Open chiles and spread flat; discard seeds and stems and cut out ribs. Cut chiles lengthwise into 1/4-inch-wide strips. Reserve about 1/4 cup for garnish, and roughly chop those strips into small pieces.

Make the filling: Heat oil in a 10-inch heavy skillet over medium-low heat until hot but not smoking. Add onions, jalapeño, and garlic and cook, stirring occasionally, until softened, about 5 minutes. Stir in salt, tomatoes with juice, and remaining poblano strips and simmer for 2 minutes. Remove from heat and stir in the chopped cilantro.

Make the sauce: Melt butter in a medium saucepan over  medium-low heat. Add flour and cook, whisking constantly, for 2 minutes. Add milk in a steady stream, whisking, and continue to cook and cook, whisking occasionally, until the sauce is slightly thickened, 3-4 minutes. Remove from heat and gradually add 2 cups of the cheese, stirring until cheese is melted, then add salt and pepper.

Assemble and bake: Arrange half of the tortillas in a greased 2-quart baking dish. Spoon filling evenly over top. Cover with remaining tortillas. Pour sauce over tortillas (tips of tortillas will stick up) and sprinkle with the remaining cup of cheese and reserved poblanos.  Bake, uncovered, in the upper third of oven until gratin is bubbling and top is golden, about 30 minutes.

Allow to cool 5-10 minutes before serving.


BLOG DESIGN BY: SHERBET BLOSSOM DESIGNS