Friday, June 29, 2012

Homemade Oreos with Cookies & Cream Filling


According to my husband, there is no cookie greater than the Oreo.  I'm pretty certain that he could eat an entire box (of double-stuff) all by himself.  He also believes that all Oreos should be double-stuffed.  So when I came up with the idea to use a cookies and cream filling for homemade Oreos, I knew he would be fully supportive.

I used this recipe for homemade Oreos back when I made red velvet Oreos.  This time I made the classic chocolate cookie, but I mixed some crushed up Oreos into the vanilla filling.  And now I'm a firm believer that the only way to improve upon an Oreo is to stuff it with more Oreo flavor.  These cookies are rich, sweet, and pretty much perfect.  I'm obsessed.  Joey is obsessed.  I'm pretty sure you'll be obsessed too.

Homemade Oreos with Cookies & Cream Filling
cookies adapted from Retro Desserts, via Annie's Eats and Smitten Kitchen
filling is my own recipe
makes about 20-24 sandwich cookies
Chocolate Cookies
  • 1 1/4 cups all-purpose flour
  • 1/2 cup Dutch-process cocoa powder
  • 1 tsp baking soda
  • 1/4 tsp baking powder
  • 1/4 tsp salt
  • 1 cup sugar
  • 10 Tbs. unsalted butter, at room temperature
  • 1 egg
Preheat the oven to 375 and line 2 baking sheets with parchment paper or silicone baking mats.

In the bowl of a food processor or stand mixer, combine the flour, cocoa powder, baking soda, baking powder, salt, and sugar.  Pulse a few times to combine.  Add the butter, and pulse a few more times to incorporate, then add the egg and mix until a cohesive dough forms.

Scoop a scant tablespoon of the dough onto the baking sheets, and press lightly with moistened fingers to slightly flatten.  Repeat with the remaining dough, spacing the cookies a few inches apart.

Bake 9-11 minutes, rotating the pans halfway through.  Allow to cool completely before filling.

Cookies & Cream Filling
  • 10 Tbs unsalted butter, at room temperature
  • 1 3/4 cups confectioner's sugar, sifted
  • pinch of salt
  • 1 1/2 tsp vanilla extract
  • about 8 Oreo cookies, crushed into crumbs
In the bowl of a stand mixer fitted with the paddle attachment, cream the butter at medium-high speed until smooth and creamy.  Add the confectioner's sugar and salt, and mix at low speed until incorporated.  Increase the speed to medium high and mix until fluffy.  Reduce the speed to medium-low, add the vanilla and cookie crumbs, and mix until well-incorporated.

To assemble the cookies, match each pair according to size.  Spread or pipe the filling onto one half, then lightly press the other cookie on top to form a sandwich.


Wednesday, June 27, 2012

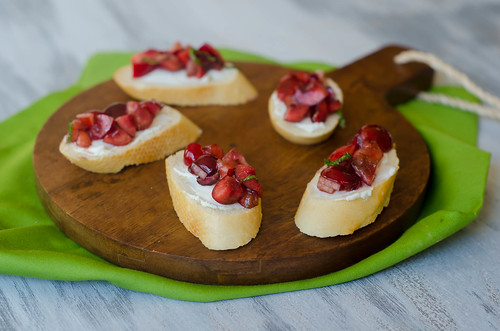
Cherry & Goat Cheese Crostini


I look forward to cherry season all year long.  Like any good food blogger, I save countless recipes that I can't wait to try.  And without fail, the first few pounds of cherries that we buy go straight from the bag into our mouths.  Once I get that out of my system, I start churning out recipes.  Like this crostini.

When we had our best friends over for dinner a few weeks ago, for some reason I was really struggling with what to serve for an appetizer.  I wanted to do some sort of bruschetta or crostini, but nothing was coming to mind, so I just started browsing my favorite food blogs.  Of course Annie had the answer - cherry and goat cheese crostini!

Since I was throwing this together at the last minute, I didn't have time to go to the store.  So I just improvised and hoped for the best.  I assembled what I thought to be way more than we'd eat, but they were all gone pretty quickly.  This crostini is super fast and easy, and I'll definitely be enjoying it all summer long.

Fresh Cherry and Goat Cheese Crostini
inspired by Fine Cooking, via Annie's Eats

  • 1 cup pitted and chopped fresh cherries
  • 1 shallot, finely diced
  • 2 Tbs chopped fresh mint
  • 1 Tbs chopped fresh basil
  • splash of balsamic vinegar
  • splash of olive oil
  • salt to taste
  • 4 oz. fresh goat cheese, at room temperature
  • about 18 1/2-inch thick baguette slices, lightly toasted
In a medium bowl, mix together the cherries, shallot, mint, basil, balsamic vinegar, and olive oil.  Taste and season with salt as needed.

Spread a thin layer of goat cheese on each piece of bread, then top with the cherry mixture.  Serve immediately.


Sunday, June 24, 2012

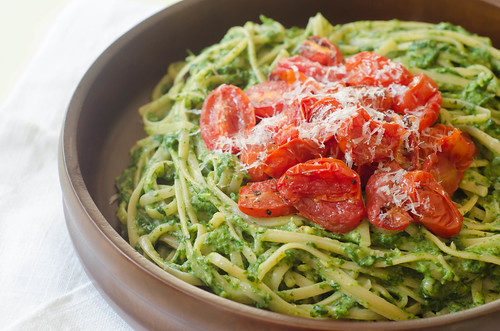
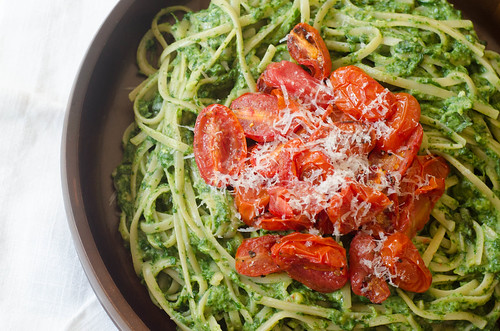
Creamy Spinach Pasta with Roasted Tomatoes


I'm not one to hide veggies in dishes as a way to trick my kids into eating them, but if I can cram as many veggies as possible into a dish, then more power to me!  I've seen several variations of pasta with avocado sauce, but for whatever reason, it never really appealed to me.  As much as I love avocado, the idea of it mixed with hot pasta just wasn't appetizing - but as it turns out, I'm wrong sometimes, and it was pretty awesome!

You start by sautéing some onion and garlic in some olive oil, add the spinach and let it wilt, then add chopped avocado and Greek yogurt.  Give it a whir through the blender, and you have a beautifully hued, wonderfully creamy, and healthy pasta sauce.

Apparently I am incapable of making dinner these days without adding roasted cherry tomatoes, so I topped the dish with some of nature's candy, and of course it was a great addition.

We all loved these noodles, and Caroline thought it was pretty fun to eat green spaghetti.  She even asked if we can have yellow or purple spaghetti next time.  I'll work on it :)


Creamy Spinach and Avocado Pasta with Roasted Tomatoes
adapted from Perry's Plate

  • 1 1/2 cups halved grape tomatoes
  • olive oil
  • kosher salt
  • pinch of sugar
  • 6-8 oz pasta (spinach fettuccine would be especially fun!)
  • 2 Tbs unsalted butter
  • 1/2 cup diced white onion
  • 1-2 garlic cloves, minced
  • 10-12 oz. baby spinach, washed
  • 1/4 cup Greek yogurt
  • 1 avocado, chopped
  • 1/4 cup chopped fresh basil
  • 1/2 cup grated Pecorino or Parmesan cheese, plus more for serving
Preheat the oven to 375 degrees.  On a rimmed baking sheet, toss the tomatoes with olive oil, salt, and sugar.  Roast 20-25 minutes, tossing once.

Meanwhile, cook the pasta according to the package directions, and save about 1/2 cup of the cooking water for the sauce.

As the noodles cook, sauté the onion in a large skillet until softened, 5-6 minutes.  Add the garlic and cook until fragrant.  Stir in the spinach, a few handfuls at a time, cover the pan, reduce heat to medium-low, and cook until all the spinach is wilted, about 5 minutes.

Stir in the yogurt, avocado, and 2-3 tablespoons of the reserving pasta water.  Using an immersion blender, puree the mixture until smooth, adding more pasta water as needed to thin out the sauce.  Alternatively, transfer to a blender or food processor and puree until smooth.

Stir in the basil and Pecorino, and add the noodles to the sauce, tossing well to coat.

Divide the pasta among plates, top each serving with a handful of roasted tomatoes, and a sprinkling of Pecorino.


Friday, June 22, 2012

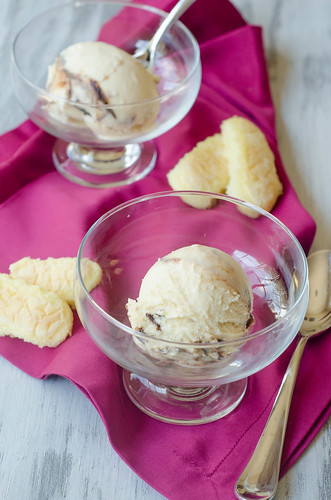
Tiramisu Ice Cream


About, oh ... 4 years ago, I bought The Perfect Scoop.  Completely overwhelmed by the number of "must-try" recipes, I gave it to Joey and asked him to pick an ice cream for me to make.  He chose Tiramisu Ice Cream, but it required a trip to the grocery store, so I churned something else that day.  And here we are, 4 years later, and I'm finally getting around to his choice.  Nothing like being on top of things, right?

And as usual, I'm kicking myself for waiting this long to try it.  Not only is the base mixed up in mere seconds, but come on - it's tiramisu!  Ice cream!  The base is a mixture of mascarpone cheese, half and half, Kahlua, sugar, and rum.  After it's chilled and churned, a mocha ripple is mixed in, and you have a pretty awesome ice cream.  It's impossibly creamy, with a nice - but not overwhelming - boozy flavor.  The mocha ripple cuts through the richness of the ice cream.  I served a few (store bought) lady fingers on the side and they were perfect for soaking up the last drops of the ice cream in the bottom of the bowl.

We had our best friends over for dinner a few weeks ago, and we had a summery Italian feast:  goat cheese and cherry crostini, caprese and sausage lasagna, Caesar salad, and this ice cream.  Good friends, good food, good ice cream.  It's what summer is all about, right?

Tiramisu Ice Cream
 The Perfect Scoop, by David Lebovitz

  • 2 cups mascarpone cheese 
  • 1 cup half-and-half
  • 2/3 cup sugar
  • pinch of salt
  • 1/4 cup Kahlua, or other coffee flavored liqueur 
  • 3 Tbs dark rum or vodka
  • 1/2 tsp vanilla extract
  • mocha ripple (recipe follows)
In a blender, combine the mascarpone, half and half, sugar, salt, Kahlua, rum (or vodka), and vanilla extract.  Puree until smooth and the sugar has dissolved.  Chill for several hours in the refrigerator.

Freeze the ice cream according to your ice cream maker's instructions.  As you remove it from the machine, alternate layers of the mocha ripple with the ice cream (you may not use all the mocha ripple sauce).  

Freeze for several hours before serving.

Mocha Ripple
  • 1/2 cup sugar
  • 1/3 cup light corn syrup
  • 1/2 cup water
  • 6 Tbs Dutch-process cocoa powder
  • 1/2 tsp vanilla extract
  • 1 Tbs instant coffee granules
In a medium saucepan set over medium heat, whisk together the sugar, corn syrup, water, and cocoa powder.  Whisk constantly until the cocoa powder and sugar have dissolved, and the mixture begins to bubble around the edges.

Continue whisking until it comes to a low boil.  Cook for 1 minute, whisking frequently.  Remove from heat and stir in the vanilla and coffee.  Chill thoroughly in the refrigerator before using
 
*You can also use 1/2 cup strongly brewed espresso in lieu of the water and instant coffee.

*I mixed up the base of the ice cream and the mocha ripple the night before, then churned the ice cream the next morning.  That way both were sufficiently chilled.  If the mocha ripple is too warm, it will not be its own distinct layer, and will melt the freshly churned ice cream.


Tuesday, June 19, 2012

Crispy Parmesan Tilapia with Roasted Tomato Caprese Salsa


Chicken Parmesan is one of my all-time favorite dinners.  What's not to love?  Crispy chicken, tomato sauce, melted cheese... all good things.  However, what with being in the beginning stages of summer, I'm more apt to crave lighter dinners.  This dinner definitely fits the bill.  I feel like fish - especially something like tilapia - is typically lighter in taste than chicken.  Plus, it cooks in no time flat.  Definitely a plus.  Rather than smothering the meat in a heavy tomato sauce and a blanket of melted cheese, I topped it with a salsa of sorts - roasted cherry tomatoes, cubes of mozzarella, and lots of fresh basil.  You could certainly serve this over some pasta, but I opted to go with a bed of baby spinach.

Any spin on chicken parmesan is fine by me, but I especially like this lighter and summery take on it.  Bring on the summer!

Crispy Parmesan Tilapia with Roasted Tomato Caprese Salsa
Pink Parsley Original


Roasted Tomato Caprese Salsa
  • 1 pint cherry or grape tomatoes
  • 1/2 Tbs olive oil
  • kosher salt
  • pinch of sugar
  • 1/2 cup cubed mozzarella
  • 1/4 cup chopped fresh basil
  • splash of balsamic vinegar
  • freshly ground black pepper
Parmesan Tilapia
  • 1/2 cup flour
  • 2 eggs
  • splash of water or milk
  • 1/2 cup panko bread crumbs
  • 1/2 cup shredded Parmesan cheese
  • salt and pepper
  • 1/4 tsp garlic powder
  • 4 tilapia filets, patted dry
  • 4 Tbs olive oil, divided
For the roasted tomatoes, preheat the oven to 400 degrees.  Toss the tomatoes with the oil, salt, and sugar.  Spread in a single layer and cook about 20 minutes, tossing once.  Remove from the oven and allow to cool slightly.  Using tongs, transfer to a medium bowl, squeezing some of the tomatoes to break them (it lets the juices permeate the whole salsa).  Toss with the mozzarella, basil, and balsamic vinegar.  Season to taste with salt and pepper and add more oil if necessary as well.  Set aside.

Meanwhile, prepare the tilapia:  Set up an assembly line with three shallow bowls (pie plates work really well too!).  In the first bowl, add the flour and a pinch of salt.  In the second, beat the eggs with the milk/water.  In the third, mix the panko, Parmesan, salt and pepper, and garlic powder.

Preheat 2 tablespoons of the oil in a large nonstick skillet over medium heat.  Season the tilapia filets with salt and pepper.

One at a time, dredge the tilapia in the flour, then dip in the egg, allowing excess to drip off.  Finally coat with the panko/parmesan mixture, pressing lightly to adhere the crumbs to the fish.  Repeat with the remaining pieces.

Working 2 pieces at a time, cook the tilapia in the oil about 2-3 minutes per side, or until it flakes easily with a fork.  Remove to a paper towel-lined plate and repeat with the remaining fish.  

Divide evenly among serving plates and top with the roasted tomato salsa.  Serve immediately.


Sunday, June 17, 2012

Grilled Chicken Salad with Corn, Blueberries, and Feta


I know this sounds really weird.  And honestly, maybe even a bit unappetizing.  But trust me on this.  It's one of my new favorite salads.  It's light, refreshing, and full of so many wonderful flavors that you'll make this again and again over the summer.  The freshness and crunch from the corn pairs so well with the salty feta, and then the burst of sweetness from the blueberries just ties it all together.  Fresh herbs heighten the flavors even more, and you get a nice bite from diced red onion.

I was definitely a bit leery of this salad, and when Joey asked what we were having, I just told him grilled chicken salad.  But he loved it just as much as I did.  The old saying "if it grows together, it goes together" really rings true here.  Blueberries and corn both reach peak freshness in the summer, and they pair just wonderfully here.  I grilled some flatbreads alongside the chicken and corn, and it was a great vessel for the chicken salad.  Pita would also be great, or even toasted baguette slices.  Serve it over a bead of spinach or romaine for a nice light lunch.

Grilled Chicken Salad with Corn, Blueberries, and Feta 
adapted from  The Pioneer Woman Cooks

  • 2 boneless, skinless chicken breast halves (about 1 lb)
  • 1 ear corn, shucked
  • salt and pepper
  • olive oil, for brushing
  • 1 Tbs mayonaise (light is fine)
  • 3 Tbs Greek yogurt (or sour cream)
  • 2 Tbs milk
  • juice of 1/2 lemon
  • 1/2 tsp sugar
  • 1/3 cup + 2 Tbs crumbled feta cheese
  • 1-2 Tbs chopped fresh mint
  • 1 Tbs chopped fresh chives
  • 2-3 Tbs finely diced red onion
  • 3/4 cup fresh blueberries

Prepare grill.

Meanwhile, pound chicken to about 1/4-1/2 inch uniform thickness.  Brush with olive oil and season well with salt and pepper.  Rub the corn with olive oil and season with salt and pepper as well.

Grill the chicken about 5-7 minutes per side, turning once, until cooked through.  Grill the corn, turning every few minutes, until charred in spots and tender.  Remove from grill and set aside.

Meanwhile, whisk together the mayonnaise, yogurt, milk, lemon juice, sugar, and 1/3 cup feta.  Season to taste with salt and pepper.

Slice the corn off the cob and add to a large bowl.  Chop the chicken into bite-sized pieces and add to the bowl as well.  Stir in the onion, mint, and chives, and pour about half the dressing over the salad.  Mix well, taste, and add more salt and pepper as needed.  Gently fold in the blueberries.  Serve, then sprinkle individual servings with the remaining feta.


Thursday, June 7, 2012

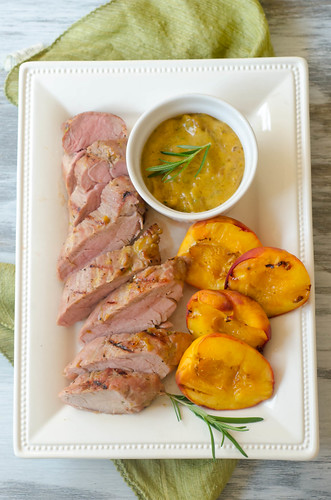
Peach Dijon-Glazed Pork Tenderloin


Southern cooking sometimes gets a bad reputation.  People ask if it's all Paula Deen and fat back.  While yes, we do have those things, it's so much more than that.  I would argue that southern food has the richest traditions in the country.  It's about seasonal, fresh food that you harvest yourself - ask any born and bred southerner how many hours they spent on their porches shelling beans and shucking corn.  It's about family and fellowship - go to any little old lady's house after church on Sunday and you'll definitely find a veritable feast to feed any and all visitors and kinfolk.  And it's about tradition - every family has their own recipe for biscuits, pimento cheese, and banana pudding.

I love it when I find other chefs and authors who feel the same way as I do.  Virginia Willis is one of my favorite cookbook authors and southern women, and her cooking embodies what I love about southern cuisine.  Heavily steeped in tradition and family, seasonal, with fun twists to update classics.

Peaches and pork are both iconic in the south, and this dish combines the two in a super fast, easy, and delicious dinner.  Pork tenderloin is briefly brined in a brown-sugar salt mixture, then grilled.  As it finishes up on the grill, it's brushed with a sweet and spicy glaze of peach preserves and Dijon mustard.  I grilled some peaches on the side because - hey - it's peach season here, and why not?  The pork is juicy and flavorful thanks to the brine and it's stint on the grill, and it pairs perfectly with the glaze and grilled peaches.

I served this with goat cheese grits and grilled asparagus, and it was pretty much the perfect early-summer dinner.  The whole meal embodied everything I love about southern cuisine - grits, pork, peaches, seasonal, and most of all, loved by the whole family!


Peach-Dijon Glazed Pork Tenderloin
barely adapted from Basic to Brilliant, Y'all, by Viriginia Willis

  • 1/4 cup kosher salt
  • 3/4 cup firmly packed brown sugar
  • 2 cups boiling water
  • 3 cups ice cubes
  • 2 (1 1/2 lb to 2 lb) pork tenderloins, trimmed
  • 1/2 cup peach preserves
  • 1 Tbs finely chopped fresh rosemary
  • 1/3 cup Dijon mustard
  • freshly ground black pepper
Combine the salt and brown sugar in a large heatproof bowl.  Add the boiling water and stir to dissolve, then stir in the ice cubes.  Stir until the water has cooled to warm room temperature, and add the pork tenderloins.  Cover the bowl with plastic wrap and refrigerate 30 minutes (Don't brine any longer, or the pork will be too salty!).

Meanwhile, stir together the peach preserves, rosemary, and Dijon.  Season to taste with salt and pepper.

Prepare the grill.  

Remove the tenderloins from the brine, rinse well, and pat dry with paper towels.  Season with black pepper.

Grill, turning once, until the internal temperature reaches 145 degrees, about 15 minutes.  During the last few minutes, brush with the peach-dijon mixture.

Remove to a cutting board and cover with aluminum foil.  Allow to rest about 5 to 10 minutes.  Slice on the diagonal and serve immediately with the remaining sauce.


BLOG DESIGN BY: SHERBET BLOSSOM DESIGNS