Tuesday, November 29, 2011

Glazed Cranberry-Lemon Cake for Eat to the Beat


Years ago, before I started blogging, my friend Elly hosted a blogging event called Eat to the Beat.  I remember reading her blog back then and wanting to start my own food blog just so I could participate.  So when she resurrected it for her 5 year Blogiversary, I couldn't wait to participate.  The premise is pretty straightforward - make any recipe that can be related to music in any way.  I had several ideas floating around in my head, but then as the deadline approached, I couldn't make up my mind.  I was already planning to make this cake for Thanksgiving, so I decided it would be a great recipe to submit.

Does anyone else remember when Woodstock was held in 1994? That was back in my angst-ridden preteen years, and I sure did love some of those bands.  My older sister had the VHS (ha!) of the concert, so when she came home from college over Thanksgiving break, I watched it over and over and over again (in case you couldn't guess, I was really cool back then).  I still remember the performance by The Cranberries, which became my favorite band after that.  Though they are probably most known for "Linger," I really loved "Dreams" as well.

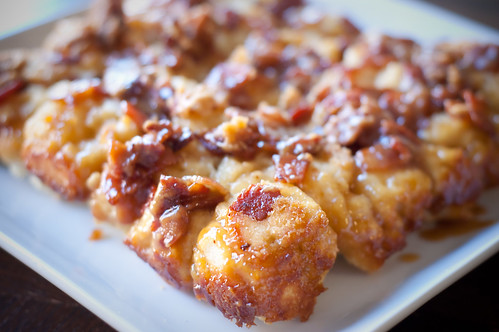
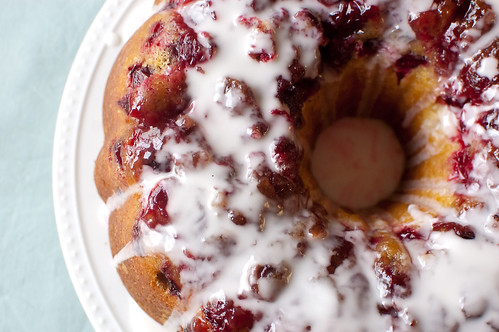
So onto the cake - it was a great contribution to Thanksgiving because not only is it something a little bit different from the usual pumpkin and pecan pies, but it is easy to make and is visually impressive.  The cranberries are so pretty, and I always love it when a cake has glaze dripping down the sides.

The lemon bundt cake is really delicious.  Oftentimes bundt cakes can seem dry and crumbly, but this one isn't.  It is perfectly moist and sweet with a nice hint of lemon.  And the cranberries on top were a nice tart contrast to the sweetness of the cake and glaze.  Just as a warning, if you don't like tart, then you should increase the sugar in the topping.  But I found that the tartness mellowed over the course of a few days anyway, so keep that in mind.

***Don't forget to enter my giveaway before Friday at midnight - I'm giving away a 1 year subscription to Cook's Illustrated magazine.*** 


Glazed Cranberry-Lemon Cake
barely adapted from Williams-Sonoma

  • Unsalted butter for greasing the pan, plus 12 Tbs. (1 1/2 sticks), at room temperature
  • 1/3 - 2/3 cup firmly packed light brown sugar 
  • 3 cups (12 oz) fresh cranberries
  • 2 1/2 cups all-purpose flour 
  • 2 1/2 tsp. baking powder 
  • 1/2 tsp. baking soda 
  • 1 tsp. salt 
  • 1 1/2 cups granulated sugar 
  • 2 lemons 
  • 3/4 cup buttermilk 
  • 1 1/2 tsp. vanilla extract 
  • 3 eggs 
  • 1 cup confectioners’ sugar, sifted, plus more as needed  
Preheat the oven to 350°F. Generously grease a 12-cup bundt pan with butter. Sprinkle the brown sugar in the bottom of the pan, then evenly scatter the cranberries over the sugar.

In a bowl, whisk together the flour, baking powder, baking soda and salt. Add the granulated sugar to the bowl of a stand mixer. Finely grate the zest from the lemons over the sugar and use your fingers to combine the two, sort of pinching the sugar through your hands.

Squeeze the juice from the lemons. In a liquid measuring cup, combine 2 Tbs. of the lemon juice, the buttermilk and vanilla.  Set aside the remaining lemon juice.

Add the butter to the lemon zest–sugar mixture and beat on medium-high speed until light and fluffy, 1 to 2 minutes. Beat in the eggs, 1 at a time, scraping the sides of the bowl after each addition. Reduce the mixer speed to low and add the dry ingredients in 3 batches, alternating with the buttermilk mixture.  Start and end with the dry ingredients.  Raise the mixer speed to medium-high and beat for 2 minutes.

Scrape the batter into the prepared pan and spread it evenly over the cranberries. Bake until the cake is browned and a cake tester inserted into the center comes out clean, 35 to 40 minutes. Let cool in the pan for 5 minutes, then invert the cake onto a cake plate, lift off the pan and let cool completely.

After the cake has cooled, whisk together the confectioners’ sugar and 1 1/2 - 2 Tbs. of the reserved lemon juice until thick and smooth. Test the consistency by drizzling a bit of glaze over the cake. If it runs off the cake, whisk in a little more confectioners’ sugar; if it sits on the cake without moving, whisk in a little more lemon juice. Drizzle the glaze over the cake and let set for at least 15 minutes. Slice into wedges and serve. 


Sunday, November 27, 2011

Holiday Giveaways: Cook's Illustrated Subscription - Closed

***This giveaway is now closed, and a winner has been chosen.  Thank you to everyone who entered!***

Now that Thanksgiving is over, we are officially in the holiday season! And since I love you guys so much, I thought I'd celebrate by giving away some of my favorite things over the course of the next few weeks.  I'll be giving something new away once a week between now and Christmas, so be sure to check it out every Monday.

I'm kicking things off by giving away a one-year subscription to one of my favorite cooking magazines.  Cook's Illustrated is always one of the first places I look when I'm researching a new recipe.  I love their scientific approach to cooking, and they have never let me down.  I own several of their cookbooks, but I really love receiving the magazine every month as well.  I'll be giving a way a one-year subscription to either the magazine or the website - winner's choice!

To enter, leave a comment telling me what you are most looking forward to cooking this holiday season.  One entry per person.  International residents will only be eligible for the online subscription.  This giveaway is open until Friday, December 2nd at midnight.


Tuesday, November 22, 2011

Twice-Baked Sweet Potatoes with Sage, Brown Butter, and Gruyere


As I mentioned in my post for Sweet Potato & Marshmallow Bars, I really love sweet potatoes, but I think that sweet potato dishes often fall into the sweet/dessert sector.  Not these.  These twice-baked sweet potatoes have just a hint of sweetness, but they are most definitely savory.  And that's definitely a good thing - sage, brown butter, and gruyere.  mmmmm.  I know you probably already have your Thanksgiving menu planned out, but if you are still looking for a side dish to replace sweet potato casserole, this would be a great choice.  Especially if you are planning dinner for just a few people - you don't have to make a huge casserole, and everyone gets their own individual portion.

These potatoes were kind of an experiment, but they were so delicious.  I made these for lunch one day thinking that I'd eat one half potato that day, and save the other one for the next day.  Well, I ended up eating both.  Oink oink! 

I loved the combination of the crunchy breadcrumb topping with the creamy potatoes, the savory sage and breadcrumbs mixed with the sweetness of the filling, and the richness from the Gruyere.  Everything is better with Gruyere, right?   

This is a great side dish to pretty much any meat, but it is great on it's own as well.  Served with a side salad, this would make a wonderful light fall or winter dinner.


Twice-Baked Sweet Potatoes with Sage, Brown Butter, and Gruyere
Pink Parsley Original, topping inspired by Martha Stewart
  • 2 sweet potatoes, scrubbed 
  • 4 Tbs unsalted butter
  • 1/2 cup fresh bread crumbs, still somewhat chunky
  • 4 tsp chopped fresh sage, divided
  • kosher salt and freshly ground black pepper
  • 1/4 cup + 2 Tbs grated Gruyere cheese
  • 2 tsp maple syrup
  • 2 Tbs sour cream or Greek yogurt
  • pinch cayenne pepper
Preheat the oven to 400 degrees.  Pierce the sweet potatoes a few times with a fork, and place on a baking sheet.  Cook 45 minutes to 1 hour, or until they are cooked through and tender to the touch.  Remove from the oven and allow to cool until they are cool enough to handle.

Cut each potato in half lengthwise, and carefully scoop out the filling and add to a medium bowl.  You don't want to scoop out all of it, since the skins are pretty thin, but aim to scoop out 90% or so. 

In a small skillet, melt the butter over medium heat, whisking constantly.  When it reaches a deep golden-brown color and has dark brown specks in it, remove from heat immediately.

In a small bowl, combine the breadcrumbs, 2 tablespoons of the butter, 2 teaspoons of the sage, 2 tablespoons of sage, and salt and pepper to taste. 

Using a fork, mash the sweet potato filling until it's smooth.  Add the remaining brown butter, sage, Gruyere, the maple syrup, cayenne, and Greek yogurt.  Mix well to combine.  Divide the filling among the potato skins.  Sprinkle the breadcrumb mixture over the potatoes.

Return to the oven and cook about 15 minutes, or until the filling is heated through and the breadcrumbs are turning light golden-brown.  Serve.


Sunday, November 20, 2011

Triple Chocolate Pumpkin Pie


While I love baking and cooking with pumpkin, I have to admit that I'm not a huge fan of pumpkin pie.  I think it can be a bit boring, plus I'm not wild about the texture.  My dad really doesn't like it, and he calls it "an excuse to eat nutmeg and cinnamon." 

However, this pumpkin pie is definitely worth eating.  With three kind of chocolate, pumpkin, and cinnamon, this pie is pretty awesome.  You start with a pretty standard graham cracker crust, bake it for a few minutes, then brush it with melted bittersweet chocolate.  The pie filling is made with pumpkin, semisweet chocolate, and your standard pumpkin pie spices.  After it's baked and cooled, milk chocolate is then drizzled on top.  I wasn't super excited about it since as I mentioned, I don't really like the texture of pumpkin pie.  But this was really good - it had a mousse-like texture, and was silky smooth without being too mushy.  If you are looking for a super-pumpkiny pie though, I wouldn't make this.  The pumpkin is definitely more subtle than in a typical pumpkin pie thanks to all the chocolate.

The only problem I had with the recipe was that it made much more than I needed for one pie.  I'm wondering if maybe it was meant to be for two?  I ended up throwing out close to half of the crust mixture, and I had a lot of the filling leftover as well.  So I would suggest that if you don't want two pies, you halve the ingredients below.  Other than that, it was really easy and straight-forward, and is ideally made ahead of time.  Which makes it an ideal dessert for Thanksgiving.  Especially if you're looking for something a little different than the usual suspects.  It is still familiar enough to pumpkin pie lovers, but it has a fun twist that will make it stand out in a sea of traditional Thanksgiving desserts.


Triple-Chocolate Pumpkin Pie
adapted from Martha Stewart


For the crust:

  • 2 cups finely ground graham cracker crumbs
  • 3 oz (6 Tbs) unsalted butter, melted
  • 1 Tbs granulated sugar
  • 2 Tbs packed light-brown sugar
  • 1/2 tsp coarse salt
  • 1/2 tsp ground cinnamon
  • 3 oz bittersweet chocolate (preferably 61 percent cacao), finely chopped
For the Pie:
  • 6 oz semisweet chocolate (preferably 55 percent cacao), chopped
  • 2 oz (4 Tbs) unsalted butter, cut into small pieces
  • 1 can (15 oz)  pumpkin puree
  • 1 can (12 oz) evaporated milk
  • 3/4 cup packed light-brown sugar
  • 3 large eggs
  • 1 Tbs cornstarch
  • 1 tsp vanilla extract
  • 1  tsp kosher salt
  • 1 tsp ground cinnamon
  • 3/4 tsp ground ginger
  • 1/4 tsp ground nutmeg
  • pinch of ground cloves
  • 1 oz milk chocolate, melted
 
Preheat oven to 350 degrees. Combine graham cracker crumbs, butter, sugars, salt, and cinnamon in bowl. Firmly press mixture into bottom and up sides of a  9 inch pie plate. Bake until firm, 8 to 10 minutes.
 
Remove from oven, and sprinkle bittersweet chocolate over bottom of crust. Return to oven to melt chocolate, about 1 minute. Spread chocolate in a thin layer on bottom and up sides. Let cool on a wire rack. Reduce oven temperature to 325 degrees.
 
To make the filling, melt the butter and semisweet chocolate together in a large bowl (either using a double boiler, or in the microwave, cooking at 30 second intervals and stirring well after each).
 
In a medium bowl, whisk together the pumpkin, milk, brown sugar, eggs, cornstarch, vanilla, salt, cinnamon, ginger, nutmeg, and a pinch of cloves. Whisk about 1/3 pumpkin mixture into chocolate mixture. Whisk in remaining pumpkin mixture until completely incorporated.
 
Transfer pie dish to a rimmed baking sheet, and pour pumpkin mixture into the crust. Bake until the center is set but still just a bit wobbly, 55 to 60 minutes. Let cool in pie dish on a wire rack. Refrigerate until well chilled, at least 8 hours, but preferably overnight. Before serving, drizzle melted milk chocolate on top. Serve immediately.


Thursday, November 17, 2011

Maple-Bacon Biscuit Bake


I feel like I should simultaneously apologize and say "You're welcome" for posting this recipe.  It is so bad but so good at the same time.  Bad/good that it is prepped and ready in under an hour.  Bad/good that it is sinful and decadent.  Bad/good that it makes a lot of biscuts.  So you can hoard it all for yourself or share the wealth with several people.

It's sort of a cross between an upside down cake and monkey bread.  The maple-bacon mixture is poured into the bottom of a pan, and then biscuit dough is dropped over it.  After a quick bake in the oven, it is inverted onto a platter and then served monkey bread-style.  Just grab a biscuit and chow down.  Some of the bacon-maple mixture did stick to the pan, but I just scraped it off onto the biscuits.  I do think it would have been better to have lined the pan with parchment though.  I've added that step in my version below.


I think this would be a great treat to make if you are hosting guests in the coming week.  I would say you should make it Thanksgiving morning, but I personally try to eat light and healthy for breakfast - I want to save my calories for the big meal!  But if you are one of those crazies (like me) who gets up early to shop on Black Friday, this would certainly be a welcome thing to come home to after a morning/night of fighting the crowds. 


It's hard to say whether this is best served hot from the oven or at room temperature.  Obviously it's hard to beat it when it's fresh from the oven, but once it cools for a bit, the bacon-maple mixture hardens into sort of a candy.  Honestly, I'm not one of those people who thinks bacon is great in desserts, but this is really wonderful.  So who knows, maybe I'm a convert and you'll be seeing some bacon cupcakes on here soon ;-)


Maple-Bacon Biscuit Bake
adpated from King Arthur Flour


Maple-Bacon Syrup
  • 8 oz bacon, cut into 1/2-inch pieces
  • 1/3 cup brown sugar
  • 1/4 cup all-purpose flour
  • 1/4 cup maple syrup
  • 2 Tbs reserved bacon fat
Biscuits
  • 2 cups all-purpose flour
  • 2 tsp baking powder
  • 1/2 tsp salt
  • 4 Tbs cold butter
  • 1 cup cold buttermilk
Preheat the oven to 475 degrees.  Line a 9-inch round pan or 8-inch square pan with parchment paper, and spray with cooking spray.

Cook the bacon in a skillet until browned and crispy.  Use a slotted spoon to transfer to a paper towel, and reserve 2 tablespoons of the rendered fat.

In a medium bowl, whisk together the syrup, flour, brown sugar, and rendered fat.  Spread over the bottom of the baking pan, and sprinkle the bacon evenly over the top.

For the biscuits, whisk the dry ingredients together in a mixing bowl.  Drop the butter into the mixture, and using your fingers, a pastry blender, or 2 knives, work it into the dry ingredients until the mixture is crumbly and has pea-sized pieces of butter.  Add the buttermilk, and stir to make a sticky dough.

Drop the dough over the maple-bacon mixture using a cookie scoop or large spoon.

Bake for 10 minutes, turn off the oven, and leave the pan in the oven for an additional 5 to 10 minutes, until the biscuits are golden brown.

Remove from the oven and immediately invert onto a serving plate.  Lift off the pan and the parchment paper, and serve.


Tuesday, November 15, 2011

Pomegranate Sangria


Sangria is one of my favorite drinks to make for entertaining.  It is easily adaptable to any season, so your choices for fruit and wine are pretty much endless.  It can - and should - be made ahead, so you're not scrambling to blend frozen drinks or mix cocktails at the last minute.  And it can be made in as big or as small of a quantity as you want.  Pretty perfect in my book.

This sangria is my favorite for the fall and winter months.  While as a general rule, I prefer produce from the spring and summer months, the combination of pomegranate seeds, apples, and pears is hard to beat.  It's sweet, tart, and boozy.  And the best part:  eating the fruit once you've polished off the sangria!

I mixed up a big pitcher of this for my book club, but I also think this would be a great signature cocktail to serve before dinner if you are hosting Thanksgiving.  Nothing like a little mixed drink to calm you down if you're frazzled and running behind.  And your guests won't mind if dinner is served a little late - as long as there's plenty of sangria!


Pomegranate Sangria
Pink Parsley Original Recipe
  • 1 (750-mL) bottle red wine (I used Pinot Noir)
  • 2 cups Pomegranate juice
  • 2/3 cup brandy
  • 1/2 cup freshly squeezed orange juice
  • 2 pears, chopped
  • 1 apple, chopped
  • Pomegranate seeds, for garnish
In a large pitcher, stir together the wine, Pomegranate juice, brandy, and orange juice.  Add the apples and pears, and refrigerate for several hours, but preferably overnight.  Sprinkle pomegranate seeds into each glass before serving.


Sunday, November 13, 2011

Pulled Turkey Sandwiches with Cranberry BBQ Sauce


One of my favorite things to do is to reinvent leftovers, and one of the best times to do that is Thanksgiving.  For one, just reheating meat and eating it isn't very appetizing to me, plus I would get sooo tired of just eating turkey like that for days on end.  But when I have other options, it makes leftovers exciting.  I will certainly be making this sandwich after Thanksgiving this year.  It is also a double win because it uses leftover cranberry sauce as well.    Actually, it is a triple win because it is also very quick and easy.  Just shred or chop some turkey and whip up this easy BBQ sauce.

I pretty much always make my own BBQ sauce now:  it is easy, cheap, and I like knowing exactly what I'm eating.  For this, you might be tempted to just mix the cranberry sauce into a bottle of  purchased BBQ sauce, but I think it would end up too sweet.  I used my typical BBQ sauce recipe, omitting the molasses and honey, and adding a bit more hot sauce to compensate for the sweetness of the cranberry sauce.  I served this with baked sweet potato fries, and we enjoyed a fun and casual Thanksgiving-esque dinner.


Thanksgiving Leftover Ideas
Turkey Cranchiladas (Pink Parsley)
Leftover Panini (Annie's Eats)
Turkey Tacos with Cranberry Salsa (Simply Recipes)
Turkey Noodle Soup (Smells Like Home)
Turkey Croquettes (Martha Stewart)
Wheatberry & Turkey Salad (The Meaning of Pie)
Turkey a la King (Real Mom Kitchen)


Cranberry BBQ Sauce
adapted from this Easy BBQ Sauce
  • 3/4 cup ketchup
  • 1 Tbs cider vinegar
  • 1 tsp hot sauce (or to taste)
  • 1 tsp Dijon mustard
  • 1/2 tsp liquid smoke
  • salt and pepper
  • 1/2-1 cup cranberry sauce
  • honey (optional)
Whisk together the first 5 ingredients in a medium bowl, and add salt and pepper to taste.  Whisk in the cranberry sauce, starting with 1/2 cup and adding more as desired.  I added almost a full cup when I made this. Add additional hot sauce if desired, or honey if you want a sweeter sauce.

Toss with shredded turkey and serve on toasted buns.


Thursday, November 10, 2011

Sweet Potato Casserole Cookie Bars


Sweet potato casserole is one of my favorite Thanksgiving dishes, but let's face it:  you're basically eating dessert that's being disguised as a vegetable.  So why not drop the act and actually eat it as a dessert?  That's what these bars are, and they are a delicious dessert at that.  Or a delicious snack.  Or if I'm being totally honest here, a delicious breakfast.

The bars are denser than cake, and a little lighter than a brownie or blondie.  Sweet potato puree is mixed into a batter that's full of warm fall spices:  cinnamon, nutmeg, and ginger.  And then after they are baked, they are topped with marshmallows and toasted.  Is there anything better than toasted marshmallow?  I think not.

If you are looking for a casual dessert or snack for the Thanksgiving season, these are a great choice.  I'm thinking that I'll make them for our next tailgate - portable, festive, and most importantly, delicious. 


Sweet Potato Casserole Cookie Bars
adapted from Scarletta Bakes
  • 1 medium sweet potato
  • 1/2 cup unsalted butter, at room temperature
  • 1 cup packed brown sugar
  • 2 large eggs
  • 1 tsp vanilla extract
  • 1/2 tsp salt
  • 1 tsp ground cinnamon
  • 1/8 tsp nutmeg
  • 1/8 tsp ground ginger
  • 1 1/2 cups all-purpose flour
  • half of a 10.5 oz bag of mini marshmallows
Preheat the oven to 400 degrees.  Scrub the sweet potato and poke a few holes in the top with a fork.  Bake 45 min to an hour, until it is cooked through and soft.  Remove from oven, allow to cool until it is cool enough to handle, then peel and mash with a fork until smooth.  Measure out 3/4 cup of the puree and set aside.

Decrease the oven temperature to 350 degrees.  Line an 8x8 inch baking dish with foil, and spray with cooking spray.

In the bowl of a stand mixer fitted with the paddle attachment, cream the butter and sugar at medium speed until light and fluffy, 3 to 5 minutes.  Add the eggs, one at a time, scraping down the bowl as needed.  Mix in the vanilla and the salt, cinnamon, nutmeg, and ginger.  With the mixer on low, slowly add the flour, and mix until just incorporated.  Using a rubber spatula, fold in the sweet potato puree.

Pour the batter into the prepared pan and bake 26-30 minutes, or until a toothpick inserted into the center comes out clean.  Scatter the marshmallows over the top, being sure to cover the entire pan.  Preheat the broiler, and broil the bars until the marshmallows are dark golden-brown.  You may have to rotate the pan a few times depending on how evenly your broiler cooks. 

Remove from oven and allow to cool to room temperature before cutting into bars.


Tuesday, November 8, 2011

Crock Pot Chicken & Corn Chowder


One of the things I like the most about soup is that you make a big pot, and it will feed you for days.  I don't mind eating the same thing for lunch a few days in a row - especially if it's something I love!  So oftentimes I'll make soup one day over the weekend, and then I have lunch ready to go several days the next week.

This soup did just that.  And it couldn't have come at a better time.  One morning last week I woke up with a sore throat, which quickly got worse, and by lunchtime I had a 102 degree fever.  Not fun.   So over the course of the next few days, when nothing really sounded good and I had very little appetite, this really hit the spot.

It is a hearty soup - full of potatoes, chicken, corn, and carrots.  There is a subtle spice thanks to the chipotle chile, it's creamy thanks to creamed corn plus a small amount of heavy cream.  But it still tastes bright and fresh due to the basil and thyme.  I garnished it with all sorts of fun toppings over the course of a few days:  chopped bacon, shredded cheddar. green onion, extra basil, Fritos, saltine crackers.... the sky's the limit, so go nuts. 


Farmhouse Style Chicken and Corn Chowder
adapted from America's Test Kitchen, Slow Cooker Revolution
serves 6 to 8
  • 2 slices bacon, chopped 
  • 1 large onion, minced
  • 6 garlic cloves, minced
  • 1 Tbs tomato paste
  • 2 tsp minced fresh thyme, or 1/2 tsp dried
  • 1/4 cup all-purpose flour
  • 5 cups low-sodium chicken broth
  • 1 pound red potatoes, scrubbed and cut into 1/2-inch pieces
  • 2 carrots, peeled and sliced 1/4-inch thick
  • 2 bay leaves
  • 1 lb boneless, skinless chicken thighs, trimmed of excess fat
  • salt and pepper
  • 1 cup frozen corn kernels
  • 1 (15-oz) can creamed corn
  • 1/2 cup heavy cream or half-and-half
  • 2 tsp minced chipotle chiles in adobo
  • 3 Tbs minced fresh basil
 Cook bacon in a 12-inch skillet over medium heat until crisp and browned, 5 minutes.  Remove to a paper towel-lined plate using a slotted spoon.  Add the chopped onion and cook until softened, 5 to 7 minutes.  Add the garlic, tomato paste, and thyme and cook until fragrant, about 1 minute.  Stir in the flour and cook for 1 minute.  Whisk in 2 cups of the broth, scraping up any browned bits.  Transfer to slow cooker.

Add remaining 3 cups of broth, potatoes, carrots, and bay leaves to the slow cooker.  Season chicken with salt and pepper and nestle into the mixture.  Cover and cook on low until chicken is tender, 4 to 6 hours.

Transfer chicken to a cutting board, and allow to cool slightly before shredding it into bite-sized pieces.  Add it back to the slow cooker, along with the creamed corn, frozen corn, cream, and chipotle chiles.  Continue to cook until everything is heated through, another 10 to 15 minutes.  Remove the bay leaves, stir in the basil, and season with additional salt and pepper to taste.  Serve.


Thursday, November 3, 2011

Fontina & Wild Mushroom Pizza


Normally, I think of pizza as a casual dinner - one that you'd enjoy with a beer.  But sometimes I like to elevate it to a "wine-worthy" dinner.  This pizza just felt too fancy for beer.  You start with a standard pizza dough, then top it with mushroom pesto, sauteed wild mushrooms, fontina, and Parmesan.  My grocery store carries a pack of assorted wild mushrooms, so I just bought those.  I believe it's a mix of cremini, shiitake, oyster, and portobello.  I sauteed them in a little butter, then amped up the flavor with some garlic, fresh thyme, and white wine. 

And while the pizza as a whole was really delicious, the mushroom pesto is what made it special.  It uses a combination of dried porcinis and roasted mushrooms to maximize the mushroom flavor.  I gave it even more by replacing half of the olive oil with truffle oil.  I loved the pesto so much that I was tempted to just eat it with a spoon for my dinner, but I managed to save it for the pizza.  I will definitely make it again to serve with pasta though.  Or stuffed into chicken or pork tenderloin.  Or for another one of these pizzas.

I served this pizza with my fall harvest pear salad, and of course a big glass of wine.  It was fancy pizza night after all :-)


Wild Mushroom & Fontina Pizza
Pink Parsley Original
  • 1 ball of pizza dough
  • olive oil
  • 1 recipe mushroom pesto (recipe follows)
  • 8 oz mushrooms, preferably a variety of wild mushrooms
  • 1 Tbs butter
  • 2 cloves garlic, minced
  • 1 tsp chopped fresh thyme
  • 1/4 cup dry white wine
  • salt and pepper
  • 1 1/2 cups shredded Fontina cheese
  • 1/2 cup shredded Parmesan cheese
Preheat the oven to 500 degrees for 30 minutes, along with the pizza stone.

Meanwhile, prepare the mushrooms.  In a skillet set over medium heat, melt the butter.  Add the mushrooms and saute until browned and softened, 5-8 minutes.  Add the garlic and thyme and cook until fragrant.  Season with salt and pepper, then pour in the wine.  Cook until the liquid has evaporated and remove from heat.


On a large square of parchment paper dusted with cornmeal, stretch the pizza dough into a 12-inch circle.  Brush the outer edges with olive oil, and spread the pesto over the dough, leaving a small border (about 1/2 inch).  Scatter the mushrooms evenly over the pesto, and top with the fontina and Parmesan cheeses.


Carefully transfer the pizza and parchment to the preheated stone, and cook about 10 minutes, or until the cheese is melted and bubbly and the crust is lightly browned.  Allow to cool 10 minutes before slicing and serving.


Mushroom Pesto
adapted from Cook's Illustrated
  • 5 oz cremini mushrooms, sliced
  • 1/4 cup extra-virgin olive oil
  • salt and pepper
  • 2 cloves garlic
  • 1/4 oz dried porcini mushrooms
  • 1 small shallot, roughly chopped
  • 2 tsp fresh thyme leaves
  • 2 Tbs fresh parsley leaves
  • 2 Tbs Parmesan cheese
 Adjust oven rack to lowest position and heat oven to 450 degrees; line rimmed baking sheet with heavy-duty foil. On the baking sheet, toss sliced mushrooms with 1 tablespoon oil and salt and pepper. Roast, stirring occasionally, until browned and crisp, about 20-25 minutes.  For the last 10 minutes, add the garlic, in their skins, to the pan to roast as well.

Peel the garlic when it's cool enough to handle.

Meanwhile, soak the dried mushrooms in 1/4 cup boiling water for about 5 minutes.  Strain through a paper towel-lined colander and reserve the liquid.

In bowl of food processor fitted with steel blade, process roasted mushrooms, garlic, porcini and liquid, shallot, thyme, parsley and remaining 3 tablespoons oil until smooth, stopping as necessary to scrape down sides of bowl. Transfer mixture to small bowl and stir in cheese; season to taste with salt and pepper.


Tuesday, November 1, 2011

Cauliflower Risotto


In my opinion, cauliflower is an incredibly under-appreciated vegetable.  And I think it's because so often it is relegated to being served steamed.  I know that it's the healthiest way to prepare most veggies, but it's also my least favorite.  Unless you season the beejesus out of them, they usually end up pretty bland.  And it's easy to overcook them and they become mushy.  Mushy vegetables = no bueno.  But roast some veggies and we're telling a different story.  You get beautiful caramelization, a good combination of crispy and soft textures, and the best flavor.  And roasted cauliflower is one of my favorite side dishes.

So when I saw this recipe for cauliflower risotto, I knew it had potential, but needed a little work.  It's an interesting technique:  cauliflower is steamed and pureed, and that puree is mixed into the risotto to infuse the entire dish with cauliflower.  So you have cauliflower flavor in every bite.  In order to amp up the flavor even more, plus add some texture, I roasted some cauliflower and served it on top of the risotto. I also wish I had omitted the celery.  I'm not a fan of celery, so I don't know why I added it in the first place, but I ended up picking most of it out of my serving.  I don't think it added anything. I used fresh thyme, but I think rosemary would be great as well.

I'm not a fan of pureed cauliflower masquerading as mashed potatoes - cauliflower is cauliflower, and potatoes are potatoes. But the cauliflower puree in this risotto definitely adds a lot to the dish.  It gives the risotto a wonderful creaminess, but without having to add extra butter, cream, or gobs of cheese.  For such a decadent and elegant dish, this is actually pretty healthy.  And for the first time in 9 months, I got to enjoy a glass of wine while I stirred my risotto - one of my favorite rituals. :-)


Cauliflower Risotto
adapted from Everyday Food, October 2011
serves 4-6
  • 1  head cauliflower, cored and cut into florets
  • olive oil
  • 6 cups low-sodium chicken or vegetable broth
  • 1 Tbs butter
  • 1 large shallot, minced
  • 2 cloves garlic, minced
  • kosher salt and freshly ground pepper
  • 1 cup Arborio rice
  • 1 cup dry white wine
  • 1 tsp minced fresh thyme leaves
  • 1/2 cup grated Parmesan, plus more for serving
Preheat the oven to 400 degrees.  Toss half the cauliflower with olive oil, salt, and pepper, and roast 15-20 minutes, until browned and cooked through, tossing once.  Remove from oven and set aside.

Steam the remaining cauliflower, then puree in a food processor until smooth.  Season with salt and pepper, and thin with about 2 tablespoons of chicken or vegetable broth.  Set aside.

Meanwhile, bring the broth to a simmer in a medium saucepan.  Reduce heat and cover to keep warm.

In a large, heavy-bottomed skillet, melt the butter over medium-high heat.  Add the shallot, reduce heat to medium, and cook until soft, 3-5 minutes.  Add the garlic and 1/4 tsp salt and cook until fragrant, about 1 minute.

Add the rice, and stir constantly until they are opaque around the edges, 2-3 minutes.  Add the wine and cook until it has mostly evaporated, about 1-2 minutes.

Pour 1 1/2 cups of the broth to the skillet.  Cook, stirring often, until most of the broth has been absorbed.  Repeat with the remaining broth, adding about 1/2 cup at a time and stirring constantly, until the rice is tender but still al dente and the sauce is creamy, about 20 minutes.

Add the cauliflower puree, thyme, and Parmesan and stir to combine.  Remove from heat and season with salt and pepper to taste.  Divide among plates, top with roasted cauliflower, and sprinkle with Parmesan.  Serve immediately.


BLOG DESIGN BY: SHERBET BLOSSOM DESIGNS