Tuesday, January 31, 2012

Bacon Sliders with Bacon-Balsamic-Onion Jam


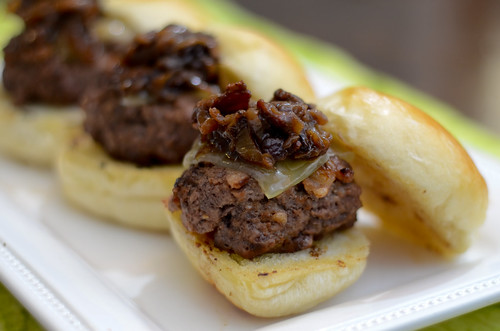
Burgers are great, and I love them, but there is something about sliders that is just so goshdarn cute!  I've actually made these burgers three times, and I love them the most as sliders.  They are very rich and pretty heavy, so I think the smaller portion is the way to go.  Incidentally, they would also make great finger food for the Super Bowl.  I'm not a huge professional football fan, but I do love eating snack food, so I definitely always look forward to Super Bowl parties!

So what makes these burgers so great?  You start with a pretty simple burger - meat, a few seasonings, and the kicker:  chopped bacon.  Thanks to the fat content of the bacon, these won't really dry out, so you don't have to worry about overcooking them.  However, if you make these as sliders, you should be sure to chop the bacon pretty small so that it cooks fully.  No one likes pieces of half-cooked bacon, right?  The bacon-balsamic-onion jam is the best part of these burgers though.  I don't think I even need to elaborate on that anymore.  Bacon.  Balsamic.  Caramelized onions.  The end.  FYI it is also an insanely wonderful addition to grilled cheese should you have any left over :)  I finished these sliders off with some Gruyere cheese, but I think blue cheese would be really great as well.  Or even a super sharp cheddar. 

If you are looking for more Super Bowl food ideas, check out the Featured Recipes Page.  I've updated it with some great options that will all be well-received at any party!

Bacon Sliders with Bacon-Balsamic-Onion Jam
adapted from Fine Cooking, July 2011, via Cook Like a Champion and Annie's Eats

For the jam:
  • 4 thick slices applewood-smoked bacon, cut crosswise into 1/2-inch strips
  • 1 large red onion, halved and thinly sliced
  • Kosher salt and freshly ground black pepper
  • 1 tsp sugar
  • 1/3 cup balsamic vinegar 
  • 1/2 teaspoon Dijon mustard
  • 1/3 cup water


For the burgers:
  • 2 thick slices applewood-smoked bacon
  • 1-1/2 pounds ground beef (85% lean)
  • 1 teaspoon Worcestershire sauce
  • 1 teaspoon Kosher salt
  • 1/2 teaspoon freshly ground black pepper
  • 1 tsp Dijon mustard
  • 1 Tbs balsamic vinegar
  • 7-8 slider buns or dinner rolls, split
  • Sliced Gruyere cheese, optional

Cook the bacon in a large skillet set over medium heat until lightly browned, about 8 minutes. Use a slotted spoon to transfer to paper towels to drain. Discard all but about 2 tablespoons of oil from the skillet.

Add the onion to the skillet, season with salt and pepper to taste, add the sugar, cover, and cook for 2 minutes. Uncover and add a splash of water, then scrape up any browned bits from the bottom of the skillet. Cover and continue cooking, stirring occasionally, until the onions are soft, about 10 minutes. Stir in the vinegar, mustard and water. Return the bacon to the skillet and simmer until the liquid has thickened and most of it has been absorbed, 2-4 minutes. Transfer the jam to a small bowl, add another splash of balsamic vinegar, and set aside.  The jam can be left at room temperature until ready to serve, or refrigerated for up to 2 days.

To make the burgers, mince the bacon. In a large bowl, combine the beef, bacon, Worcestershire sauce, salt, pepper, mustard, and balsamic vinegar.  Gently mix into the ground beef, using your hands or a fork.  Divide the ground beef mixture evenly into 7-8 portions (depending on the size of your buns), and form each portion into a patty that will fit onto the slider bun. 

Heat a large (preferably nonstick or cast iron) skillet over medium-high heat and add the patties.  Cook 3-4 minutes on each side, or until they reach your desired degree of doneness (I personally like my burgers cooked to medium-well).  Top with slices of cheese for the last minute or two of cooking, or place under the broiler to melt.

Toast the buns, add the burger, and top with about 1 tablespoon of the jam.  Serve immediately.


Sunday, January 29, 2012

Vanilla Bean Scones


As I've mentioned several times before, my daughter Caroline has an egg allergy.  She's actually allergic to several things, but that's the only food allergy (that we know of).  I know that I should be glad that it's not deadly, and that she is otherwise very happy and healthy, but to be completely honest, it makes me really sad sometimes.  Like when we go to a birthday party and all the other kids are eating cake, and she's eating the graham cracker that I brought along for her.  Or when she doesn't get to eat the fun snacks at preschool, and just eats her boring goldfish.  Last week was "circus week" at school, and when I asked what she had for a snack, she told me that she had her crackers, but that her friends had "cupcakes shaped like clowns."  Luckily, she understands that "eggs can make her sick," but I still feel a little tug at my heart when she misses out.  I know it's not the end of the world that she doesn't get the occasional cupcake (first world problems, right?), but I hate that she is limited and restricted, and that she'll probably feel left out as she gets older.  We are having her retested next month, so we're cautiously optimistic that she's outgrown it, but I'm trying not to get my hopes up. 

In any case, when I make things like these scones, it almost makes me forget about her allergy - they are naturally egg free!  And insanely delicious, at that.  I used the base recipe from these blueberry scones, and adapted it to my liking - adding a vanilla bean, some vanilla extract, and vanilla Greek yogurt - triple the vanilla flavor!  I also decreased the salt a bit and added a little more sugar.  I had originally planned to top these with a vanilla glaze, but after tasting them, it definitely wasn't necessary.  Not to sound overly effusive, but these are easily the best scones I've ever made.  I know that vanilla may sound boring, but they are light and fluffy, buttery, perfectly sweet, and the best part is the crispy top and bottom.  They are brushed with butter and sprinkled with sugar before baking, and the sugar caramelizes a bit.  So perfect.  This recipe makes eight scones, and I'm very embarrassed to admit that I probably ate five of them over the course of three days....

Possibly the best part about making these scones was letting Caroline help me, and then taste one.  She loved it, and it was so nice to allow her the special treat.  When I make things like this, it doesn't make her allergy seem so bad.


Vanilla Bean Scones
adapted from these Blueberry Scones, which are from America's Test Kitchen
makes 8 scones
  • 8 Tablespoons cold butter, plus more for brushing
  • 2 cups all-purpose flour
  • 1/2 cup + 2 Tbs granulated sugar, plus more for sprinkling
  • 2 teaspoons baking powder
  • 1/4 teaspoon baking soda
  • 3/4 teaspoon kosher salt
  • 1 vanilla bean, split open and seeds scraped out
  • 1 Tbs vanilla extract
  • 1/2 cup vanilla Greek yogurt
  • 1/2 cup milk or buttermilk
Grate the butter on the large holes of a box grater onto a plate lined with parchment paper, and freeze.

Preheat oven to 425, and combine the dry ingredients.  Stir in frozen butter.  Whisk together the vanilla bean, yogurt, vanilla extract, and whole milk, and stir into the dry ingredients with a wooden spoon until just combined.  The dough will be crumbly, but that's okay.

Turn out onto a well-floured surface, and knead a few times until it forms a ball.  Roll out into a 12x12 inch square.  Using a bench scraper, fold the dough into thirds, then fold into thirds again in the opposite direction to form a square.  Place on the parchment-lined plate, and freeze for 5 minutes.

Roll out to a 12x12 inch square again.  Carefully roll up, as you would cinnamon rolls.  Press the roll into a 4-inch wide rectangle.  Using the bench scraper, cut into 4 equal-sized rectangles.  Then cut each rectangle diagonally to make 2 triangles.

Place on a baking sheet lined with parchment paper.  At this point the scones can be baked or refrigerated overnight.  Brush with melted butter, then sprinkle with sugar.  Bake 18-25 minutes, or until golden-brown. 


Thursday, January 26, 2012

Cornmeal-Herb Waffles with Salsa and Poached Eggs


Oh man, this was a gooooood dinner.  Like, really really good.  We felt like we were eating a fancy brunch in a restaurant when we had this - something that we never do anymore, but I definitely miss!

The waffles are of the savory variety, containing just a little sugar.  They have cornmeal to give them a nice texture, and chives and cilantro for more flavor.  Topped with  homemade salsa and a poached egg, this was really and truly one of the best dinners we've had in a while. 

And speaking of poached eggs, this was my first time attempting them.  I'm happy to say that I had great success thanks to Deb of Smitten Kitchen and her step-by-step tutorial (and thanks to my pal Annie for recommending the tutorial)!  My eggs weren't the most beautiful poached eggs ever, but they were definitely tasty.  I topped the whole thing with some freshly cracked black pepper and a sprinkle of chives and cilantro.  I considered adding cheese to the waffle batter, but it really isn't needed.  And I suppose if you really wanted to go crazy, you could sprinkle some bacon over the top.  But I personally think this meal is pretty perfect as is. 

Make this this weekend.  I promise you won't be sorry.


Savory Cornmeal-Herb Waffles with Salsa and Poached Eggs
waffles barely adapted from Joy the Baker
  • 1 1/4 cups all-purpose flour
  • 1/4 cup cornmeal
  • 1 1/2 tsp baking powder
  • 1 tsp sugar
  • 1/2 tsp baking soda
  • 1/2 tsp kosher salt
  • 1/4 tsp freshly ground black pepper, plus more for serving
  • pinch of cayenne
  • 5 Tbs unsalted butter, melted
  • 2 eggs
  • 1 1/4 cups buttermilk
  • 3 Tbs snipped fresh chives, plus more for serving
  • 1 Tbs chopped fresh cilantro, plus more for serving
  • salsa
  • poached eggs

 Preheat your waffle iron as you mix the batter.  Preheat the oven to 200 degrees and place a baking sheet inside.

In a large bowl, whisk together the flour, cornmeal, baking powder, sugar, baking soda, salt, black pepper, and cayenne.  In a medium bowl, whisk together the butter, eggs, buttermilk, and herbs.  Make a well in the dry ingredients, and add the wet ingredients.  Stir until just combined - there will still be lumps, and that's okay.

Cook waffles according to the directions for your particular waffle iron.  Keep warm in the oven as you cook them all.

To serve, top each waffle with salsa and a poached egg.  Sprinkle with additional chives, cilantro, and season with pepper.  Serve immediately.


Tuesday, January 24, 2012

Prosciutto-Wrapped Tilapia with Blood Orange Salsa


If you are still on the healthy-eating bandwagon for 2012, here is another super delicious recipe for you.  Fish is always a good choice when you're trying to keep things light (unless it's beer battered and fried, that is).  Seeing as how all things prosciutto are holy, and winter citrus is my obsession right now, this dinner was destined to be a winner.  The only beef I have, however, is that my blood oranges were probably the palest ones I've ever seen.  I love the deep red, creepy bood oranges, and these were just a little darker than a grapefruit.  It's okay though because they still tasted wonderful.

Tilapia is known to be a very mild and unassuming fish - one that some may call bland - but I call it a blank canvas.  Wrap it in prosciutto and you give it more flavor, plus some crispy texture.  Top it with the blood orange salsa and dressing, and you have a home run dinner.  I served this with a simple chopped salad, but I think it would also be great with some orzo, rice, or quinoa.  Or serve the whole thing over some salad greens and make it into a big entree salad. 


Prosciutto-Wrapped Tilapia with Blood Orange Salsa
adapted from Confections of a Foodie Bride

  • 4 filets of tilapia
  • 4-8 slices of prosciutto
  • 2 tsp Olive oil
  • Salt
  • Pepper
For the salsa:
  • 2 blood oranges
  • 2 Tbsp very finely chopped red onion
  • 2 Tbsp chopped cilantro
  • 1 tsp finely chopped jalapeno (without seeds or ribs)
  • Juice of 1/2 lemon
  • 1 Tbsp olive oil
  • Salt & pepper
Preheat the broiler and place an oven-safe cooling rack inside a cookie sheet.  Spray it lightly with nonstick cooking spray.

Very lightly season the fish with salt, and wrap each filet with 1-2 slices of tilapia.  Sprinkle the fish with about 1 teaspoon of orange zest (total, not per filet).  Season with pepper and brush with olive oil.

Cook the fish 6-8 minutes, or until the center is completely cooked and the prosciutto is crispy.

Meanwhile, zest one of the oranges into a small bowl.  Set a strainer over the bowl and peel and segment the oranges.  Cut each segment in half or thirds.  Squeeze the juice from the leftover membranes into the bowl.  Whisk in the lemon juice olive oil, and season with salt and pepper.  Add the orange segments, onion, cilantro, and jalapeno and toss to coat.

When ready to serve, top each piece of fish with the salsa, and an extra spoonful or two of the orange dressing.


Sunday, January 22, 2012

Kale & Bacon Omelet Baked in a Bread Boule


There are certain words that just make my skin crawl.  I won't bore you with the (longish) list, but one of the biggest offenders is "brinner."  I don't know why I hate it so much, but it just annoys me to no end when people say it.  Just say "breakfast for dinner."  It's really not that many more syllables.  And saying "brinner" doesn't really specify what you're eating:  it could be eggs and bacon, waffles or pancakes, omelets, oatmeal, cereatl, etc.  It's like saying that you're having dinner for dinner.  Or lunch for dinner.  I just don't get it.  However, I'm certainly not against the concept.  One of my favorite dinners growing up was eggs, grits, and biscuits.  And I'm up for pancakes and waffles any time of the day.

This is one of those ideas that I was annoyed that I didn't come up with on my own.  Bake an omelet in a bread boule.  Seriously, how ingenious is that?!  This particular omelet was really wonderful - lots of kale, Parmesan, ricotta, and just a little bacon.  But you could certainly mix up the add-ins with infinite possibilities.  Anything you like in an omelet or quiche would be wonderful here.  I am pretty partial to this combination though, partly because it is one of the only times Joey has actually enjoyed kale.  And not only did he like it, but he ate all the leftovers for breakfast for the rest of the week.  Tha'ts definitely a success, considering that he rarely eats breakfast at all.

This was such a unique presentation of an omelet.  I can't wait to play around with different variations.  And I think it would be so adorable to bake individual servings in sourdough dinner rolls (or really any roll that is hard and crusty).  The possibilities are endless!


Kale & Bacon Omelet Baked in a Sourdough Bread Boule
barely adapted from Virginia Willis, Basic to Brilliant, Y'all!
  • 2-3 thick-cut slices of bacon, cut into 1-inch pieces
  • 1 onion, chopped
  • 5 cups kale cleaned, stems removed, and chopped
  • kosher salt and freshly ground black pepper
  • 2 Tbs water or broth
  • 6 large eggs, lightly beaten
  • 1/2 cup freshly grated Parmigiano-Reggiano cheese, plus more for serving
  • 1/4 tsp red pepper flakes
  • 1 tsp Dijon mustard
  • 3/4 cup ricotta cheese (part-skim is fine)
  • 1 8-inch round sourdough bread boule
Preheat the oven to 350 degrees and line a baking sheet with parchment paper.

In a large skillet, cook the bacon until crisp and brown, 5 to 7 minutes.  Use a slotted spoon to transfer to a paper towel to dry.  Pour off all but 2 teaspoons of the fat.  Alternatively, if you want to make a vegetarian version, skip the bacon and heat 2 teaspoons of canola oil over medium heat until shimmering.

Add the onion and cook until softened and golden, stirring often, about 4 to 6 minutes.  Decrease the heat to medium-low, add half the greens, and toss until they begin to wilt, about 1 minute.  Add the remaining greens and season well with salt and pepper.  Add the water, decrease the heat to low, and cover.  Cook, stirring occasionally, until the greens are wilted and tender, about 15 minutes.  Use a slotted spoon to transfer the greens to a large bowl, leaving any excess water in the skillet.

Meanwhile, prepare the bread boule.  Slice off the very top of the bread and then remove the inside bread in chunks, leaving a shell.  Reserve the bread for another use (croutons, bread crumbs, etc).  Place the bread boule on the prepared baking sheet.

To the greens, add the eggs, 1/4 cup of the grated cheese, the reserved bacon, the red pepper flakes, and the Dijon mustard.  Fold in the ricotta and season with salt and pepper.

Pour the filling into the bread boule and sprinkle the top with the remaining 1/4 cup cheese.  Bake 45 to 50 minutes, or until the eggs are set.  Allow to cool at least 10 minutes, and sprinkle with reserved cheese. Slice into wedges using a serrated knife, and serve.


Wednesday, January 18, 2012

Short Rib and Porcini Lasagne


Sometimes you just need comfort food.  Like when it's cold outside.  Or you've had a bad day.  Or your toddler has had a fever for five straight days and it peaked at 106 degrees.  Or your three month old baby rolls off an ottoman and hits his head. You know, those kinds of days.  This lasagne certainly fits the bill.  It's homey, it's rustic, and it's utterly delicious. 

If you love short ribs, you'll love this lasagne.  If you love porcini mushrooms, then you'll love this lasagne.  If you love lasagne, then you'll love this lasagne.  It's rich and filling, but a little goes a long way, so you don't have to eat a giant slice to be satisfied.  Though you may eat a giant slice (or two) because it's so darn good.

Admittedly, it is a bit of an undertaking from a time standpoint.  But it's great for when you want to zone out and forget all your worries and just cook. Nothing is terribly difficult or time-consuming, but from start to finish it will take a few hours - but don't let that scare you away.  A majority of the prep-time is cooking the short ribs, so that is inactive.  And you can actually make them a few days ahead of time, so that will save you a lot of time the day you plan to serve this.  If you are feeling particularly ambitious, you can make your own pasta, but I took the easy way out this time and used no-boil noodles.  Which surprisingly taste almost as good as fresh pasta once the whole thing has been assembled and cooked.

Once assembled, this lasagne is pretty awesome.  The tender pasta, the short ribs (it's hard to go wrong with short ribs), the earthy mushrooms, rich and hearty tomato sauce, and the creamy bechamel all work so wonderfully together.  Yes, it takes a long time to make, but what a perfect project for a cold and dreary weekend.  While you're at it, invite some friends over to eat.  They will most definitely thank you.


Short Rib and Porcini Lasagne 
adapted from Fine Cooking, Dec 2011/Jan 2012
  • 3/4 oz (1 cup) dried porcini mushrooms
  • 2 lbs beef short ribs
  • kosher salt and freshly ground black pepper
  • 1 Tbs extra-virgin olive oil
  • 1 small yellow onion, finely chopped
  • 1 small carrot, finely chopped
  • 1 celery stalk, finely chopped
  • 2 cloves garlic, minced
  • 1 Tbs tomato paste
  • 1 bay leaf, fresh or dried
  • 1/2 cup dry red wine
  • 1 1/2 cups canned crushed tomatoes
  • 3 Tbs unsalted butter
  • 3 Tbs all-purpose flour
  • 2 cups milk (low-fat is fine)
  • 1 clove garlic, smashed
  • 1 1/2 cups finely grated Parmesan cheese
  • 1 box no-boil lasagne noodles
In a small bowl, soak the porcini in 1 1/2 cups of hot water for about 10 minutes.  Drain, and reserve the soaking liquid.  Coarsely chop the mushrooms and set aside.

Season the short ribs with salt and pepper.  In a large Dutch oven, heat 1 Tbs of the oil over medium-high heat until shimmering.  Add the short ribs, in batches if necessary, and brown on all sides, 2 to 3 minutes per side.  Transfer to a plate and pour off all but 1 tablespoon of fat.

Reduce the heat to medium and add the onion, carrot, and celery.  Cook until the vegetables are tender, 4 to 5 minutes.  Add the garlic and cook until fragrant 30 seconds to 1 minute.  Add the tomato paste and cook until it darkens 1 to 2 minutes.  Pour in the wine and add the bay leaf.  Simmer, stirring and scraping up any browned bits as you go, until almost all the wine has evaporated, 2 to 3 minutes.

Add the reserved mushroom liquid and the tomatoes, and bring to a simmer.  Return the short ribs to the pot, along with any accumulated juices and the chopped porcini.  Cover and reduce the heat to maintain a gentle simmer.  Cook, turning the ribs every 30 to 40 minutes, until the meat is fall-off-the-bone tender, 2 1/2 to 3 hours total.

Use tongs to remove the ribs from the pot and move them to a plate to cool.  Pour the sauce into a heatproof bowl and discard the bay leaf.  Allow to sit for a few minutes, until the fat rises to the surface.  Be sure to get as much fat off as you can, or the tomato sauce will be greasy.  Skim it off with a large spoon and discard.  When the meat is cool enough to handle, remove and discard the bones and any fat or cartilage.  Shred the meat and set aside in a medium bowl.

Make the bechamel sauce.  Melt the butter in a 3-4 quart saucepan set over medium heat.  Stir in the flour with a wooden spoon and cook until golden, stirring constantly, about 2 minutes.  Gradually whisk in the milk and add the garlic clove.  Cook at a gentle simmer, stirring often, until the mixture thickens, about 10 minutes.  Fish out the garlic clove and season with 1 teaspoon of salt.  Mix the bechamel sauce into the tomato sauce.

Add the lasagne noodles to a large heatproof bowl or casserole dish.  Pour enough boiling water over them to cover completely, and allow them to soak about 5 to 10 minutes, or until they are soft and pliable.  Drain the water, and when cool enough to handle, line them in a single layer on a lint-free kitchen towel.  Pat dry with another kitchen towel.

Assemble and bake the lasagne.  Heat the oven to 350 degrees and lightly grease a 9x13 inch baking dish.

Spread 3/4 cup of the sauce on the bottom of the dish and cover the sauce with a slightly overlapping layer of the noodles.  Spread 3/4 cup of sauce over the noodles, and add 1/2 cup of the shredded meat over the sauce.  Sprinkle with 1/4 cup of the shredded Parmesan cheese.

Add another layer of noodles, then repeat the layers as instructed above, to make a total of 4 layers of sauce and meat and 5 layers of noodles.  At this point you should have used all the meat, but still have some sauce and cheese left over.  Spread 3/4 cup of the sauce over the top and sprinkle with the remaining cheese.

Cover the baking dish with foil and bake for 40 minutes.  Remove the foil and bake until the top is browned and bubbly, 15 to 20 minutes.  Cool for at least 10 minutes before serving.  Sprinkle with additional cheese as desired when you serve.


Thursday, January 12, 2012

Portabello & Black Bean Enchiladas with Roasted Poblano Sauce


Without a doubt, these chicken enchiladas will forever be my favorite.  But it never hurts to try new flavors and combinations, which is why I've also posted enchiladas verdes and vegetable enchiladas.  I also have a recipe for shrimp enchiladas that I love but just haven't ever posted.  So my point in all this is that I love enchiladas.  They will always and forever be one of my favorite Mexican dishes.  And anytime I see a new recipe, I'm tempted to try it.

These enchiladas have a lot going for them:  they are full of veggies, relatively healthy but still taste indulgent and rich; and the roasted poblano sauce is to die for.  It is so flavorful thanks to the combination of chile powder, cumin, and the all-important poblano pepper.  That pepper gives the sauce so much spicy/tangy flavor, and I'm pretty tempted to add a roasted poblano to all my enchilada sauces in the future.  So so good.

It seems like there are a lot of steps and this is a labor-intensive meal, but if you stagger it and work efficiently, it comes together pretty quickly.  First, roast the poblano.  Then as it cools, start the sauce.  As the sauce is simmering, dice and roast your veggies.  Then you can just mix it all together, assemble, and bake!


Portabello & Black Bean Enchiladas with Roasted Poblano Sauce
adapted from Eating Well by A Hint of Honey, via Perry's Plate

Roasted Poblano Enchilada Sauce
  • 1 poblano pepper
  • 2 tsp. extra virgin olive oil
  • 1/2 large onion, chopped
  • 2 cloves minced garlic
  • 1/2 tsp. salt
  • 1/2 tsp. ground cumin
  • 1/2 tsp. chili powder
  • 1/4 tsp. paprika
  • 1/8 tsp. ground chipotle pepper (optional)
  • 2 cups crushed tomatoes
  • about 1/4 cup water (to thin out the sauce)
  • 1/2 cup fresh cilantro, chopped + extra for garnish
Filling
  • 1 red bell pepper, seeded and chopped
  • 1 green bell pepper, seeded and chopped
  • 12 oz. portobellos (about 4-5 mushrooms), stemmed, gills scraped out, and diced
  • 1/2  onion, chopped
  • extra virgin olive oil
  • salt and freshly ground black pepper
  • 1 can black beans, drained and rinsed
  •  1/2 cup fresh cilantro, chopped
  • 1/2 cup shredded cheddar cheese or Pepperjack
  • 12-14 six inch corn tortillas
  • 1/2-1 cup shredded cheese (cheddar, Pepperjack, or a combination)
  • fresh salsa or pico de gallo, for serving
Preheat oven to 425 F.

To prepare the sauce: Roast the poblano pepper  directly over the flame of a gas burner, turning frequently with tongs, until evenly charred. (Alternatively, char under the broiler, turning once or twice, for 5 to 7 minutes total.) Transfer to a deep bowl, cover with plastic wrap, and set aside to steam for 10 minutes, or until cool enough to handle.

Meanwhile, heat 2 tsp. olive oil in a medium saucepan over medium heat. Add the onion and saute until softened, 3-5 minutes.  Stir in the garlic, salt, cumin, chili powder, paprika and ground chipotle (if using) and cook, stirring constantly, until fragrant, about one minute.

Peel the poblano, discard the stem and seeds, and chop. Add to the saucepan along with the tomatoes, water, and chopped cilantro. Return to medium heat and simmer, until the liquid has reduced slightly, 10 to 15 minutes. Remove from heat and puree using an immersion blender, or transfer to a blender or food processor (be very careful if you do this since the sauce will be piping hot!).  The sauce can be made a few days in advance and refrigerated.

To prepare the filling:

While the sauce simmers, spread the mushrooms, peppers, and onions in a single layer on a rimmed baking sheet.  Drizzle with olive oil and sprinkle with salt and pepper. Roast, stirring halfway through, until the vegetables are tender and browned in spots, about 15 minutes. Transfer to a large bowl and stir in beans, 1/3 cup of the enchilada sauce, the cheese, and cilantro.

Reduce oven temperature to 375 F.

To prepare the enchiladas: Spread 1/2 cup of the sauce in the bottom of a lightly greased 9x13 baking dish. Stack the tortillas on a microwave safe plate and cover with plastic wrap or a damp paper towel.  Micrwave 30 seconds to 1 minute, or until they are soft and pliable.  Arrange the tortillas in a single layer on a clean work surface.

Spread about 1/3 cup of the filling in each tortilla, and roll them. Place seam-side down in the baking dish. Spread the remaining sauce over the enchiladas and sprinkle with cheese

Bake, uncovered, until hot, about 15-20 minutes. Before serving, top with fresh salsa and garnish with cilantro. 


Tuesday, January 10, 2012

Mocha-Frosted Espresso Brownies


I have a major weakness for both coffee and all coffee-flavored desserts.  Even as a little girl, I loved coffee ice cream.  And as much as I try to convince Caroline that my coffee is "yucky," she still likes it and asks for sips when we go to Target (is anyone else incapable of going to Target without also going to the Starbucks in the front of the store?).  It was also a cruel cruel punishment that my biggest craving throughout my pregnancy with Smith was iced vanilla lattes.  So as much as I love coffee, I'm actually not a huge fan of mochas.  I think they are a little too rich for a drink.  But mocha flavored desserts?  I'm all over those.

Sometimes I just can't leave well-enough alone.  I started out wanting to make brownies for dessert one night when we were having some friends over.  Then when I opened my cookbook to the recipe I use, the espresso brownies caught my eye.  So I figured, why not?  And then once they came out of the oven, I thought about how awesome they would be if I topped them with some mocha buttercream.  Again, why not?  And then I remembered these peppermint frosted brownies that I bookmarked at Christmas, and how I loved the thin layer of ganache on top.  And I went for it.

Let me tell you right now that if you make these, you might as well throw your resolutions out the window.  Unless your resolution was to eat more brownies.  In that case, good job!  I definitely should have cut these into smaller squares... but I didn't.  These might be one of the most decadent desserts I've ever made, so it should come as no shock that they are also one of my favorite.  And definitely my favorite brownie. 


Mocha-Frosted Espresso Brownies
inspired by Confections of a Foodie Bride


Triple-Chocolate Espresso Brownies
barely adapted from Baking Illustrated

  • 5 oz semisweet or bittersweet chocolate, chopped
  • 2 oz unsweetened chocolate, chopped
  • 8 Tbs unsalted butter, cut into quarters
  • 3 Tbs cocoa powder
  • 2 Tbs instant espresso powder or instant coffee powder
  • 3 large eggs
  • 1 1/4 cups sugar
  • 2 tsp vanilla extract
  • 2 Tbs Kahlua liqueur (optional)
  • 1/2 tsp salt
  • 1 cup all-purpose flour

Preheat the oven to 350 degrees and adjust the rack to the lower-middle position.  Line a 9-inch square baking dish with foil, leaving a 2-inch overhang on two sides.  Use another sheet of foil to line the dish perpendicular to the fist piece, leaving another overhang on two sides.  Spritz with cooking spray.

Add the chopped chocolates and the butter to a medium, microwave-safe bowl, and cook for 30-second intervals, until melted, stirring well after each time.  Whisk in the cocoa and espresso powder until smooth.  Set aside to cool slightly.

In a medium bowl, whisk together the eggs, sugar, vanilla, Kahlua, and salt until well-combined.  Whisk in the warm chocolate mixture, then stir in the flour with a wooden spoon.  Pour the batter into the prepared baking dish, and spread into the corners with a spatula.  Level the surface.

Bake 30 to 35 minutes, or until a toothpick comes out with just a few crumbs attached.  Cool on a wire rack to room temperature, about 2 hours.


Mocha Frosting
adapted from My Baking Addiction, via Smells Like Home
  • 1 stick unsalted butter, softened to room temperature
  • pinch of salt
  • 1 Tbs Kahlua
  • 2 - 2 1/2 cups powdered sugar, sifted
  • 1 Tbs cocoa powder, sifted
  • 1 Tbs instant espresso powder, dissolved in 1Tbs warm water
  • 1-3 Tbs heavy cream
In the bowl of a stand mixer fitted with the paddle attachment, cream the butter at medium speed until light and fluffy.  Decrease the speed to low and slowly add in the powdered sugar and cocoa powder.  As it combines, increase the speed and beat until it has all come together.  Add the salt, kahlua, espresso, and heavy cream, and increase the speed to medium.  Beat until well combined and light and fluffy.  Add more cream or sugar to get the consistency you like.


Chocolate Glaze
adapted from Confections of a Foodie Bride

  • 1/2 cup semisweet chocolate chips
  • 2 Tbs butter or vegetable oil
  • 1 tsp Kahlua
Melt the chocolate chips and butter in the microwave.  Stir in the Kahlua

To assemble the brownies, use an offset spatula to spread the mocha frosting in an even layer over the brownies.  Allow to set for about 10-20 minutes. then pour the chocolate glaze over the top.  Working quickly but gently, use a rubber spatula or the back of a spoon to spread the glaze over the frosting.  Refrigerate for at least 30 minutes, or until the glaze is set.  Remove the brownies from the pan using the foil overhang, and cut into squares.


Sunday, January 8, 2012

Spinach-Artichoke Stuffed Portabellos


Everyone and their mother loves spinach-artichoke dip.  If it is available at a party, no matter how much you make, or how many people are eating it, it will all be gone by the end of the night.  It's a perennial favorite for good reason - it's warm and comforting, cheesy, delicious, and it's "healthy."  At least that's what I tell myself.  It does have spinach.  And artichokes.  And vegetables = good for you right?  Don't they negate the absurd amount of cheese in there?

These mushrooms actually are pretty healthy.  They are heavy on the veggies and light on the cheese.  And I made them even healthier (and egg-allergy friendly) by substituting Greek yogurt for the mayo, and reduced fat cream cheese for the full-fat version.  And of course it should come as no surprise that they are delicious as well.  Not only is is hard to go wrong with mushrooms stuffed with spinach-artichoke dip, but they are popping up on several of my favorite food blogs as well.  So they are blogger-approved.

Served with a side salad, this was a great light and healthy meal, though I think they would also be great as a side to roast chicken, pork tenderloin, or a steak dinner.  The filling itself makes a great dip (I had a little left over and had it for a snack the next day!).  It would also be great stuffed into small mushrooms as well - a lighter way to serve that popular dip at a party!


Portabello Mushrooms with Creamy Spinach-Artichoke Filling
adapted from Fine Cooking, December 11/January 12
serves 4
  • 3 Tbs olive oil
  • 4 garlic cloves, minced
  • 4 medium portabello mushrooms, stems and gills removed (a butter knife works really well for removing the gills)
  • 4 oz cream cheese, softened (reduced-fat is fine)
  • 3 Tbs nonfat Greek yogurt 
  • 2 tsp fresh thyme
  • pinch red pepper flakes
  • 10 oz frozen chopped spinach, thawed and squeezed dry
  • 9 oz frozen artichokes, thawed, patted dry, and chopped
  • 1/2 cup fresh breadcrumbs or panko
  • 1/2 cup grated Parmesan cheese
Preheat the oven to 450 degrees.

In a small bowl, combine 2 tablespoons of the olive oil and about half of the minced garlic.  Brush the insides of the mushroom caps with the mixture and sprinkle generously with salt and pepper.  Arrange the mushrooms in a single layer on a baking sheet, oiled-side up.  Roast until just tender, about 10 minutes.  If the mushrooms gave off excess water, use a paper towel or kitchen towel to blot up the moisture.

While the mushrooms roast, mix the cream cheese, Greek yogurt, and 1 teaspoon of the thyme in a medium bowl.  Stir in the spinach and artichokes and season with salt and pepper.

In another bowl, toss together the remaining garlic, 1 tablespoon oil, 1 teaspoon thyme, breadcrumbs, and Parmesan cheese.

Spoon the artichoke mixture evenly into the mushroom caps and sprinkle with the breadcrumbs.  Bake until the crumbs are golden-brown and the filling is hot, about 10-12 minutes.  Serve immediately.


Thursday, January 5, 2012

Chicken Parmesan Pizza


When people say they don't like leftovers, I have to imagine that they are eating rubbery, dried out meat with limp and soggy veggies.  That is not at all how I eat them.  I actually really like leftovers because it gives me an opportunity to re-imagine the dinner into something else.  This pizza is the perfect use for not only leftover chicken parmesan, but also any grilled, fried, or baked chicken as well.  It is most definitely one of my favorite meals - leftovers or not.

And the best thing?  It is so flipping easy.  Just spread some marinara on pizza dough, top with some chopped up chicken breasts, and then cover the whole thing with mozzarella and Parmesan.  It doesn't get any easier.  Happy Friday, everyone - here's hoping for a delicious and fun weekend!


Chicken Parmesan Pizza
Pink Parsley Original

  • 1 lb pizza dough
  • olive oil
  • cornmeal, for sprinkling
  • 1/2- 3/4 cup marinara sauce
  • 1 cup chopped chicken (fully cooked)
  • 1 1/2 cup shredded mozzarella cheese
  • 1/2 cup freshly grated Parmesan cheese
  • 2 Tbs chopped fresh basil
Place a pizza stone or upside-down baking sheet in the oven and preheat to 500 degrees for at least 30 minutes.

Sprinkle a piece of parchment paper generously with cornmeal, and then shape the pizza dough into a 12 inch circle.  Brush the outer edge with olive oil.  Spread a thin layer of marinara sauce over the dough, and top with the chopped chicken.  Scatter the shredded cheese over the top.

Bake 10 minutes, or until the crust is golden-brown and the cheese is bubbly and browning.  Remove from the oven and allow to cool for about 10 minutes.  Sprinkle with basil before slicing and serving.


Tuesday, January 3, 2012

Pan-Roasted Fish with Avocado-Pineapple Salsa


I'm a meal-planner.  I sit down every weekend and peruse my cookbooks, spreadsheets, magazines, and favorite blogs for inspiration and recipe ideas, go to Starbucks for a coffee, and then I wander around the grocery store for a while.  It's one of my favorite weekend rituals.  For the most part I am pretty good about sticking with my menu plan, but there are definitely times when something gets pushed back or taken off if I'm not in the mood for it.

I almost pushed off this fish.  And if it weren't for the fact that I couldn't bear the thought of wasting the $20 I spent on the wild-caught sea bass, I probably would have.  Now to think that this meal could have suffered that fate is pretty crazy.  Because it ended up being one of the best meals we've had in a while.

You could use pretty much any mild, white fish that you'd like.  Halibut would be great, but tilapia would definitely be the most budget-conscious choice (though since it is thinner, you would need to adjust the cooking time accordingly).  Pan roasting the fish allows it to be nice and crispy on the outside, while remaining tender and soft inside.  The real standout here was the salsa though.  It was a perfect balance between sweet and spicy, and the avocado mellowed the whole thing out.  I served this over cilantro-lime quinoa, and we loved every single bite of this dinner.  If you aren't a fan of seafood, you could easily serve the salsa over chicken, pork, or even tofu.  I also think this would be a great combination for fish tacos.

It is below freezing outside right now, but this bright and fresh meal made me feel like summer is just around the corner... I can wish, right?


Pan-Roasted Fish with Avocado-Pineapple Salsa
salsa adapted from Everyday Food, January/February 2012
  • 2  avocados, diced small
  • 2 cups finely diced pineapple
  • 1/2 jalapeno, seeds and ribs removed, finely chopped
  • 1/2 small red onion, finely chopped
  • 1/4 cup finely chopped fresh cilantro
  • juice of 2 limes
  • salt and freshly ground black pepper
  • 4 white fish fillets (5-6 oz each)
  • 1 Tbs olive oil
Preheat the oven to 425 degrees.

In a medium bowl, combine the pineapple, jalapeno, cilantro, red onion, and lime juice  Season with salt and pepper to taste and set aside.

Pat the fish dry with paper towels and season liberally with salt and pepper.

Heat the oil in a large oven-safe skillet until very hot, but not smoking.  Carefully place the fish in a single layer in the pan.  Allow to cook, without moving them, for 1-2 minutes, or until they are very light golden-brown. Very carefully flip the fish with a spatula.

Remove the pan from heat and transfer it to the oven.  Cook 5-7 minutes, or until the fish is opaque throughout and flakes easily with a fork.  The cooking time will vary based on the thickness of the fish, so start checking it around 4-5 minutes.

To serve, top each piece of fish with salsa.


Sunday, January 1, 2012

Tortellini Minestrone


Happy 2012, everyone!  I hope everyone had a great weekend, and now of course it's time to buckle down with your resolutions.  Lose weight.  Get more organized.  Save more money.  The usual, right?  I'm actually not really big into resolutions, per se, but I do think it's important to set goals.  And did you know that you are 60% more likely to reach your goals if you write them down?  I totally made up that statistic, but the sentiment is true.  I find that writing down specific, tangible goals definitely makes a big difference, versus just having vague ideas of things I want to achieve. 

So anyway, if you made the resoltion/goal to eat healthier, eat more dinners at home, eat more veggies, and/or cook more, then this soup is a great place to start.  It is healthy, tasty, filling, and perhaps most importantly, it's on the table in under 30 minutes.  This particular version uses a combination of carrots, onions, celery, mushrooms, and zucchini, but I think pretty much any combination of veggies would work.  This would be a great soup to make when you're trying to clean out the veggie drawer in your fridge.  It also calls for cannellini beans, but again, I think several other varieties would be just as good.  


If you need some healthy inspiration, I've updated my Featured Recipes page to showcase some of my favorite healthy dinners.


Tortellini Minestone
adapted from Cook's Illustrated, Soups and Stews
serves 4-6
  • 1 Tbs olive oil
  • 2 carrots, peeled and cut into 1/2-inch pieces
  • 2 stalks of celery, cut into 1/2-inch pieces
  • 1 medium onion, minced
  • 5 oz mushrooms, sliced 
  • 4 garlic cloves, minced
  • 1 Tbs minced fresh oregano, or 1 tsp dried
  • 3 cups low-sodium chicken broth
  • 2 1/2 cups V8 vegetable juice
  • 1 (15-oz) can cannellini beans, drained and rinsed
  • 1 (9-oz) package fresh cheese tortellini (preferably whole wheat)
  • 1 medium zucchini, halved lengthwise, seeded, and cut into 1/2-inch pieces
  • salt and ground black pepper
  • 1/2 cup pesto (homemade, or if store-bought, use the refrigerated variety)
  • grated Parmesan, for serving
Heat the olive oil in a large Dutch oven over medium heat.  Stir in the carrots, celery, and onions,1/4 teaspoon of salt, and black pepper to taste, and cook until just softened, 3-5 minutes.  Stir in the mushrooms, and cook until all the vegetables are softened, 5-6 more minutes.  Add the garlic and oregano and cook until fragrant, about 30 seconds.

Stir in the broth, scraping up any browned bits.  Stir in the vegetable juice and beans and bring to a boil.  Reduce the heat to a simmer and cook about 10 minutes.

Add the tortellini and zucchini and continue to simmer until they are cooked through and tender, 5-7 minutes.

Season with salt and pepper to taste.  Divide among serving bowls and top each portion with a spoonful of pesto and a sprinkling of Parmesan before serving.


BLOG DESIGN BY: SHERBET BLOSSOM DESIGNS