Tuesday, December 14, 2010

Black Eyed Pea Hummus


I feel like I need to apologize.  See, I try to post a good variety of healthy dinners, with a few indulgent meals and treats thrown in.  But it seems like lately I've been sharing more and more sweets and fewer healthy dinners.  I feel like maybe I should apologize, but hey - they're all delicious, so I don't feel that bad.  Plus, it's the holidays - and people want sweets at this time of year!

However, people also want snacks and appetizers.  'Tis the season for cocktail parties and potlucks, and when I can, I like to take a healthy option.  There are sure to be plenty of dishes filled with cheese, butter, meat, etc.  One of my favorite things to make is hummus, and this is a fun twist.  You can really  make hummus out of any bean:  black beans (which is Joey's favorite), white bean, and of course the classic hummus made with chickpeas. 

If you've been reading my blog for a while, you may remember the Beer Pairing Dinner that Joey and I hosted this summer, and I served this as a bonus course while people arrived and milled around.  I actually made the accompanying corn bread sticks to use as dippers, and while they tasted fine, I wouldn't recommend them simply because they broke when dipped into the hummus, and were a bit dry as well.  Pita chips are just fine with these, as are corn chips and veggies. 

The black eyed peas give the hummus a nice southern twist, and I think it would be a welcome addition to any buffet or party.  In fact, I think I'll make it again for New Years Day at my in-laws house.  After all, black eyed peas do represent money for the coming year. :-)


Black Eyed Pea Hummus
adapted from Carolina Cooking by Debra Zumstein, originally from 700 Dayton - The Mansion at Forsyth Park
  • 1 (16-ounce) can black eyed peas, rinsed and drained
  • 2 cloves garlic, chopped
  • 1/4 cup tahini paste, well stirred
  • juice of 1 lemon
  • 1/3 cup extra virgin olive oil, plus more for drizzling
  • kosher salt and freshly ground black pepper
  • 1/4 tsp paprika, plus more for sprinkling
  • pinch cayenne
  • 1 Tbs minced fresh parsley leaves
In the bowl of a food processor fitted with a steel blade, combine the black eyed peas (reserving 2 tablespoons), garlic, salt and pepper, paprika, cayenne, and parsley,  Process 15 seconds, until almost fully ground.

In a small measuring cup, combine the tahini, lemon juice, and oil.  With the machine running, pour through the feed tube and continue to process 1 minute, until the mixure is smooth.  If it seems too thick, add water, a few teaspoons at at time, until the desired consistency is acheived.

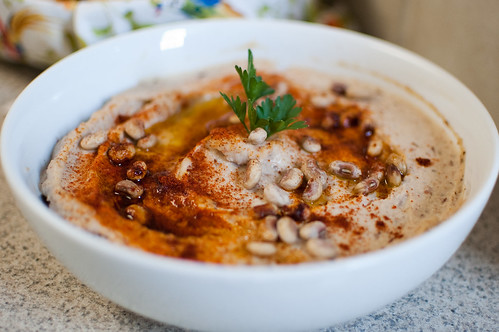
Transfer to a serving bowl, sprinkle with paprika, drizzle with olive oil, and scatter the remaining black eyed peas over the top.  Serve immediately or chill until ready to serve.


Sunday, December 12, 2010

PPQ: Grasshopper Pie Parfaits


This week's Project Pastry Queen dish was chosen by the fabulous Tara of Smells Like Home.  The original recipe is for Grasshopper Pie, but one of the "Rather Sweet" Variations is to turn the pie into parfaits.  I opted to do this because Joey and I do not need a whole pie sitting around, waiting to be eaten.  So I halved the recipe and made parfaits instead.  And don't they look so pretty and festive?

This recipe is pretty simple:  Oreo pie crust, minty marshmallow filling, hot fudge sauce.  And since everyone is pretty crazy for chocolate + mint around the holidays, this would be a great dessert to take to a potluck or dinner party.  Especially since it can be made weeks ahead and is served frozen.

I didn't really make many changes - mostly I just added more mint flavor because I felt like it was more of a "mint essence" on its own.  First, I used Candy Cane Joe Joes from Trader Joe's for half the oreos.  And let me just stop for a minute and say that if you have a Trader Joe's nearby, get yourself there as soon as possible and buy these.  If an Oreo and a Thin Mint had a love child, it would be a Candy Cane Joe Joe.  So addictive. 

So like I was saying, I used half classic oreos and half Joe Joes.  I also added a little extra Creme de Menthe to the marshmallow filling as well as to the chocolate sauce.  And as a side note, the recipe calls for green Creme de Menthe, but given my tendency to skim the ingredients before going to the store, I bought clear.  I thought "no big deal, they'll just be white and black instead of green and black."  But what I failed to realize is that the filling has 2 egg yolks in it, therefore has a yellow-ish tinge that wasn't so attractive.  I just added a few drops of green food coloring though, and it turned out just fine.

To turn the pie into parfaits, simply crush the oreos, then layer the oreos, hot fudge sauce, and marshmallow filling in glasses.  You want at least 2 layers of each component.  Freeze for at least 3 hours, and serve with more hot fudge sauce.

Tara has the full recipe posted on her blog.  Check it out for a fun holiday pie, or turn it into elegant parfaits.  Next week:  Rocket Rolls!


Friday, December 10, 2010

Beth's Famous Fudge


"Beth was sweeter than her fudge."  These were the first words delivered at my grandmother's funeral.  And they rang true.  My grandmother, or rather step-grandmother really, though I never considered  her to be "step," was famous for both her loving nature and her fudge.  I've mentioned before that I have the best grandfather in the world, and his devotion to Beth is just one of the many reasons.  She had a series of strokes the day after Easter in 2004.  They left her paralyzed pretty much from the neck down.  She was admitted into a rehabilitation center, and lived there until she died in September of 2006.  Twice a day, every single day, Pop visited her for a minimum of 2 hours.  Every.  Single.  Day.  My sweet Pop was the most devoted husband I've ever seen.  And this was the second wife he'd buried.  I just marvel at that commitment and love, and I can only hope that Joey and I still feel that way about each other when we're old and gray (or bald, as in Pop's case)!

Every year she literally made dozens of pounds of her fudge.  It's nothing out of the ordinary - just a classic chocolate fudge, but there was something special about hers.  It was always the perfect consistency.  And super sweet - which some may complain about, but it's fudge.  What do you expect?  She would "grudgingly" say at Thanksgiving every year that it was time to start the great fudge-making extravaganza, and we all looked forward to Christmas because she always brought it to our gatherings.  And we'd usually smuggle some home.  Luckily, she shared her recipe with my mom, who has now shared it with me.

A candy thermometer is absolutely vital for this fudge:  if the mixture isn't hot enough, it won't set.  If its too hot, it will be grainy and dry.  So 238 degrees Farenheit exactly is what you want.  Other than that, it is very straightforward and simple:  Melt the sugar, marshmallows, butter, and milk together to reach 238, then mix in the chocolate, vanilla, and cream of tartar.  Easy peasy. 

With 5 cups of sugar, this is not for the faint of heart.  However, it is one of the most nostalgic treats out there for me, and I can't help but to feel closer to her when I make it.  In fact, I made a batch recently, and gave a tin of it to Pop for his birthday.  He was quite excited to be able to enjoy this fudge again after all these years, and now that Joey has proclaimed it to be "the best fudge ever," I hope to carry on her tradition for years to come.


Beth's Fudge
makes 5 pounds
  • 1 (15-ounce) can evaporated milk
  • 5 cups sugar
  • 1 package mini marshmallows
  • 2 sticks butter
  • 1 (12-ounce) package, plus 1/2 cup semisweet chocolate chips
  • 1 tsp cream of tartar
  • 1 Tbs vanilla extract
  • 2 cups nuts (optional)
In a large stockpot, melt together the milk, sugar, marshmallows, and butter over medium heat, stirring often.  Bring to a boil and heat to 238 degrees.  Meanwhile, line a 9x13 inch bakign dish with foil and spray with cooking spray.

Remove from heat, and using an electric mixer, beat in the chocolate chips, cream of tartar, and vanilla extract.  Fold in the nuts, if using.  Carefully but quickly, pour the mixture into the prepared pan, and use a spatula to smooth the top.  Allow to set before cutting into squares.


Wednesday, December 8, 2010

Blue Cheese Cheesecake with Pear-Onion Jam


Cheesecake is one of my all-time favorite desserts.  Classic cheesecake, pumpkin cheesecake, chocolate cheesecake, fruity cheesecake, carrot cheesecake, gingerbread cheesecake, red velvet cheesecake... I've made them all and loved them all.  And while I have seen several recipes for savory cheesecakes, they've always seemed a little too "out there" for me.  I feel like having an unappetizing cheesecake is terrible because let's face it - a cheesecake is huge, and that is a lot of food going to waste.  So I've always shied away from them, even though I was intrigued.

That is, until a few weeks ago.  Some of the women on my street get together every so often for girls' night; we all bring appetizers and drinks, and basically we sit around and gossip and chat until the wee hours of the night.  Our most recent night however, posed a small dilemma.  We were going to be at Georgia Tech all day tailgating and going to a football game, so we weren't expecting to be home in time for me to spend a lot of time making a dish.  Therefore, I wanted to have something that I could make ahead of time.  I searched and searched for something that appealed to me and that would appeal to my friends (who all LOVE food, so I didn't want to do something plain or generic).  Finally I stumbled upon this blue cheese cheesecake.  Jackpot!

I bought a really nice blue cheese from Whole Foods since it played such a starring role.  As the cake baked, I prepared the pear-onion jam, then I refrigerated both components separately.  The end result was so delicious.  The pungent blue cheese flavor was definitely prominent, but was contrasted nicely by the tangy cream cheese and sweet pear-onion jam.  There are so many adaptations as well.  Use goat cheese instead of blue cheese, replace the asiago with parmesan, use gruyere... and as for the jam, fig-onion jam would be lovely, as would a jam of apples.  I absolutely loved this, and couldn't resist snacking on it all night long. 

Luckily, we ended up having so much food that there was enough leftover for me to put out a big wedge as an appetizer for our Fake Thanksgiving dinner the next day.  Served with crackers and apple slices, this makes a great appetizer for nibbling, and I think it would make an absolutely lovely addition to a cheese tray as well. 


Blue Cheese Cheesecake with Pear-Onion Jam
adapted from Culinary Concoctions by Peabody
  • 3 (8-ounce) packages cream cheese, softened to room temperature
  • 8 ounces blue cheese, crumbled
  • 6 ounces Asiago cheese, shredded
  • 4 large eggs
  • 1/4 cup heavy cream
  • 1/4 tsp freshly ground black pepper
Preheat the oven to 350 degrees.  Grease a 9-inch springform pan.

In the bowl of a stand mixer fitted with the paddle attachment, cream the cream cheese, asiago, and blue cheese until smooth and creamy.  Add the eggs, one at a time, beating well after each addition.  Add the cream and pepper and mix to combine. 

Pour the mixture into the springform pan and bake uncovered, in a water bath, until browned on top and barely set in the center, 45 to 50 minutes.  Cool completely and refrigerate several hours or overnight before serving.


Pear-Onion Jam
  • 4 cups onions, diced
  • 2 tsp olive oil
  • 2 cups peeled and chopped pears
  • 2 Tbs raspberry or pear vinegar
  • 1 cup brown sugar, lightly packed
  • 1/4 tsp kosher salt
  • pinch cayenne pepper
Saute onions in the oil over medium heat until softened and browned. Reduce heat and cook an addtional 10-15 minutes, until they are beginning to caramelize.  Add the pears, vinegar, brown sugar, salt, and cayenne.  Cook until pears are slightly softened but still crisp. 

Using a slotted spoon, remove the pears and onions from the skillet into a medium bowl, leaving behind as much of the liquid as possible.  Increase heat to medium and cook until the mixture has thickened into a glaze.  Mix into the pears and onions, cover, and refrigerate until ready to serve.

To serve, pour the pear-onion jam over the cheesecake, then remove the sides of the springform pan.  Serve with crackers, bread, or apple slices.


Tuesday, December 7, 2010

Cajun Red Beans & Rice


I realize that my blog has been inundated by recipes for rich, indulgent sweets and desserts, and for that I'm sorry.  Well not too sorry, actually - it has all been quite tasty.  But I have been eating something other than chocolate cheesecake and cookies.  In fact, I've been eating some pretty delicious dinners.  Like this red beans and rice recipe.  It is also relatively healthy, which is a nice bonus during the time of year for overindulgence.

Years ago, when I was a vegetarian, red beans and rice was one of my favorite dinners that my mom prepared.  And while this is reminiscent of that dinner, this version has both bacon and andouille sausage. So vegetarian it is not, but delicious it is.  I used to shy away from any recipe that starts with dried beans, but I don't know why.  They aren't difficult to prepare, and they have much less sodium than the canned variety.  And as they cook, they become so creamy and delicious.  Sure, they take longer to cook, but in that time they are permeated by all sorts of delicious flavors.  The recipe calls for an overnight soak, but I opted for a quick-brine and only soaked them for an hour.  Both versions are included below. 

This meal does take some time to cook, but most of it is inactive.  Its a great dinner to make on a cold day when you don't want to leave the house.  There are a few noteworthy ingredients in this recipe.  The red wine vinegar may seem a little out of place, but it provides a really nice acidic bite to the final dish.  And the scallions gave the whole dish a nice and fresh brightness.  The bacon may seem a little out of place, but tasso is traditionally used in Louisiana.  However, it can be hard to find outside of the area, so bacon plus some additional spices makes an acceptable substitute.  And finally, in an effort to make this a little healthier, I used chicken andouille sausage in lieu of traditional pork sausage.

We all really enjoyed this dinner, and Caroline practically inhaled it.  It really was the perfect dinner to enjoy on a cold night (along with some traditional Southern cornbread), and I am certain I'll be making this dinner all winter long.


One Year Ago:  Salted Cocoa-Roasted Nuts


Cajun Red Beans and Rice
adapted from Cook's Illustrated, Jan/Feb 2010
serves 6 to 8
  • 1 pound small red beans, rinsed and picked over
  • Salt
  • 4 slices of bacon, chopped fine
  • 1 medium onion, chopped fine (about 1 cup)
  • 1/2 cup chopped green bell pepper (1/2-1 pepper)
  • 1/2 cup chopped celery (1-2 ribs)
  • 3 medium garlic cloves, minced
  • 1 tsp fresh thtyme, minced
  • 1 tsp paprika
  • 2 bay leaves
  • 1/4 tsp cayenne pepper
  • ground black pepper
  • 3 cups chicken broth
  • 6 cups water
  • 10 ounces andouille or chicken andouille sausage, halved lengthwise and cut into 1/4-inch slices
  • 2 tsp red wine vinegar, plus more for seasoning
  • 3 scallions, sliced thin
  • hot sauce, for serving
Dissolve 3 tablespoons of salt in 4 quarts of water in a large pot and add the beans.  For the overnight brine, allow to soak at least 8 hours, or up to 24 hours.  For the quick-soak method, bring the pot to a boil over high heat.  Boil for 1 minute, then remove from heat, cover, and stand for 1 hour.  Drain and rinse the beans.

In a large dutch oven, cook the bacon over medium heat, stirring frequently.  Cook until browned and almost fully rendered, 5 to 8 minutes.  Add the onion, bell pepper, and celery, and cook, stirring frequently, until softened, 6-7 minutes.  Add the garlic, bay leaves, thyme, paprika, cayenne pepper, and 1/4 teaspoon black pepper.  Cook until fragrant, about 1 minutes, stirring constantly.

Stir in beans, broth, and water.  Bring to a boil over high heat, then reduce heat but just enough to still maintain a vigorous simmer.  Stirring occasionally, cook 45-60 minutes, or until the beans are soft and the liquid has begun to thicken.

Stir in the sausage and 2 teaspoons of the red wine vinegar.  Cook until the liquid is thick and the beans are fully tender and creamy, about 30 minutes.  Season to taste with additional salt, pepper, and vinegar.  Serve over rice, sprinkled with scallions and passed with hot sauce.


Sunday, December 5, 2010

PPQ: Black-and-White Cranberry Tarts


It's my turn again for Project Pastry Queen, and as usual, I struggled immensely with my choice.  We've just had Thanksgiving, so I felt like everyone was over pumpkin.  It's not quite Christmas, so I didn't think a giant cake was appropriate.  Maybe something savory?  Maybe a salad?  But I just couldn't resist these pretty little tarts.  Cranberries are one of my favorite things to bake with, and let's face it.  You can't go wrong with an oreo crust and white chocolate filling.  So the choice was made.

I have to admit that I was a little surprised to see that you don't bake the crusts at all.  However, this presented a problem when it was time to remove the tarts from the pans, and after I broke one tart, I decided to just serve them in the tartlette pans.  No big deal, but I will definitely bake the crusts for 10 minutes or so next time I make them.

The cranberries are just barely cooked - really just heated through enough to absorb some sugar and cut the tartness a bit.  Left whole, it creates quite a striking dessert - especially with the contrasting colors of the black crust, white chocolate ganache filling, and bright red cranberries.  I think these would translate well into a large tart, and I plan to make one for one of the several Christmas functions we'll be attending this year.  Festive, gorgeous, delicious, and most importantly easy. 

Check back next week:  We're making grasshopper pie!


Black-and-White Cranberry Tarts
adapted from The Pastry Queen
makes 8 tarts


Crust
  • 1 (16-ounce) package oreo cookies (about 33 cookies)
  • 1 stick unsalted butter, melted
White Chocolate-Cranberry Filling
  • 16 ounces white chocolate, chopped into small pieces
  • 1 cup heavy cream
  • 1/4 cup (1/2 stick) unsalted butter
  • 2 Tbs light corn syrup
  • 2 cups fresh cranberries, rinsed and picked over
  • 1/4 cup water
  • 1/4 cup sugar
To make the crusts, preheat the oven to 350 degrees.  Process the cookies in a food processor until ground to coarse crumbs.  Pour in the melted butter and pulse until well-combined.  Press the mixture into the bottom of eight tartlet pans. Bake 10 minutes, and set aside.

To make the filling, place the choped white chocolate in a large bowl.  In a medium saucepan, heat the cream, butter, and corn syrup to the boiling point.  Pour over the white chocolate and whisk until smooth.

Combine the cranberries, water, and sugar in a medium saucepan and warm over low heat about 5 minutes.  Do not let the cranberries get hot enough to pop.  Drain the cranberries well, discarding the liquid.  Fold the cranberries into the white chocolate mixture and pour evenly into the tart shells. 

Refrigerate at least 2 hours or overnight.  Remove from tart pans and serve.


Friday, December 3, 2010

Aztec "Hot" Chocolate Ice Cream


A few weeks ago, I handed Joey The Perfect Scoop and told him to pick out an ice cream.  Since I had made sweet potato ice cream recently, and it wasn't his favorite, I thought I'd be a good wife and make something he would enjoy.  I was actually a little surprised when he chose this one because he usually goes for something more classic and simple.  But I was game.

I love the combination of chocolate and cinnamon, and I was intrigued by the addition of chile powder.  It seems that adding spice to chocolate is all the rage right now, so consider me on the bandwagon.  The ice cream base is a smooth, rich dark chocolate.  You then add in the cinnamon, cayenne, and chile powder.  When I first tasted the ice cream, I was surprised by how much it actually tastes like hot chocolate.  Then came the kick from the cayenne.  Its pretty subtle, and oddly addicting.  You just keep going back for more to dissect the flavors and achieve that perfect balance of sweet, smooth, and spicy. 

David Lebovitz recommends using ancho or chipotle chile powder, but I actually didn't have either one on hand.  Since they tend to be more spicy than standard chile powder, I opted to add a little cayenne in addition to it.  I think this gave the ice cream the perfect amount of heat without being overpowering. 

 This was definitely a fun and unusual ice cream, and would be a fun conversation piece if you served it at a party.  I think it would be especially fun to make hot chocolate "affogato" with it.  Just pour some hot chocolate over the ice cream, and serve. 


One Year Ago:  Company Pot Roast


Aztec "Hot" Chocolate Ice Cream
adapted from David Lebovitz, The Perfect Scoop
makes about 1 quart
  • 2 1/4 cups heavy cream
  • 6 Tbs unsweetened Dutch-process cocoa powder
  • 3/4 cup sugar
  • 3 oz semisweet chocolate, chopped
  • 1 1/4 cups whole milk
  • 1 tsp vanilla extract
  • pinch of salt
  • 1 1/4 tsp ground cinnamon
  • 2-3 tsp chile powder
  • 1/8-1/4 tsp cayenne pepper
  • 2 Tbs brandy
Whisk together the cream, cocoa powder, and sugar in a large saucepan.  Heat the mixture, whisking frequently, until it comes to a full, rolling boil.  Remove from heat and add the chopped chocolate, whisking constantly until it's completely melted.  Stir in the milk, vanilla, salt, cinnamon, chile powder, cayenne, and brandy.  Pour into a blender and blend for 30 seconds, until very smooth.

Chill for several hours in the refrigerator, then freeze in the ice cream maker according to the manufacturer's instructions. 


BLOG DESIGN BY: SHERBET BLOSSOM DESIGNS