Sunday, July 31, 2011

Chocolate Chip Scones


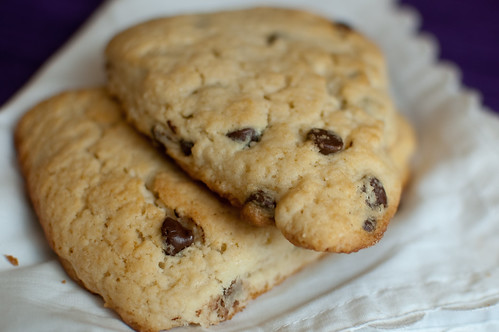
Scones are one of those breakfast items that are really just a dessert in disguise.  That's not to say I don't love them - I just try not to kid myself into thinking I'm being healthy when I eat one.   I chose these scones for my Project Pastry Queen choice this week because I knew that Joey would love them.  He goes nuts for pretty much any dessert that's chocolate chip-based.  

Mine spread a bit while baking, but it wasn't really a problem.  I stayed true to the recipe with the exception of the pecans - I omitted, as I usually do with nuts in desserts.  I also brushed the tops with some melted butter before baking.  I think a glaze would be extra decadent on these - I think a coffee or mocha glaze would be especially tasty!  Next time I make these I think I'll make the scones smaller though - they were pretty massive when made as directed.

As with most scones, these came together quite quickly, and were equally as low-maintenance.  I only wish I had saved half of them to freeze and bake later - I have a feeling they would have been much appreciated come September when I have a newborn!

Check out the Project Pastry Queen page to see how everyone else enjoyed the scones, and next week we're making more brownies!


Chocolate Chip Scones
The Pastry Queen
makes 8 giant scones
  • 1 cup pecans (optional)
  • 3 cups all-purpose flour
  • 1 cup sugar
  • 1/2 tsp salt
  • 1 Tbs baking powder
  • 10 Tbs unsalted butter, chilled
  • 1 tsp vanilla extract
  • 1 1/2 - 2 cups cold heavy cream
  • 1 cup semisweet chocolate chips
  • 2 Tbs butter, melted
Preheat the oven to 350 degrees.  Arrange the pecans in a single layer on a baking sheet and toast 7 to 9 minutes, or until golden brown and aromatic.  Coarsely chop the pecans ad set aside.

Increase the oven temperature to 425 degrees.

Process the flour, sugar, salt, and baking powder for 30 seconds in te bowl of a food processor fitted with a metal blade.  Cut the butter into 1/2-inch cubes and add to the flour mixture.  Pulse about 15 times, or until the mixture is crumbly.

Stir the vanilla into the cream.  With the food processor running, slowly pour 1 1/2 cups of the cream through the feed tube.  Stop the food processor as soon as the cream has been added.  If the dough has begun to stick together in a ball, remove it.  If not, add more cream, 1 tablespoon at a time, and pulse until the dough begins to clump up and form a ball.

Place the dough on a lightly floured flat surface and knead in the chocolate chips and pecans, handling the dough as little as possible.  Form the dough into a 3/4-inch thick round and cut into 8 wedges.  Place on an ungreased baking sheet, brush with melted butter, and bake 10-15 minutes, until the scones are a light golden brown.  Serve warm or a room temperature.  The scones are best the day they are made.


Wednesday, July 27, 2011

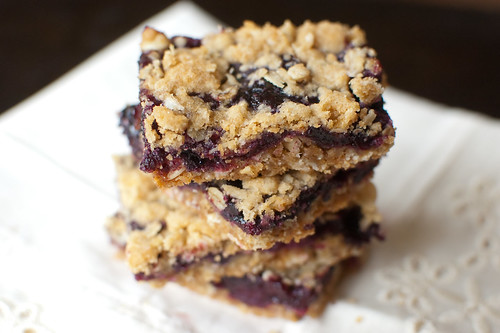
Blueberry-Oatmeal Crumble Bars


Less than 5 miles from our house is a pick-your-own blueberry farm.  Two years ago, I met up with a few friends and our kids for a morning of blueberry picking.  I had visions of coming home with gallons and gallons of freshly picked berries - what would I possibly do with them all??  Instead, the berries were scarce, the sun was hot, and the kids were cranky.  To say it was an utter failure would be a total understatement.  To put it in perspective, we picked berries for almost 2 hours, and I paid 60 cents for my "bounty."  We all agreed then and there that we'd never do that again.  From then on, I vowed to do my berry picking at the the grocery store or farmer's market.

But this year I decided to give it another go.  Blueberries are Caroline's favorite fruit, and now that she's a bit older, I thought that she might enjoy picking her own berries.  But this time I planned better.  We set out quite a bit earlier, and since it had rained the night before, the weather was nice and cool.  In probably 5 minutes, I had picked more berries than I did the entire time before.  There were plenty down on Caroline's level, and she had her own bucket for collecting them.  We picked and picked, and eventually Caroline got tired of it, because she dumped out her bucket and filled it up with leaves and twigs instead.  Oh well.  I ended up picking almost 2 pounds in just under an hour, which was plenty for some baking and snacking.

We came right home and made these bars.  I wanted to find an egg-free treat that Caroline could not only help me bake, but that she could enjoy as well.  These were a cinch to throw together, and we had a fun time making them.  They reminded me a bit of Nutrigrain bars, and Caroline of course loved them.  I think these would be great with any combination of berries or fruit, and I can't wait to try them in the fall with apples or pears - you know, that I pick myself of course. ;-)


Berry Oatmeal Crumble Bars
adapted from Baking Bites


Blueberry Filling
  • 3 cups fresh or frozen blueberries
  • 1 Tbs lemon juice
  • zest of 1/2 lemon
  • 1/2 cup sugar
  • pinch of salt
  • 2 Tbs cornstarch
Crumble and Crust
  • 1 1/2 cups all-purpose flour
  • 1 1/2 cups rolled oats
  • 1 cup brown sugar
  • 3/4 cup butter, softened and cut into 7-9 pieces
  • 1/2 tsp baking soda
  • 1/2 tsp salt
  • 1/4 tsp cinnamon
  • 1 tsp vanilla extract
To make the filling, combine the berries and the lemon juice in a medium saucepan.  Cook over medium heat, stirring often, until the berries are soft and tender, 8-10 minutes.  Add the sugar and cornstarch to the berries, and bring to a boil.  Cook an additional 1-2 minutes, until thickened.  Remove from heat and set aside.

Preheat the oven to 350 degrees and grease a 9x13 inch baking dish.

To a food processor, add all the ingredients for the crust and crumble topping.  Pulse in 1-second intervals until the mixture resembles coarse crumbs.  Reserve 1 1/2 cups for the topping, then press the rest of the mixture into the bottom of the prepared baking dish.

Use a spoon to drop dollops of the berry filling over the crust, and use a spatula to spread the mixture over the entire surface.

Use your fingers to squeeze together clumps of the remaining crumble topping, and sprinkle evenly over the berry filling.

Bake until golden-brown, 30 to 35 minutes.  Cool completely before slicing and serving, or serve cobbler-style by scooping with a spoon.


Monday, July 25, 2011

Creamed Corn


Ask and you shall receive!  When I posted the Blueberry BBQ Salmon, I was asked by several people to also share the creamed corn recipe.  So here it is!

I've actually never been a huge fan of creamed corn.  I think it's kind of soupy, fake tasting, and just not worth the calories.  But I do like the idea behind it, so I set out to find a homemade version.  I made and shared this recipe for Cheesy Creamed Corn with Cilantro and Queso Fresco a few years ago, but this time I wanted to find a more traditional version.

For a side dish, this is fairly labor-intensive.  The corn is first cut from the cobs, then the cobs are scraped clean of the pulp and "milk."  The corn is sauteed with onion, then fortified with heavy cream, the pulp that you scraped off the kernels earlier, herbs, and sugar.  I used my immersion blender to puree some of the corn, but you could also add a portion to a blender or food processor; or just leave well enough alone and serve it as is. 

As much as we loved the blueberry bbq salmon, I think Joey liked this corn even more.  It's a perfect way to take advantage of delicious sweet corn, and it's definitely fun to reinvent such a traditional dish.


Creamed Corn
adapted from Martha Stewart
  • 8 ears of corn, husked
  • 2 Tbs butter, divided
  • 1/2 cup finely chopped Vidalia onion
  • 3/4 cup heavy cream
  • 1 tsp sugar
  • 2 Tbs minced fresh chives
  • 1 Tbs minced fresh basil
  • kosher salt and freshly ground black pepper.
Cut the tip off of each cob of corn, and stand in a shallow bowl.  Use a knife to remove the kernels by slicing downward.

Over another bowl, use the back of a spoon scrape the kernels clean of the pulp.

In a large skillet, melt 1 tablespoon of the butter.  Add the onion and cook until just softened, 3-4 minutes.  Add the corn kernels, pulp, and 3/4 cup water.  Bring to a boil.  Reduce the heat, cover, and simmer until the corn is tender, 10 to 15 minutes.

Add the cream and sugar, and bring to a simmer.  Cook until the cream has thickened, 4 to 6 minutes.  Use an immersion blender to puree part of the corn - just pick 5-6 spots in the pan to puree.

Add the remaining tablespoon of butter, the chives, and the basil.  Season with salt and pepper to taste, and serve.


Thursday, July 21, 2011

Peach-Tilapia Packets


I hope that you all love peaches as much as me, because I have no less than 4 peachy recipes to share in the coming weeks.  Some are savory, some are sweet.. but they are all pretty awesome! Peaches are by far my favorite summer fruit, so I definitely take advantage and cook with them as often as possible while they're in season.

I know that tilapia gets kind of a bad reputation, but I actually think it's a great fish.  As far as farmed fish goes, it is one of the most sustainable choices out there - though buying US caught tilapia is a better choice than going foreign.  Plus, it is very mild, cooks quickly, is very affordable, and can be combined with so many other flavors to create tons of different flavor profiles.

This recipe is one of my new favorites.  You make an easy marinade from fresh peaches, garlic, and herbs, and marinate the fish for up to several hours.  Each piece of fish is then wrapped in a foil packet and grilled (or baked).  Super low maintenance, and super tasty and healthy.  I really love pairing fruit with fish, so this was an especially awesome dinner for me.  The herbs and garlic help to keep the peaches from overpowering the delicate fish, but there is still plenty of peachy goodness to enjoy.

And speaking from experience, it is also a very forgiving dish.  My grill ran out of propane as I cooked this, so I had to transfer it to the oven to finish cooking.  I ended up overcooking the fish just a tad, but it still tasted great, and the foil packets really help to keep the moisture in.  I served this with an incredibly awesome rice dish that I'll be sharing in the next few weeks, along with some grilled (umm and then broiled when the propane ran out) zucchini.  It was an awesome summer dinner that I can't wait to enjoy again before peach season is over!


Peach-Tilapia Packets
adapted from How Sweet it is
  • 2 large peaches, peeled and roughly chopped
  • 2 Tbs fresh basil
  • 2 Tbs  fresh mint
  • 2 Tbs  fresh parsley
  • zest of 1/2 lemon
  • 1/4 cup olive oil
  • 1-2 cloves garlic, smashed
  • 1/2 tsp salt
  • 1/2 tsp pepper
  • 4 tilapia filets
  • 1 red onion, sliced into rings
 Combine all the ingredients through the pepper in a food processor, and blend until the mixture is combined and smooth. 

Line a medium baking dish with the fish (or use a large ziploc bag), and pour the marinade over it.  Turn the fish a few times to coat well, then cover and refrigerate at least 1 hour, or up to 14 hours.

Prepare grill by preheating to medium-high heat. 

Lay out 4 14-inch lengths of foil, and arrange a few onion slices in the center of each one.  Using tongs, transfer 1 piece of fish to each piece of foil, then spoon a little marinade over the tops.  Fold the foil over the fish, folding the edges to seal.

Grill 10-12 minutes, or until the fish is cooked through and flakes easily with a fork.  Alternatively, cook in the oven at 425 degrees for 12-15 minutes.  Carefully open the packets to serve.


Wednesday, July 20, 2011

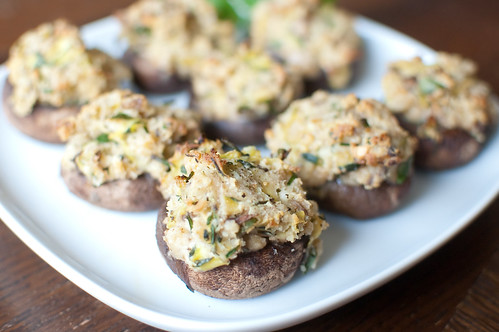
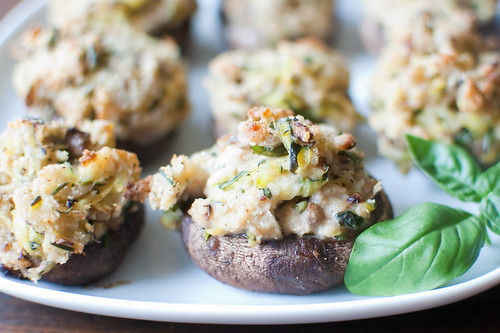
Zucchini & Goat Cheese Stuffed Mushrooms


Joey and I discuss "nature vs. nurture" quite often when it comes to Caroline.  Is she inherently awesome, or is it a product of our awesome parenting?  ;-)  Though in all seriousness, she is a very good eater, and we discuss it at length.  Is it because we are constantly introducing her to new foods, or is it just because she loves to eat?  I guess we'll find out when our second child starts eating table foods, but for now I like to think that I at least had a little something to do with it.  I'm quite sure that I'll screw her up in other areas of life, but at least I know I did something right - she does love to eat vegetables.

We've been eating a lot of zucchini lately - baked zucchini fries, grilled or broiled zucchini, zucchini bread, zucchini on pizza... it has yet to get old.  So far Caroline has enjoyed the grilled zucchini the most.  She actually had a third helping yesterday!  "Please more 'kini please!"

I was definitely intrigued when I found this recipe for zucchini and shrimp stuffed mushrooms, because I loved the idea of stuffing mushrooms with more veggies.  I loved the lighter take on them, but I had my own inspiration for the filling.  I love the combination of zucchini and goat cheese, so I ran with that instead.  It's a very simple filling, amped up with the addition of garlic, herbs, and cheese.

As expected, Caroline ate her fair share.  And of course I loved them too:  but then again you could stuff pretty much anything with goat cheese and I'm happy!


Zucchini and Goat Cheese Stuffed Mushrooms
Pink Parsley original, inspired by Living Lou
  • 10 large button or cremini mushrooms, wiped clean, and stems removed but reserved
  • 1 cup grated zucchini (about half a medium zucchini)
  • 1 shallot, minced
  • 1 Tbs olive oil, plus more for drizzling
  • 1 clove garlic, minced
  • 2 oz. cream cheese, softened (reduced fat is fine)
  • 2 oz. (1/4 cup) crumbled goat cheese
  • 2 Tbs grated Parmesan or Pecorino cheese
  • 3 Tbs dried breadcrumbs
  • 2 Tbs minced fresh basil
  • 2 Tbs snipped fresh chives
  • kosher salt and black pepper
Preheat the oven to 400 degrees. 

Finely chop the mushroom stems.  Toss the zucchini in a colander with a little salt and allow to drain 5-10 minutes, then wrap in a paper towel and squeeze to remove excess moisture.

Heat the oil in a small skillet over medium heat.  Add the shallot, mushroom stems, and zucchini, and saute until the vegetables have softened, 3-4 minutes.  Add the garlic and cook until fragrant, about 30 seconds.

Remove the skillet from heat and stir in the cream cheese, goat cheese, Parmesan, bread crumbs, and herbs.  Taste and season with salt and pepper.

Scoop the filling into each of the mushroom caps.  Drizzle with additional olive oil.  Bake 15-20 minutes, or until the tops are golden brown and the mushrooms are cooked through.  Serve immediately.


Monday, July 18, 2011

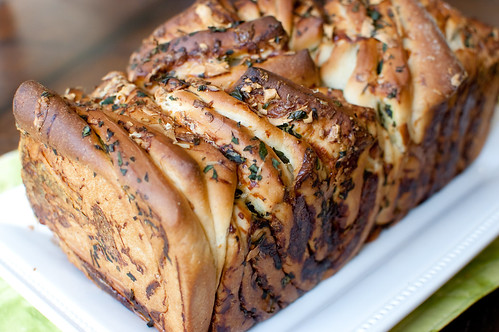
Cheese & Herb Pull-Apart Bread


A pretty standard meal around here is pasta, bread, and salad.  And not that I get bored, but I do like to mix things up a bit - either by trying new pasta dishes, different salads, or variations on bread.  Admittedly, that is probably what I do the least of though - it's just so easy to just grab a baguette from the bakery at the grocery store and heat it up.  I have a few recipes that I make when I want to get fancy - like these herbed dinner rolls or Garlic and Herb Ciabatta Bread, but for the most part I go with the old standby.

This cinnamon-sugar pull-apart bread has been popping up all over the place, and while I can't wait to try that as well, I was extra excited to try this savory variation.  It is layers of soft bread, filled with garlic, herbs, cheese, and then drizzled with melted butter.  The combinations of herbs and cheeses are pretty much infinite, so just use what you have on hand.  I think for the herbs I used basil, chives, parsley, oregano, and thyme.  And for the cheese I used cheddar, gouda, and Parmesan. 

This method seems imrpressive, but it is actually really easy.  It's a pretty standard yeasted dough, but when it comes time to shape it, it is rolled out into a large rectangle, sprinkled with the filling, then cut into squares and stacked into the loaf pan.  You can be as anal or free form as you want, but I preferred measuring my squares to have them be as close in size as possible (I'm a scientist by training - I really can't help the compulsions). 

My favorite part of this bread was the crunchy outer pieces mixed with the soft and doughy inside.  And of course you can't go wrong with gobs of melted cheese.  This was such a fun bread to make, and it would be especially well-suited to serve to company.  Served with pasta, grilled steaks, a roasted chicken - it's so versatile and would be a great addition to pretty much any meal.


Cheese & Herb Pull-Apart Bread


Bread
  • 2 cups bread flour
  • 1 cup all-purpose flour
  • 1 cup warm water
  • 1 packet instant yeast (2 1/4 tsp)
  • 3 Tbs sugar
  • 3/4 tsp salt
  • 2 Tbs butter, melted
Filling
  • 3-4 cloves garlic, minced
  • 3/4 cup fresh herbs (any combination that suits you)
  • 1 cup cheese (I used cheddar, gouda, and Parmesan)
  • 4 Tbs butter, melted
  • kosher salt and freshly ground black pepper
In the bowl of a stand mixer fitted with the paddle attachment, combine the water, sugar, and yeast.  Add the first 2 cups of flour, and mix until combined.  Switch to the dough hook, and with the mixer on low speed, add the third cup of flour, a few tablespoons at a time, until the dough forms.  Knead 6-9 minutes, until soft and pliable, and it no longer sticks to the sides of the bowl. 

Turn the dough out onto a lightly floured surface and knead to form a smooth ball.  Transfer to a lightly oiled bowl and allow to rise 1-2 hours, until doubled in size. 

Punch down the dough and turn out onto a lightly floured surface.  Allow to rest for 5 minutes.  Meanwhile, chop the herbs and garlic, melt the butter, and grate the cheese.

Roll the dough out into a 12x20 inch rectangle.  Brush with 2 tablespoons of the melted butter, then sprinkle the dough with the garlic, herbs, and cheese.  Sprinkle with salt and pepper to taste.

Cut the dough into 6 equally sized strips using a pizza cutter or knife.  Stack the strips on top of each other and cut into 6 equally-sized squares. 

Grease a 9x5 inch loaf pan, and stack the squares on top of each other in the pan.  I found the best way to do this was to hold the pan on its side and stack them that way.  If you lose some of the filling as you stack, just sprinkle it on top once the dough has been stacked.  Drizzle the remaining 2 tablespoons of melted butter over the top.

Cover with a clean kitchen towel and allow to rise 40 minutes. 

Preheat the oven to 350 degrees.  Bake the bread 35-45 minutes, or until the top is golden-brown and the inside is cooked through.  If the top browns too quickly, cover the bread with foil.

Remove from oven and allow to cool for at least 20 minutes.  Run a knife around the edges and invert onto a serving platter to serve.


source:  adapted from Petite Kitchenesse and Joy the Baker


Sunday, July 17, 2011

PPQ: Peanut Butter Cookies


If I were forced to choose my favorite cookie (though please don't make me!), I would be hard-pressed to go with anything other than a classic peanut butter cookie.  I, like so many others, just love peanut butter - I love it straight from the jar by the spoonful, on toast, with jelly for a sandwich, mixed with chocolate in pretty much anything... I even love it in savory applications - peanut sauce, anyone? And I'm happy to report that I've passed that love on to my daughter.  Her lunches pretty much rotate between peanut butter and jelly sandwiches, peanut butter on crackers, and peanut butter bananas.  Just last week, we stopped at Starbucks on our way to church.  I leaned over Joey to order my (decaf) iced coffee, then Joey ordered his coffee.  And from the backseat we hear "Please, peanut butter jelly, please!"  Smart Caroline, wanted to place her order, too!

This week was Wildcard Week for Project Pastry Queen, which means we can go back and make a recipe that we've missed along the way.  I don't know why I didn't make these the first time around - I'm guessing maybe I still had some lingering morning sickness or first trimester exhaustion?  Either way, I'm glad I went back to make them this week!

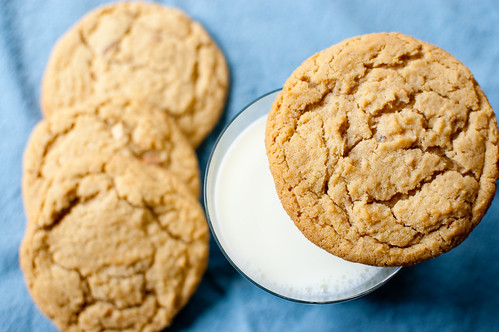
Actually, these are originally peanut butter and jelly cookies.  And while I think that sounds wonderful, I just felt like being basic this week.  So I just made some giant peanut butter cookies instead.  They are wonderfully soft and chewy, with just the right amount of crunchiness around the edges.  And with honey-roasted peanuts mixed right into the dough, you get an extra dose of crunch.


These are without a doubt the best peanut butter cookies I've ever made.  They really are pretty much perfect - and enjoyed with a cold glass of milk, it doesn't get much better.

Sarah of 20-something Cupcakes has the full recipe posted on her blog.  Check out the Project Pastry Queen website to see what everyone else made this week, and next week we're making a giant, peachy cake - complete with Dulce de Leche!


BLOG DESIGN BY: SHERBET BLOSSOM DESIGNS