Thursday, July 30, 2009

Southern Cobb Salad


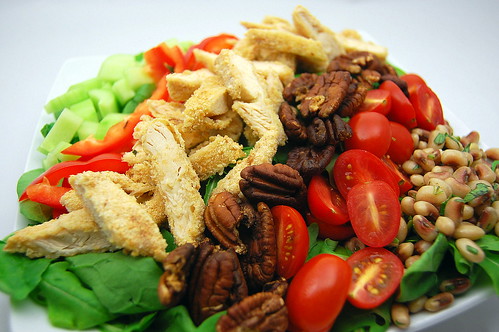
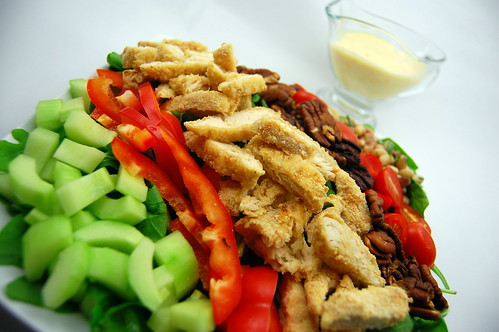
When I saw this recipe in the June issue of Better Homes and Gardens, I knew I had to make it. A traditional cobb salad is made with chicken, hard boiled eggs, avocado, bacon, tomatoes, and blue cheese. The southern version uses deviled eggs instead of hard boiled, and adds red bell peppers, fried chicken, pecans, black eyed peas, and tops it off with pimento cheese dressing.

I used the recipe as more of an inspiration, and I made my own version. I nixed the deviled eggs since neither Joey or myself are fans. I also breaded chicken tenders and baked them instead of pan frying. I also added some cherry tomatoes and cucumbers, and used my own pimento cheese, and just thinned it out with milk for the dressing. Finally, I used a mix of arugula and spinach instead of iceberg lettuce.

The more I thought about it as I was making this, I realized this isn't really a cobb salad. I guess its just a chicken salad with a southern spin. But whatever you call it, its delicious!

Southern Cobb Salad
adapted and inspired by Better Homes and Gardens, June 2009


For the dressing
  • 1 cup prepared Pimento cheese spread
  • 1/4-1/2 cup milk
Allow pimento cheese to come to room temperature. Adding 1-2 Tablespoons at a time, use a hand mixer to beat the cheese until it reaches your desired consistency. Set aside.

For the Chicken
  • 1 lb boneless skinless chicken tenders, trimmed and patted dry
  • 1 egg
  • 1 Tablespoon milk
  • 1/4 teaspoon hot pepper sauce
  • salt, pepper, and garlic powder
  • 1 cup all-purpose flour
  • 1 cup dried breadcrumbs
Preheat oven to 400. Season chicken with salt, pepper, and garlic powder. In a shallow dish, combine the egg, milk, and hot pepper sauce. In 2 more dishes, add the flour and breadcrumbs. Starting with the flour, dredge the chicken, and shake off excess. Dip into the egg, and finally, coat with breadcrumbs. Lay the chicken tenders on a parchment lined baking sheet. Bake 12-15 minutes, or until cooked through. Allow to rest for 10 minutes, then slice into bite-sized pieces.

For the salad
  • 2 teaspoons cider vinegar
  • 1 cup frozen black-eyed peas, thawed
  • 2 teaspoons snipped fresh oregano, finely chopped
  • 1/2 cucumber, peeled, seeded, and coarsely chopped
  • 1/2 red bell pepper, thinly sliced
  • 1/2 cup pecan halves, toasted
  • 1 cup cherry tomatoes, halved
  • 3 cups arugula
  • 3 cups baby spinach, stems removed
Mix the arugula and spinach on a large platter. Arrange the cucumber, bell pepper, chicken, pecans, tomatoes, and black eyed peas atop greens. Drizzle dressing over salad, tossing to coat (another note - I probably used less than half of the dressing, and it was plenty). Serve immediately.


Monday, July 27, 2009

Tilapia Puttanesca


Puttanesca sauce is a traditional Italian pasta sauce, usually served over spaghetti. The origins of the sauce are much debated, but puttanesca means "lady of the night," or prostitute to be more blunt. One story says that this was made by prostitutes between seeing "clients."

No matter the origin, it is delicious. I was actually a little nervous that it would be too salty and briny, as it has anchovies, capers, and kalamata olives. However, Joey and I both thought that it had a very mild taste. The only saltiness I got was when I bit into an olive. I left them halved and whole, and because of this, I think next time I would chop half of them to be better incorporated into the sauce. The recipe also did not call for anchovies, but I wanted it to be more authentic. I was actually pretty nervous to use them, since I didn't think I'd like them, but they really just kind of melted into the onions and olive oil, then imparted a nice mild but salty flavor to the rest of the sauce.

I served this over tilapia, which normally isn't my favorite fish, but 1. it was on sale, and 2. a milder fish would go better with the sauce. I would have otherwise made this with red snapper or halibut because in general I prefer them over tilapia. We ate this with Pamesan and herb cous cous, and it made for a nice and healthy dinner.

Tilapia Puttanesca
adapted from Better Homes and Gardens, June 2009

  • 1 lb. fresh skinless tilapia filets
  • kosher salt and fresh cracked pepper
  • 1/2 medium red onion, cut into wedges
  • 1 Tbsp olive oil
  • 1/4 cup anchovies packed in olive oil, finely chopped
  • 2 cloves garlic, minced
  • splash red wine
  • splash of balsamic vinegar
  • 1 14.5-oz can diced tomatoes, undrained
  • 2 Tablespoons fresh oregano, finely chopped
  • 1/4 tsp red pepper flakes
  • 1/4 cup kalamata olives, half finely chopped, half left whole
  • 1 Tablespoon capers, drained
  • 2 Tablespoons coarsley chopped fresh Italian parsley
Pat fish dry with paper towels, and season with salt and pepper. Set aside.

In a large skillet cook onion and anchovies in olive oil over medium heat, 8 minutes or until tender, stirring occasionally. Remove pan from heat and add vinegar and wine, scraping the bottom of the pan. Stir in garlic, diced tomatoes, oregano, and red pepper flakes. Bring to a boil; reduce heat. Simmer, uncovered, 5 minutes.

Add olives and capers to sauce. Top with tilapia filets. Return sauce to boiling; reduce heat. Cook, covered, 6-10 minutes or until fish flakes when tested with a fork. Removed fish. Simmer sauce, uncovered, 1-2 minutes more to thicken. To serve, spoon sauce over fish. Sprinkle with parsley.


Thursday, July 23, 2009

Grilled Vegetable Salad


I know I say this all the time, but I just love grilling. It is so easy, fast, and imparts the best flavor into food. I whipped up this veggie salad to go with grilled chicken for dinner one night, and I actually liked it better than the chicken! Once again, this is open to all sorts of adaptations. Just use whatever veggies and herbs you have on hand. I wish I had had some mushrooms, peppers, or squash, and I think eggplant would be lovely as well. I threw some cherry heirloom tomatoes in at the end, just because they were pretty :-)

Grilled Summer Salad


  • 1 medium zucchini, sliced very thinly, lengthwise
  • 1 medium sweet onion, sliced into rings - keep each ring together for easier grilling
  • 1 cup mixed heirloom tomatoes, halved
  • olive oil
  • kosher salt and fresh pepper
  • 1 Tablespoon dijon mustard
  • juice of 1/2 lemon
  • 2-3 Tablespoons red wine vinegar
  • mixed fresh herbs (I used oregano and basil)
  • pinch of sugar
Brush zuchhini and onion slices with olive oil, and season with salt and pepper. Grill until crisp-tender, 2-4 minutes per side.

Combine vinegar, mustard, lemon juice, herbs, sugar, and additional salt and pepper. Whisk in olive oil to desired consistency (I like my dressing more on the vinegar side, while I know some people prefer it heavier on the oil). Slice each zucchini slice into thirds, and slice onions in half. e toss together with vinaigrette and tomatoes. Check and adjust seasonings if necessary. Garnish with additional herbs or cheese if desired.


Thursday, July 16, 2009

Venezuelan Stuffed Corn Cakes


Stuffed corn cakes, or arepas, are a popular street food in South America. They have recently become popular in the US, and a few months ago, they even made an appearance on Throwdown with Bobby Flay. Joey and I always enjoy watching Throwdown. In case you aren't familiar with the premise, Chef Bobby Flay challenges the "best of the best" with their signature dish. He has a few days to perfect his version of it, and is then judged by a panel. Its always neat to see local favorites doing what they love, and its funny to watch a celebrity chef flounder a bit.

Anyway, a few months ago we saw an episode in which Flay threwdown with arepas, and Joey and I both commented that the dish looked great. When I saw this recipe in America's Test Kitchen, I knew I had to give it a try.

These were fairly easy to put together. I always get a little nervous when I work with dough, even though these cakes were very simple. My only issue is that they didn't seem to puff up as much as I expected, but maybe that's just the recipe. They were a little denser than I expected is all. I also should have cooked them maybe 1 minute longer, as the very center was still a little soft. Overall this was a very satisfying dinner. We all absolutely loved the filling though. I could have eaten the entire bowl by the spoonful!

Venezuelan Corn Cakes with Chicken and Avocado Filling
source: America's Test Kitchen

Filling
  • 1 cup cooked chicken, shredded into bite size pieces
  • 1 ripe avocado, halved, pitted, and cut into small chunks
  • 2 Tablespoons minced fresh cilantro
  • 2 scallions, sliced thin
  • juice of half a lime
  • 1/4 teaspoon chili powder
  • 1/4 teaspoon kosher salt
  • 1/4 teaspoon cracked pepper
Mix all of the ingredients together and adjust seasonings to taste. Cover with plastic wrap and refrigerate until needed

Corn Cakes
  • 2 cups masarepa blanca (precooked corn flour - white corn meal can be subbed)
  • 1 teaspoon salt
  • 1 teaspoon baking powder
  • 2 1/2 cups warm water
  • 1/4 cup vegetable oil
Preheat oven to 400.

Whisk the masarepa, salt, and baking powder together in a medium bowl. Gradually add the water and stir to form a dough. Using a generous 1/3 cup of dough, form eight 3-inch rounds, each about 1/2 inch thick.

Heat 2 Tablespoons of oil in a nonstick skillet over medium-high heat until simmering. Add 4 of the corn cakes and cook until golden on both sides, about 4-6 minutes total. Transfer to a parchement lined baking sheet, and repeat with remaining oil and corn cakes.

Bake until the corn cakes sound hollow when tapped on the bottom, about 10-15 minutes. Split the cakes open using a fork or paring knife as you would an English muffin, and stuff each with a generous 3 Tablspoons of filling. Serve immediately.


Monday, July 13, 2009

Grilled Pizza with Summer Vegetables and Goat Cheese


So when I saw this recipe on Smitten Kitchen, I knew I had to try it. 1. We love pizza. 2. I love goat cheese. 3. I love zucchini and squash. Plus, I have been wanting to try my hand at pizza dough, so I knew this would be a great opportunity.

I used her recipe as a template, and added and adjusted to my taste - she even says in her write up that that's the beauty of the recipe. I grilled the pizza, because its what I like to do. I also added a sliced homegrown tomato, and I used some basil and garlic infused olive oil that I picked up at the farmers' market this weekend with my veggies.

My pizza dough turned out great (look for a post for this soon), and I really loved the pizza. Joey said he liked it well enough, but isn't a huge fan of squash in general. Oh well, I guess this means I get to eat the leftovers :-) I think this would also be a great appetizer for summer gatherings.

Grilled Summer Veggie Pizza with Goat Cheese
adapted from Smitten Kitchen
  • pizza dough (homemade or store-bought)
  • 4 oz log of goat cheese, at room temperature
  • 1 lemon
  • salt and pepper to taste
  • chopped fresh herbs (I used basil and oregano)
  • 1 medium zucchini
  • 1 medium summer squash
  • 1 medium tomato
  • olive oil
Preheat grill to medium high heat. Roll out pizza dough to desired size and shape. Slice squash, zucchini, and tomato into 1/8-1/4 inch rounds. Mix to combine the juice of half a lemon, salt, and pepper, and goat cheese in a small bowl.

Brush olive oil onto one side of the dough. Carefully place dough, oiled side down, onto grill. Allow to cook 5-7 minutes, or until one side is cooked through. Brush the other side with oil, and flip pizza. Working quickly, spread goat cheese on pizza, and sprinkle with herbs. Arrange veggies over goat cheese, drizzle with olive oil, and season with salt and pepper. When dough and vegetables are fully cooked, carefully remove pizza from grill. Squeeze lemon juice over pizza, and cut into wedges to serve.


Grilled Potato Salad


I will readily admit that I am not a fan of potato salad. Partly because I don't like mayonnaise, but I think its also a texture and temperature thing. So when Southern Living declared that their "best potato salad recipe ever" was insdie the June issue, I was weary. But, I gave it a chance.

Let me tell you, I am now a convert. This particular salad is served warm, with a light mayo dressing, with bacon, scallions, onions, and dijon mustard. It takes a little bit of time and prep, but it is all easy and you can work on the rest of your meal as the potatoes cook on the grill. I made a few changes to lighten it up a bit, and added some fresh herbs, but we still really enjoyed it.

Grilled Potato Salad adapted from Southern Living, June 2009
  • 8 turkey bacon slices
  • 4-5 medium-sized red potatoes, cut into 3/4-inch cubes (about 5 cups)
  • 1 large sweet onion, cut in half, and in 1/2 inch strips
  • 2 T olive oil
  • Potato Salad Dry Rub
  • Potato Salad Dressing
  • chopped fresh scallions and oregano
Preheat grill to 350-400 (medium-high heat). Cook bacon, in batches, in a large skillet over medium-high heat 8-10 minutes or until crisp; remove bacon,and crumble.

Add potatoes, onion, and dry rub to skillet, adding olive oil, and toss to coat (note: if you use pork bacon, omit the olive oil and toss in pan drippings from frying the bacon).

Grill potato mixture, covered with grill lid, over 350-400 heat in a grill wok or metal basket (I actually just used the same skillet I cooked the bacon in - an ovenproof stainless steel skillet). Cook 30 minutes or until tender, stirring every 5 minutes. Transfer mixture to a large bowl. Add potato salad dressing, and toss to coat. Stir in bacon. Garnish with scallions and oregano. Serve warm
Potato Salad Dry Rub
  • 2 tsp. salt
  • 1 1/4 tsp pepper
  • 1 tsp paprika
  • 1 tsp garlic powder
  • 1/4 tsp dried thyme
  • 1/4 tsp dried crushed rosemary
  • 1/8 tsp celery seeds
Stir together all ingredients. Store in an airtight container up to 1 month

Potato Salad Dressing
  • 3 Tablespoons lowfat yogurt
  • 2 1/2 Tablespoons mayonnaise
  • 2 Tablespoons Dijon mustard
Stir together all ingredients. Store in an airtight container in refrigerator up to 2 weeks.
  • 2 teaspoons Worstershire sauce


Friday, July 10, 2009

Grilled Okra


Okra always takes me back to my childhood. My great-aunt and uncle lived across the street from us, and they had a very substantial garden. I have so many fond memories of going over to their house in the summer, drinking yoohoo, and eating Sunday dinner (which is really lunch) after church. For some reason, the okra really stands out to me. Of course being in the deep south, it was fried okra, and to be honest, until a few years ago, I'd never had okra any other way.

When I saw some okra at the local produce stand last week, I knew I had to find something to do with it. I'm not big on frying, and I've really been on a grilling kick, so I decided to try it out grilled. I have heard that okra can tend to be slimy, so I kind of expected this recipe to be a bust, but I was totally wrong! Honestly, I think I like this better than fried. The flavor really comes through, and I love the smokiness from the grill.

Joey and I enjoyed it, but Caroline was not a fan. She ate one piece, spit it out, then proceeded to move the rest off to the side. Apparently her dislike was so strong that she didn't even want it near the rest of her food! Don't let her reaction sway you though, this really was delicious!

Grilled Okra
make as much or as little as you'd like!
  • fresh okra
  • olive oil
  • kosher salt
  • ground black pepper
  • lemon wedges, for serving.
Thread okra onto two skewers, to make flipping easier. Brush both sides with olive oil, and sprinkle generously with salt and pepper. Grill 2-4 minutes per side, until okra is bright green, and cooked through. Serve with lemon wedges.


Grilled Ranch Burgers


Once again, I would just like to profess my love for Cook's Illustrated. They have never steered me wrong. These burgers were in the Summer Entertaining Issue, which I am absolutely in love with. I have made several of the recipes in here, and each one has turned out nothing short of phenomenal.

They call this a recipe for "stuffed burgers," as the traditional toppings are simply mixed in with the beef and grilled with the burger. They had such an awesome flavor and texture. I was a little worried that the blue cheese would overpower the ranch, but I could still taste it through the cheese. I served these with Grilled Potato Salad and Grilled Okra, and Joey promptly declared it to be one of his new favorite dinners. Even Caroline loved it, although she was not a fan of okra. We'll just give her some time ;-)

Ranch Burgers
adapted from Cook's Illustrated, Summer Entertaining, pgs 4-5
  • 2 lbs 85 percent lean ground chuck
  • 3/4 cup crumbled blue cheese
  • 2 medium garlic cloves, finely minced (I grated using my microplane)
  • 4 teaspoons powdered ranch dressing mix (from a packet)
  • 1/2 teaspoon dry mustard
  • 1/2 teaspoon salt
  • 1/4 teaspoon ground black pepper
Turn all burners to high, cover, and heat grill until very hot, about 15 minutes. Scrape grate clean with grill brush. Lightly dip wad of paper towels in oil; holding with tongs, wipe cooking grate. Leave primary burner on high and turn other burners to low.

Break beef into small pieces in a medium bowl and add cheese, garlic, ranch, mustard, salt, and pepper. Using fork, toss until evenly distributed. Divide mixture into 6 equal portions and lightly pack into 1-inch-thick patties.

Grill burgers on hot side of grill, uncovered, until well seared on the first side, 2-4 minutes. Using wide metal spatula, flip burgers and continue grilling, about 3-6 minutes, until desired degree of doneness. While burgers grill, toast buns on cooler side of grill.

Top with sliced tomato and addition blue cheese if desired.


Thursday, July 9, 2009

BB: Pasta with Sundried Tomatoes


This month's first Barefoot Blogger recipe was chosen by Cat of Delta Whiskey. I was very excited when I saw her selection, as I had just seen the Pioneer Woman make a version of this and had already put it on my list of recipes to try. This dish came together really quickly. I actually made the dressing the day before, so I had even less to do when the time came to get dinner on the table.

I also stayed pretty true to the recipe, I just decreased the salt (as usual), used my own sundried tomatoes, and subbed cherry tomatoes for larger tomatoes. I also mistakenly thought I had capers, so I used 3 manzanilla olives instead. I grilled some turkey Italian sausage to complete the meal. The only change I would make next time is to double the dressing. It didn't seem scant, but I would have loved to have more!

We ate this as our main course last night, but I think it would be great as a pasta salad at a picnic or potluck as well!

Pasta with Sundried Tomatoes
adapted from Ina Garten, Barefoot Contessa, Family Style
  • 1/2 pound fusilli (spirals) pasta
  • Kosher salt
  • Olive oil
  • 1 pint cherry tomatoes, halved
  • 3/4 cup good black olives, such as kalamata, pitted and diced
  • 1 pound fresh mozzarella, medium-diced
  • 6 sun-dried tomatoes, chopped

For the dressing:

  • 5 sun-dried tomatoes in oil, drained
  • 2 tablespoons red wine vinegar
  • 6 tablespoons good olive oil
  • 1 garlic clove, diced
  • 3-4 Manzanilla olives, coarsley chopped
  • 1 1/2 teaspoons kosher salt
  • 3/4 teaspoon freshly ground black pepper
  • 1 cup freshly grated Parmesan
  • 1 cup packed basil leaves, julienned

Cook the pasta in a large pot of boiling salted water with a splash of oil to keep it from sticking together. Boil for 12 minutes, or according to the directions on the package. Drain well and allow to cool. Place the pasta in a bowl and add the tomatoes, olives, mozzarella, and chopped sun-dried tomatoes.

For the dressing, combine the sun-dried tomatoes, vinegar, olive oil, garlic, olives, salt, and pepper in a food processor until almost smooth.

Pour the dressing over the pasta, sprinkle with the Parmesan and basil, and toss well.


Make Your Own Sundried Tomatoes


So this week my tomato plants have really gone crazy. I've gotten more tomatoes than I know what to do with! As I was preparing to make this week's Barefoot Bloggers recipe, I thought - hey why not make my own sundried tomatoes! It turns out they are very easy and require very minimal effort. The biggest challenge of making these is just time. They need to cook for several hours (like 7+, and from what I read up to 20), so I wouldn't suggest waiting until 4pm to start them if you want to go to bed at a reasonable hour (not that I did that). But let me tell you, they are sooo much better than storebought.... just like so many things in the world of home-cooking. Plus, think about how much money you can save. A jar costs at least $5 in my area, and I made these for pennies! Doesn't get much better than that.

These will keep for several months in the freezer. If the recipe you are using calls for them to be packed in oil, just soak them for a few hours in olive oil and any desired seasonings for a few hours before cooking.

Sundried Tomatoes
  • Tomatoes
  • Salt
  • Pepper
Preheat oven to 150. If your oven doesn't go this low, just set it to the lowest setting. Wash and dry tomatoes well. Cut into halves or quarters, depending on the size. Discard seeds and thick flesh. Space evenly on a cake rack positioned over a baking sheet, skin side down. Sprinkle liberally with kosher salt and freshly ground pepper.

Bake until the tomatoes are completely dried, but not charred, turning every few hours and checking for doneness. Allow to cool, and store in a ziploc bag. Refrigerate if you plan to use them within a week or so, otherwise freeze.


Monday, July 6, 2009

Guacamole Salad


So guacamole is easily one of my favorite foods. I could seriously eat it by the pint. Of course, Ina would find a way to turn guacamole into a respectable side dish.... since apparently its not very kosher to eat it by the spoonful ;-)

I've made this many times, and every time its a little different depending on what I have on hand, and what I feel like eating that particular day. I still have some yellow tomatoes from the produce stand, so I added some in. And I also had some red bell pepper to use up so I subbed that for yellow.
Guacamole Salad
adapted from Ina Garten, Barefoot Contessa at Home
  • 1/2 pint cherry tomatoes, halved
  • 1/2 large yellow tomatoes, seeded and diced
  • 1 red or yellow bell pepper, seeded ad 1/2-inch diced
  • 1 (15-ounce) can black beans, drained and rinsed
  • 1/2 cup small-diced red onion
  • 1 Tablespoon minced jalapeno pepper, seeded (1/2-1 jalapeno)
  • 1/2 teaspoon freshly grated lime zest
  • 1/4 cup freshly squeezed lime juice
  • 1/4 cup olive oil
  • 1/2 teaspoon kosher salt
  • 1/2 teaspoon freshly ground black pepper
  • 1/2 teaspoon minced garlic
  • 1/8 teaspoon ground cayenne pepper
  • 2 ripe Hass avocados, seeded, peeled, and 1/2 inch dice
Combine the tomatoes, peppers, black beans, red onion, jalapeno, and lime zest in a large bowl. Whisk together the lime juice, olive oil, salt, black pepper, garlice, and cayenne pepper and pour over vegetables. Toss well.

Just before serving, fold the avocados into the salad. Check the seasoning and serve at room temperature.

Serves 6.


Chicken and Summer Vegetable Tostadas


I love love love these tostadas! I found this recipe on My Recipes, and have made it three times since! It is fast, easy, healthy, and delicious. I even feed the filling to my one year old daughter, and she loves it too! This recipe can be easily adapted to suit your tastes, and you could really play around with the filling. Not the prettiest dish, but it makes up for it in taste.

Chicken and Summer Vegetable Tostadas
adapted from Cooking Light

  • 1 teaspoon ground cumin
  • 1/4 teaspoon kosher salt
  • 1/4 teaspoon ground black pepper
  • 2 teaspoons canola oil
  • 1 1/4 lbs chicken breasts, cut into 1-inch pieces
  • 1 cup chopped red onion
  • 1 cup frozen corn (fresh would be awesome too)
  • 1 cup zucchini, quartered and sliced
  • 1/2 cup black beans, drained and rinsed
  • 1/2 cup green salsa
  • 1/4 cup chopped cilantro
  • 4 (8-inch) whole wheat tortillas
  • cooking spray
  • 1 cup shredded monterey jack cheese
Preheat Broiler

Combine the first 3 ingredients, and sprinkle evenly over chicken breasts. Heat oil in a large skillet, and add the chicken. Saute for 3 minutes, and add corn and onion. Saute another 2-3 minutes, or until chicken is done. Mix in zucchini and salsa, and cook 2 minutes, or until most of the liquid has evaporated, stirring frequently. Mix in cilantro, reserving a few teaspoons for garnish.

Spray tortillas with cooking spray. Working 2 at a time, broil 1-2 minutes on each side, until crisp but not browned. Spoon about 3/4 cup filling on each tortilla, and top with 1/4 cup cheese. Broil 2-3 minutes, or until cheese has melted. Top with remaining cilantro, and cut into wedges to serve.


Sunday, July 5, 2009

Peach and Vidalia Onion Salsa


So the summer that I met Joey easily ranks up there as one of my favorite times of my life. I was living in a great apartment, had great friends, enjoyed my job, and just had a great time in general. And of course meeting my future husband was the icing on the cake :-) I was less than a year out of college, so I hadn't started feeling like a grown-up yet: no mortgage, car payment, or any adult responsibilities really. Almost every weekend my friends would come over, and we'd go to my pool. I always liked to have yummy snacks for us to eat, and salsa was among my favorite things to make. I seriously made a batch at least once a week. I had so much fun experimenting with different combos and flavors, but this was my favorite. Ripe Georgia peaches, tomatoes, and a hint of spiciness from jalapeno. Now everytime I make this, I think of that summer, and of course I think of meeting my wonderful husband. Maybe my salsa was what made him fall in love with me? ;-)

This is a really easy recipe, and can be altered to suit your tastes. I'm a spice wuss, so I only add half of a seeded jalapeno. I also love cilantro, so I have a heavy hand with that. Hope you enjoy this salsa as much as we do!

Peach Salsa
  • 2 ripe peaches, peeled and coarsly chopped
  • 3 medium tomatoes, seeded and coarsly chopped
  • 1/2 medium sweet onion, coarsly chopped
  • 1/2 jalapeno, seeds and membranes removed, and diced
  • 1/2 cup cilantro leaves
  • 1 garlic clove, minced
  • 1 Tablespoon red wine vinegar
  • juice of 1 lime
  • 1/2 teaspoon salt
  • 1/8 teaspoon freshly cracked pepper
Combine all ingredients in a food processor, and pulse 10-15 times, or until desired consistency is reached. Taste and adjust seasonings to taste (salt, jalapeno, garlic, etc). I like to eat with blue corn or multi-grain chips.


Zucchini Bread


I picked up some zucchini at the local produce stand last week, and I really wanted to find something fun and interesting to do with it. First I used it in my summer vegetable risotto, and then while flipping through my Baking Illustrated cookbook, I came across a recipe for zucchini bread. I just can't tell you how much I love Cook's Illustrated. Seriously, they test and retest every aspect of every recipe, and the results are consistently amazing.

This was no exception. The bread was light and sweet, without being too overpowering. There is less sugar in this version than in a typical recipe, which really lets the zucchini shine. Its no secret that I'm a big fan of the sweet and savory, so of course I loved this bread. But I have to say, the crust was my favorite part. It was sweet and crunchy, and absolutely delicious. I had to stop myself from just picking off the crust. And as a bonus, Caroline and Joey loved the bread too!

Just a few notes... the recipe calls to shred the zucchini and toss with some sugar, then allow to drain for 30 minutes. Since zucchini has a high water content, draining it before mixing it into the batter keeps the bread from becoming too soggy. I omitted the nuts since Caroline hasn't had nuts yet, but the original recipe calls for 1/2 cup chopped and toasted pecans or walnuts.

Zucchini Bread

adapted from Baking Illustrated, pages 28-30
  • 2 cups unbleached, all-purpose flour, plus more for dusting the pan
  • 1 pound zucchini, ends and stems removed, halved lengthwise and shredded
  • 3/4 cup sugar
  • 1 teaspoon baking soda
  • 1 teaspoon baking powder
  • 1/2 teaspoon salt
  • 1/4 cup plain yogurt
  • 2 large eggs, beaten lightly
  • 1 Tablspoon juice from 1 lemon
  • 6 Tablespoons (3/4 stick) unsalted butter, melted and cooled
Preheat oven to 375 degrees. Butter and flour a 9x5 loaf pan.

Shred the zucchini on the large holes of a box grater, or using the grater attachment of a food processor. Toss with 2 Tablespoons of sugar, and allow to drain for 30 minutes.

Meanwhile, combine the flour, baking soda, baking powder, and salt, and whist until well blended. Set aside.

Whisk together the remaining 1/2 cup plus 2 Tablespoons sugar, yogurt, eggs, lemon juice, and melted butter in a small bowl. Set aside.

After the zucchini has drained, squeeze in several layers of paper towels to absorb excess moisture. Stir the zucchini and the yogurt mixture into the flour until just moistened. Scrape the batter into the prepared pan and smooth the surface with a rubber spatula.

Bake until the loaf is golden brown and a toothpick inserted in the center comes out clean, 55 to 60 minutes, rotating the pan halfway through. Cool in the pan 10 minutes, then transfer to a wire rack and cool for at least an hour before serving.


Thursday, July 2, 2009

Duo of Goat Cheese Bruschetta


So as we embark on a fun-filled holiday weekend, I wanted to make a nice snack for Joey and me to enjoy before dinner tonight. I had 2 different ideas, so instead of focusing, I just made them both!

A few months ago, I came across a recipe for strawberry and goat cheese bruschetta in Better Homes and Gardens. Well of course I no longer have that issue, so I just flew from the cuff. For the other bruschetta, I just wanted to let the tomatoes shine. I picked up the yellow tomatoes from a local farm stand this week, and the vine ripe red tomatoes are from my garden.

They were both delicous, but seriously, put goat cheese on anything and I'm sold. I think I actually preferred the strawberry version, but Joey liked the tomato one better. I'm just a huge fan of sweet and savory in general. In any case, we kicked off the weekend right with these, and a nice glass of white wine.

Now this is a very intense recipe, so pay attention.

Tomato and Goat Cheese Bruschetta
  • crusty bread, sliced on the diagonal
  • goat cheese (in log form, not crumbled), allow to come to room temp for at least 20 minutes
  • strawberries or tomatoes, sliced thinly
  • fresh basil leaves
  • kosher salt and pepper (for tomato only)
Toast sliced bread 2-3 minutes, until crispy but not browned. Spread goat cheese evenly over surface, and top with either tomatoes or strawberries and basil. Sprinkle tomatoes with kosher salt and freshly ground pepper.


Wednesday, July 1, 2009

Grilled and Stuffed Portobellos


There are several things that make me immediately want to try a new recipe: grilling - check. mushrooms - check. cheese - check sausage - check. So I was super excited when I saw this recipe on Annie's blog a few weeks ago. I had initially planned to make this when we had family visiting last week, but never got around to it. Instead, I made it last night, and it was so worth the wait. Yum, yum, yum! The filling was cheesy and savory, the mushrooms were soft but still sturdy, and the entire dish had a great smokey flavor from the grill. I made a few modifications, like using basil and sundried tomato chicken sausage, adding a couple of garlic cloves, and topping with parmesan cheese, but one of the things I love about this recipe is how open it is to adaptation. My only issue is that the filling ended up giving off a lot of water, so I think I will leave out the water used to cook down the spinach next time I make this. I served this with the summer risotto below, and I'd say it now qualifies as one of my favorite meals.

Grilled and Stuffed Portobello Mushrooms
adapted from Annie's Eats, orginally from Bobby Flay
  • 1 lb chicken sausage with basil and sun-dried tomatoes, casings removed
  • 1/2 medium yellow onion, diced
  • 2 garlic cloved, peeled and minced
  • 1/2 cup dry red wine
  • 8 oz fresh baby spinach leaves, stems removed and coarsly chopped
  • salt and pepper to taste
  • 2 Tbsp fresh oregano leaves, finely chopped
  • 8 oz fresh mozarella, diced
  • 1/2 cup freshly grated Parmesan cheese
  • 5 large Portobello mushroom caps, stems removed
  • olive oil, for brushing
  • 1 tomato, sliced
  • additional fresh herbs and Parmesan cheese for garnishing
Preheat grill to medium heat and clean and oil the grates.

In a large skillet, brown the sausage, breaking into small pieces. Add the onion and cook until transluscent, 5-7 minutes. Add the garlic and cook until fragrant, about 1 minute. Pour in the wine, and cook until fully reduced. Add the spinach and season with salt and pepper. Cook until the spinach has wilted, about 2 minutes. Remove from heat, and stir in the oregano and cheese.

Brush both sides of mushroom caps with olive oil, and season with salt and pepper. Place on grill, stem-side down, and cook 2-3 minutes. Flip caps and cook an additional 2 minutes. Remove from the grill, and place on a flat surface, cap side down. Fill each with the sausage and cheese filling, and top with a slice of tomato. Return to grill and cook until the tomato has softened and the cheese has completely melted, about 5 minutes. Carefully remove from grill, and top with additonal Parmesan cheese and herbs.


BLOG DESIGN BY: SHERBET BLOSSOM DESIGNS