Tuesday, August 31, 2010

Chipotle-Cornmeal Crusted Fish


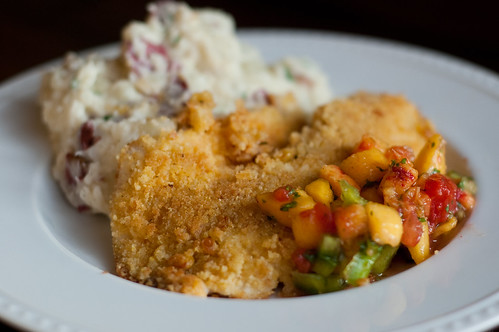
If I see a recipe and the word "chipotle" is in the title, it's pretty much guaranteed that I'll make it.  I just love the smoky-spicy flavor that chipotles give food.  This was also an incredibly easy and quick dinner to throw together.  AND I used the leftover corn muffins for the crust instead of plain cornmeal, which made the fish especially delicious. Win - win - win. 

The peach salsa is a great accompaniment to the fish, and well, smashed potatoes go with just about everything.  This was a great dinner, and it speaks volumes of the fish when Caroline finished that before even touching her mashed potatoes.  I used tilapia since it was on sale, but I would also suggest, cod, catfish, or halibut.  Any white fish would be great,  Just be sure to adjust your cooking time based on the thickness of the fillet. 


One Year Ago:  Seafood Risotto


Fish with Cornmeal-Chipotle Crust
adapted from Moosewood Restaurant New Classics
  • 4 firm fish fillets (5-6 ounces each)
  • 2 canned chipotles in adobo sauce, minced
  • 1 Tablespoon vegetable oil
  • juice of 1/2 lime
  • 1 large garlic clove, minced
  • 1 teaspoon chopped fresh thyme
  • 1/4 teaspoon salt
  • 1/2 cup cornmeal, or cornbread crumbs
Peach Salsa
makes 2 cups
  • 2 ripe peaches, peeled, pitted, and chopped
  • 1 ripe tomato, cored, seeded, and chopped
  • 1/2  bell pepper, seeded and chopped
  • 1 garlic clove, minced
  • 2 Tablespoons chopped cilantro
  • 1/2 jalapeno, seeded and minced (about 1 Tbs)
  • juice of 1/2 lime
  • pinch salt
  • freshly ground black pepper
 For the salsa, mix together all the ingredients, and set aside for at least 10 minutes.  Taste and season accordingly.

Preheat the oven to 375 degrees.  Lightly oil a large baking sheet with oil. Pat the fillets dry with a paper towel, and season with salt and pepper.

In the bowl of a food processor, combine the chipotles, oil, lime juice, cilantro, garlic, thyme, and salt.  Pulse a few times to combine. 

Pour the sauce into a shallow bowl or dish, and spread the cornmeal in a separate dish.  Dip each fish fillet first into the chipotle sauce, then dredge in the cornmeal.  Turn the fish several times to coat, and pat the fillets to adhere the crumbs.  Arrange the fish in a single layer on the prepared baking sheet.  Drizzle with a small amount of oil.

Bake uncovered until the fillets are golden and the fish flakes easily with a fork.  It could be as little as 10 minutes, or up to 25 depending on the type and thickness of the fish.  For the last 2 minutes, turn on the broiler to acheive a crispy crust. 

Serve with peach salsa and lime wedges.


Sunday, August 29, 2010

PPQ: Mocha-Almond-Meringue Tarts

This week's Project Pastry Queen recipe was chosen by Joelen of What's Cooking, Chicago?  The actual recipe is Texas Big Hairs Chocolate Hazelnut Meringue Tarts.

I changed things up quite a bit this week, partly out of necessity.  I've been trying to limit my trips to the grocery store, and while I thought I had hazelnuts, it turns out I only had pecans, pistachios, pine nuts, almonds, walnuts, and peanuts.  I then realized I didn't have frangelico either, so I subbed Kahlua.  And thus, mocha-almond tarts were born.  I ran with it at that point, adding instant coffee, almond extract, and more Kahlua to the ganache.  I was very pleased with the final product, and I was also really proud of myself.  Two years ago, there's no way I would have experimented that much with a baking recipe.  Cooking I could do from the hip, but I felt much more rigid while baking.  I guess its the scientist in me, not wanting to mess with the chemistry.  At this point, I know I can add flavors and textures to things like ganache and still get delicious results.  The funny thing was, these tarts look like they should be s'mores tarts, but then you taste coffee.  But it did give me the idea to make a s'mores tart!


I have to admit, my favorite part of this recipe was the meringue.  It was so much fun styling and playing.  I'm certainly not much of a hairdresser (Heaven help me when Caroline's hair is long enough to braid), but I had a lot of fun with these.  I thought I was making them pretty big and pouffy, but then I saw the picture in the cookbook and realized how small mine seemed - I guess everything really is bigger in Texas.

For the original recipe, head over to Joelen's blog.  I'm going to post my ganache recipe below, since it is pretty different from the original.  And check back next week for jailhouse potato cinnamon rolls - they sound like a perfect tailgating treat to kick off football season!


One Year Ago:  Bacon and Cheddar Scones


Mocha Ganache
adapted from The Pastry Queen
  • 1 cup heavy whipping cream
  • 1 tablespoon unsalted butter
  • 1/8 teaspoon salt
  • 1 teaspoon instant coffee
  • 1/4 teaspoon almond extract
  • 1 Tablespoon Kahlua
  • 7 ounces bittersweet chocolate, finely chopped
Place the chocolate in a medium bowl.  Heat the cream, butter, salt, and instant coffee in a small saucepan until gently boiling.  Add the almond extract and Kahlua, and pour over the chocolate.  Allow to sit undisturbed for 5 minutes, then whisk until smooth.


Friday, August 27, 2010

Grilled Pizza Margherita


Pizza Margherita sounds so much fancier than "cheese pizza" doesn't it?  This could also be called "caprese pizza."  Its all the components of my favorite combination:  tomatoes, mozzarella, and basil.   An authenic pizza margherita is cooked in an 800 degree oven and needs 2 days of proofing to acheive a thin, crispy crust.  I guess this is an imposter pizza because I just used my standard pizza dough.  Still, its delicious.  Its hard to mess up pizza.  In a pinch, I've also used dough from Trader Joe's or the Publix deli with good results. 

As the grill is heating, prep the tomato sauce, cut the cheese (hee hee), and shape the pizza dough.  Then its 10-15 minutes max to cook the pizza. With a salad this is the perfect light summer dinner.  I know Friday night is pizza night for many families, so its not too late to plan this for dinner tonight!

One Year Ago:  Salmon Pesto Pasta & Grilled White Pizzas with Arugula


Grilled Pizza Margherita
adapted from Cook's Illustrated
makes one 12-inch pizza
  • 1 ball pizza dough
  • 1 14.5-ounce can diced tomatoes
  • 1/4 teaspoon sugar
  • 1 medium garlic clove, minced
  • 1/4 cup basil leaves
  • 6 ounces fresh mozzarella, cut into 1-inch chunks
  • extra virgin olive oil
  • kosher salt
Add the tomatoes (with their juices) to the bowl of a food processor, and pulse several times to crush the tomatoes.  Transfer the tomatoes to a fine-mesh strainer set over a medium bowl and allow to drain 20-30 minutes, stirring occasionally.  Combine the drained tomatoes with sugar, 2 Tablespoons of basil, garlic, and 1/8 teaspoon salt. 
Meanwhile, preheat the grill to high heat (450-500 degrees) for at least 15-20 minutes.

As the tomatoes drain, shape the pizza on a well-floured surface by flattening the dough into an 8-inch disk, pressing to eliminate air pockets.  Stretch the outer edges with flattened fingers while giving quarter turns until the dough is a 12-inch circle.  Allow to sit at room tempeature 10-15 minutes.  Using a pastry brush, oil the dough well. 

Using a cutting board or pizza peel, transfer pizza, oil-side down, onto the grates of the grill.  Cook 5-10 minutes, or until under-side of dough is golden-brown.  Brush the top with more oil.  Using 2 spatulas, carefully flip the dough.  Working quickly, spread the tomatoes on the now-cooked side, then scatter the cheese evenly on top.  Close the grill cover and continue too cook until the crust is cooked through and the cheese has melted.  Carefully slide pizza onto a platter, and sprinkle with remaining basil, 1 teaspoon of olive oil, and a pinch of kosher or sea salt.  Serve immediately. 


Wednesday, August 25, 2010

BB: Ultimate Grilled Cheese


Ina Garten has a new cookbook coming out - it will be released in October, and is called How Easy is That?  How Ina is that??  In case the title didn't give it away, its focus is straightforward recipes perfect for entertaining and everyday cooking.  Tara, the brains behind Barefoot Bloggers, was offered an advanced copy of it to test out some recipes and share with her fellow blogging pals.  This month, we made Ultimate Grilled Cheese, as chosen by another one of my favorite bloggers, Rebecca of Ezra Pound Cake.

When I saw the title of this recipe, I had to wonder what exactly makes it the "ultimate" grilled cheese.  Well, you start with sourdough bread.  Butter each piece.  Then you spread each piece with an incredibly rich sauce of mayo, dijon, Parmesan cheese, salt, and pepper.  Scatter some bacon on top of the sauce, then pile on extra sharp cheddar and Gruyere.  So yeah, this sandwich doesn't mess around.

Joey was really excited by this sandwich.  Me?  Well it was certainly delicious of course.  It was a tiny bit too rich for me though, especially since I'm not the biggest fan of mayo (even though I actually decreased it when I made it).  I think if I had stopped at half a sandwich I would have been better off.  Still - add bacon, cheddar, and gruyere to anything and you can't go wrong. I'm just glad I served it with a light salad.

If you're interested to see what else will be included in Ina's latest cookbook, head over to Smells Like Home and check out what she's made so far.  And I for one can't wait to pick up a copy come October!

One Year Ago:  Pimiento Cheese with Bacon


Ultimate Grilled Cheese
Ina Garten, How Easy is That?
makes 6 sandwiches
  • 12 slices thick-cut bacon
  •  1 cup good mayonnaise
  • 1/4 cup Dijon mustard
  • 1/4 cup freshly grated Parmesan cheese
  • 1  tsp kosher salt
  • 1/2 tsp freshly ground black pepper
  • 12 slices sourdough bread
  • 6 tbsp butter, at room temperature
  • 6 oz Gruyere  cheese, grated
  • 6 oz extra-sharp Cheddar, grated
 Preheat the oven to 400 degrees.  Line the bacon on a rack set over a baking sheet, and bake for 20-30 minutes, or until browned and crispy.  Transfer to a paper towel-lined plate and allow to drain, then chop into 1-inch pieces.

Meanwhile, make the sauce.  Mix together the mayonnaise, mustard, salt and pepper, and Parmesan.  Combine the Gruyere and cheddar in a medium bowl.  Spread the sauce on each slice of bread, then top half the slices with bacon.  Top the bacon with 1/3 cup of cheese.

Form sandwiches, pressing each one down.  Butter the top half of each sandwich.  Melt 1-2 Tablespoons of butter in a large nonstick skillet, and grill have the sandwiches buttered-side up, flipping after a few minutes.  Repeat with remaining sandwiches.  Serve immediately.


Tuesday, August 24, 2010

Grilled Gumbo Salad


When I saw last that week's Project Pastry Queen selection was corn muffins, the first thought I had was "gumbo."  I have been eyeing a gumbo recipe in The Lee Bros. Southern Cookbook, and I fully intended to make it on Saturday night.  But that morning, we went to the farmer's market, and then followed it up with an outdoor bbq festival.  So yeah, not really feeling heavy, hot stew that night after spending all day in the heat.  Luckily, I'd had this recipe for gumbo salad saved for a few weeks, and this was the perfect time to bust it out.

In short, we loved this salad.  Great flavor from the shrimp, okra, peppers, and onions, then nice fresh bursts of flavor from the tomatoes, and all pulled together by a delicious fresh corn vinaigrette.  It was quick to throw together, and didn't dirty up too many dishes either.  Which makes it a double-winner in Joey's book. 

One Year Ago:  S'Mores Cupcakes


Grilled Shrimp Okra Salad
adapted from Southern Living, July 2010
serves 3-4 as a main course salad
  • 1/2 pound large shrimp, peeled and deveined (36/40 count)
  • 2 Tbs olive oil, divided
  • 2 tsp Cajun seasoning, divided
  • 3/4 pound fresh okra
  • 1 large sweet onion, cut into 1/2-inch thick rings
  • 1 bell pepper, quartered
  • 1 ear corn, shucked
  • 1 pound cherry tomatoes, halved
  • salt and pepper
Corn Vinaigrette
  • 1/2 cup fresh corn kernels
  • 1/4 cup olive oil
  • juice of 1 lemon
  • 1 garlic clove
  • 2 Tbs balsamic vinegar
  • 1 tsp Dijon mustard
  • 1 tsp fresh thyme
  • salt and pepper
Prepare grill to medium-high heat (350-400 degrees).  Toss the shrimp with  1 tablespoon of olive oil and 1 teaspoon of the cajun seasoning.  Thread the shrimp onto skewers and sprinkle lightly with salt and pepper.

To make the vinaigrette, combine the corn, oil, lemon juice, garlic, vinegar, mustard, and thyme in a food processor.  Pulse several times, until the dressing is combined and the corn has been coarsely chopped.  Taste and season with salt and pepper.  Set aside.

Trim the tops of the okra and cut in half length-wise.  Toss with onion, corn, and bell pepper on a baking sheet with the remaining tablespoon of oil and remaining teaspoon of Cajun seasoning.

Grill vegetables on a grill pan, tossing occassionally, until charred and tender.  The okra will take less time than the onion and bell pepper.  Turn the corn ever 2-3 minutes, or until lightly charred.  Grill shrimp 2 minutes per side, or until pink cooked through. 

Coarsely chop the bell pepper, and halve the onion slices.  Cut the kernels off the corn.  Remove the shrimp from skewers.  Combine the shrimp, grilled vegetables, tomatoes, and half the corn vinaigrette in a large bowl.  Toss well to combine, add more vinaigrette if needed, and serve warm or at room temperature.


Sunday, August 22, 2010

PPQ: Rather Rich Corn Muffins

 
I really love cornbread, and I have several recipes I use depending on what I'm in the mood for.  Ina's Jalapeno-Cheddar Cornbread is my go-to, but if I want "real" cornbread, I use the Lee Brothers' Thin and Crispy Cornbread.  So I wasn't really all that excited to make corn muffins for this week's Project Pastry Queen recipe.  Until I tasted them that is.  They are um, rather rich.  Butter, sugar, and heavy cream... but that's what makes them so good.  That and the fresh corn kernels that is.

One of the things that I like about this recipe is how open it would be to adaptations.  I'm sure subbing half-and-half or even buttermilk would work well, and I think bell peppers, jalapeno peppers, cheese, and onions would all be great mix-ins.  They are also a snap to throw together.  In less than 30 minutes, and you're enjoying a warm piece of corn muffin.

Thanks to Amanda of Fake Ginger for choosing this recipe - I guess I have another "go-to" recipe for cornbread now!

If you're interested in making these muffins, she has the recipe posted on her site.  Next week - go big or go home with Texas Big Hairs Chocolate Hazelnut Meringue Tarts!

One Year Ago:  Fontina and Herb Stuffed Chicken Breasts


Friday, August 20, 2010

Plum Ice Cream


Last week I decided I was overdue for some homemade ice cream, so I sat Joey down with The Perfect Scoop and told him to pick out a recipe.  His choice?  Well, it wasn't this one.  I'll get to his next week.  It just so happened that I had about a pound of plums, perfectly ripe and just waiting to be eaten, and wouldn't you know that David Lebovitz has a recipe for plum ice cream.

David suggests pairing this ice cream with a raspberry or blackberry swirl, which I think is a fabulous idea.  I even had some of both in my fridge, but I was crunched for time and skipped it.  I would love to try it out though!  I  added a step to strain the puree to get rid of the skins before chilling.  I just thought I'd prefer it smooth.  I also decreased the sugar just a tad, since the plums I used were really really ripe.  And since I didn't have any kirsch, I added a bit of almond extract instead.

We really enjoyed this ice cream.  Its a bit of an unusual flavor, but it tastes very rich and smooth.  Caroline and my niece both really loved it as well - and I'm sure it had nothing to do with its brilliant purple hue. 

One Year Ago:  Oatmeal Raisin Ice Cream and Shrimp Quesadillas


Plum Ice Cream
adapted from David Lebovitz, The Perfect Scoop
makes about 1 quart
  • 1 pound plums (about 6-8)
  • 1/3 cup water
  • 3/4 cup sugar
  • 1 cup heavy cream
  • 1/2 tsp almond extract or kirsch
Slice the plums in half and remove the pits.  Cut each plum into eighths, and place them in a medium saucepan with the water.  Cover and cook over medium heat, stirring occasionally, about 8 minutes.  Remove from the heat, stir in the sugar, and cool to room temperature.

Puree in a blender or food processor with the cream and almond extract until smooth.  Strain through a fine-mesh sieve into a medium bowl, and cover with plastic wrap.

Chill the mixture thoroughly, then freeze according to your ice cream maker's instructions.


Wednesday, August 18, 2010

Stir-fried Shrimp

I actually really enjoy all sorts of ethnic food, but rarely stray away from my stand-by's of  Mexican, Italian, and American.  I love Indian food, Chinese, Japanese, Thai, Spanish, French... the list goes on and on.  And anytime I make one of these types of food, I wonder why its been so long.  Such was the case with this dish.

Shrimp are stir-fried with garlicky eggplant, scallions, and cashews, and tossed in a mixture of soy sauce, oyster sauce, sherry, sugar, oil, vinegar, and red pepper flakes.  To say we enjoyed this dinner would be an understatement.  I finished mine, Joey finished his, and Caroline was begging for seconds.  As an aside, when Caroline wants something, she thanks you in advance rather than saying please.  So she finished her bowl and held it out saying "dank dyooooo."  Unfortunately, I only made a third of the recipe, so there were no leftovers.  I was actually really surprised by how much they both enjoyed this dinner, as I didn't think either was a big fan of eggplant.

This particular recipe is from Cook's Illustrated, and in this article it also gives recipes for stir-fried shrimp with snow peas and red bell peppers and hot and sour sauce, as well as stir-fried Sicuan-Style shrimp with zucchini, bell pepper, and peanuts.  Both of those sound really great as well, so I guess I'll have to try those out too.  I mean, Caroline did "ask" after all.


One Year Ago:  Fontina-Stuffed Meatball Kabobs


Stir-Fried Shrimp with Garlicky Eggplant, Scallions, and Cashews
serves 4
adapted from Cook's Illustrated, August 2010
  • 7 medium garlic cloves, 2 minced, 5 sliced
  • 1 pound shrimp, pelled, deveined, and tails removed
  • 4 Tablespoons sesame oil, divided
  • 1/2 tsp salt
  • 2 Tbs low-sodium soy sauce
  • 2 Tbs oyster sauce
  • 2 Tbs dry sherry
  • 2 Tbs sugar
  • 1 Tbs rice wine vinegar
  • pinch of red pepper flakes
  • 2 tsp cornstarch
  • 6 large scallions, greens cut into 1-inch pieces and whites sliced thin
  • 1/2 cup unsalted cashews
  • 1 medium eggplant (about 3/4 pound), cut into 3/4-inch dice
Combine the minced garlic, 1 Tbs oil, and salt in a medium bowl with the shrimp.  Toss to combine and allow the shrimp to marinate at room temperature for 30 minutes.

Meanwhile, whisk together the soy sauce, oyster sauce, sherry, sugar, vinegar, 1 Tablespoon of sesame oil, red pepper flakes, and cornstarch in a small bowl. 

Heat 1 Tablespoon of oil in a 12-inch nonstick skillet over high heat until just smoking.  Add eggplant and saute until lightly browned, 3-6 minutes.  Add the scallion greens and continue to cook until they begin to brown and the eggplant is fully tender, 1-2 minutes longer.  Transfer to a medium bowl.

Add the remaining tablespoon of oil to the skillet and heat until just smoking.  Add the garlic, scallion whites and the cashews to the skillet and cook, stirring frequently, until they are just fragrant, about 30 seconds.  Add the shrimp, reduce heat to medium-low, and cook, stirring constantly, until they are light pink on both sides, about 1-2 minutes.

Whisk soy sauce mixture to recombine, and add to the shrimp; return heat to high and cook until sauce is thickened and shrimp are cooked through, another 1-2 minutes.  Stir in the cooked eggplant-scallion mixture, and serve.


Tuesday, August 17, 2010

Stuffed and Baked Tomatoes


I mentioned in my post for zucchini-ricotta fritters that I had just bought The Complete Italian Vegetarian Cookbook.  This cookbook has quickly become a trusted reference and recipe source for all the vegetables we've received from our CSA.  My only gripe is that I'm afraid the season will be over before I have a chance to try all the recipes I have bookmarked! 

Every Monday, we receive an email from our farmer, giving an estimate of what produce we'll receive for the week.  As tomatoes were booming, he said to let him know how many tomatoes was too many.  Too many?  I said bring it on!  There is no such thing as "too many tomatoes," especially when they are by far the best tomatoes I've ever eaten in my life! 

This recipe for stuffed tomatoes is certainly a good use for all those beautiful tomatoes.  They are hollowed out, then stuffed with a mixture of bread crumbs, herbs, cheese, and garlic, and roasted in the oven.  The tomatoes get nice and soft, and the breadcrumb topping is nice and crispy.  I served these with a side of pesto rice and green bean salad (recipes coming soon!), for a really nice summer meal.


Baked Tomatoes Stuffed with Bread Crumbs, Parmesan, and Herbs
adapted from The Complete Italian Vegetarian Cookbook
serves 4
  • 4 large, ripe but firm tomatoes (about 2 pounds)
  • 1 cup plain breadcrumbs
  • 1 cup freshly grated Parmigiano-Reggiano cheese
  • 6 Tbs minced fresh parsley leaves
  • 3 Tbs minced fresh basil leaves
  • 3 Tbs minced fresh oregano leaves
  • 3 medium garlic cloves, minced
  • 2 Tbs dry white wine
  • 5 Tbs extra-virgin olive oil
  • 3/4 tsp kosher salt
  • freshly ground black pepper
Preheat the oven to 375.  Cut off and discard a 1/2-inch slice from the top of each tomato.   Using a small spoon, scoop out and discard any remaining parts of the core, plus the seeds.  Use your fingers to reach into each tomato and pull up as much liquid as you can.  Be careful not to puncture the skin. 

Combine the breadcrumbs, cheese, herbs, garlic, wine, 3 tablespoons of oil, salt, and pepper.  Stuff the tomatoes using a small spoon or your fingers, making sure that the filling reaches all the hollowed out places.  Mound the filling a little above the top of each tomato and pat it gently to compact it.

Lightly grease a baking dish that is just large enough to hold the tomatoes, and place the tomatoes in a single layer in the dish.  Drizzle the remaining oil over the tops of the tomatoes.

Bake 25-30 minutes, or until the stuffing is golden-brown and the tomatoes are soft, but not falling apart.  Allow them to cool at least 15 minutes before serving.


Monday, August 16, 2010

Ground Beef Tacos


Its easy to overlook something as simple as beef tacos when planning your weekly menu.  Or to just throw it on there as an afterthought for a quick and easy dinner.  Ground beef, taco seasoning, and store-bought shells.  Done and done.  To be honest, that has never really been one of my favorite dinners, and I don't know when the last time I bought taco shells was.  If I'm going to cook Mexican food, I'm making chicken enchiladas, quesadillas, or burritos.  Well, now I'll be adding these tacos to my favorite Mexican meals.  The whole time we were eating I just kept saying over and over again how good they were.

The secret of these tacos lies in the homemade seasoning and the home-fried taco shells.   I've been making my own taco seasoning for quite some time now, but the spices and seasonings used here were pretty much perfect.  I'll also never buy a taco shell again now that I have this recipe.  Yes, it was a little time consuming, and I hate to say that its worth it, since I know everyone has different limits, but well, they were worth it.  Crunchy on the outside, with a little chewiness inside.  Once you get the hang of shaping them it goes quite quickly, and I really don't mind just mentally checking out for a bit at the end of a long day.  It was actually a little therapeutic.  The shells can also be made ahead of time and reheated in the oven, which makes these tacos ideal for entertaining. 

I'm listing the toppings I used, but feel free to mix them up or add whatever suits your tastes.  Sliced jalapenos, salsa, black olives, or guacamole would all be great as additional toppings as well. 

One Year Ago:  Garlicky Oven Fries and Mango-Banana Daiquiris


Ground Beef Tacos
adapted from Cook's Illustrated
makes  12 tacos

Beef Filling
  • 2 teaspoons vegetable oil
  • 1 small onion, chopped (about 2/3 cup)
  • 4 garlic cloves, minced
  • 2 Tbs chili powder
  • 1 teaspoon ground cumin
  • 1 teaspoon ground coriander
  • 1/2 teaspoon dried oregano, or 1/2 Tbs minced fresh oregano
  • 1/4 tsp cayenne pepper
  • kosher salt and ground black pepper
  • 1 pound 90% lean (or leaner) ground beef
  • 1/2 cup tomato sauce
  • 1/2 cup low-sodium chicken broth
  • 1 tsp brown sugar
  • 2 teaspoons apple cider vinegar
Shells and Toppings
  • 3/4 cup vegetable or canola oil
  • 12 (6-inch) corn tortillas
  • 4 ounces shredded cheese(about 1 cup)
  • 2 cups shredded iceberg lettuce
  • 2 tomatoes, chopped small
  • 1/2 cup sour cream
  • 1 avocado, chopped
  • 1 small onion, chopped (2/3 cup)
  • 2 Tablespoons chopped fresh cilantro leaves
  • hot pepper sauce
Heat oil in a large nonstick skillet until shimmering.  Add the onion and cook, stirring occasionally, until softened, about 4 minutes.  Add the garlic, spices, and 1/2 teaspoon salt.  Cook, stirring constantly, until fragrant, about 1 minute.  Add the ground beef and cook, breaking up meat with a wooden spoon and scraping the bottom of the pan to prevent scorching, about 5 minutes longer, until meat is no longer pink.

Add tomato sauce, broth, brown sugar, and vinegar; bring to a simmer and reduce heat to medium-low.  Simmer uncovered, stirring frequently, until liquid has reduced and thickened, about 10 minutes.  Adjust seasonings with salt and pepper and set aside to keep warm.

Meanwhile, fry the shells.  Heat oil in an 8-inch heavy-bottomed skillet over medium heat to 350 degrees, about 5 minutes.  You can test by dropping a small piece of tortilla into the oil.  It should bubble and the tortillas should rise to the surface within 2 seconds.  Line a baking sheet with a double layer of paper towels.

Using tongs to hold the tortilla, slip half the tortilla into the oil.  With a metal spatula in the other hand, hold the tortilla in the oil, at a 90 degree angle to the top half.  Fry until just set but not brown, about 30 seconds.

Flip the tortilla, and hold it open about 2 inches while keeping the bottom half submerged in oil.  Fry until golden brown, about 1 1/2 minutes.  Flip again and fry the other side until golden brown, about 30 seconds.

Transfer shells to the baking sheet and lay upside down to drain.  Repeat with remaining shells.

When all the tortillas have been fried, divide the filling evenly among the shells.  Serve immediately, passing the topping separately. 


Sunday, August 15, 2010

PPQ: Watermelon Lemonade


Earlier in the summer, we took Caroline to visit my grandpa (who is the best grandpa in the entire world), and Caroline was introduced to lemonade for the first time.  We were all outside, sipping lemonade, and Caroline came begging for a taste.  I let her try it, and as she was walking away, the sweet-tart drink hit her, and she stopped in her tracks, turned around and came sprinting back for more, "yumming" the whole time.  It was one of the funniest things she's ever done, and we still laugh when we think about it.  Her life will never be the same.  Needless to say, this particular recipe was a hit with my 2 year old!

This week's recipe was chosen by Ashley of Delish.  I had actually been eyeing this recipe all summer, and I'm glad I got the chance to try it out.  I thought it would be watermelon puree mixed with lemon juice, but its actually just basic lemonade with watermelon chunks.  However, as the lemonade sits, they begin to break down and the lemonade starts to turn pink.  The recipe also calls for chunks of other fruits to be mixed in, but I decided to keep it simple this time.  I think peaches and strawberries would be wonderful though.

The lemonade is sweet, tart, and totally refreshing.  The perfect summer drink, which I think could also be the base for a fabulous sangria!

Check out Ashley's blog for the full recipe, and check back next week for some rather rich corn muffins!


Wednesday, August 11, 2010

Pasta with Fresh Corn Pesto


 The August issue of Bon Appetit is full of recipes that I can't wait to try.  I've already blogged the blueberry cobbler, and I have a whole backlog of recipes to try before the seasons change and I lose access to my beloved tomatoes, zucchini, corn, and berries. 

This pesto is pretty interesting.  I don't know that I've ever made pesto from anything other than basil or roasted red peppers, but I really liked the corn variation.  It tastes very fresh, with a little sweetness from the corn, and then the typical "pesto-y" flavors from the pine nuts, basil, garlic, and Parmesan.  I made fresh pasta, which I really prefer if I'm serving it with a sauce that is as simple as this.  When you only use a few ingredients and components, I truly think its important for them to all be of good quality.  It will really take the dish to a whole new level. 

This is also an incredibly quick dish, especially if you already have pasta on hand.  Super easy, flavorful, and simple.  Summer cooking at its finest.

One Year Ago:  Tomato-Mozzarella Tart with Basil-Garlic Crust (you should really really make this ASAP!)


Pasta with Fresh Corn Pesto
adapted from Bon Appetit, August 2010
serves 4 as a main course
  • 4 bacon slices, preferably applewood-smoked
  • 4 cups fresh corn kernels, cut from 4-6 ears
  • 2 large garlic cloves, minced
  • 1 1/4 teaspoons kosher salt
  • 3/4 teaspoon ground black pepper
  • 1/2 cup freshly grated Parmesan, plus more for serving
  • 1/3 cup pine nuts, toasted
  • 1/3 cup extra virgin olive oil
  • 8 ounces fresh pasta (I made fettuccine)
  • 3/4 cup chopped fresh herbs (I used a mixture of basil, parsley, oregano, and chives)
Cut each bacon slice in half length-wise, then crosswise into 1/2-inch pieces.  Cook in a large nonstick skillet over medium heat until crisp and brown, then transfer to a paper towel-lined plate to drain.  Pour off all but 1 Tablespoon of the fat.

Add the corn, garlic, salt and pepper to the skillet, and saute until the corn is just tender, but not brown, 3-5 minutes.  Transfer 1 1/2 cups of the corn to a small bowl and reserve.  Transfer the rest to a food processor, and add the pine nuts and 1/2 cup of Parmesan.  With the machine running, slowly stream the oil through the feed tube and blend until pesto is almost smooth.  Set aside.

Cook pasta in a large pot of boiling, salted water until just tender, but still firm to the bite (not quite as done as you would want it).  Reserve 1 1/2 cups of the pasta water and drain the pasta.  Return pasta to the pot and add the pesto, reserved corn kernels, and 1/2 cup fresh herbs.  Toss well and add pasta water 1/4 cup at a time until the desired consistency is reached.  Cook an additional 2-3 minutes, or until pasta is cooked through.  Season with additional salt and pepper if needed.


Divide among serving bowls and sprinkle with additional herbs, cheese, and reserved bacon. 


Tuesday, August 10, 2010

Fig-Glazed Burgers with Red Onion Jam


Even though I'm not a huge meat-eater, I do love a good burger.  I love mixing things up and trying out new and different variations.  Lucky me, July's Southern Living has a whole spread of Top-Rated Burgers.  These were the first ones that stuck out at me.  I absolutely love figs.  One of my strongest childhood memories is going to my grandpa's house and picking figs off his tree, then eating them right there in the yard.  And since my grandpa is pretty much my favorite person in the world, figs will always be a favorite as well. 

These burgers start out with a patty seasoned with herbs and spices, then is grilled, glazed with fig preserves, and topped with Meunster cheese.  As the burgers cook, a red onion jam is made by sauteeing onions with a little sugar, vinegar, and thyme.  And just so you know, the leftover onions make phenomenal grilled cheese sandwiches.  The result is a perfect combination of sweet, salty, and tart.  Joey said this is his new favorite burger, so I have a feeling they'll be making regular appearances in our house.


One Year Ago:  Roasted Tomatoes Stuffed with Goat Cheese


Fig-Glazed Burgers with Red Onion Jam
adapted from Southern Living, July 2010
makes 4 burgers

Red Onion Jam
  • 4 cups thinly sliced red onions (about 2 medium or 1 large)
  • 1 tsp olive oil
  • 1/4 cup sugar
  • 1/4 cup red wine vinegar
  • 3/4 tsp. chopped fresh thyme
Cheeseburgers
  • 1 1/2 pounds ground beef
  • 2 Tbs. chopped fresh oregano
  • 1 tsp. kosher salt
  • 1 Tbs. Dijon mustard
  • 1/4 tsp. garlic powder
  • 1/2 tsp. ground black pepper
  • 3 Tbs. fig preserves
  • 4 (1/2-oz) Meunster cheese slices
  • 4 hamburger buns, split and toasted
Saute the onions in hot oil over medium-high heat in a large skillet for 10 minutes.  Stir in the sugar, vinegar, and thyme, reduce heat to low, and cover and cook an additional 10 minutes, or until onion is very tender.  Remove from heat and keep warm.

Prepare grill and heat to medium-high (350-400 degrees), and grease grates with vegetable oil using a paper towel and tongs.  Gently stir together all the ingredients for the burgers (through black pepper) and shape into 4 (1/2-inch) patties.

Grill patties 5 minutes on each side.  Brush each patty with fig preserves and top with a slice of cheese.  Grill an additional 2 minutes, or until beef is cooked and cheese is melted. 

Serve on buns with red onion jam.


Sunday, August 8, 2010

PPQ: Peach Cream Cheese Tart

 I hope you guys aren't getting tired of peach recipes, because I fully intend to bombard you with them until the cruelly short peach season is over.   They are by far my favorite fruit, and I love eating them in savory dishes, sweet, dishes, and over the kitchen sink (with the fuzz peeled off of course - who eats the skin?). 

When I first bought The Pastry Queen last summer, this was one of the first recipes that stuck out to me.  Why I never made it last summer, I don't know.  So when Tara chose it for this week's Project Pastry Queen recipe, I was stoked. 

This isn't a last-minute dessert, as you need time for the dough to chill, mixing up the filling, peeling, pitting, and scoring the peaches, baking the tart, glazing, and finally chilling the tart.  But its all pretty basic, and the result is definitely worth it for me.  This is what I would classify as a "cheesecake tart,"  as it basically tastes like a cheesecake baked in a pastry crust in a tart shell.  And that's most definitely not a bad thing.

The sweet cheesecake filling is cream cheese and mascarpone based, topped with peaches that have been coated in cinnamon-sugar, and then brushed with an apricot-brandy glaze.  The peaches are sweet and caramelized, and the filling is perfectly sweet and tangy.  This is definitely a dessert to impress.

Tara has the full version posted on her blog, Smells Like Home.  Next week, we're cooling down with Watermelon Lemonade!

One Year Ago:  My most popular post ever!  Chicken Enchiladas!


Friday, August 6, 2010

Fresh Blueberry Cobbler


Last week we were on vacation with Joey's college roommates, and we had the best time!  Caroline had friends to play with, Joey had friends to play with, and I got to read 4 books in the span of a week - a good time was had by all.  The day we returned, both of my sisters happened to be coming through Atlanta on their way to Europe, so we had a girls' night at my house.  I was kind of stressed about what to make for dinner since I didn't have much prep time, or much energy, but in the end it all worked out.  I served Garlic-Mustard Glazed Pork Tenderloin, Summer Vegetable Gratin, and Twice Baked Potatoes.

For dessert, I made this blueberry cobbler.  Bon Appetit claims these are the easiest-ever biscuits, and they are pretty darn easy.  Flour, salt, and sour cream are the only ingredients.  The sour cream really gives them a great tangy taste, while keeping them nice and tender at the same time.  This was a perfect dessert to make in my time-crunch.  It was in the oven and baking in less than 30 minutes, and is obviously delicious.  The original recipe called to serve with sour cream or creme fraiche, but that didn't seem as appetizing as vanilla ice cream.  Plus, cobbler + vanilla ice cream is a perfect combination in my opinion.

And on an unrelated note, I've updated the Featured Recipes page with lots of fun grilling recipes.  Check it out!

One Year Ago:  Grilled Pork Tenderloin with Herbs and Red Wine Vinegar


Blueberry Cobbler
adapted from Bon Appetit, August 2010
  • 5 cups fresh blueberries (2 1/2 pints)
  • 1/2 cup sugar
  • 2 Tablespoons water
  • 4 teaspoons corn starch
  • 1 Tablespoon fresh lemon juice
  • 1 teaspoon lemon zest
  • 1/8 teaspoon ground cinnamon
  • pinch of kosher salt
Biscuits
  • 1 1/2 cups self-rising flour
  • 1/4 teaspoon kosher salt
  • 1 1/2 cups creme fraiche or sour cream
  • all-purpose flour
  • 3 Tablespoons sugar
Combine the blueberries, sugar, water, cornstarch, lemon juice, lemon zest, cinnamon, and salt in a saucepan.  Whisk over medium-high heat until cornstarch dissolves.  Bring to a boil, stirring occasionally.  Reduce heat to medium-low and simmer 3-4 minutes, until thickened, stirring constantly.  Transfer to a lightly greased 11x7x2 inch baking dish.

Combine the self-rising flour and salt in a medium bowl.  Add the creme fraiche, and stir until a soft dough forms.  Form a ball with the dough and turn out onto a lightly floured surface.  Shape the dough into a 10 to 12-inch log, and cut crosswise into 6 rounds.  Pat each round into 3/4-inch thick 3-inch disks.  Arrange biscuits atop filling and sprinkle each biscuit with 1/2 tablespoon of sugar.

Place baking dish on a rimmed cookie sheet and bake cobbler until bubbling and golden, about 25 minutes.  Cool at least 15 minutes before serving.


Thursday, August 5, 2010

Mexican Corn Salad

Elote is a popular street food in Mexico. corn on the cob that is slathered in crema or mayonnaise, chile powder, and cheese, then grilled in the husk.  I have had a variation of it before, and while I don't like mayonnaise, I really enjoyed the dish.  This salad is a deconstructed version of the original dish.  I have made this at least 5 times this summer, and with all the beautiful corn coming into season, I'll definitely be making it more and more.

We eat a lot of Mexican-inspired food, and sometimes the sides stump me.  I know the traditional sides are rice and beans, but since Mexican food can sometimes be on the heavier side, I like serving something light on the side.  This corn salad and guacamole salad are my standbys, and I see no reason to go back to rice and beans when I have these delicious, healthy, and flavorful dishes in my repertoire.

Since I don't really care for mayonnaise, I sub at least half for Greek yogurt.  I also have used feta and queso fresco when I couldn't find cojita.  Any mild crumbly cheese will work well.  Bell peppers are a nice addition, and I always add cilantro as well. 


Grilled Mexican Corn Salad
adapted from Food and Wine
serves 4 as a side
  • 2 garlic cloves, minced
  • 1 Tablespoon minced red onion
  • 3 Tablespoons fresh lime juice
  • 6-8 ears of corn, husked
  • vegetable oil
  • 1/3 cup mayonnaise or Greek yogurt
  • 1 teaspoon ancho chile powder
  • 4 ounces cojita, ricotta salata, feta, or queso blanco, crumbled (about 1 cup)
  • 3 Tablespoons minced fresh cilantro
  • kosher salt and ground black pepper
  • hot sauce
Prepare grill, and brush the corn with oil.

Combine the garlic, onion, and lime juice in a medium bowl and toss to coat.  Allow to stand for 10 minutes.  Whisk the mayonnaise (or yogurt) and chile powder into the onion mixture.  Set aside.

Grill the corn 10 minutes, turning every 2-3 minutes, until lightly charred and tender.  Allow to cool slightly, then cut the kernels off the cobs and add to the dressing.  Toss with the cheese and cilantro, mixing well to coat with the dressing.  Season with salt, pepper, and hot sauce.  Serve with additional hot sauce if desired.


Wednesday, August 4, 2010

Summer Vegetable Gratin


 If you have squash, zucchini, and tomatoes coming out of your ears this summer, this is a great way to use some up.  There are a few things I really like about this gratin:
  1. Even squash haters like my sister think its very tasty.
  2. It can be a side or light main dish.
  3. Tomatoes are magical when they're roasted
  4. Its delicious!
Its not the fastest dish to throw together, but most of the time is inactive time, just waiting for the vegetables to drain off their excess moisture.  A step I wouldn't recommend skipping unless you really like soggy, waterlogged vegetables.  I've now made this twice in the last 2 weeks, and I have plans to make it as much as I can before all the good veggies are gone!

One Year Ago:  Blueberry Shortcakes with Lemon-Thyme Biscuits


Summer Vegetable Gratin
source:  Cook's Illustrated
serves 6-8 as a side, or 4 as a light entree (and can be halved quite easily)
  • 6 Tablespoons olive oil
  • 1 pound zucchini, ends trimmed and sliced crosswise into 1/4-inch slices
  • 1 pound yellow squash, ends trimmed and sliced crosswise into 1/4-inch slices
  • 2 teaspoons salt
  • 1 1/2 pounds ripe tomatoes (3-4 large), sliced 1/4-inch thick
  • 2 medium onions, halved lengthwise and sliced thin (about 3 cups)
  • 3/4 teaspoon ground black pepper
  • 2 medium garlic cloves, minced
  • 1 Tablespoon minced fresh thyme leaves
  • 1 large slice good-quality white sandwich bread, torn into quarters
  • 2 ounces grated Parmesan cheese (about 1 cup)
  • 2 medium shallots, minced (1/4 cup)
  • 1/4 cup chopped fresh basil leaves
Adjust the oven rack to the upper-middle position and heat the oven to 400 degrees.  Lightly oil a 9x13 inch baking dish and set aside.

Toss zucchini and squash slices with 1 teaspoon of salt in a large colander, and allow to drain about 45 minutes, or until they release 3 Tablespoons of liquid.  Arrange slices on a triple layer of paper towels or a dish towel, cover with a clean dish towel, and press firmly to remove as much moisture as possible.

As the squash and zucchini drain, line another dish towel with the tomatoes, and sprinkle with 1/2 teaspoon salt.  Allow to stand 30 minutes, then using a clean dish towel or paper towels, press firmly to dry the tomatoes.

Meanwhile, heat 1 Tablespoon of the oil in a 12-inch skillet over medium heat until shimmering.  Add the onions, 1/2 teaspoon salt, and 1/4 teaspoon pepper.  Cook, stirring occasionally, until onions are softened and dark golden brown, about 20 minutes.  Set aside.

Combine the garlic, 3 Tablespoons of oil, 1/2 teaspoon pepper, and thyme in a small bowl.  Whisk to combine.  In a large bowl, toss the squash and zucchini with half the garlic-oil mixture.  Arrange in the baking dish, then top with an even layer of the onions.  Slightly overlap the tomato slices in a single layer over the onions, and drizzle with the remaining oil mixture.  Bake until the vegetables are softened and tomatoes are starting to brown around the edges, 40-45 minutes. 

As the vegetables cook, pulse the bread in a food processor until finely ground (You should have about 1 cup of crumbs).  Combine the bread crumbs, Parmesan, 1 Tablespoon oil, and shallots in a medium bowl. 

Remove the baking dish from the oven and increase the heat to 450.  Sprinkle the bread crumb mixture over the vegetables, and bake gratin until bubbling and lightly browned, 5-10 minutes.  Remove from oven and sprinkle with basil.  Allow to sit at room temperature 10 minutes before serving.


Tuesday, August 3, 2010

Garlicky Shrimp with Bread Crumbs


Shrimp is one of my favorite proteins to cook.  Its easy, cheap, and quick.  And it can be so elegant, thereby making it a perfect meal for a special occasion or for entertaining.  This shrimp certainly falls in that category.  Shrimp are seared, then cooked in a flavorful sauce of sherry and clam juice, and seasoned with shallot, parsley, lots of garlic, and a pinch of red pepper flakes.  They are then topped with toasted buttery breadcrumbs.  I was blown away by this meal.  So much so, that I'm adding it to my menu next week - and I rarely repeat recipes that soon! 

One Year Ago:  Sunflower Cupcakes


Garlicky Shrimp with Buttered Breadcrumbs
from Cook's Illustrated, American Classics
serves 4 as a main course
  • 1 (3-inch) piece of baguette, cut into small pieces
  • 5 Tablespoons unsalted butter, cut into 5 pieces
  • kosher salt and black pepper
  • 2 Tablespoons minced parsley leaves
  • 2 pounds jumbo (21-25 per pound) shrimp, peeled and deveined
  • 1/4 teaspoon sugar
  • 4 teaspoons vegetable oil
  • 5medium garlic cloves, minced (about 5 teaspoons)
  • 1/8 teaspoon red pepper flakes
  • 2 teaspoons unbleached all-purpose flour
  • 1/3 cup dry sherry
  • 2/3 cup bottled clam juice
  • 2 teaspoons juice from 1 lemon, plus 1 lemon, cut into wedges
Pulse the bread in a food processor until coarsely ground (you should have about 1 cup of crumbs).  Thoroughly dry the shrimp with paper towels; toss with sugar, 1/4 teaspoon salt, and 1/4 teaspoon of pepper.  Set aside.

Melt 1 Tablespoon of the butter in a 12-inch nonstick skillet over medium heat.  When the foaming subsides, add the crumbs, shallot, 1/8 teaspoon salt, and 1/8 teaspoon pepper.  Cook, stirring often, until the crumbs are golden-brown, 7-10 minutes.  Stir in 1 tablespoon of the parsley and transfer to a plate to cool.

Wipe out the skillet with a paper towel.  Return to high heat, and 2 teaspoons of the oil, and heat until shimmering.  Add half the shrimp in a single layer, being careful not to overcrowd the skillet.  Cook until they are spotty brown and the edges turn pink, about 3 minutes (do not flip them!).  Remove the skillet from heat and transfer the shrimp to a plate.  Wipe out the skillet, and repeat with the remaining shrimp and oil; transfer to the plate.

Return the skillet to medium heat and melt 1 Tablespoon of butter.  Add the garlic and red pepper flakes, and cook, stirring constantly, until fragrant and just beginning to color, about 1 minute.  Add the flour and cook, stirring constantly, for 1 minute.

Increase the heat to medium-high and slowly whisk in the sherry and clam juice.  Bring to a simmer and cook until the mixture has reduced to 3/4 cup, about 3-4 minutes.  Whisk in remaining 3 Tablespoons of butter, 1 tablespoon at a time, and stir in lemon juice and remaining tablespoon of parsley.

Reduce heat to medium-low, return shrimp to skillet, and toss to combine.  Cover and cook until shrimp are pink and cooked through, 2-3 minutes.  Divide shrimp and sauce evenly among plates or shallow bowls, and sprinkle with the bread crumbs.  Serve with lemon wedges.


Sunday, August 1, 2010

PPQ: Peach Jam Scones


My choice for this week's Project Pastry Queen is Peach Jam Scones.  I pored over the cookbook for a few hours, and I went back and forth between a few recipes before finally settling on these.  I just can't resist peaches!

Both of my sisters were in town for a night, so I made these for breakfast.  We all really liked them - our daughters included!  The combination of the jam and fresh peaches make them nice and sweet, and the scone is light and fluffy.

I used a trick I learned from Cook's Illustrated and grated the butter, then froze it before adding it to the dry ingredients.  It helps the butter become incorporated easier, thereby keeping the butter nice and cold, giving you a flakier scone.  I wold recommend working fast though - my scones spread a bit in the oven.  I think refrigerating or freezing them briefly would also help.

Next week:  More peaches!  Peach and Cream Cheese Tart coming up!


Peach Jam Scones
adapted from The Pastry Queen, by Rebecca Rather
makes 8 really big scones
  • 6 cups all-purpose flour
  • 1 1/4 cups sugar
  • 1/4 cup baking powder
  • 1/4 teaspoon salt
  • 1 1/2 cups unsalted butter, very cold (3 sticks)
  • 1 1/2-2 cups buttermilk
  • 1/2 cup peach jam
  • 3 fresh peaches, peeled, sliced, and pitted
  • 1 Tablespoon melted butter
Preheat oven to 425.  Grate the butter on the large holes of a grater, and place in the freezer for at least 10-15 minutes.

In the bowl of a food processor, combine the flour, 1 cup of sugar, baking powder, and salt for 30 seconds.  Add the butter and pulse a few times.  With the processor running, slowly pour 1 1/2 cups of the buttermilk through the feed tube.

Stop the processor as soon as all the milk has been added.  If the dough has formed a ball, remove it onto a floured surface.  If not, add more buttermilk, 1 Tablespoon at a time, and pulse until the dough begins to clump up and form a ball.

On a lightly floured surface, use your hands to pat the dough into a 1/4-inch rectangle, about 12 by 10 inches.  Spread a thin layer of jam lengthwise over half the dough and arrange the peach slices over the jam.  Fold the plain dough over the jam-side to make a 12 by 5 inch rectangle with the peaches and jam folded inside.  Cut the dough into 4 rectangles, then cut each rectangle diagonally into 2 triangles.  Brush each scone with melted butter and sprinkle with the remaining 1/4 cup sugar.

Bake on an ungreased cookie sheet for 10 to 15 minutes, until the scones are light golden brown.  Serve warm or at room temperature.


BLOG DESIGN BY: SHERBET BLOSSOM DESIGNS