Monday, February 28, 2011

Thin Crust White Pizza


We eat pizza fairly often for dinner, and while I change up the toppings pretty regularly, I always stick to the same crust.  I've just never really felt the need to deviate from my standard pizza crust, but when I saw Annie of Annie's Eats rave abut thin crust pizza, I was sold.  I had actually seen this recipe in the previous month's Cook's Illustrated, and while it did catch my eye, I forgot about it soon after reading about it.

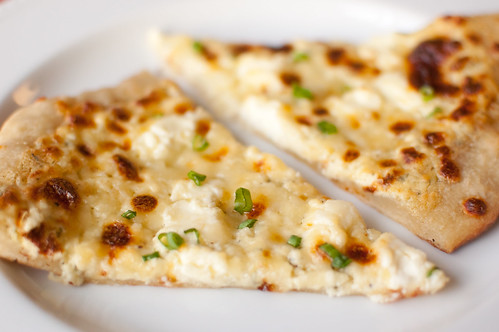
The nice thing about this pizza crust is that the recipe makes enough for two pizzas.  It also calls for the dough to be chilled in the refrigerator anywhere from 24 hours to 3 days.  So you can either make one and freeze one, or make one and save the other to make in the next few days.  For the first pizza, I made the classic cheese pizza that Annie posted, but for the other, I made white pizza.  I absolutely love ordering white pizza when we go out for pizza, but I had never made it myself.  Now I'm afraid I'll never order it out again; this one was so good that any other version is going to have a hard time living up to it.  The sauce is a mixture of ricotta, egg, herbs and spices, and then it is smothered in mozzarella, parmesan, and more ricotta.  So incredibly rich and delicious.

As far as the dough goes, I was a bit apprehensive when I prepped it, since it was very very sticky and kind of hard to handle.  But after the overnight chill, it turns into a smooth and silky dough that is easily rolled and stretched into a perfectly circular pizza crust.  Since the dough is prepped so far in advance, this pizza comes together quite quickly. 

I know there are many other variations of thin-crust pizza I could make, but after this white pizza, it's going to be hard to try anything new.


Thin-Crust White Pizza
adapted from Cook's Illustrated, Jan 2011

Dough
  • 3 cups (16 1/2 oz) bread flour, plus more for work surface
  • 2 tsp sugar
  • 1/3 tsp instant yeast
  • 1 1/3 cups ice water
  • 1 Tbs olive oil
  • 1 1/2 tsp salt
White Sauce
  • 1/2 cup whole-milk ricotta
  • 2 Tbs olive oil
  • 2 Tbs heavy cream
  • 1/2 large egg yolk
  • 3 cloves garlic, minced
  • 1/2 tsp kosher salt
  • 1/4 tsp black pepper
  • pinch cayenne pepper
  • pinch nutmeg
  • 1 tsp minced fresh oregano
  • 1/2 tsp minced fresh thyme leaves
  • 1 scallion, minced, plus more for garnish
Topping
  • 1/4 cup whole-milk ricotta cheese
  • 1 cup shredded whole milk mozzarella
  • 1/4 cup finely shredded Pecorino-Romano cheese
For the dough:  In the bowl of a food processor fitted with the metal blade, combine the flour, sugar, and yeast.  Pulse to mix well.  With the processor running, pour the water through the feed tube.  Continue to process until no flour remains and the dough is just combined, about 10 seconds.  Allow the dough to rest 10 minutes.

Add the oil and salt to the dough and process until a smooth, satiny ball forms that clears the sides of the workbowl, about 30-60 seconds.  Turn the dough out onto a lightly oiled work surface, and knead briefly.  Pat the dough into a ball and transfer to a a lightly oiled bowl.  Cover with plastic wrap and refrigerate at least 24 hours, or up to 3 days.

For the sauce:  Whisk all the ingredients together in a medium bowl.  Set aside.


To bake the pizza:  Remove the dough from the refrigerator and divide in half.  Smooth it into a smooth, tight, bowl, and cover with lightly-oiled plastic wrap.  Allow to sit at room temperature for about 1 hour.  Return the other half to the refrigerator. 

Preheat the oven to 500 degrees, and adjust the oven rack to the second-highest position.  Place the pizza stone on the rack and heat for at least 30 minutes.

Coat the dough with flour and flatten into a 8-inch disk, leaving a 1-inch border around the edges that it slighly thicker than the center.  Transfer to a large square of parchment paper that is lightly sprinkled with cornmeal.  Lifting the edge, use your knuckles and the back of your hand to pull and stretch the dough into a 13-inch circle, turning the dough a quarter of a turn as you stretch.  Use a rolling pin if necessary.

Brush the outer edge of the dough with olive oil.  Use a spatula to spread the white sauce over the dough, leaving a 1/4-inch border around the outside.  Sprinkle the Pecorino cheese over the white sauce, followed by the mozzarella.  Using a 1/2-teaspoon measuring spoon, drop the ricotta over the mozzarella.

Transfer the pizza (on the parchment) to the heated pizza stone, and bake 10-12 minutes, or until the cheese is melted, browned, and bubbly, rotating the pizza halfway through.  Remove the pizza and sprinkle with the reserved scallions.  Allow to cool 5-10 minutes before serving.


Friday, February 25, 2011

Root Beer Bundt Cake


I'm not really a big soda drinker, but I really love root beer.  I don't drink it very often, maybe just a few times a year.  But when I do indulge, I sure do love it!  Big brands, like A&W are okay, but I really like the artisan varieties that are sold in glass bottles.  Such a treat!

I recently gave in and bought Baked, a cookbook that seems to be all the rage across the blogosphere these days.  I've picked it up and browsed through it numerous times at the bookstore, but never bought it.  I finally bit the bullet when I ordered a few things from Amazon last week. 

This cake was one of the first things that called to me, and given my love of root beer, and especially root beer floats, that should come as no surprise. We were invited to a friend's house for dinner last weekend, so I offered to bring this for dessert.    It is very simple and straightforward to make, and the frosting is made utilizing the food processor!  I have never used my food processor for frosting before, but I have to say, it was so fun and so fast!  No creaming butter, whipping egg whites, etc.  Just throw everything in and pulse a few times until the frosting comes together.  When it came to frosting the cake, I decided to throw caution to the wind and just go for "whimsical." 

This cake is not for the chocolate-weary.  It is very very rich, and I highly suggest you serve it with a big scoop of vanilla ice cream to cut the richness a bit.  Plus, that makes it feel like you're eating a root beer float!  The root beer flavor isn't quite as pronounced as I would have liked, but according to the authors, it will intensify over the course of a day or two.  I think the root beer flavor was perhaps masked a bit by the cocoa powder.  It calls for dark cocoa powder, which is a much stronger taste than the classic.  So I think the chocolate just overshadowed the root beer a tad.  Either way, it was still really delicious.

As a sidenote, does this cake look like a giant chocolate doughnut to anyone else? :-)


Root Beer Bundt Cake
adapted from Baked:  New Frontiers in Baking


For the cake
  • 2 cups root beer (not diet)
  • 1 cup unsweetened cocoa powder
  • 1/2 cup unsalted butter, cut into 1-inch pieces
  • 1 1/4 cups granulated sugar
  • 1/2 cup firmly packed brown sugar
  • 2 cups all-purpose flour
  • 1 1/4 tsp baking soda
  • 1 tsp salt
  • 2 large eggs
For the Root Beer Fudge Frosting
  • 2 oz. dark chocolate (60% cacao), melted and cooled slightly
  • 1/2 cup unsalted butter, softened
  • 1 tsp salt
  • 1/3 cup root beer, plus more as needed
  • 2/3 cup unsweetened cocoa powder
  • 2 1/2 cups confectioners' sugar
Preheat the oven to 325 degrees.  Generously spray the inside of a 10-inch bundt pan with nonstick cooking spray.

In a small saucepan, heat the root beer, cocoa powder, and butter over medium heat until the butter is melted.  Add the sugars and whisk until dissolved.  Remove from heat, pour into a large mixing bowl, and let cool.

In a medium bowl, whisk the flour, baking soda, and salt together.

In a small bowl, whisk the eggs until just beaten, then whisk them into the cooled cocoa mixture until combined.  Gently fold the flour mixture into the cocoa mixture.  The batter will be slightly lumpy; do not overbeat, as it could cause the cake to  be tough.

Pour the batter into the prepared pan and bake 35-45 minutes, rotating the pan halfway through baking time, until a small knife inserted in the center comes out clean.  Transfer the pan to a wire rack to cool completely.  Gently loosen the sides of the cake from the pan and turn it out onto the rack.

To make the frosting, add all the ingredients to a food processor.  Pulse in short bursts until the frosting is shiny and smooth.  Add more root beer, a few teaspoons at a time, if the frosting is too thick to spread easily with a spatula.

Use a spatula to spread the frosting over the crown of the cake in a thick layer.  Let the frosting set before serving.  Serve with vanilla ice cream on the side.


Wednesday, February 23, 2011

Creamy Baked Chicken Taquitos


I've been lacking a bit in inspiration for menu planning lately.  It's not that I haven't been cooking, but I've been making old favorites instead of trying out new recipes.  Last week I'd had enough, so I started browsing some of my favorite blogs for ideas for my weekly menu.  I love any and all Mexican food, so when I saw these taquitos, I immediately added them to my weekly menu.

We loved loved loved this dinner.  The filling was bright, fresh, and flavorful, and the salt sprinkled on top was a really nice touch.  We dipped them into what I call "tomatillo guacamole," which is just mashed avocado mixed with tomatillo salsa.  I highly recommend it for these taquitos, as well as just snacking with chips.  If you have your chicken cooked and salsa ready, this comes together quite quickly.  The filling can be prepped in advance, which would make for an even faster meal.  Or, they can be assembled and then frozen for later.  Next time I make these, I definitely plan to make a double batch and freeze half.

One Year Ago:  Caesar Salad Tartlets with Roasted Garlic Crusts


Creamy Baked Chicken Taquitos
adapted from Pennies on a Platter, originally from Our Best Bites
  • 3 oz cream cheese, softened (reduced fat is fine)
  • 1/3 cup salsa verde
  • juice of 1/2 a lime
  • 1 tsp chile powder
  • 1/2 tsp ground cumin
  • pinch cayenne pepper
  • 1/2 tsp onion powder
  • 3 cloves garlic, minced
  • 1/4 cup chopped fresh cilantro
  • 3 Tbs chopped scallions
  • 2 cups cooked and shredded chicken *
  • 1/2 cup shredded extra sharp cheddar cheese
  • 1/2 cup shredded Pepperjack cheese
  • 8-12 (6-inch) corn tortillas
  • kosher salt and freshly ground black pepper
  • cooking spray
Preheat the oven to 425 degrees and spray a baking sheet with cooking spray.

In a large bowl, combine the cream cheese with the salsa, lime juice, cumin, chile powder, cayenne, onion powder, garlic, cilantro, scallions, and 1/4 tsp kosher salt.  Fold in the chicken and cheeses.  Taste and season with additional salt and pepper if necessary.

Working 3 tortillas at a time, stack them on a microwave-safe plate and cover with plastic wrap.  Cook 30 seconds, or until tortillas are soft and pliable. 

Spoon 2-3 tablespoons of filling onto the lower third of each tortilla, and roll tightly.  Place seam side-down on the prepared baking sheet.  Repeat with remaining tortillas and filling.

Spray the taquitos lightly with cooking spray, sprinkle with salt.  Bake 15-20 minutes, or until the tortillas are crisp and golden-brown.  Serve with salsa, sour cream, and/or guacamole.


*This is how I prepare my chicken if I don't have leftover chicken to use:  Preheat the oven to 375 degrees.  Spread a piece of aluminum foil across a baking sheet, and arrange chicken breasts in a single layer in the center.  Sprinkle with salt and pepper, and season as you wish.  Fold the aluminum foil over the chicken breasts, and enclose them to form a "packet."  Bake the chicken (on the baking sheet) 35-45 minutes, or until it is cooked through.


**To freeze, prepare the taquitos, but before baking, place the baking sheet in the refrigerator until the taquitos are completely cold.  Wrap each taquito in plastic wrap or aluminum foil, and freeze.  To bake, unwrap the taquitos and cook  in a 425 degree oven for 20 minutes (no need to thaw first).


Monday, February 21, 2011

Broccoli-Cheese Soup


One of my favorite soups to order out is broccoli-cheddar soup, but since it is usually heavy on the cheese and cream, and light on vegetables, I try to abstain.  Therefore, I was excited when I saw this recipe in this month's Cook's Illustrated.  The whole point of this version is to give you lots of vegetable and broccoli flavor, with a hint of cheese.  It is heavy on vegetables and light on cheese.  It's reasonably healthy, and quite simple to prepare as well, so it makes it a double winner.

When developing this recipe, they wanted to highlight the broccoli.  In order to do that and allow the broccoli to be incorporated into every bite, you basically have to cook the beejesus out of it.  However, by cooking it for so long, the soup took on an unattractive grayish color.  This is remedied by cooking the broccoli with baking soda - it causes it to cook faster while still retaining its bright color.  Adding a handful of spinach towards the end of cooking also enhances the green hue.  The soup is then pureed with both Parmesan and cheddar, and you are left with a bright green, velvety soup that is full of broccoli flavor.

With the weather starting to turn to spring, this soup is a great transition meal - warm and comforting soup with lots of bright and fresh flavor.  I served this soup with turkey paninis, and we felt like we were in our own little cafe!


Broccoli-Cheddar Soup
adapted from Cook's Illustrated, March/April 2011
serves 6-8
  • 2 Tbs unsalted butter
  • 2 pounds broccoli - florets cut into small pieces, stalks peeled and chopped into small chunks
  • 1 medium onion, chopped (about 1 cup)
  • 2 medium garlic cloves, minced
  • 1 1/2 tsp dry mustard
  • pinch cayenne pepper
  • kosher salt and black pepper
  • 3-4 cups water
  • 1/4 tsp baking soda
  • 2 cups low-sodium chicken broth or vegetable broth
  • 2 oz baby spinach (about 2 cups)
  • 3/4 cup grated sharp cheddar cheese, plus more for serving
  • 3/4 cup  finely grated Parmesan cheese
Melt the butter in a dutch oven over medium-high heat.  Add the broccoli, onion, dry mustard, cayenne, garlic, and 1 teaspoon salt.  Cook, stirring frequently, until the broccoli and onion are fragrant and slightly softened, about 6 minutes.  Add 1 cup of water and baking soda, cover, and cook until the broccoli is very soft, about 20 minutes, stirring periodically.

Add the broth and 2 cups of water, and bring to a simmer.  Add the spinach, and cook until wilted, about 1-2 minutes.  Transfer half the soup to a blender with half the cheese, and puree until smooth, about 1 minute.  Transfer the soup to a medium bowl and repeat with the remaining soup.  Return all the soup back to the pot, and bring to a light simmer.  Thin the soup out with the remaining water if necessary. Season to taste with salt and pepper, and serve with additional cheddar.


Friday, February 18, 2011

Double Cookie Dough Ice Cream


Even though many people opt to make a fancy, over the top dessert for Valentine's Day (which I love), I usually just make something simple.  Joey is a man of simple tastes when it comes to dessert:  oreos, chocolate chip cookies/cake, or cheesecake with strawberries.  I usually make a heart-shaped cookie cake, but this year I decided to make this ice cream.  Joey loves cookie dough, so I knew this would be a hit with him - and of course it was.

I love that the base of the ice cream is also cookie dough-flavored, and then bits of cookie dough are mixed in.  It is a double-whammy, and certainly better than vanilla ice cream with the cookie dough mix-in.  This is a pretty standard custard-based ice cream recipe, save for the step of browning the butter with the brown sugar - but that step is what gives the ice cream the characteristic cookie dough flavor. 

Joey of course loved this ice cream, and I did too.  And just because it is still winter, it doesn't mean you can't indulge in ice cream - I firmly believe it is a year-round treat!

And look at who snuck into my photo shoot -a certain 2 year old loooves chocolate!


Double Cookie Dough Ice Cream

For the cookie dough:
  • 5 Tbs salted butter, melted (or unsalted butter + 1/4 tsp salt)
  • 1/3 cup packed brown sugar
  • 1/4 cup flour
  • 1/2 tsp vanilla extract
  • 3/4 cup chocolate chips (recommended:  mini chips)
For the ice cream:
  • 3 Tbs unsalted butter
  • 2 cups heavy cream
  • 2/3 cup packed brown sugar
  • 4 large egg yolks
  • pinch of kosher salt
  • 2 tsp vanilla extract
  • 1 1/2 cups whole milk
  • 1 cup chocolate chips
To make the cookie dough, stir together the butter and sugar until smooth.  Mix in the flour and vanilla, then fold in the chocolate chips.  Wrap the mixture in plastic wrap, form into a disk, and refrigerate until firm.

To make the ice cream, melt the butter and sugar in a medium saucepan over medium-high heat.  Cook, stirring often, until the butter is a deep golden-brown color, being careful not to burn it.  Whisk in the heavy cream and heat until simmering.

Meanwhile, whisk egg yolks until light and fluffy in a medium bowl.  Add a small amount of the cream mixture to the eggs, whisking constantly.  Whisk in the rest of the cream slowly.  Return the mixture to the saucepan, and cook over medium heat, stirring often, until it has thickened slightly and reads 170-175 degrees on an instant-read thermometer.

Remove from heat and pour through a fine-mesh sieve into a medium bowl.  Mix in the vanilla, salt, and whole milk.  Cover with plastic wrap and chill until very cold.

Churn ice cream according to manufacturer's instructions.  As it churns, remove the cookie dough from the refrigerator and cut into small pieces.  Pour the ice cream into an airtight container and mix in the chocolate chips and the cookie dough.  Freeze until firm.


source:  Annie's Eats.  Ice cream adapted from Joy the Baker, cookie dough from The Perfect Scoop by David Lebovitz


Wednesday, February 16, 2011

Weeknight Bolognese


Everyone has their own go-to comfort food, and mine is pasta.  It probably dates back to when I was a vegetarian.  I wasn't an adventurous eater, so my old standby was a bowl of spaghetti with marinara.  Now that I eat meat and have a bit more of an adventurous palate, I'll try new foods, but pasta is still what makes me feel all warm and fuzzy inside.

By definition, bolognese is a sauce that is simmered for hours and hours, building flavor.  However, sometimes the craving for pasta with meat sauce doesn't hit until 5 pm.  And then what's a girl to do?  Turn to Ina, of course.  Her weeknight version of bolognese contains the basics:  beef, tomatoes, and cream.  But she throws in some extras to boost the flavor:  oregano, red pepper flakes, basil, red wine, and nutmeg.  Her additions give the sauce an intense flavor, and what's more is that it's achieved in under an hour.  Which is key for this busy mom.  


Weeknight Bolognese
serves 4-5
adapted from Ina Garten, How Easy is That?
  • 1 lb lean ground sirloin
  • 4 cloves minced garlic
  • 1/2 Tbs dried oregano
  • 1/4 tsp crushed red pepper flakes
  • 1 1/4 cups dry red wine, divided
  • 1 (28-oz) can crushed tomatoes, preferably San Marzano
  • 2 Tbs tomato paste
  • kosher salt and ground black pepper
  • 3/4 lb dried pasta, such as shells or oricchiette
  • 1/4 tsp ground nutmeg
  • 1/4 cup chopped fresh basil leaves, lightly packed
  • 1/4 cup heavy cream
  • 1/2 cup freshly grated Parmesan cheese, plus more for serving
Add the sirloin to a large skillet over medium-high heat.  Cook, crumbling the meat with a wooden spoon, 5-7 minutes, until the meat has started to brown and is no longer pink.  Stir in the garlic, red pepper flakes, oregano, and tomato paste and cook for 1 more minute, or until fragrant. 

Pour 1 cup of the wine into the skillet and stir to scrape up any browned bits.  Add the tomatos 2 teaspoons of salt, and 1 teaspoon of pepper, stirring until combined.  Bring to a boil, lower heat, and simmer 10-15 minutes.

Meanwhile, bring a large pot of salted water to boil.  Add the pasta and cook until al dente.  Drain and pour into a large serving bowl.

As the pasta cooks, finish the sauce.  Add the nutmeg, basil, cream, and remaining 1/4 cup wine.  Simmer for 8 to 10 minutes, stirring occasionally until thickened.  Add the sauce to the pasta, along with the Parmesan cheese, and toss well.  Serve hot and pass additional Parmesan at the table.


Monday, February 14, 2011

Spinoccoli Pizza


That would be spinach and broccoli pizza.  And it is one of my favorite dinners.  We have homemade pizza a few times a month, and I'm always on the lookout for fun variations.  Sure, we like the standard cheese and pepperoni, but y'all know that I like to mix things up as well.  This pizza certainly does just that.  It is normal pizza dough with a Parmesan cream sauce, and topped with spinach, broccoli, cheddar, and mozzarella.  It may sound like a strange combination, but it works.  Roasted broccoli is one of my favorite vegetable side dishes, so to combine it with pizza is sure to be a winner!  It's not often that we repeat meals, but I have made this pizza at least 3 times.  One of those times, I cut it into rectangles and served it as an appetizer, and it was enjoyed by all. This makes more white sauce that you'll need for the pizza, but the rest is excellent for dipping the pizza and crust!

Even though I wouldn't classify this pizza as "healthy," it is a nice vehicle for some veggies.  Once you have your crust ready (whether you buy or make it is up to you), it comes together quite quickly.  And Joey's favorite aspect of this meal:  very few dishes!  One pot, a cutting board, knife, and cheese grater.  That's it.   All in all, it is a fast, easy, and delicious dinner.  And one that I will most definitely continue to make regularly.

If you love pizza, check out my Featured Recipes Page - I've updated it with lots of great ideas for pizza and pasta!


Spinoccoli Pizza
adapted from Annie's Eats
makes 1 pizza
  • pizza dough
  • 1 Tbs buter
  • 1 Tbs four
  • 3/4 cup milk (low fat is fine)
  • 2 garlic cloves, smashed
  • salt and pepper, to taste
  • 6 Tbs freshly grated Parmesan cheese
  • 1 cup broccoli florets, chopped into 1-2 inch pieces
  • 1 cup chopped fresh spinach, packed
  • 2/3 cup shredded mozzarella cheese
  • 2/3 cup shredded extra-sharp cheddar cheese
Preheat the oven to 500 degrees for at least 30 minutes, with pizza stone.

To make the white sauce, melt the butter in a small saucepan over medium heat.  Add the flour, and cook, whisking constantly, until golden and bubbly, about 1 minute.  Whisk in the milk, and add the garlic cloves.  Cook, stirring often, until the mixture thickens and bubbles.  Remove from heat, season with salt and pepper, and stir in the parmesan cheese.  Discard the garlic.

Roll out the pizza dough into a 12-14 inch round.  Brush the perimeter with olive oil.  Spread a thin layer of the white sauce over the surface, then top with the spinach and broccoli.  Scatter the cheeses over the vegetables.  Transfer the pizza to the stone, and bake 10-12 minutes, or until the cheese is melted and bubbly.  Allow to cool slightly before serving.


Friday, February 11, 2011

Chocolate Truffle Tarts


If you've been reading my blog for a while, you may remember the anniversary dinner  that I posted last May.  I have shared most of the recipes by now, but I have been saving this one for Valentine's Day.  Whenever I want to make a special dessert, my mind always goes to chocolate first.  And these tarts are definitely chocolately - a chocolate shortbread crust, filled with chocolate truffle filling, and topped with rich chocolate ganache.  If that doesn't scream Valentine's Day then I don't know what does.

For a dessert with multiple components, these actually come together pretty easily.  The dough is a snap to make in the food processor - the most time consuming step is pressing it into the individual tart pans.  The truffle filling and ganache are also quite simple.  And what makes this an even more ideal dessert is that they are assembled ahead of time and then chilled until ready to serve.  I just took them out about 20 minutes before we ate dessert to take some of the chill off, and they were perfect.

I had quite a bit of leftover ganache, so I used it to make chocolate covered strawberries - which I thought were super cute perched atop each tart.  Just a fun, festive touch.  Happy Valentine's Day!


Chocolate Truffle Tarts
filling and ganache from Tartelette
shortbread crust from Baking:  From My Home to Yours


Chocolate Shorbread Tart Dough
  • 1 1/4 cups all-purpose flour
  • 1/4 cup cocoa powder
  • 1/4 cup confectioners' sugar
  • 1/4 tsp salt
  • 1 stick plus 1 Tbs (9 Tbs) cold, unsalted butter, cut into small pieces
  • 1 egg yolk
Chocolate Truffle Filling
  • 8 oz bittersweet chocolate
  • 12 Tbs unsalted butter, at room temperature
  • 1/4 cup sugar
  • 1/4 cup strong-brewed coffee
  • 4 large eggs
Chocolate Ganache 
  • 4 oz bittersweet chocolate
  • 1/3 cup heavy cream
  • 2 Tbs unsalted butter
Preheat the oven to 375 degrees and lightly grease small tart pans with butter.

Add the flour, cocoa powder, sugar, and salt to the bowl of a food processor a pulse a few times to combine.  Scatter the pieces of butter over the dry ingredients and pulse until the butter is coarsely cut in - some will be the size of oatmeal flakes, while some will be the size of peas.

Add the egg yolk to a small measuring cup with a pourable spout, and stir to break it up.  Add the egg a little at a time, pulsing after each addition.  Once the egg is in,  process in long pulses - about 10 seconds each - until the dough, which will look granular to begin with, forms clumps and curds.  Just before you reach this stage, the sound of the machine will change, so be ready.

Turn the dough out onto a work surface, and very lightly and sparingly knead the dough just to incorporate the dry ingredients.  Press the dough into the tart pans, and chill for 30 minutues to 1 hour before baking.

Bake the dough 10-20 minutes, until the dough is firm and crisp. Remove the tarts from the oven and decrease the temperature to 350 degrees.


For the filling, chop the chocolate into small pieces.  Place in a medium bowl and set aside.  Combine the sugar, coffee, and butter in a small saucepan and bring to a boil.  Pour over the chocolate and leave undisturbed, for 2-3 minutes.  Whisk until smooth, then add the eggs, one a time, stirring well after each addition.  Divide the filling evenly among the tart shells, and bake 10 minutes.  Allow to cool completely.


For the ganache, chop the chocolate and place in a medium bowl.  Heat the cream over medium heat until gently boiling, and pour over chocolate.  Allow to sit undisturbed for 2-3 minutes, then whisk until smooth.  Add the butter and whisk to incorporate.  Divide evenly among the tarts and smooth the tops with an offset spatula.  Refrigerate until ready to serve.


Thursday, February 10, 2011

Baked Eggs with Herbs and Goat's Cheese


One of my favorite things about the weekend is that Joey is home and we can enjoy a nice breakfast together.  He usually requests waffles, but sometimes I can convince him to try something new.  I've had the idea of doing an egg dish with herbs and goat cheese for a while now, but I couldn't decide on the specifics - should I make an omelet, frittata, or just mix them into some scrambled eggs?  I eventually settled on a simple baked eggs preparation, and I'm so happy with my choice! 

This elegant breakfast comes together in under 20 minutes.  The most time consuming part is chopping the herbs.  We both really enjoyed these eggs, though next time I think I'll cook them in a shallower dish.  I used ramekins, but I felt like they were a little too deep, and the eggs weren't cooked very evenly.  We still really enjoyed this breakfast though - I really loved how the top gets crispy, and I loved the combination of the herbs with the goat cheese.  Toast is a must, and bacon and fruit are optional (but highly recommended) sides. 


Baked Eggs with Herbs and Goat Cheese
inspired by Ina Garten, Barefoot in Paris
serves 2
  • 1 clove garlic, minced
  • 2 tsp chopped fresh scallions
  • 1 tsp chopped fresh parsleye
  • 1 Tbs chopped fresh basil
  • kosher salt and freshly ground black pepper
  • 2 Tbs crumbled goat cheese
  • 2 Tbs heavy cream
  • 1 tbs unsalted butter
  • 4 large eggs
Preheat the broiler and adjust the oven rack to be 6 inches from the heating element.   Place 2 gratin dishes on a baking sheet.  Divide the butter and cream between them, and place under the broiler until hot and bubbly, about 3 minutes.

Meanwhile, combine the herbs, garlic, salt and pepper in a small dish.  Carefully crack 2 eggs into each of 2 teacups, being careful not to break the yolks. 

Remove the baking sheet from the oven and quickly but carefully pour the eggs into each of the dishes.  Scatter the herb mixture and goat cheese over the eggs, and season well with salt and pepper. 

Return the baking sheet to the oven, and cook until the whites are just set, 5-6 minutes, rotating the baking sheet to ensure even cooking.  Remove from oven and allow to sit about 1-2 minutes before serving. 


Tuesday, February 8, 2011

Chocolate-Strawberry Cupcakes


If there is a combination that just screams Valentine's Day, it has to be chocolate-strawberry.  The quintessential romantic dessert is chocolate covered strawberries, so of course anything with that flavor combo will seem romantic and indulgent.

Since strawberries are just starting to come into season, I knew I wanted to share a fun Valentine's dessert that featured them.  I considered whoopie pies, macarons, or mousse, but since cupcakes are really my true love, I went with those.  I used my favorite chocolate cupcake recipe, and topped them with my favorite strawberry buttercream recipe.  I actually shared this recipe for chocolate cupcakes in the early days of my blog, but it is kind of buried within another post, and I've made some changes since then, so I'm going to share it here as well.

The buttercream is a Swiss meringue buttercream, and is one of my favorite icings ever.  It is so smooth and silky, and it has a light buttery flavor that is offset by sweet strawberries.  I've made it several times to go with strawberry cupcakes, but I really love it with the chocolate as well.  The combination of the rich chocolate cupcake and sweet buttercream is truly a match made in heaven... just like me and my sweetheart! :-)


If you are looking for ideas for dinner and dessert for the big day, check out my Featured Recipes page.  I've updated it with what I think are romantic meals!


Chocolate-Strawberry Cupcakes
makes about 30 cupcakes


Chocolate Cupcakes
adapted from Hershey's Perfectly Chocolate Cake
  • 2 cups sugar
  • 1 3/4 cups all-purpose flour
  • 3/4 cup unsweetened cocoa powder
  • 1 1/2 tsp baking soda
  • 1 1/2 tsp baking powder
  • 1 tsp salt
  • 2 eggs
  • 1 cup buttermilk
  • 1/2 cup vegetable oil
  • 2 tsp vanilla extract
  • 1 cup hot coffee
Preheat the oven to 350 degrees.  Seperate cupcake liners into muffin tins.

In the bowl of a stand mixer fitted with the paddle attachment, whisk together the sugar, flour, baking soda, baking powder, cocoa powder, and salt.  Stir the ingredients together over low speed.  Add the eggs, buttermilk, vegetable oil, and vanilla.  Mix at medium speed until well-combined, about 2-3 minutes.  Carefully add the coffee and beat on the lowest setting to combine.  Remove bowl from the mixer and stir with a rubber spatula until well-combined.

Fill each muffin tin 2/3 full, and bake 18-20 minutes, until a toothpick inserted into the center comes out clean.  Cool 5 minutes in the muffin tins, then transfer to a wire rack to cool completely.


Strawberry Swiss-Meringue Buttercream
adapted from Martha Stewart, Cupcakes
makes about 5 cups
  • 1 1/2 cups diced strawberries
  • 4 egg whites
  • 1 1/2 cups sugar
  • pinch of salt
  • 1 1/2 cups (3 sticks) unsalted butter, cut into tablespoons, at room temperature
Puree the strawberries in a food processor.

Combine the egg whites, sugar, and salt in the bowl of a stand mixer set over a small pan of simmering water.  Whisk constantly by hand until the sugar has dissolved (the mixture should feel completely smooth when rubbed between your fingertips).

Attach the bowl to the stand mixer and fit with the whisk attachment.  Starting on low speed and gradually increasing to medium-high speed, mix until still (but not dry) peaks form.  Continue mixing until until the mixture is light, fluffy, glossy, and completely cool (test by touching the bottom of the mixing bowl), about 10 minutes.

With the mixer on medium-low speed, add the butter 2 tablespoons at a time, mixing well between each addition.  Scrape down the sides of the bowl, increase the speed to medium, and mix until the buttercream comes together (it can take up to several minutes, but it will come together eventually).  Switch to the paddle attachement and beat at medium-low speed to remove air bubbles, about 2 minutes.  Gradually add the strawberry puree, and mix to combine.

Frost cupcakes as desired, and garnish with strawberry slices just before serving.


Monday, February 7, 2011

Creamy Mushroom Soup


I know they are out there, but I just don't understand people who hate mushrooms.  If you've only had canned mushrooms, I can see hating them - they are icky.  But a fresh mushroom, sliced and sauteed in butter?  There isn't much that is better.  Except maybe when you turn them into a creamy, comforting soup.  Especially one that is laced with sherry, garlic, and cream. 

This soup is easy and quick, so it makes an ideal weeknight dinner.  Served with a side salad and a loaf of crusty bread, this is a great winter meal that will warm you from the inside out.


One Year Ago:  Grilled Rosemary Chicken Thighs


Creamy Mushroom Soup
adapted from The Pastry Queen
serves 4-5
  • 1/4 cup (1/2 stick) unsalted butter
  • 1 medium onion, finely chopped
  • 2 cloves garlic, minced
  • 1/2 lb. cremini mushrooms, sliced
  • 1/2 lb. shiitake mushrooms, stems removed, sliced
  • 3 Tbs all-purpose flour
  • 3 1/2 - 4 cups chicken or vegetable stock
  • 1/4 tsp freshly ground pepper
  • 1/8 tsp nutmeg
  • 1 Tbs freshly squeezed lemon juice
  • 1/4 cup dry sherry
  • 1/4 cup heavy cream
  • pinch of cayenne pepper
  • salt
  • chopped fresh chives, for garnish
Melt the butter over medium heat in a large saute pan or dutch oven.  Add the onion and cook until soft and transparent, then add the garlic and saute until fragrant, 30 seconds to one minute.  Add the mushrooms and cook on medium heat about 10 minutes, until they release their liquid and then reabsorb it.

Reduce the heat to low and add the flour, stirring well to incorporate.  Gradually pour in the broth, stirring constantly.  Add the pepper, nutmeg, lemon, and sherry.  Simmer the soup over medium-low heat for 10-15 minutes.  Add the cream and stir until the soup is hot.  Add the cayenne and season with salt, if needed.  Transfer to serving bowls and garnish with the chives.


Wednesday, February 2, 2011

Pimiento Cheese Fritters for Annie


As I mentioned in the Virtual Holiday Party post, one of the biggest benefits of blogging for me is the friendships I've developed along the way.  One of these friendships is with the ever-fabulous and famous Annie, of Annie's Eats.  She is one of the most talented, smart and funny people I know, and I'm so glad to consider her a friend.  I am positively thrilled for her and her sweet family because she is going to have a baby girl in April!  Being a mom to a girl myself, I know how much fun they are, how cute (and dangerous) the clothes are, and how incredibly sweet and cuddly they are. 

In honor of Annie's impending baby girl, Courtney of Cook Like a Champion put together a virtual baby shower for our dear Annie.  Of course I was excited to participate - I had so much fun with the virtual holiday party, and I was looking forward to another fun blogger shindig.


Since Annie is from the midwest and I'm a southern gal, I wanted to introduce a bit of southern culture to her and the other participants.  I really don't think I've ever been to a bridal or baby shower where pimiento cheese wasn't served, so I decided that I would make that my contribution.  But this shower is for one of my favorite foodies, so I knew I needed to step it up.   

For those of you who aren't familiar with pimiento cheese, it is basically a spread for sandwiches that is made up of extra sharp cheddar,diced pimientos (or roasted red peppers), enough cayenne for a small kick, and just enough mayo to bind it all together.  I treat it as a condiment and eat it on everything from toasted pita, to grilled cheese sandwiches, as a dip for veggies, to burgers. 

One of our favorite restaurants in the area is Relish, and the focus is modern southern cuisine.  They are quite famous for these pimiento cheese fritters, and whether we go there for lunch or dinner, we always order a plate of them.  They are crispy on the outside, and filled with melted, gooey cheese on the inside.  Dipped in a sweet-spicy pepper jelly, they are one of the most addictive snacks (or meals) ever.

I actually tried to make some fritters a few weeks back when I made fried green tomatoes, but they completely melted into the hot oil and were a massive failure.  I did a little research, and actually found the recipe from Relish.  The keys to successful fritters are using a combination of cream cheese and mayo for stability, and completely covering the cheese with the panko coating.  Once those things are taken care of, they are easy-peasy.  It is both exciting and dangerous how easy and delicious these fritters are, and since Relish has sadly closed, at least now I know I can get my fix at home.


Both Annie and Courtney have the full round-up of what everyone else contributed to the party.  Be sure to check it out - there are so many yummy dishes that it makes me even more sad that we're not throwing a real-life shower!  Congratulations, Annie!


sidenote:  this recipe makes a LOT of fritters.  I actually only made 1/4 of the recipe when I made these and ended up with 10 fritters, so adjust the quantities accordingly.


Pimiento Cheese Fritters
recipe from Relish, via 11 Alive News
  •  1 1/4 lbs extra sharp cheddar cheese, grated
  • 8 oz. pepperjack cheese, grated
  • 4 oz. cream cheese, at room temperature
  • 1/4 cup roasted red peppers, chopped
  • 1 1/3 tsp Cajun seasoning
  • 1/4 cup mayo
  • pinch kosher salt
  • 2 cups flour
  • 2 cups buttermilk
  • 4 cups panko bread crumbs
  • 1 gallon peanut or vegetable oil, for frying
  • red pepper jelly, for serving
Combine the cheddar and pepperjack cheeses in a large bowl.  In the bowl of a food processor fitted with the steel blade, add the cream cheese, peppers, Cajun seasoning, mayo, and salt.  Puree until smooth, then combine with the  cheese.  Use a rubber spatula to combine well.  Season with additional salt if necessary.  Chill at least 2 hours, or overnight.

Scoop tablespoon-size portions of the pimiento cheese and roll them into smooth balls.  Arrange them in a single layer on a parchment-lined baking sheet.

Into 3 separate shallow dishes, add the flour, buttermilk, and panko.  Dip each ball first into the flour, shaking off any excess.  Next roll in the buttermilk, and finally coat with panko.  Repeat the buttermilk and panko, being sure that the entire ball is covered - if any of the cheese is showing, it will leak out while frying.  Continue until all the pimiento cheese has been coated.  Return to the refrigerator and chill at least 1 hour.

Add the oil to a large pot.  Place the pot over medium heat until the oil reaches 350 degrees.  Fry the pimiento cheese 6-8 fritters at a time, for 3-4 minutes, until they are golden-brown.  Remove with a slotted spoon or skimmer and place on a paper towel-lined plate to drain.  Continue until all the fritters have been fried.  Serve immediately with pepper jelly.


Tuesday, February 1, 2011

PPQ: Pear-Ginger Quick Bread


This week's Project Pastry Queen recipe is another one of those that I've been wanting to make for quite some time.  I love the pear-ginger combination, and quick breads are always a nice treat to have around.  This bread is studded with fresh pears and ginger, and tastes light and fresh thanks to the addition of both lemon and orange zest.  It smelled so good as it baked, and I couldn't stop myself from eating two slices in about five minutes. 

Simple and straightforward, this bread is in the oven within ten minutes, and in about an hour you'll have a wonderfully sweet, fragrant, and delicious breakfast or snack.  Thanks to Aliza of Baker by Night for choosing this yummy recipe.  She has the full recipe posted on her blog.

Next week:  Emergency Fruit Crostatas


BLOG DESIGN BY: SHERBET BLOSSOM DESIGNS