Monday, June 27, 2011

Caramelized Onion Dip


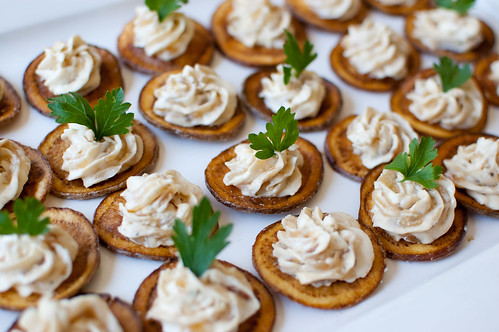
It's become a bit of a running joke in my circle of friends that I hate onion dip.  I'm sure you know the one I'm talking about - onion soup mix, stirred into sour cream?  Everyone else seems to love it, and it's always a staple at parties, tailgates, and get-togethers.  However, I'm just not crazy about it, and it does nothing for me.  But to use caramelized onions as the base?  I can get behind that!  I first made this dip for my birthday party this year, and I was immediately smitten.  So when I planned my Trashy to Classy Cocktail Party last month, I knew it was the perfect dish to include.  Obviously just serving it as a dip wasn't classy enough though, so I turned it into a canape of sorts by piping the dip onto a homemade potato chip, and garnishing with a fresh parsley leaf.  These looked so cute, and were a great addition to my menu - the dip is familiar to everyone, but it was just classed up.  I actually only assembled enough to fit on my serving tray, so I put out the rest in the kitchen as chips and dip - and both were gone in no time.

The dip is really easy to make, and can be made ahead - actually I think it tastes best on the second or third day.  So it is a great choice for entertaining.  When I've made this in the pat, I just serve it with kettle chips or a good-quality store bought brand, but making your own chips definitely takes them to the next level.  It's certainly not necessary, but it sure was tasty.

Since it's summer and I'm in Georgia, I couldn't help but to use Vidalia onions in my dip, and it made it even more special.  I also have decreased the butter, as it can seem kind of greasy otherwise.  Finally, I'm not noting this in the recipe, but I've subbed out part of the mayo for Greek yogurt in the past as well - it's just a personal preference for me because I'm not a huge mayo fan, and can find the flavor overpowering. 

If you're looking for an appetizer to take to a Fourth of July cookout this weekend, this makes a great option - and I may just be coming around to onion dip after all :-)


Caramelized Onion Dip
adapted from The Barefoot Contessa, by Ina Garten
  • 2 large yellow or Vidalia onions
  • 3 Tbs unsalted butter
  • 3 Tbs olive oil
  • 1/4 tsp cayenne pepper
  • 1 tsp kosher salt
  • 1/2 tsp freshly ground black pepper
  • 4 oz cream cheese, room temperature
  • 1/2 cup sour cream
  • 1/2 cup mayonnaise
 Cut the onions in half and slice them into 1/8-inch thick slices.  You should have about 3 cups of onions. *

Heat the butter and oil in a large saute pan on medium heat.  Add the onions, cayenne, salt, and pepper and saute for 10 minutes.  Reduce the heat to medium-low and cook, stirring occasionally, for 20 more minutes, until the onions are browned and caramelized.  Allow to cool slightly.

Combine the cream cheese, sour cream, and mayonnaise in the bowl of an electric mixer fitted with a paddle attachment.  Beat until smooth, add the onions, and mix until well-combined.  Taste for seasonings.  Serve immediately, or chill to serve later.  Bring to room temperature before serving.

*When I made this dip for the party, I actually diced the onions to make for easier piping.  Both work fine, but if you dice them, they will caramelize a little faster, so just keep an eye on them.


Sunday, June 26, 2011

Cherry Crumb Muffins


Joey really spoiled me this year for Mother's Day, and he bought me a Kindle.  Even though I love reading, I wasn't sure if I wanted an e-reader.  I just love books, and I didn't want to give them up.  But I am officially a convert.  It is so much fun, and it's definitely easier to pack than the 10 books I take on vacation.  Anyway, as he was showing me some of the features, he showed me how you can preview a book before you buy it.  Apparently one of my suggested items was The Clinton Street Baking Company.  As I scrolled through the pages, I somehow managed to buy it by accident.  And then even though I had the option to cancel my order, I was so used to my iPhone that I tried to cancel by touch screen - which clearly doesn't work.  So I was "stuck" with another cookbook...

It turned out to have been a great mistake though, because this is a really fun cookbook - lots of recipes for breakfast treats, desserts, and even a few sandwiches and savory items.  I mentally flagged several recipes, but with cherries coming into season now, I couldn't pass up these muffins.  They don't have much added sugar, but they are plenty sweet thanks to the cherries and the crumb topping.  I think you could even make them a little healthier by using Greek yogurt in place of the sour cream, subbing part of the flour for whole wheat flour, and leaving off the crumb topping.  But made as listed here, they are really delicious, and they still tasted fresh for several days after baking.

Even though I love my Kindle, I don't plan to buy cookbooks for it - I love being able to write in the margins, and not worry about splatters and spills so much.  But it was definitely worth it for these muffins!


Cherry Crumb Muffins
adapted from Clinton Street Baking Company
makes 10 muffins
  • 4 Tbs unsalted butter, at room temperature
  • 1/2 cup sugar
  • 1/2 tsp almond extract
  • 1 cup all-purpose flour
  • 1/2 tsp baking powder
  • 1/4 tsp baking soda
  • 1/4 tsp salt
  • 1 large egg
  • 1/2 cup sour cream
  • 1 cup fresh cherries, pitted and quartered
  • 10 cherries, pitted and left whole
Crumb Topping
  • 1/4 cup all-purpose flour
  • 1/4 cup sugar
  • 1/8 tsp cinnamon
  • 2 Tbs unsalted butter, cubed
Preheat the oven to 350 degrees.  Line a muffin tin with liners or grease well.

Cream the butter, sugar, and almond extract together in an electric mixer fitted with the paddle attachment on medium-high speed. 

Sift the remaining dry ingredients together into a medium bowl.

Add the egg to the butter mixture and blend until combined.

Add 1/4 cup of the sour cream to the mixer, followed by half the dry ingredients, mixing and repating with remaining sour cream and flour mixture.  Mix until the batter is just combined.

Turn off the mixer and fold in the cherries with a spatula.

To make the crumb topping, combine all the ingredients into a small bowl, and using a fork or your fingers, blend together.

Divide the batter evenly among 10 muffin cups.  Top each muffin with 1 Tablespoon of the crumb topping and 1 cherry. 

Bake 25 to 30 minutes, until a toothpick inserted in the center comes out clean.  Cool for 10 minutes in the pans, then remove to serve or cool completely.


Wednesday, June 22, 2011

Pistachio, Strawberry, and Vanilla Semifreddo


In case you can't tell from my blog design, my favorite colors are pink and green.  In addition to using them in my blog design, they were my wedding colors, and also the colors of Caroline's nursery.  So pretty much from the moment I saw this dessert in June's Bon Appetit, I knew I needed to make it.   Not to mention that I am absolutely loving pistachio flavored desserts these days, and strawberries are at their peak.  So I knew this would be something I'd love.

In case you're not familiar with the term "semifreddo," it basically means half-cold.  It is a custard based dessert that is lightened with whipped cream, so it's a bit like ice cream, but has sort of a mousse-like texture at the same time.  When reading the instructions, it seemed kind of complicated and labor intensive (prep each flavor, make the custard, whip the cream, freeze each layer individually..), but once I started it was very straightforward.  The only "difficult" step was straining the pistachio mixture.  It had thickened significantly upon standing, so it definitely took some elbow grease to extract as much liquid as possible (though it was really more of a paste).  And it turned out to be my favorite layer of the dessert.  Other than that, everything else came together quite easily.  The hardest part was waiting for it to chill, so I could dig in :-)

As expected, this turned out to be such a pretty dessert.  As I mentioned, the pistachio layer was my favorite, but the strawberry and vanilla layers were great as well.  This would be a great dessert for entertaining, since it is made completely ahead of time, and it presents so beautifully.  I think it would also be great served with strawberry sauce or chocolate sauce, but it was still wonderful on it's own.


Pistachio, Strawberry, and Vanilla Semifreddo
adapted from Bon Appetit, June 2011
  • 1 cup shelled unsalted pistachios
  • 4 tablespoons sugar, divided, plus 1/2 cup
  • 1 cup whole milk, divided
  • 1/4 teaspoon almond extract
  • 1 1/2 tsp vanilla extract
  • 1 cup fresh strawberries (about 4 ounces), hulled, halved
  • 1 teaspoon vanilla extract
  • 2 large eggs, at room temperature
  • 1/4 teaspoon kosher salt
  • 1 1/3 cups chilled heavy whipping cream
Line a loaf pan (approximately 9x5x3") with 2 layers of plastic wrap, leaving a generous overhang on all sides. 

Grind pistachios and 2 tablespoons sugar in a food processor until very finely chopped. Transfer pistachio mixture to a small saucepan. Add 1/2 cup milk and bring to a boil. Remove from heat, cover, and let steep for 20 minutes. Set a fine-mesh strainer over a medium bowl; strain, by pressing down on the pistachios with a wooden spoon or spatula.  Discard the solids. Stir in almond extract and set pistachio mixture aside. 

Place remaining 1/2 cup milk in a medium bowl.  Stir in the vanilla extract and chill until ready to use.

Purée strawberries and 2 tablespoons sugar in a food processor until smooth. Set a fine-mesh strainer over another medium bowl; strain, pressing on solids to extract as much juice as possible. Discard solids. Stir in vanilla extract and set strawberry mixture aside. 

Whisk eggs, salt, and remaining 1/2 cup sugar in a medium metal bowl. Set bowl over a medium saucepan of simmering water (do not allow bottom of bowl to touch water). Beat egg mixture at high speed until it triples in volume and an instant-read thermometer inserted into mixture registers 170°F, about 3 minutes. Remove bowl from heat and continue beating until thick and cool, about 3 minutes. Add one-third of egg mixture to each of the pistachio, strawberry, and vanilla mixtures; fold each just to blend. 

Beat cream in a large bowl until soft peaks form. Add one-third of cream to each of the pistachio, strawberry, and vanilla mixtures; fold each just to blend. Cover vanilla and strawberry mixtures separately; chill. Pour pistachio mixture into pan; smooth top. Cover; freeze until firm, about 45 minutes. 

Gently pour strawberry mixture over pistachio layer; smooth top. Freeze until firm, about 45 minutes. 

Gently fold vanilla mixture to blend; pour over and smooth top. Freeze until firm, about 4 hours. 

DO AHEAD: Can be made 3 days ahead. Fold plastic wrap over; seal tightly and keep frozen.
 
To serve, uncover semifreddo. Using plastic wrap as an aid, lift from mold. Invert onto a chilled platter; peel off plastic. Slice crosswise.


Tuesday, June 21, 2011

Shrimp Burgers


Burgers are definitely synonymous with summer, and it appears as though I've made it my mission to try as many variations as possible before fall.  Most have been grilled, and most have been beef, turkey, or chicken.  But I've been wanting to make a seafood variation for years now.  I've actually had this recipe bookmarked since I first bought The Lee Bros. Southern Cookbook.  According to Matt and Ted (yes, we're on a first name basis), shrimp burgers are popular in - you guessed it - shrimping towns on the coast.  I'm sure Bubba from Forrest Gump would agree - when you live in a shrimping town, you have to get creative and find new ways to prep and eat shrimp!

These burgers are inspired by Hominy Grill, a popular restaurant in Charleston, SC. If you watch Throwdown with Bobby Flay, you may have heard of it - he challenged the chef to a coconut cake throwdown.  Anyway, this is basically a crabcake on a bun.  But made with shrimp.  And with the addition of fresh corn, ginger, lemon zest, and hot sauce.  I had a little trouble keeping the burgers together when I flipped them, and then they were pretty messy to eat, but I think it's from chopping the shrimp coarsley.  I think if they were chopped finer, or even pulsed in a food processor, they would hold together better.  You may also have better luck if you chill them for several hours vs 30 minutes, as the recipe indicates.  In any case, I just turned this into a fork-and-knife burger.  And the messiness definitely didn't deter us from enjoying them - they were bright and fresh from the herbs, ginger, and lemon, with a nice kick from the hot sauce. 

I served these on toasted buns with lettuce, tomato, and homemade tartar sauce.  On the side, we had toasted okra and watermelon - this was such a great summer meal, and I'm going to have trouble trying more seafood burger variations now that I love this one so much.

And if you love burgers as much as we do, check out my Featured Recipes Page - I've updated it with some of our favorites!


Shrimp Burgers
adapted from The Lee Bros. Southern Cookbook
serves 4
  • 2 quarts water
  • 1 recipe shrimp boil (recipe follows)
  • 1 pound shrimp, shells on
  • 2 Tbs chopped fresh scallions
  • 1/3 cup fresh corn kernels, cut from the cob
  • 2 Tbs chopped parsley
  • 1 Tbs grated fresh ginger
  • zest of 1 lemon
  • juice of 1 lemon
  • 2 Tbs mayonnaise
  • 1 Tbs Greek yogurt
  • 1 cup breadcrumbs, preferably fresh
  • kosher salt
  • freshly ground black pepper
  • hot sauce, to taste
  • 1 egg, lightly beaten
  • 2 Tbs canola oil
To serve
  • 4 hamburger buns, split
  • tomato
  • lettuce
  • tartar sauce (recipe follows)
  • fresh lemon wedges
In a medium saucepan, bring the water and shrimp boil to a boil over high heat.  Turn off the heat and add the shrimp.  Let stand until they are just pink, about 2 minutes.  Drain and run under cold water to stop the cooking.  Peel and devein the shrimp, and chop.  You should have 1 1/2 - 2 cups of chopped shrimp.

In a large bowl, mix the shrimp with scallions, corn, parsley, ginger, lemon zest, and lemon juice.  Stir in the mayonnaise, yogurt, and bread crumbs, and season with salt, pepper, and hot sauce.  Add the egg and gently fold with a spatula until evenly distributed.

From the shrimp mixture into 4 patties, each about 3-4 inches in diameter.  Cover with plastic wrap and refrigerate at least 30 minutes, or up to several hours.

Heat the oil in a nonstick skillet over high heat.  When it shimmers, add the burgers and cook until both sides are golden-brown, about 3 minutes per side.  Drain on a paper towel-lined dinner plate.

Toast the buns in the empty skillet until golden brown, and serve the burgers with a squeeze of lemon, lettuce, tomato, and tartar sauce.


Shrimp Boil
  • 1 Tbs peppercorns
  • 1 Tbs celery seeds
  • 6 bay leaves, torn into pieces
  • 1/2 cup kosher salt
  • 3 Tbs ground cayenne pepper.
Combine the peppercorns, celery seeds, bay leaves, and salt in the bowl of a food processor or chopper, and pulse several times to grind the peppercorns and combine the spices.  Transfer to a small bowl and stir in the cayenne.


Tartar Sauce
  • 1/2 cup drained relish (chowchow, artichoke, okra, pickle, etc)
  • 1/4 cup mayonnaise
  • 1/4 cup Greek yogurt
  • juice of 1 lemon
  • 1 tsp lemon zest
  • hot sauce, to taste
  • 1 tsp Dijon mustard
  • salt and pepper to taste
In a medium bowl, combine all the ingredients and stir well.  Taste and add additional hot sauce, salt, or pepper to taste.  Cover and chill until ready to serve.


Sunday, June 19, 2011

PPQ: Peach Cobbler


It's my turn to host Project Pastry Queen again, and I've noticed a pattern.  Every single one of my recipe choices has been a fruit-based treat.  For a self-proclaimed chocoholic, I am actually a bit surprised by that!  Though I'll be honest:  this time I was thisclose to choosing a cake with Jack Daniels icing, since I knew my week landed on Father's Day and Joey loves Jack.  However, I decided to be selfish, since I wouldn't have been able to eat a cake that frosted with whiskey.  Plus, peaches are coming into season here, and what kind of Georgia-girl would I be if I don't choose peaches??

This peach cobbler is nothing fancy or complicated - just a really basic dessert.  The kind you'll find at a church picnic or your grandmother's house.  Fresh, sweet peaches with a doughy and buttery crust.  You'll want to serve this warm, with vanilla ice cream; though I did eat my fair share straight from the dish, and it still tasted pretty fantastic. 

I stayed pretty true to the recipe, but I added a bit of cinnamon to the peaches to give them a little warmth and bring out more sweetness.  I started to make these into individual cobblers, but in the end decided to stay rustic and family-style. 

I hope all the dads out there have a happy Father's Day!  See how everyone else liked this cobbler, and check back next week - we're baking up muffins that use an entire lemon!

Hill Country Peach Cobbler
adapted from The Pastry Queen, by Rebecca Rather
  • 1/2 cup (1 stick) unsalted butter
  • 1 cup granulated sugar
  • 1 cup all-purpose flour
  • 1 Tbs baking powder
  • pinch salt
  • 3/4 cup milk 
  • 3 cups sliced fresh peaches
  • 1/2 tsp ground cinnamon
  • 1/2 cup firmly packed brown sugar
Preheat the oven to 350.

Melt the butter in a small saute pan set over medium-high heat until it bubbles and turns a nutty-brown color.  Watch it carefully to prevent it from burning.

Pour the butter into an 8-inch square baking dish.

In a medium bowl, stir together the granulated sugar, flour, baking powder, salt, and milk.  Pour the mixture over the butter, but do not stir.

Arrange the peaches evenly on top of the batter, and sprinkle with cinnamon and then the brown sugar.

Bake the cobbler for 40-45 minutes, until the top is golden brown.  Miraculously, the batter will migrate from the bottom of the pan to the top to cover the peach slices.  Serve warm with vanilla ice cream, or at room temperature.


Thursday, June 16, 2011

Raspberry Chicken Salad with Grilled Peaches & Brie Croutons


I know that is a ridiculously long title, but it wouldn't have been possible for me to leave any of it out.  I mean seriously - Peaches?  Chicken?  Raspberry?  Brie?  No way.  Does this not sound like an awesome summer salad?  And I haven't even told you about the candied almonds.

This recipe was actually the reason I bought the Cuisine Grilling magazine last summer, but somehow I'm just now getting around to making it.  And as usual, I'm kicking myself for waiting so long.  I love salads that have fresh fruit in them - pears and apples in the fall and winter, berries, peaches, and apricots in the summer, strawberries in the spring...it's all good.

This salad has a double-dose of fresh raspberries - some are used in the vinaigrette/marinade, and the rest are tossed with the salad greens and served fresh in the salad.  It is definitely a fun dressing to make - the raspberries are mashed up with the vinegar and other dressing ingredients.  The chicken is then briefly marinated in some of the vinaigrette, while the rest is used to dress the salad.  Fresh peaches are halved, pitted, and grilled along with the chicken, and the whole salad is served with grilled brie croutons (mmmm melted brie.....).  My favorite component however, could possibly be the candied almonds.  They give the whole salad a nice crunch and dose of richness in an otherwise fairly light meal.  From start to finish this was on the table in under an hour, and it has been one of my favorite meals in several weeks.

Raspberry Chicken Salad with Grilled Peaches and Brie Croutons
adapted from Cuisine Grilling, 2010
  • 1/2 cup slivered almonds
  • 3 Tbs sugar
  • 1 Tbs unsalted butter
  • kosher salt
  • 1/3 cup red wine vinegar
  • 1 1/3 cups fresh raspberries, divided
  • 1 tsp Dijon mustard
  • 3 Tbs honey, divided
  • 3 Tbs minced fresh basil
  • 3 Tbs minced fresh mint
  • 1 Tbs minced shallots
  • 1/4 cup olive oil
  • 4 slices French bread, 1-inch thick
  • 4 slices brie (4 oz)
  • 4 boneless, skinless chicken breast halves (about 6 oz each)
  • 2 Tbs olive oil
  • 4 peaches, halved and pitted
  • 4-6 oz salad greens (I used a mix of spinach and romaine)
Toast the almonds in a nonstick skillet until golden and fragrant, stirring often.  Add the sugar, butter, and salt, and stir until the sugar dissolves and coats the almonds.  Transfer to a plate to cool, then break up into pieces.

Whisk together the vinegar, 1/3 cup raspberries, 1 tablespoon of the honey, mustard, 1 tablespoon each of the basil and mint, and the shallots.  Using the whisk, mash the raspberries to incorporate into the other ingredients.  Drizzle in the oil, whisking constantly.  Set aside 1/2 cup for the chicken marinade, and reserve the remaining dressing for the salad.

Preheat the grill to medium-high.  Pound the chicken breasts between 2 pieces of plastic wrap to 1/2-inch thickness.  Marinate the chicken in the reserved marinade for 15 minutes, turning every few minutes to evenly coat.

Meanwhile, combine the remaining honey with 2 tablespoons  of oil.  Brush onto the cut-side of the peaches, and both sides of the bread slices.

Season both sides of the chicken with salt and pepper, and grill, covered, until cooked through, about 4 minutes per side (the internal temperature should be 165 degrees).  Grill the peaches until lightly marked, about 2-3 minutes per side.  Grill the bread 1-2 minutes, until toasted.  Flip over and divide the cheese evenly among slices.  Continue grilling, uncovered, until the cheese melts, 2-3 more minutes.

Toss the salad greens and the remaining basil and mint with the reserved vinaigrette.  Gently fold in the raspberries and almonds, and serve the salad atop the chicken.  Serve with the grilled peaches and brie croutons.


Tuesday, June 14, 2011

Pistachio Macarons


Ever since I first conquered macarons over the holidays, I've been looking forward to making different variations and flavors.  When I hosted my Trashy to Classy Cocktail Party, I knew I had a perfect opportunity to make something "trashy" into delicate, elegant little macarons.

I know there are countless variations on Watergate "salad," but the gist of it is instant pistachio pudding mixed with marshmallows and some sort of canned fruit - pineapple, fruit cocktail, etc.  I remember this salad well from family picnics growing up, so I was really excited to adapt it into macarons.  I kept it simple and just made pistachio macarons with marshmallow filling, and I served them on a platter with fresh cherries (yay, cherry season!).

The macarons were by far the most popular dish of the night.  Partly because no one had ever had them before and they were a fun new novelty, but mostly because they're so darn delicious!  They were all gone within the first hour of the party - even the sad misshapen ones that I didn't initially put out.

As far as the combination of pistachio with marshmallow goes, I wouldn't have initially put them together, but it turned out to be quite good.  That's not to say I'll make the same combo next time - I'd love to try pistachio buttercream, raspberry jam, or chocolate ganache.

As far as the process of making the macarons goes, I didn't have any trouble really, but as I folded the ground pistachios in I noticed that I definitely should have ground them finer.  It wasn't an issue for baking, but there were just bigger pieces than I would have preferred. 

Check out these sites for more in-depth info for making macarons:
DemystifyingMacarons 
Confections of a Foodie Bride
Annie's Eats


Pistachio Macarons
makes about 25 sandwich cookies

For the macarons:
  • 225 gm confectioners’ sugar
  • 60 gm blanched, slivered almonds
  • 65 gm pistachios
  • 3 egg whites (about 100 gm), aged 1 day at room temperature
  • 25 gm granulated sugar
  • Green powdered food coloring (optional)

To make the cookies, combine the confectioners sugar, almonds, and pistachios in the bowl of a food processor.  Process until the nuts are very finely ground and the mixture is well blended.

In the bowl of an electric mixer fitted with the whisk attachment, whip the egg whites on medium-high speed until foamy.  Gradually add the granulated sugar and continue beating until the egg whites are glossy and hold stiff peaks.  Mix in the powdered green food coloring, if using.  (Start with only a little bit at a time.  Remember, you can always add more but you can’t take it away.)

Add the ground nut/sugar mixture to the mixing bowl and gently fold in to the egg whites using a wide spatula. The mixture should remain shiny and flow easily.

Transfer the batter to a pastry bag fitted with a plain round tip.  Pipe rounds (approximately 1 inch in diameter) onto baking sheets lined with silicone baking mats.  Let rest for 20-30 minutes, or until the outsides form a harder "shell." 

Preheat the oven to 315˚ F.  When they are finished resting, baking for 12-15 minutes.  Let cool completely before carefully removing from the baking sheets.

When the cookies are cool, match them up according to size and fill with desired filling.

source:  Annie's Eats, originally from Use Real Butter and Tartlette


Monday, June 13, 2011

Bean and Cheese Burritos


Allergy season can be a real downer when there is such beautiful spring weather outside, and unfortunately Joey and I were both hit hard this year.  Joey seemed to be a little worse off than me (or maybe I just handle it better ;-) so one night I wanted to make a comforting meal for our sore throats and runny noses.  I made these pretty spicy, which definitely helped clear our sinuses, but it wasn't overpowering what with the addition of gobs of cheese and sour cream.

I kind of just threw them together based on what I had on hand and what sounded good, and we were both pleasantly surprised by how much we enjoyed them.  Even though they are vegetarian, that doesn't mean their healthy (see:  gobs of cheese and sour cream), but I topped them with freshly sliced scallion and tomatoes for a fresh finish.

While allergy season is now behind us, that's no reason why we have to stop eating these burritos - spicy, cheesy food is good all year round :-)


Bean and Cheese Burritos
Pink Parsley Original
  • 2 tsp oil
  • 1 medium onion, diced
  • 1-2 Tbs minced pickled jalapenos (depending on spice tolerance)
  • 1 Tbs chili powder
  • 1 tsp cumin
  • salt and pepper
  • 2 (15-oz) cans pinto beans - undrained
  • 1-2 Tbs pickling liquid from jalapenos
  • 4 oz can diced green chiles, drained
  • 1/2 cup salsa
  • 1/2 cup chopped fresh cilantro
  • 2 cups shredded cheese (preferably a mixture of cheddar and pepperjack)
  • 12 6-inch flour tortillas
To serve:
  • 1 cup diced fresh tomato
  • 2-3 scallions, minced
  • sour cream
  • salsa
Preheat the oven to 375 and lightly spray a 9x13 dish with cooking spray.

In a large skillet, heat the oil over medium heat, and add the onion.  Cook, stirring often, until softened and translucent,  5-6 minutes.  Add the jalapenos, chili powder,cumin, and salt and pepper, and cook an additional 1-2 minutes.

Pour the undrained beans into the skillet with the diced green chiles, and bring to a boil.  Reduce heat to a simmer and add the pickling liquid and salsa, and cook until thickened.  Using a potato masher or wide spoon, mash the beans to acheive a consistency similar to refried beans.  Stir in the cilantro, taste, and adjust seasonings.  Add half the cheese and stir to melt.

Carefully add a scant 1/3 cup of filling to each tortilla, and roll up (you may lose some of the filling, but that's okay.  Just work carefully and do the best you can).  Line the rolled burritos in a single layer in the prepared dish, and top with the remaining cheese.

Cover with foil and bake 15 minutes, then remove foil and continue to cook 5-10 minutes longer, until the cheese is melted.  Remove from oven and cool 10 minutes, and top with scallions and tomatoes before serving.


Friday, June 10, 2011

Blackberry-Pinot Noir Glazed Pork


Even though I've only been blogging for a few years, I have actually been reading food blogs for a lot longer.  Confections of a Foodie Bride was one of the first blogs I followed, and I've had this recipe saved since 2008.  And at the risk of sounding cliche, I can't believe I waited so long to make it.  Pinot Noir is my favorite wine, and I love anything with blackberries, so it's obviously got a lot going for it from the start.

Shawnda uses the glaze on meatballs, which I think would be really awesome (and I definitely plan to make at some point), but I served it on grilled pork tenderloin for my Trashy to Classy Cocktail Party.  Since I was reinventing cocktail weinies, I thought this would be a fitting presentation.  I especially loved the fresh blackberry on the skewer, and this was one of the first dishes to go that night.

I cubed the pork tenderloin and skewered it to grill, but you could also just grill it whole, or even roast it (I would use this method if you choose to go that route).  If you serve this as a meal rather than a small plate, I would suggest serving it over a simple risotto and grilled or roasted asparagus.  How's that for an elegant and simple meal?


Blackberry-Pinot Noir Glazed Pork Tenderloin
Glaze adapted from Confections of a Foodie Bride
  • 1 Tbs olive oil
  • 1/4 cup minced shallots
  • 1 cup blackberry preserves
  • 2/3 cup Pinot Noir
  • 1/2 tsp minced fresh rosemary
  • 1/2 tsp freshly grated lemon zest
  • salt and freshly ground black pepper
  • pinch red pepper flakes
  • 1 1-lb pork tenderloin
In a medium skillet, heat the oil over medium heat.  Add the shallots and saute until softened and golden, 2-3 minutes.  Add the blackberry preserves, wine, rosemary, salt, pepper, lemon zest, and red pepper flakes.

Bring to a boil, then reduce to a simmer.  Cook 5-6 minutes,until thickened slightly.  Transfer 1/4 cup to a small bowl to use for the glaze, and increase the heat to medium-high.  continue cooking the remaining glaze until reduced and thickened, another 3-5 minutes.  Taste and adjust seasonings and set aside in a small bowl.

Meanwhile, prepare the grill.  Trim the pork and cut into 1-inch cubes.  Thread onto skewers and season liberally with salt and pepper.

Brush the grates of the grill with oil, and cook the pork, turning after 4-5 minutes.  Brush the cooked side with some of the glaze, and turn again after another 3-4 minutes.  Brush the other side with glaze, then remove from heat when the pork is cooked through.

Serve the pork with the thickened sauce (if it has thickened too much upon standing, just heat quickly in the microwave 15 seconds or so).

*When I made these, I grilled them on long skewers, then threaded them onto toothpicks for individual servings.   


Thursday, June 9, 2011

Taco Lettuce Wraps


In case you haven't been able to tell by the multitude of recipes here, I do love a good taco. We seem to have some form of tacos for dinner once a week, and we never tire of them.

Last spring I made these Asian Lettuce Wraps, and we really enjoyed them.  So sometime in the past year the idea of a taco lettuce wrap popped into my head, and I've been thinking about them ever since.  I used the filling from ground beef tacos and used ground turkey instead, then just piled on the toppings.  I kept it pretty classic - cheese and salsa, and I crushed some tortilla chips over the top for added crunch.  Obviously you can go crazy with any combination - sour cream, guacamole, diced onion, avocado, tomatoes... the options are endless.

These were surprisingly filling, but I ate more than I should have anyway - the cool and crisp lettuce was just so good paired with the spicy filling.  The beauty is that the filling reheats well, so leftovers are awesome the next day, or you can reinvent the filling into quesadillas, nachos, traditional tacos, serve it over some rice or a salad... the options are endless.  So if you are a taco lover like me, give these a try if you're looking for a healthier option.

More Taco Recipes:
Chicken Soft Tacos
Chipotle-Grilled Pork Tacos

Chorizo, Potato, and Mushroom Tacos (my favorite weeknight dinner!)
Beer-Battered Fish Tacos
Spicy-Citrus Shrimp Tacos


Taco Lettuce Wraps
Pink Parsley Original, filling adapted from Cook's Illustrated


Filling
  • 2 teaspoons vegetable oil
  • 1 small onion, chopped (about 2/3 cup)
  • 4 garlic cloves, minced
  • 2 Tbs chili powder
  • 1 teaspoon ground cumin
  • 1 teaspoon ground coriander
  • 1/2 teaspoon dried oregano, or 1/2 Tbs minced fresh oregano
  • 1/4 tsp cayenne pepper
  • kosher salt and ground black pepper
  • 1 pound ground turkey breast or chicken breast
  • 1/2 cup tomato sauce
  • 1/2 cup low-sodium chicken broth
  • 1 tsp brown sugar
  • 2 teaspoons apple cider vinegar
To serve:
  • Iceberg lettuce
  • shredded cheddar
  • salsa
  • crumbled tortilla chips
Heat oil in a large nonstick skillet until shimmering.  Add the onion and cook, stirring occasionally, until softened, about 4 minutes.  Add the garlic, spices, and 1/2 teaspoon salt.  Cook, stirring constantly, until fragrant, about 1 minute.  Add the ground turkey and cook, breaking up meat with a wooden spoon and scraping the bottom of the pan to prevent scorching, about 5 minutes longer, until meat is no longer pink.

Add tomato sauce, broth, brown sugar, and vinegar; bring to a simmer and reduce heat to medium-low.  Simmer uncovered, stirring frequently, until liquid has reduced and thickened, about 10 minutes.  Adjust seasonings with salt and pepper.

To assemble, spoon filling into the lettuce, being careful not to overfill.  Top with cheese, salsa, and chips.  Serve.


Wednesday, June 8, 2011

Deviled Strawberries


I often see people post about recipes that don't require using the oven in the summer.  I never really understood that, since I don't feel like my oven really heats up the house - I never knew if it was our floorplan, the air conditioner, or what, but it just never seemed to be an issue for me.  And anyway, doesn't everyone have air conditioning in this day and age?  Apparently not.  I spent the last several days in Minneapolis visiting my sister, and I was shocked to learn that not only does she not have a/c, but that is the norm there??  Call me sheltered, but I never even considered air conditioning to be optional.  Though in all fairness, if you live in an area that has snow on the ground for 6 months out of the year, it hardly seems necessary.  Sort of like having a heater in the tropics I suppose.  It just never occurred to me since I was born and raised in Atlanta.

Anyway, I cooked my favorite chicken enchiladas one night, and now I stand corrected and totally get the sentiment of keeping the oven off during the summer.  I was literally sweating while standing in the kitchen.  So if you are suffering through the summer without air conditioning, this would be a perfect dessert for you.  Plus, it is light and refreshing, portable, low-maintenance, and can easily be made ahead. 

Even though the pistachio macarons seemed to be the runaway hit of my Trashy to Classy Cocktail Party, I was really partial to these strawberries.  Strawberries are halved, and a bit of the inside is scooped out.  They are then filled with a lightly spiced mascarpone whipped cream filling and sprinkled with cinnamon.  The addition of cinnamon and cardamom seemed odd to me, but the spices gave the filling a really nice warmth.  I certainly ate more than my fair share while prepping them for the party, and judging by the empty tray at the end of the night, everyone else enjoyed them just as much.


Deviled Strawberries with Spiced Mascarpone Cream
adapted from The Quinces and the Pea
  • 1 pound strawberries, rinsed and dried
  • 1/2 cup mascarpone cheese
  • 1/3 cup heavy whipping cream
  • 1 Tbs sugar (more if the strawberries aren't very sweet)
  • 1 vanilla bean, scraped
  • 1/2 tsp cardamom
  • cinnamon, for sprinkling
Halve each strawberry through the stem-end, and use a melon baller or paring knife to scoop out part of the middle.

In a medium bowl, beat the mascarpone, cream, sugar, vanilla, and cardamom until soft peaks form.  Using a piping bag fitted with corner snipped off (or a round tip), fill each strawberry with the cream.  Sprinkle lightly with cinnamon, and serve.


Thursday, June 2, 2011

Foil-Baked Fish with Black Beans and Corn


When I was growing up, my mom used to make what she called "hobo packets."  Essentially, it was chicken on top of a bed of peppers, onions, and whatever veggies she had to use up.  It was wrapped in foil and baked, and to serve, you just opened the packet and dug in. 

This is basically a glorified version of the hobo packets that I grew up eating.  Any white fish will do, though I used halibut since I got some for a good price. Otherwise, I would probably go for a less-expensive fish, such as cod or tilapia.  The fish is coated in a compound butter made with chipotles, garlic, and orange zest, then cooked atop a bed of black beans and corn. 

The butter melts into the fish, leaving it super flavorful, and then all the juices fun down into the veggies underneath.  This is a super-simple dinner that was ready in no time flat, and since it contains some of our favorite ingredients, it was enjoyed by the whole family.


Foil-Baked Fish with Black Beans and Corn
  • 4 skinless white fish fillets (6 to 8 oz each), 1-inch thick
  • salt and pepper
  • 4 Tbs unsalted butter, softened
  • 2 tsp minced chipotle chiles in adobo sauce
  • 1 tsp grated orange zest
  • 2 Tbs freshly squeezed orange juice
  • 2 cloves garlic, minced
  • 1 (16-oz) can black beans, rinsed and drained
  • 2 cups corn kernels
  • 1/2 red onion, minced
  • 2 scallions, minced
  • 1/4 cup chopped fresh cilantro
Adjust the oven rack to the lower-middle position and heat to 450 degrees.

Pat the fish dry with paper towels and season with salt and pepper.  Using a fork, mix together the butter, 1 teaspoon chipotle, orange zest, half the garlic, 1/2 tsp salt, and 1/4 tsp pepper in a medium bowl until well-combined.  Spread butter mixture over the fish.

Combine the beans, corn, onion, scallions, 2 tablespoons of cilantro, orange juice, remaining chipotle, remaining garlic, scallions, 1/2 teaspoon salt, and 1/4 teaspoon pepper in a bowl.

Lay four 14-inch lengths of foil on the counter and divide the bean mixture evenly over the lower half of each piece of foil.  Top with fish, and fold the foil over the fish, folding the edges to seal.

Arrange the packets in a single layer on a rimmed baking sheet and bake until the fish is just cooked through, 15 to 20 minutes.  Carefully open the packets and sprinkle with remaining cilantro.  Serve.

Source:  America's Test Kitchen, The Best Simple Recipes


Wednesday, June 1, 2011

Pasta with Grilled Plum Tomato Sauce


Among the many reasons I look forward to summer, in-season tomatoes are probably in my top three.  There is just truly nothing like a ripe tomato.  Caroline eats them like apples, and I have to say, she's pretty smart for that.  I've been itching to cook with them over the past few weeks, but they just aren't quite ready yet.

The beauty of this sauce however, is that grilling plum tomatoes enhances them, even if they are still a bit out of season.  Grilling the tomatoes infuses them with that awesome smoky and charred flavor, so the sauce has a nice depth to it.  It is also a very quick and simple recipe, and is ready pretty much in the time it takes to cook the pasta.  I served this with the grilled bruschetta with prosciutto and mozzarella and side salads, and we felt like we were enjoying a preview to summer - fast, simple, delicious food.


Pasta with Grilled Plum Tomato Sauce
  • 10 medium plum tomatoes (about 2 pounds)
  • 4 Tbs extra-virgin olive oil, divided
  • 2 cloves garlic, minced
  • pinch red pepper flakes
  • 1/4 cup minced fresh basil leaves
  • 1 Tbs minced fresh parsley
  • salt and freshly ground black pepper
  • 1 pound pasta
  • Parmesan cheese, for serving
Prepare grill.

Lay the tomatoes on a large baking sheet and brush with 1 tablespoon of the oil.  Bring a large pot of water to a boil.

Place the tomaotes on the grill and cook, turning once, until the flesh is streaked with dark grill marks and the skins are charred and blistered, about 8 minutes.

Transfer the tomatoes to a cutting board and cool them slightly.

Meanwhile, salt the boiling water and cook the pasta until al dente, and drain.

In a small skillet, heat the remaining oil over medium heat, and add the garlic and red pepper flakes.  Cook until just fragrant and beginning to turn golden-brown, one to two minutes.  Remove from heat.


Peel and discard the tomato skins, and chop the tomatoes.  Transfer to a large bowl, and combine with the garlic and oil, basil leaves, parsley leaves, and salt and pepper to taste.


Toss the pasta with the tomato sauce and mix well.  Divide evenly among serving plates, sprinkle with Parmesan, and serve immediately.


Source:  adapted from The Complete Italian Vegetarian Cookbook, by Jack Bishop


BLOG DESIGN BY: SHERBET BLOSSOM DESIGNS